可附带图片的圆形进度条
简介
项目开发过程中,我们通常会遇到这样一类需求。当程序后台进行网络请求数据或者执行耗时的运算时,我们希望能够可视化网络请求的进度,同时,进度条中间显示的是我们产品的logo。我们可以把需求拆分为两个子任务,首先,如何使圆形进度条的加载进度随着数据请求的进度 进行更新,第二,如何添加一个logo图片到圆形进度条中间。下图,大家先直观地感受一下进度条的视觉效果
总体思路
根据需求,附加logo的圆形进度条是由两个子视图组成,分别是圆形进度条,和logo图标。我们自定义一个视图HSProgressCircleView,它由两个字视图组成,HSCircleView和UIImageView,为了增加的灵活性,UIImageView是动态添加的,这样设计的原因是,如果,我们想把image换成label,用来显示进度百分比。这样就很方便了。
圆形进度条
这里,单独放一张图方便大家看清楚圆形进度条的结构。
很清楚的发现,圆形进度条由两部分组成,外沿的灰色边框,内圈的亮绿色的圆弧实时变化着。我们可以通过图层相关的知识,很好的解决问题。
默认情况下,每个视图view都有一个类型为CALayer的属性layer,用于管理与视图相关的动画。view是通过调用方法+(Class)layerClass指定视图的图层类型,因此,可以在自定义view中覆盖方法layerClass指定自己需要的图层类型,本案例中,图层类型是CAShapeLayer,它是CALayer的子类。
默认情况下,一个view视图呈现为方形的,如何让view显示为圆形了?CALayer有一个属性cornerRadius,它控制了视图view的四个角的圆弧化程度,因此,我们可以设置cornerRadius的值为视图宽度的一半,以使得视图显示为圆形。
至于绘制内圈的圆弧,可以组合使用CAShapeLayer的strokeStart,strokeEnd和path属性。下面代码,绘制了视图的内圈圆弧。
    const double TWO_M_PI = 2.0 * M_PI;
    const double startAngle = -0.25 * TWO_M_PI;
    const double endAngle = startAngle + TWO_M_PI;
    //配置layer的路径
    CGFloat arcRadius=self.frame.size.width/2.0-_borderWidth-_lineWidth/2.0;
    UIBezierPath *circlePath=[UIBezierPath bezierPathWithArcCenter:CGPointMake(radiusWidth, radiusWidth) radius:arcRadius startAngle:startAngle endAngle:endAngle clockwise:YES];
    self.shapeLayer.path=circlePath.CGPath;
    self.shapeLayer.strokeColor=_strokeColor.CGColor;
    self.shapeLayer.lineWidth=_lineWidth;
    self.shapeLayer.strokeStart=0.0;
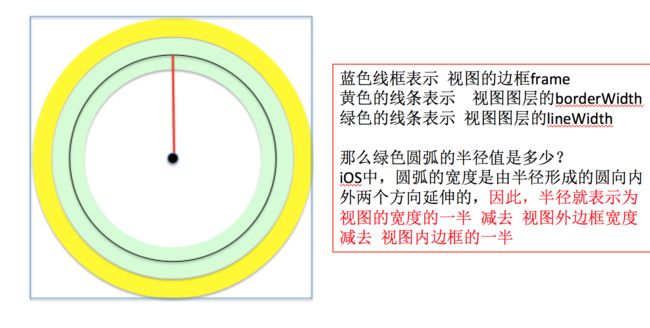
有个细节不知道大家有没有注意,这里(红色高亮显色的代码),我们设置圆形路径的半径radius的值为视图宽度的一半 减去 图层边框的宽度 减去图层内圈宽度的一半。
这里,我们定义两个属性borderWidth,和lineWidth。
@property(nonatomic)CGFloat borderWidth;//边框宽度
@property(nonatomic)CGFloat lineWidth;//内圈宽度
borderWidth和lineWidth实现方法如下
- (void)setBorderWidth:(CGFloat)borderWidth{
    _borderWidth=borderWidth;
    self.shapeLayer.borderWidth=borderWidth;
    [self setNeedsLayout];
}

- (void)setLineWidth:(CGFloat)lineWidth{
    _lineWidth=lineWidth;
    self.shapeLayer.lineWidth=lineWidth;
    [self setNeedsLayout];
}
- (void)layoutSubviews{
    NSLog(@"circleView layout subviews");
    [super layoutSubviews];
    [self initializeView];
}
- (void)initializeView{
    //配置layer的边框
    CGFloat radiusWidth=self.frame.size.width/2.0;
    self.shapeLayer.cornerRadius=radiusWidth;
    self.shapeLayer.masksToBounds=YES;
    self.shapeLayer.fillColor=[UIColor clearColor].CGColor;
    self.shapeLayer.borderWidth=_borderWidth;
    self.shapeLayer.borderColor=_borderColor.CGColor;

    const double TWO_M_PI = 2.0 * M_PI;
    const double startAngle = -0.25 * TWO_M_PI;
    const double endAngle = startAngle + TWO_M_PI;
    //配置layer的路径
    CGFloat arcRadius=self.frame.size.width/2.0-_borderWidth-_lineWidth/2.0;
    UIBezierPath *circlePath=[UIBezierPath bezierPathWithArcCenter:CGPointMake(radiusWidth, radiusWidth) radius:arcRadius startAngle:startAngle endAngle:endAngle clockwise:YES];
    self.shapeLayer.path=circlePath.CGPath;
    self.shapeLayer.strokeColor=_strokeColor.CGColor;
    self.shapeLayer.lineWidth=_lineWidth;
    self.shapeLayer.strokeStart=0.0;
}
[self setNeedsLayout]的作用是什么?
ios 5.1之前,这个方法默认是不做任何事情的,但是之后,由于引进了自动布局,默认情况下,使用你设置的约束来确定子视图的尺寸和位置。
当自动布局不能满足你的需求时候,你可以重写这个方法,用来执行更精确的布局。
默认情况下,当view 的frame发生变化的时候,都会自动调用这个方法。你不可以通过[self layoutSubviews]直接调用这个方法,如果你想强制进行布局更新, 可以调用setNeedsLayout方法,这个方法会发出一个请求,请求在下一次视图重绘之前,调用layoutSubviews;如果想立即执行布局更新,可调用layoutIfNeed
由于我们是使用静态布局创建HSCircleView的,所以layoutSubviews默认是没有任何与布局相关的动作的。因此,我们在layoutSubview中添加了initializeView,重新绘制图层。但是,layoutSubviews方法只有当view的frame变化的时候,才会自动调用,因此,我们需要手动调用layoutSubviews,但是,ISO不允许我们手动直接调用layoutSubviews,我们可以通过调用setNeedsLayout或者layoutIfNeed间接调用layoutSubviews。
自定义带图片的圆形进度条
我们需要完成三个任务,第一,添加圆形进度条,第二,添加图片视图,第三,实现更新进度条的方法。
我们在view的初始化方法中,添加圆形进度条
- (instancetype)initWithFrame:(CGRect)frame{
    self=[super initWithFrame:frame];
    if (self) {
        [self initializeView];
    }
    return self;
}

- (void)initializeView{

    HSCircleView *circleView=[[HSCircleView alloc] initWithFrame:self.bounds];
    self.circleView=circleView;
    [self addSubview:circleView];</span>

    _borderWidth=self.circleView.borderWidth;
    _lineWidth=self.circleView.lineWidth;
    _borderColor=self.circleView.borderColor;
    _strokeColor=self.circleView.strokeColor;
}
为了增加视图的可复用程度,提供方法setCentralView:用于添加logo图片视图。
- (void)setCentralView:(UIView *)centralView {
    if (_centralView != centralView) {
        [_centralView removeFromSuperview];
        _centralView = centralView;
        [self addSubview:_centralView];
    }
}
更新进度条的方法
- (void)setProgress:(CGFloat)progress{
    [self.circleView updateProgress:progress];
}
自定义类HSProgressCircleView包含了两个字视图,其中一个是HSCircleView,它的尺寸和位置是通过frame手动设置的,也就意味着子视图布局静态写死了,因此,当父视图HSProgressCircleView的frame变化时,子视图HSCircleView的frame是不会跟随父视图的frame作出相应的变化。但是,我们需要让子视图的frame始终等于父视图的bound,有两种方法可以达到我们的目的,第一种是,定义子视图HSCircleView 的时候,使用自动布局AutoLayout,第二种是,重写layoutSubviews方法,因为,每当父视图HSProgressCircleView的frame发生变化的时候,都会自动调用HSProgressCircleView的layoutSubviews。这里,由于我们是使用静态布局的方式创建子视图HSCircleView,因此,采用第二种方式动态改变HSCircleView的frame,使得它的frame始终等于父视图的bound。
- (void)layoutSubviews{
//    NSLog(@"HSProgressCircleView' s layoutSubviews has called");
    self.circleView.frame=self.bounds;
}
使用HSProgressCircleView
界面包含了一个输入下载地址的文本框textfield,一个执行下载功能的按钮button。把storyboard中textfield连接到viewController的属性urlTextfield中,连接button的点击事件处理方法到downloadFileAtPath:
@property (weak, nonatomic) IBOutlet UITextField *urlTextfield;
- (IBAction)downloadFileAtPath:(id)sender {
    //执行网络请求,获取数据
}
在viewDidLoad方法中,初始化HSProgressCircleView,并且添加展示logo的UIImageView到圆形进度条中。这里,我们使用自动布局AutoLayout创建UIImageView。
- (void)viewDidLoad {
    [super viewDidLoad];

    // 设置网址输入框的代理
    self.view.backgroundColor=[UIColor yellowColor];
    self.urlTextfield.delegate=self;

    //给view添加单击手势事件监听,点击view的时候,隐藏键盘
    UITapGestureRecognizer *tapGestureRecognizer=[[UITapGestureRecognizer alloc] initWithTarget:self action:@selector(tapSuperView:)];
    [self.view addGestureRecognizer:tapGestureRecognizer];

    //构建进度条
    HSProgressCircleView *hsProgressCircleView=[[HSProgressCircleView alloc] initWithFrame:CGRectMake(0, 0, 100, 100)];
    hsProgressCircleView.center=self.view.center;
    hsProgressCircleView.clipsToBounds=YES;
    hsProgressCircleView.borderColor=[UIColor colorWithRed:229/255.0 green:229/255.0 blue:229/255.0 alpha:1.0];
    hsProgressCircleView.borderWidth=3.0;
    self.hsProgressCircleView=hsProgressCircleView;

 //If this property’s value is YES, the system creates a set of constraints that duplicate the behavior specified by the view’s autoresizing mask. This also lets you modify the view’s size and location using the view’s frame, bounds, or center properties, allowing you to create a static, frame-based layout within Auto Layout.
   // Note that the autoresizing mask constraints fully specify the view’s size and position; therefore, you cannot add additional constraints to modify this size or position without introducing conflicts. If you want to use Auto Layout to dynamically calculate the size and position of your view, you must set this property to NO, and then provide a non ambiguous, nonconflicting set of constraints for the view.
    //translatesAutoresizingMaskIntoConstraints属性设置为YES,系统将会根据autoResizing mask指定行为创建一系列布局约束。当然,仍然可以通过frame/bounds/center等属性改变视图的尺寸和位置,但是,我们不能再为视图添加NSLayoutConstraint布局约束对象,因为,autoResizing Mask和 NSLayoutConstraint都属于自动布局机制,这样会产生冲突,所以,当我们想使用AutoLayout布局的时候,应该设置translatesAutoresizingMaskIntoConstaints为NO。
    UIImageView *imageView=[[UIImageView alloc] init];
    imageView.translatesAutoresizingMaskIntoConstraints=NO;
    imageView.image=[UIImage imageNamed:@"loading_bg2"];
    self.hsProgressCircleView.centralView=imageView;
    [self autoLayoutSubview:imageView];<span style="font-family: Arial, Helvetica, sans-serif;">}</span>
- (void)autoLayoutSubview:(UIView *)subView{
    CGFloat inset=self.hsProgressCircleView.borderWidth+self.hsProgressCircleView.lineWidth;

    //Available in iOS 8.0 and later.
    //Note that only active constraints affect the calculated layout. For newly created constraints, the active property is NO by default.
    //When developing for iOS 8.0 or later, set the constraint’s active property to YES instead. This automatically adds the constraint to the correct view.
    NSLayoutConstraint *topConstraint=[NSLayoutConstraint constraintWithItem:subView attribute:NSLayoutAttributeTop relatedBy:NSLayoutRelationEqual toItem:self.hsProgressCircleView attribute:NSLayoutAttributeTop multiplier:1.0 constant:inset];
    NSLayoutConstraint *leftConstraint=[NSLayoutConstraint constraintWithItem:subView attribute:NSLayoutAttributeLeft relatedBy:NSLayoutRelationEqual toItem:self.hsProgressCircleView attribute:NSLayoutAttributeLeft multiplier:1.0 constant:inset];
    NSLayoutConstraint *bottomConstraint=[NSLayoutConstraint constraintWithItem:subView attribute:NSLayoutAttributeBottom relatedBy:NSLayoutRelationEqual toItem:self.hsProgressCircleView attribute:NSLayoutAttributeBottom multiplier:1.0 constant:-inset];
    NSLayoutConstraint *rightConstraint=[NSLayoutConstraint constraintWithItem:subView attribute:NSLayoutAttributeRight relatedBy:NSLayoutRelationEqual toItem:self.hsProgressCircleView attribute:NSLayoutAttributeRight multiplier:1.0 constant:-inset];
    topConstraint.active=YES;
    leftConstraint.active=YES;
    bottomConstraint.active=YES;
    rightConstraint.active=YES;

    //ios8之前,需要使用addConstraints把NSLayoutConstraint添加到view中,ios 8之后,设置NSLayoutConstraint的属性active为YES,会直接将布局约束对象添加到相应的视图对象中。
    //[self.hsProgressCircleView addConstraints:@[topConstraint,leftConstraint,bottomConstraint,rightConstraint]];
}
下载功能实现
数据请求功能很简单,使用NSURLConnection发送NSURLRequest对象封装的请求地址,并且设置view Controller为NSURLConnection的代理对象。记住,view Controller需要实现协议NSURLConnectionDataDelegate中相关方法
- (IBAction)downloadFileAtPath:(id)sender {
    //    NSString *urlStr=@"https://codeload.github.com/rs/SDWebImage/zip/master";
    NSString *urlStr=self.urlTextfield.text;
    NSURL *url=[NSURL URLWithString:urlStr];
    NSURLRequest *urlRequest=[NSURLRequest requestWithURL:url];
    NSURLConnection *urlConnection=[NSURLConnection connectionWithRequest:urlRequest delegate:self];
    self.urlConnection=urlConnection;
    [urlConnection start];

    // 验证添加自动布局之后,子视图imageView的frame是否会跟随父视图HSProgressCircleView 的frame改变而变化
    //[NSTimer scheduledTimerWithTimeInterval:3 target:self selector:@selector(changeLoadingViewFrame) userInfo:nil repeats:NO];
}

//请求数据成功获取服务器的响应
- (void)connection:(NSURLConnection *)connection didReceiveResponse:(NSURLResponse *)response{
    self.receivedData=[NSMutableData data];
    self.receivedContentLength=0;
    self.expectedContentLength=response.expectedContentLength;
    self.suggestedFileName=response.suggestedFilename;
    [self.view addSubview:self.hsProgressCircleView];
}

//接受数据的过程,会不断调用这个委托方法
- (void)connection:(NSURLConnection *)connection didReceiveData:(NSData *)data{
    self.receivedContentLength+=data.length;
    [self.receivedData appendData:data];
    CGFloat progress=self.receivedContentLength*1.0/self.expectedContentLength;
    [self.hsProgressCircleView setProgress:progress];
}

//数据接收完成
- (void)connectionDidFinishLoading:(NSURLConnection *)connection{
    NSString *documentPath= [NSSearchPathForDirectoriesInDomains(NSDocumentDirectory, NSUserDomainMask, YES) objectAtIndex:0];
    NSString *savedFilePath=[documentPath stringByAppendingPathComponent:self.suggestedFileName];
    [self.receivedData writeToFile:savedFilePath atomically:YES];
    NSLog(@"%@",@"did finish loading");

    [self.hsProgressCircleView removeFromSuperview];
}

//数据请求发生异常
- (void)connection:(NSURLConnection *)connection didFailWithError:(NSError *)error{
    NSLog(@"%@",error.description);

    [self.hsProgressCircleView removeFromSuperview];
}
补充:
圆形进度条的设计思路基本上参考了
UAProgressView
对于自动布局不是很清楚的同学,可以参考下面三篇系列文章
iOS 8 Auto Layout界面自动布局系列1-自动布局的基本原理
iOS 8 Auto Layout界面自动布局系列2-使用Xcode的Interface Builder添加布局约束
iOS 8 Auto Layout界面自动布局系列3-使用代码添加布局约束
如果是想使用代码的方式创建自动 布局的话,推荐使用Mesonry第三方库
Mesonry github地址
Masonry介绍与使用实践:快速上手Autolayout
本案例源码下载地址

