android 动画详解(二)
下面就开始学习属性动画的基本用法,我们来看属性动画的继承关系,如下如所示:

显然关注的焦点应该是ValueAnimator,ObjectAnimator这两个类啦,ObjectAnimator继承自ValueAnimator,是属性动画中非常重要的一个实现类,通过ObjectAnimator类的静态欧工厂方法来创建ObjectAnimator对象,这些静态工厂方法包括:ObjectAnimator.ofFloat(),ObjectAnimator.ofInt()等等,当然最为重要的一个静态工厂方法是ObjectAnimator.ofObject(),可以接收一个Object对象并为其设置属性动画,瞬间高大上了有木有?这些静态工厂方法接收的参数分别是:
要设置动画的目标对象;
动画的属性类型;
一个或多个属性值;当只指定一个属性值,系统默认此值为结束值;当指定两个属性值,系统默认分别为起始值和结束值;当指定三个或三个以上时,系统默认线性插值;
ValueAnimator是整个属性动画机制当中最核心的一个类,前面我们已经提到了,属性动画的运行机制是通过不断地对值进行操作来实现的,而初始值和结束值之间的动画过渡就是由ValueAnimator这个类来负责计算的,ValueAnimator对过渡动画值的计算依靠一个时间因子fraction,而这个时间因子fraction是系统由setDuration()方法设置的动画执行时间通过计算得来的,所以ValueAnimator还负责管理动画的持续时间、播放次数、播放模式、以及对动画设置监听器等,确实是一个非常重要的类。
相关API
Property Animation故名思议就是通过动画的方式改变对象的属性了,我们首先需要了解几个属性:
Duration动画的持续时间,默认300ms。
Time interpolation:时间差值,乍一看不知道是什么,但是我说LinearInterpolator、AccelerateDecelerateInterpolator,大家一定知道是干嘛的了,定义动画的变化率。
Repeat count and behavior:重复次数、以及重复模式;可以定义重复多少次;重复时从头开始,还是反向。
Animator sets: 动画集合,你可以定义一组动画,一起执行或者顺序执行。
Frame refresh delay:帧刷新延迟,对于你的动画,多久刷新一次帧;默认为10ms,但最终依赖系统的当前状态;基本不用管。
相关的类
ObjectAnimator 动画的执行类,后面详细介绍
ValueAnimator 动画的执行类,后面详细介绍
AnimatorSet 用于控制一组动画的执行:线性,一起,每个动画的先后执行等。
AnimatorInflater 用户加载属性动画的xml文件
TypeEvaluator 类型估值,主要用于设置动画操作属性的值。
TimeInterpolator 时间插值,上面已经介绍。
总的来说,属性动画就是,动画的执行类来设置动画操作的对象的属性、持续时间,开始和结束的属性值,时间差值等,然后系统会根据设置的参数动态的变化对象的属性。
ValueAnimator
ValueAnimator是整个属性动画机制当中最核心的一个类,属性动画的运行机制是通过不断地对值进行操作来实现的,而初始值和结束值之间的动画过渡就是由ValueAnimator这个类来负责计算的。它的内部使用一种时间循环的机制来计算值与值之间的动画过渡,我们只需要将初始值和结束值提供给ValueAnimator,并且告诉它动画所需运行的时长,那么ValueAnimator就会自动帮我们完成从初始值平滑地过渡到结束值这样的效果。除此之外,ValueAnimator还负责管理动画的播放次数、播放模式、以及对动画设置监听器等,确实是一个非常重要的类。
但是ValueAnimator的用法却一点都不复杂,我们先从最简单的功能看起吧,比如说想要将一个值从0平滑过渡到1,时长300毫秒,就可以这样写:
ValueAnimator anim = ValueAnimator.ofFloat(0f, 1f);
anim.setDuration(300);
anim.start();
很简单吧,调用ValueAnimator的ofFloat()方法就可以构建出一个ValueAnimator的实例,ofFloat()方法当中允许传入多个float类型的参数,这里传入0和1就表示将值从0平滑过渡到1,然后调用ValueAnimator的setDuration()方法来设置动画运行的时长,最后调用start()方法启动动画。
用法就是这么简单,现在如果你运行一下上面的代码,动画就会执行了。可是这只是一个将值从0过渡到1的动画,又看不到任何界面效果,我们怎样才能知道这个动画是不是已经真正运行了呢?这就需要借助监听器来实现了,如下所示:
ValueAnimator anim = ValueAnimator.ofFloat(0f, 1f);
anim.setDuration(300);
anim.addUpdateListener(new ValueAnimator.AnimatorUpdateListener() {
    @Override
    public void onAnimationUpdate(ValueAnimator animation) {
        float currentValue = (float) animation.getAnimatedValue();
        Log.d("TAG", "cuurent value is " + currentValue);
    }
});
anim.start()
ObjectAnimator
相比于ValueAnimator,ObjectAnimator可能才是我们最常接触到的类,因为ValueAnimator只不过是对值进行了一个平滑的动画过渡,但我们实际使用到这种功能的场景好像并不多。而ObjectAnimator则就不同了,它是可以直接对任意对象的任意属性进行动画操作的;
下面举几个例子(csdn上面的例子)
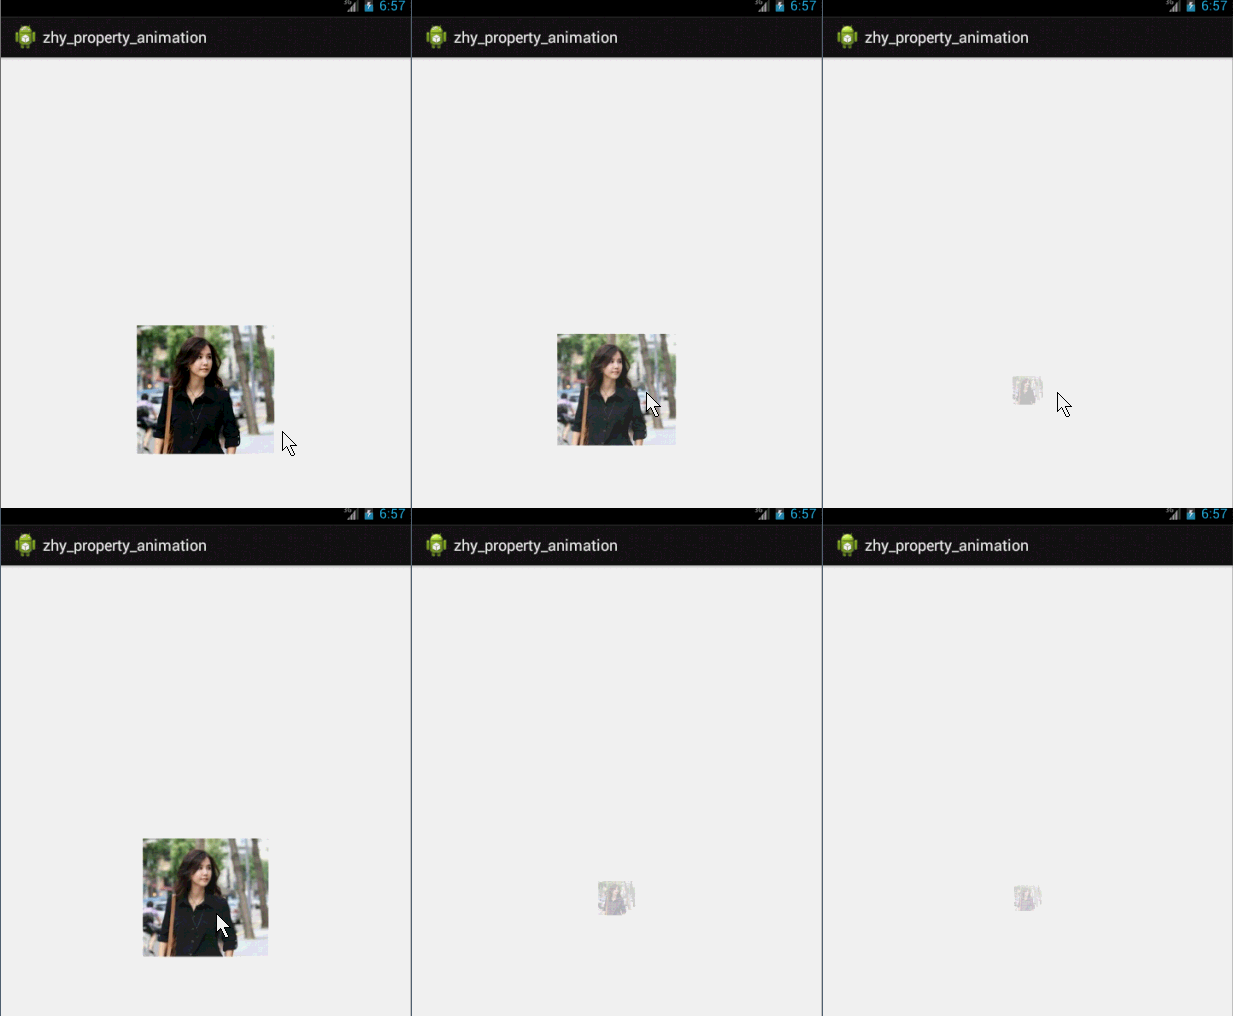
一个动画能够让View既可以缩小、又能够淡出(3个属性scaleX,scaleY,alpha),只使用ObjectAnimator咋弄?
public void rotateyAnimRun(final View view)
{
    ObjectAnimator anim = ObjectAnimator//
            .ofFloat(view, "zhy", 1.0F,  0.0F)//
            .setDuration(500);//
    anim.start();
    anim.addUpdateListener(new AnimatorUpdateListener()
    {
        @Override
        public void onAnimationUpdate(ValueAnimator animation)
        {
            float cVal = (Float) animation.getAnimatedValue();
            view.setAlpha(cVal);
            view.setScaleX(cVal);
            view.setScaleY(cVal);
        }
    });
}
其实还有更简单的方式,实现一个动画更改多个效果:使用propertyValuesHolder
public void propertyValuesHolder(View view)
    {
        PropertyValuesHolder pvhX = PropertyValuesHolder.ofFloat("alpha", 1f,
                0f, 1f);
        PropertyValuesHolder pvhY = PropertyValuesHolder.ofFloat("scaleX", 1f,
                0, 1f);
        PropertyValuesHolder pvhZ = PropertyValuesHolder.ofFloat("scaleY", 1f,
                0, 1f);
        ObjectAnimator.ofPropertyValuesHolder(view, pvhX, pvhY,pvhZ).setDuration(1000).start();
    }
//AnimatorSet
ObjectAnimator moveIn = ObjectAnimator.ofFloat(textview, "translationX", -500f, 0f);
ObjectAnimator rotate = ObjectAnimator.ofFloat(textview, "rotation", 0f, 360f);
ObjectAnimator fadeInOut = ObjectAnimator.ofFloat(textview, "alpha", 1f, 0f, 1f);
AnimatorSet animSet = new AnimatorSet();
animSet.play(rotate).with(fadeInOut).after(moveIn);
animSet.setDuration(5000);
animSet.start();
到目前为止,ObjectAnimator的用法还算是相当简单吧,但是我相信肯定会有不少朋友现在心里都有同样一个疑问,就是ofFloat()方法的第二个参数到底可以传哪些值呢?目前我们使用过了alpha、rotation、translationX和scaleY这几个值,分别可以完成淡入淡出、旋转、水平移动、垂直缩放这几种动画,那么还有哪些值是可以使用的呢?其实这个问题的答案非常玄乎,就是我们可以传入任意的值到ofFloat()方法的第二个参数当中。任意的值?相信这很出乎大家的意料吧,但事实就是如此。因为ObjectAnimator在设计的时候就没有针对于View来进行设计,而是针对于任意对象的,它所负责的工作就是不断地向某个对象中的某个属性进行赋值,然后对象根据属性值的改变再来决定如何展现出来。
那么比如说我们调用下面这样一段代码:
ObjectAnimator.ofFloat(textview, "alpha", 1f, 0f); 其实这段代码的意思就是ObjectAnimator会帮我们不断地改变textview对象中alpha属性的值,从1f变化到0f。然后textview对象需要根据alpha属性值的改变来不断刷新界面的显示,从而让用户可以看出淡入淡出的动画效果。
那么textview对象中是不是有alpha属性这个值呢?没有,不仅textview没有这个属性,连它所有的父类也是没有这个属性的!这就奇怪了,textview当中并没有alpha这个属性,ObjectAnimator是如何进行操作的呢?其实ObjectAnimator内部的工作机制并不是直接对我们传入的属性名进行操作的,而是会去寻找这个属性名对应的get和set方法,因此alpha属性所对应的get和set方法应该就是:
public void setAlpha(float value);
public float getAlpha();
那么textview对象中是否有这两个方法呢?确实有,并且这两个方法是由View对象提供的,也就是说不仅TextView可以使用这个属性来进行淡入淡出动画操作,任何继承自View的对象都可以的。
既然alpha是这个样子,相信大家一定已经明白了,前面我们所用的所有属性都是这个工作原理,那么View当中一定也存在着setRotation()、getRotation()、setTranslationX()、getTranslationX()、setScaleY()、getScaleY()这些方法,不信的话你可以到View当中去找一下。
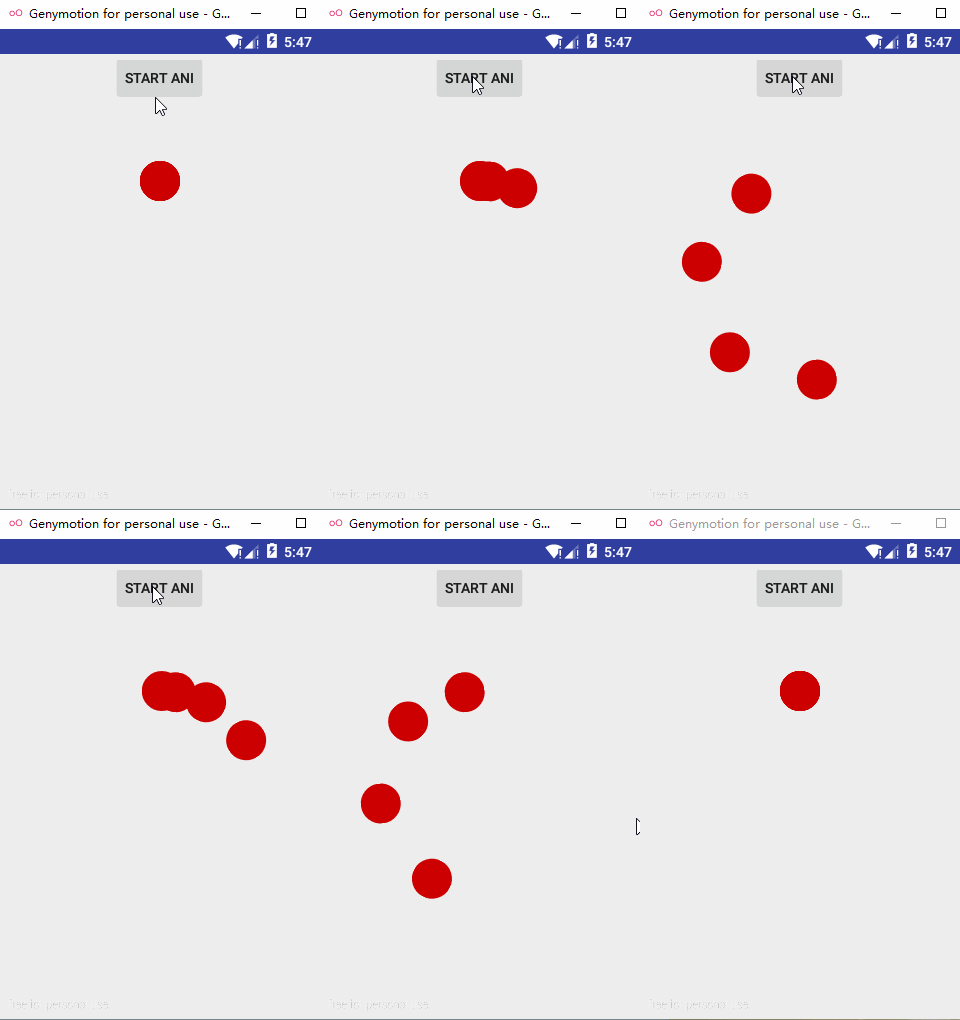
布局文件先定义了4个小圆点ImageView,把每个小圆点ImageView都放在了一个LinearLayout中,这很简单!说到绘制小圆点,我比较推荐的一种做法是在res/drawable目录下直接通过xml定义shape资源文件,这样定义的好处是可以避免使用图片资源造成不必要的内存占用。这里我把我的小圆点定义代码贴一下:
<?xml version="1.0" encoding="utf-8"?>
<shape xmlns:android="http://schemas.android.com/apk/res/android" android:shape="oval">

    <solid android:color="@android:color/holo_red_dark" />

</shape>
际上我们定义的只是一个椭圆,要显示出小圆点我们需要指定它的宽高相等,即android:layout_width和android:layout_height的值要相等,否则就会显示椭圆。然后只需要像引用图片资源一样,在drawable目录下引用它就好,比如:
<LinearLayout  android:id="@+id/ll_point_circle_4" android:layout_width="wrap_content" android:layout_height="240dp" android:layout_centerInParent="true" android:orientation="vertical">
    <ImageView  android:layout_width="40dp" android:layout_height="40dp" android:src="@drawable/shape_point" />
</LinearLayout>
下面是完整的布局文件,仅供参考:
<RelativeLayout xmlns:android="http://schemas.android.com/apk/res/android" android:layout_width="match_parent" android:layout_height="match_parent">

    <Button  android:id="@+id/start_ani_2" android:layout_width="wrap_content" android:layout_height="wrap_content" android:layout_centerHorizontal="true" android:text="@string/start_ani" />

    <RelativeLayout  android:layout_width="match_parent" android:layout_height="match_parent" android:layout_centerVertical="true">

        <LinearLayout  android:id="@+id/ll_point_circle_1" android:layout_width="wrap_content" android:layout_height="240dp" android:layout_centerInParent="true" android:orientation="vertical">
            <ImageView  android:layout_width="40dp" android:layout_height="40dp" android:src="@drawable/shape_point" />
        </LinearLayout>

        <LinearLayout  android:id="@+id/ll_point_circle_2" android:layout_width="wrap_content" android:layout_height="240dp" android:layout_centerInParent="true" android:orientation="vertical">
            <ImageView  android:layout_width="40dp" android:layout_height="40dp" android:src="@drawable/shape_point" />
        </LinearLayout>

        <LinearLayout  android:id="@+id/ll_point_circle_3" android:layout_width="wrap_content" android:layout_height="240dp" android:layout_centerInParent="true" android:orientation="vertical">
            <ImageView  android:layout_width="40dp" android:layout_height="40dp" android:src="@drawable/shape_point" />
        </LinearLayout>

        <LinearLayout  android:id="@+id/ll_point_circle_4" android:layout_width="wrap_content" android:layout_height="240dp" android:layout_centerInParent="true" android:orientation="vertical">
            <ImageView  android:layout_width="40dp" android:layout_height="40dp" android:src="@drawable/shape_point" />
        </LinearLayout>

    </RelativeLayout>

</RelativeLayout>
接着把CircleProgress属性动画类的代码贴出来,并在CircleProgress属性动画类中拿到上面4个小圆点的对象
package com.wondertwo.propertyanime;

import android.animation.AnimatorSet;
import android.animation.ObjectAnimator;
import android.app.Activity;
import android.os.Bundle;
import android.view.View;
import android.view.animation.AccelerateDecelerateInterpolator;
import android.widget.Button;
import android.widget.LinearLayout;

/** * ObjectAnimator高级实例探究 * Created by wondertwo on 2016/3/22. */
public class CircleProgress extends Activity {

    private LinearLayout mPoint_1;
    private LinearLayout mPoint_2;
    private LinearLayout mPoint_3;
    private LinearLayout mPoint_4;

    @Override
    protected void onCreate(Bundle savedInstanceState) {
        super.onCreate(savedInstanceState);
        setContentView(R.layout.activity_circle_progress);

        mPoint_1 = (LinearLayout) findViewById(R.id.ll_point_circle_1);
        mPoint_2 = (LinearLayout) findViewById(R.id.ll_point_circle_2);
        mPoint_3 = (LinearLayout) findViewById(R.id.ll_point_circle_3);
        mPoint_4 = (LinearLayout) findViewById(R.id.ll_point_circle_4);

        Button startAni = (Button) findViewById(R.id.start_ani_2);
        startAni.setOnClickListener(new View.OnClickListener() {
            @Override
            public void onClick(View v) {
                beginPropertyAni();
            }
        });
    }

    /** * 开启动画 */
    private void beginPropertyAni() {
        ObjectAnimator animator_1 = ObjectAnimator.ofFloat(
                mPoint_1,
                "rotation",
                0,
                360);
        animator_1.setDuration(2000);
        animator_1.setInterpolator(new AccelerateDecelerateInterpolator());

        ObjectAnimator animator_2 = ObjectAnimator.ofFloat(
                mPoint_2,
                "rotation",
                0,
                360);
        animator_2.setStartDelay(150);
        animator_2.setDuration(2000 + 150);
        animator_2.setInterpolator(new AccelerateDecelerateInterpolator());

        ObjectAnimator animator_3 = ObjectAnimator.ofFloat(
                mPoint_3,
                "rotation",
                0,
                360);
        animator_3.setStartDelay(2 * 150);
        animator_3.setDuration(2000 + 2 * 150);
        animator_3.setInterpolator(new AccelerateDecelerateInterpolator());

        ObjectAnimator animator_4 = ObjectAnimator.ofFloat(
                mPoint_4,
                "rotation",
                0,
                360);
        animator_4.setStartDelay(3 * 150);
        animator_4.setDuration(2000 + 3 * 150);
        animator_4.setInterpolator(new AccelerateDecelerateInterpolator());

        AnimatorSet animatorSet = new AnimatorSet();
        animatorSet.play(animator_1).with(animator_2).with(animator_3).with(animator_4);
        animatorSet.start();
    }
}
代码确实不长只有80多行,但是麻雀虽小五脏俱全,很显然beginPropertyAni()方法就是启动动画的方法,调用ObjectAnimator.ofFloat()静态工厂方法创建ObjectAnimator对象我就不解释了,很容易看懂!重点来了,Win10开机小圆点旋转动画的难点不在旋转,如果我们把旋转的最高点看作是旋转的起始点,小圆点的旋转是一个先加速后减速的过程,这恰好符合高中物理的规律,小球内切圆环轨道做圆周运动,不知道我这样解释是不是很形象呢?那么控制旋转的加速度很好办,只要设置一个AccelerateDecelerateInterpolator()插值器就OK,但是我们发现,这不是一个小球在旋转,而是有4个同时在旋转,而且旋转还不同步,这又该如何解决呢?你只要从第二个小球开始,每个小球设置固定时间间隔的延时启动,就能完美解决上面的问题。代码是这样的:
animator_2.setStartDelay(150);
animator_3.setStartDelay(2 * 150);
animator_4.setStartDelay(3 * 150);
在动画中可以清晰的看到小球下落过程中的加速运动,碰到桌面(手机屏幕的底部)后的变形压扁,以及小球弹起的动画,非常形象生动!先贴代码后面再做分析:
package com.wondertwo.propertyanime;

import android.animation.Animator;
import android.animation.AnimatorListenerAdapter;
import android.animation.AnimatorSet;
import android.animation.ObjectAnimator;
import android.animation.ValueAnimator;
import android.app.Activity;
import android.content.Context;
import android.graphics.Canvas;
import android.graphics.Color;
import android.graphics.Paint;
import android.graphics.RadialGradient;
import android.graphics.Shader;
import android.graphics.drawable.ShapeDrawable;
import android.graphics.drawable.shapes.OvalShape;
import android.os.Bundle;
import android.view.MotionEvent;
import android.view.View;
import android.view.animation.AccelerateInterpolator;
import android.view.animation.DecelerateInterpolator;
import android.widget.LinearLayout;

import java.util.ArrayList;

/** * 小球下落动画加强版XBallsFallActivity,增加了小球桌底时的压扁、回弹动画 * Created by wondertwo on 2016/3/20. */
public class XBallsFallActivity extends Activity {

    static final float BALL_SIZE = 50f;// 小球直径
    static final float FULL_TIME = 1000;// 下落时间

    @Override
    public void onCreate(Bundle savedInstanceState) {
        super.onCreate(savedInstanceState);
        setContentView(R.layout.activity_x_ball_fall);

        LinearLayout xContainer = (LinearLayout) findViewById(R.id.xcontainer);

        // 设置要显示的view组件
        xContainer.addView(new XBallView(this));
    }

    /** * 自定义动画组件XBallView */
    public class XBallView extends View implements ValueAnimator.AnimatorUpdateListener {

        public final ArrayList<XShapeHolder> balls = new ArrayList<>();// 创建balls集合来存储XShapeHolder对象

        public XBallView(Context context) {
            super(context);
            setBackgroundColor(Color.WHITE);
        }

        @Override
        public boolean onTouchEvent(MotionEvent event) {
            // 屏蔽ACTION_UP事件
            if (event.getAction() != MotionEvent.ACTION_DOWN && event.getAction() != MotionEvent.ACTION_MOVE) {
                return false;
            }
            // 在ACTION_DOWN事件发生点生成小球
            XShapeHolder newBall = addBall(event.getX(), event.getY());
            // 计算小球下落动画开始时Y坐标
            float startY = newBall.getY();
            // 计算小球下落动画结束时的Y坐标,即屏幕高度减去startY
            float endY = getHeight() - BALL_SIZE;
            // 获取屏幕高度
            float h = (float) getHeight();
            float eventY = event.getY();
            // 计算动画持续时间
            int duration = (int) (FULL_TIME * ((h - eventY) / h));

            /** * 下面开始定义小球的下落,着地压扁,反弹等属性动画 */
            // 定义小球下落动画
            ValueAnimator fallAni = ObjectAnimator.ofFloat(
                    newBall,
                    "y",
                    startY,
                    endY);
            // 设置动画持续时间
            fallAni.setDuration(duration);
            // 设置加速插值器
            fallAni.setInterpolator(new AccelerateInterpolator());
            // 添加addUpdateListener监听器,当ValueAnimator属性值改变时会激发事件监听方法
            fallAni.addUpdateListener(this);

            // 定义小球压扁动画,控制小球x坐标左移半个球宽度
            ValueAnimator squashshAni1 = ObjectAnimator.ofFloat(
                    newBall,
                    "x",
                    newBall.getX(),
                    newBall.getX() - BALL_SIZE / 2);
            squashshAni1.setDuration(duration / 4);
            squashshAni1.setRepeatCount(1);
            squashshAni1.setRepeatMode(ValueAnimator.REVERSE);
            squashshAni1.setInterpolator(new DecelerateInterpolator());
            // 添加addUpdateListener监听器,当ValueAnimator属性值改变时会激发事件监听方法
            squashshAni1.addUpdateListener(this);

            // 定义小球压扁动画,控制小球宽度加倍
            ValueAnimator squashshAni2 = ObjectAnimator.ofFloat(
                    newBall,
                    "width",
                    newBall.getWidth(),
                    newBall.getWidth() + BALL_SIZE);
            squashshAni2.setDuration(duration / 4);
            squashshAni2.setRepeatCount(1);
            squashshAni2.setRepeatMode(ValueAnimator.REVERSE);
            squashshAni2.setInterpolator(new DecelerateInterpolator());
            // 添加addUpdateListener监听器,当ValueAnimator属性值改变时会激发事件监听方法
            squashshAni2.addUpdateListener(this);

            // 定义小球拉伸动画, 控制小球的y坐标下移半个球高度
            ValueAnimator stretchAni1 = ObjectAnimator.ofFloat(
                    newBall,
                    "y",
                    endY,
                    endY + BALL_SIZE / 2);
            stretchAni1.setDuration(duration / 4);
            stretchAni1.setRepeatCount(1);
            stretchAni1.setRepeatMode(ValueAnimator.REVERSE);
            stretchAni1.setInterpolator(new DecelerateInterpolator());
            // 添加addUpdateListener监听器,当ValueAnimator属性值改变时会激发事件监听方法
            stretchAni1.addUpdateListener(this);

            // 定义小球拉伸动画, 控制小球的高度减半
            ValueAnimator stretchAni2 = ObjectAnimator.ofFloat(
                    newBall,
                    "height",
                    newBall.getHeight(),
                    newBall.getHeight() - BALL_SIZE / 2);
            stretchAni2.setDuration(duration / 4);
            stretchAni2.setRepeatCount(1);
            stretchAni2.setRepeatMode(ValueAnimator.REVERSE);
            stretchAni2.setInterpolator(new DecelerateInterpolator());
            // 添加addUpdateListener监听器,当ValueAnimator属性值改变时会激发事件监听方法
            stretchAni2.addUpdateListener(this);

            // 定义小球弹起动画
            ValueAnimator bounceAni = ObjectAnimator.ofFloat(
                    newBall,
                    "y",
                    endY,
                    startY);
            bounceAni.setDuration(duration);
            bounceAni.setInterpolator(new DecelerateInterpolator());
            // 添加addUpdateListener监听器,当ValueAnimator属性值改变时会激发事件监听方法
            bounceAni.addUpdateListener(this);

            // 定义AnimatorSet,按顺序播放[下落、压扁&拉伸、弹起]动画
            AnimatorSet set = new AnimatorSet();
            //在squashshAni1之前播放fallAni
            set.play(fallAni).before(squashshAni1);
            /** * 由于小球弹起时压扁,即宽度加倍,x坐标左移,高度减半,y坐标下移 * 因此播放squashshAni1的同时还要播放squashshAni2,stretchAni1,stretchAni2 */
            set.play(squashshAni1).with(squashshAni2);
            set.play(squashshAni1).with(stretchAni1);
            set.play(squashshAni1).with(stretchAni2);
            // 在stretchAni2之后播放bounceAni
            set.play(bounceAni).after(stretchAni2);

            // newBall对象的渐隐动画,设置alpha属性值1--->0
            ObjectAnimator fadeAni = ObjectAnimator.ofFloat(
                    newBall,
                    "alpha",
                    1f,
                    0f);
            // 设置动画持续时间
            fadeAni.setDuration(250);
            // 添加addUpdateListener监听器,当ValueAnimator属性值改变时会激发事件监听方法
            fadeAni.addUpdateListener(this);

            // 为fadeAni设置监听
            fadeAni.addListener(new AnimatorListenerAdapter() {
                // 动画结束
                @Override
                public void onAnimationEnd(Animator animation) {
                    // 动画结束时将该动画关联的ShapeHolder删除
                    balls.remove(((ObjectAnimator) (animation)).getTarget());
                }
            });

            // 再次定义一个AnimatorSet动画集合,来组合动画
            AnimatorSet aniSet = new AnimatorSet();
            // 指定在fadeAni之前播放set动画集合
            aniSet.play(set).before(fadeAni);

            // 开始播放动画
            aniSet.start();

            return true;
        }

        @Override
        protected void onDraw(Canvas canvas) {
            for (XShapeHolder xShapeHolder : balls) {
                canvas.save();
                canvas.translate(xShapeHolder.getX(), xShapeHolder.getY());
                xShapeHolder.getShape().draw(canvas);
                canvas.restore();
            }
        }

        @Override
        public void onAnimationUpdate(ValueAnimator animation) {
            // 指定重绘界面
            this.invalidate();
        }

        /** * addBall()方法返回XShapeHolder对象,ShapeHolder对象持有小球 */
        private XShapeHolder addBall(float x, float y) {
            // 创建一个椭圆
            OvalShape circle = new OvalShape();
            // 设置椭圆宽高
            circle.resize(BALL_SIZE, BALL_SIZE);
            // 把椭圆包装成Drawable对象
            ShapeDrawable drawble = new ShapeDrawable(circle);
            // 创建XShapeHolder对象
            XShapeHolder holder = new XShapeHolder(drawble);
            // 设置holder坐标
            holder.setX(x - BALL_SIZE / 2);
            holder.setY(y - BALL_SIZE / 2);

            // 生成随机组合的ARGB颜色
            int red = (int) (Math.random() * 255);
            int green = (int) (Math.random() * 255);
            int blue = (int) (Math.random() * 255);
            // 把red,green,blue三个颜色随机数组合成ARGB颜色
            int color = 0xff000000 + red << 16 | green << 8 | blue;
            // 把red,green,blue三个颜色随机数除以4得到商值组合成ARGB颜色
            int darkColor = 0xff000000 | red / 4 << 16 | green / 4 << 8 | blue / 4;

            // 创建圆形渐变效果
            RadialGradient gradient = new RadialGradient(
                    37.5f,
                    12.5f,
                    BALL_SIZE,
                    color,
                    darkColor,
                    Shader.TileMode.CLAMP);

            // 获取drawble关联的画笔
            Paint paint = drawble.getPaint();
            paint.setShader(gradient);

            // 为XShapeHolder对象设置画笔
            holder.setPaint(paint);
            balls.add(holder);
            return holder;
        }
    }
}
这次的代码挺长有260多行,如果把它拆分开来,你会觉得代码还是原来的套路,还是很熟悉的有木有?我们首先来看,弹球动画类XBallsFallActivity中的代码分为两块,一是onCreate()方法,这是每个Activity都要重写的方法,那我们在onCreate()方法中干了什么呢?只干了一件事就是拿到LinearLayout布局的对象,并调用addBall()方法给它添加XBallView这个view对象,代码是这样的:
xContainer.addView(new XBallView(this));那XBallView对象又是什么鬼呢?一个自定义view组件,也就是实现我们小球的view组件,这也是我们这个动画的难点所在,我们慢慢来分析,代码定位到XBallView类,第一眼你会发现这个类不仅继承了View类,而且还实现了ValueAnimator.AnimatorUpdateListener这样一个接口,再仔细一看你又会发现,这个接口怎么听起来这么耳熟呢?没错,这就是上面我们在上面第二部分[ValueAnimator和属性动画的监听]中讲过的AnimatorUpdateListener类!实现了这个接口就意味着可以在XBallView中直接调用addUpdateListener(this)方法对属性动画进行监听,只需要传入this即可!
那我们再继续往下看看有没有我们要找的定义属性动画的逻辑呢?果然有!XBallView类中一共定义了7个动画和两个AnimatorSet动画集合,我把这段代码摘录出来
/** * 下面开始定义小球的下落,着地压扁,反弹等属性动画 */
        // 定义小球下落动画
        ValueAnimator fallAni = ObjectAnimator.ofFloat(
                newBall,
                "y",
                startY,
                endY);
        // 设置动画持续时间
        fallAni.setDuration(duration);
        // 设置加速插值器
        fallAni.setInterpolator(new AccelerateInterpolator());
        // 添加addUpdateListener监听器,当ValueAnimator属性值改变时会激发事件监听方法
        fallAni.addUpdateListener(this);

        // 定义小球压扁动画,控制小球x坐标左移半个球宽度
        ValueAnimator squashshAni1 = ObjectAnimator.ofFloat(
                newBall,
                "x",
                newBall.getX(),
                newBall.getX() - BALL_SIZE / 2);
        squashshAni1.setDuration(duration / 4);
        squashshAni1.setRepeatCount(1);
        squashshAni1.setRepeatMode(ValueAnimator.REVERSE);
        squashshAni1.setInterpolator(new DecelerateInterpolator());
        // 添加addUpdateListener监听器,当ValueAnimator属性值改变时会激发事件监听方法
        squashshAni1.addUpdateListener(this);

        // 定义小球压扁动画,控制小球宽度加倍
        ValueAnimator squashshAni2 = ObjectAnimator.ofFloat(
                newBall,
                "width",
                newBall.getWidth(),
                newBall.getWidth() + BALL_SIZE);
        squashshAni2.setDuration(duration / 4);
        squashshAni2.setRepeatCount(1);
        squashshAni2.setRepeatMode(ValueAnimator.REVERSE);
        squashshAni2.setInterpolator(new DecelerateInterpolator());
        // 添加addUpdateListener监听器,当ValueAnimator属性值改变时会激发事件监听方法
        squashshAni2.addUpdateListener(this);

        // 定义小球拉伸动画, 控制小球的y坐标下移半个球高度
        ValueAnimator stretchAni1 = ObjectAnimator.ofFloat(
                newBall,
                "y",
                endY,
                endY + BALL_SIZE / 2);
        stretchAni1.setDuration(duration / 4);
        stretchAni1.setRepeatCount(1);
        stretchAni1.setRepeatMode(ValueAnimator.REVERSE);
        stretchAni1.setInterpolator(new DecelerateInterpolator());
        // 添加addUpdateListener监听器,当ValueAnimator属性值改变时会激发事件监听方法
        stretchAni1.addUpdateListener(this);

        // 定义小球拉伸动画, 控制小球的高度减半
        ValueAnimator stretchAni2 = ObjectAnimator.ofFloat(
                newBall,
                "height",
                newBall.getHeight(),
                newBall.getHeight() - BALL_SIZE / 2);
        stretchAni2.setDuration(duration / 4);
        stretchAni2.setRepeatCount(1);
        stretchAni2.setRepeatMode(ValueAnimator.REVERSE);
        stretchAni2.setInterpolator(new DecelerateInterpolator());
        // 添加addUpdateListener监听器,当ValueAnimator属性值改变时会激发事件监听方法
        stretchAni2.addUpdateListener(this);

        // 定义小球弹起动画
        ValueAnimator bounceAni = ObjectAnimator.ofFloat(
                newBall,
                "y",
                endY,
                startY);
        bounceAni.setDuration(duration);
        bounceAni.setInterpolator(new DecelerateInterpolator());
        // 添加addUpdateListener监听器,当ValueAnimator属性值改变时会激发事件监听方法
        bounceAni.addUpdateListener(this);

        // 定义AnimatorSet,按顺序播放[下落、压扁&拉伸、弹起]动画
        AnimatorSet set = new AnimatorSet();
        //在squashshAni1之前播放fallAni
        set.play(fallAni).before(squashshAni1);
        /** * 由于小球弹起时压扁,即宽度加倍,x坐标左移,高度减半,y坐标下移 * 因此播放squashshAni1的同时还要播放squashshAni2,stretchAni1,stretchAni2 */
        set.play(squashshAni1).with(squashshAni2);
        set.play(squashshAni1).with(stretchAni1);
        set.play(squashshAni1).with(stretchAni2);
        // 在stretchAni2之后播放bounceAni
        set.play(bounceAni).after(stretchAni2);

        // newBall对象的渐隐动画,设置alpha属性值1--->0
        ObjectAnimator fadeAni = ObjectAnimator.ofFloat(
                newBall,
                "alpha",
                1f,
                0f);
        // 设置动画持续时间
        fadeAni.setDuration(250);
        // 添加addUpdateListener监听器,当ValueAnimator属性值改变时会激发事件监听方法
        fadeAni.addUpdateListener(this);

        // 为fadeAni设置监听
        fadeAni.addListener(new AnimatorListenerAdapter() {
            // 动画结束
            @Override
            public void onAnimationEnd(Animator animation) {
                // 动画结束时将该动画关联的ShapeHolder删除
                balls.remove(((ObjectAnimator) (animation)).getTarget());
            }
        });

        // 再次定义一个AnimatorSet动画集合,来组合动画
        AnimatorSet aniSet = new AnimatorSet();
        // 指定在fadeAni之前播放set动画集合
        aniSet.play(set).before(fadeAni);

        // 开始播放动画
        aniSet.start();
逻辑很简单,动画fallAni控制小球下落,动画squashshAni1控制小球压扁时小球x坐标左移半个球宽度,动画squashshAni2控制小球压扁时小球宽度加倍,动画stretchAni1,控制小球拉伸动画时小球的y坐标下移半个球高度,动画stretchAni2控制小球水平拉伸时控制小球的高度减半,动画bounceAni定义小球弹起动画,接着用一个AnimatorSet动画集合把这六个动画先组装起来,下落动画fallAni之后是squashshAni1、squashshAni2、stretchAni1、stretchAni2这四个动画同时播放,这也是小球落地瞬间的完美诠释,再之后是小球弹起bounceAni。最后还有一个fadeAni渐隐动画控制小球弹回起始高度后消失,接着再用一个AnimatorSet动画集合把前面的那个动画集合和第七个fadeAni渐隐动画组装起来,整个桌面弹球动画就大功告成了!
需要注意的是,在addBall()方法中,返回的是一个XShapeHolder类型的对象,那么XShapeHolder是什么呢?XShapeHolder包装了ShapeDrawable对象,并且为x,y,width,height,alpha等属性提供了setter、getter方法,代码如下:
package com.wondertwo.propertyanime;

import android.graphics.Paint;
import android.graphics.RadialGradient;
import android.graphics.drawable.ShapeDrawable;
import android.graphics.drawable.shapes.Shape;

/** * * Created by wondertwo on 2016/3/20. */
public class XShapeHolder {

    private float x = 0, y = 0;
    private ShapeDrawable shape;
    private int color;
    private RadialGradient gradient;
    private float alpha = 1f;
    private Paint paint;

    public XShapeHolder(ShapeDrawable shape) {
        this.shape = shape;
    }

    public float getWidth() {
        return shape.getShape().getWidth();
    }

    public void setWidth(float width) {
        Shape s = shape.getShape();
        s.resize(width, s.getHeight());
    }

    public float getHeight() {
        return shape.getShape().getHeight();
    }

    public void setHeight(float height) {
        Shape s = shape.getShape();
        s.resize(s.getWidth(), height);
    }

    public float getX() {
        return x;
    }

    public void setX(float x) {
        this.x = x;
    }

    public float getY() {
        return y;
    }

    public void setY(float y) {
        this.y = y;
    }

    public ShapeDrawable getShape() {
        return shape;
    }

    public void setShape(ShapeDrawable shape) {
        this.shape = shape;
    }

    public int getColor() {
        return color;
    }

    public void setColor(int color) {
        this.color = color;
    }

    public RadialGradient getGradient() {
        return gradient;
    }

    public void setGradient(RadialGradient gradient) {
        this.gradient = gradient;
    }

    public float getAlpha() {
        return alpha;
    }

    public void setAlpha(float alpha) {
        this.alpha = alpha;
    }

    public Paint getPaint() {
        return paint;
    }

    public void setPaint(Paint paint) {
        this.paint = paint;
    }
}

