SEGGER_RTT的使用
1.What is RTT?
With RTT it is possible to output information from the target microcontroller as well as sending input to the application at a very high speed without affecting the target's real time behavior.
SEGGER RTT can be used with any J-Link model and any supported target processor which allows background memory access, which are Cortex-M and RX targets.
RTT supports multiple channels in both directions, up to the host and down to the target, which can be used for different purposes and provide the most possible freedom to the user.
The default implementation uses one channel per direction, which are meant for printable terminal input and output. With the J-Link RTT Viewer this channel can be used for multiple "virtual" terminals, allowing to print to multiple windows (e.g. one for standard output, one for error output, one for debugging output) with just one target buffer. An additional up (to host) channel can for example be used to send profiling or event tracing data.
| Channel | Typical Purpose |
|---|---|
| Up-channel 0 | Terminal output |
| Down-Channel 0 | Keyboard input |
Supported Targets
RTT can be used with any target, which is supported by J-Link and allows background memory access while the target is running.
| Core | RTT |
|---|---|
| Cortex-M0 | |
| Cortex-M0+ | |
| Cortex-M1 | |
| Cortex-M3 | |
| Cortex-M4 | |
| Cortex-M7 | |
| RX100 | |
| RX200 | |
| RX600 | |
具体介绍请查看参考:地址https://www.segger.com/jlink-rtt.html
3.接下来我们来使用使用一下。
芯片是:NRF51822 cortex-m0的内核。
下载J-link驱动并安装 。
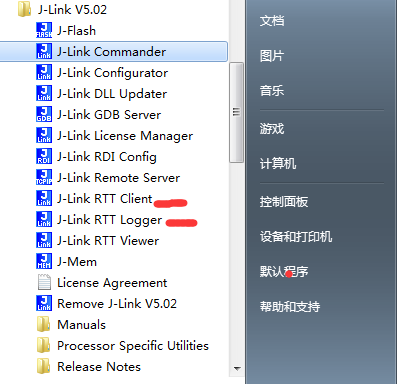
在安装路径下面找到并安装,如下:
4.随便打开一个nrf51822的工程。
把RTT和Syscalls添加到工程里面。在Syscalls里面只要要选择对应的开发环境对用文件即可,我用的是keil所以选择
SEGGER_RTT_Syscalls_KEIL 即可。如下:
注意:添加对应的路径
5.在主函数页面里面,添加对应的头文件
以及在main()里面初始化
//segger_rtt_init
SEGGER_RTT_Init();
SEGGER_RTT_printf(0,"\r\hello,rtt\r\n");
打开:
打开:J-LINK RTT Client 和J-link RTT LOGGER,可见还没有连上
设置J-link RTT LOGGER
设置项: 分别为Device name (随便写),
调试接口:用的是SWD。
速度 :2.5M
其他的默认。
注意:output file 是打印出来的Log。文件默认放在Segger的\SEGGER\JLink_V502这个路径下面
6.编译程序,运行:
打印出来了 Hello,rtt 这是在主函数里面添加的打印代码。。OK。。。。。。


