说到简单实现一个倒计时功能大家可能觉得这还不简单,分分钟搞定的事情啊,线程+handler,so easy
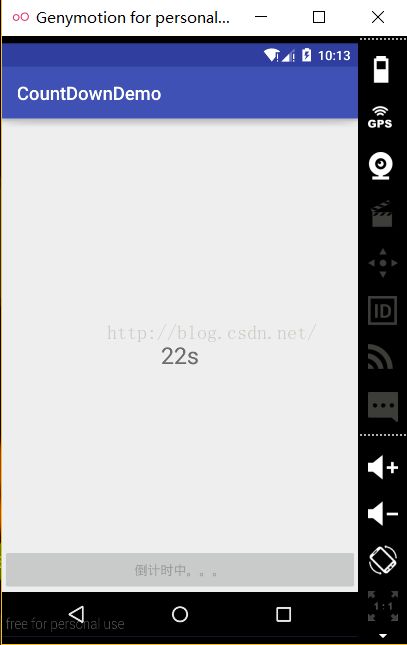
来我们先简单看一下实现效果:

代码布局很简单,layout_main.xml如下:
<?xml version="1.0" encoding="utf-8"?>
<RelativeLayout xmlns:android="http://schemas.android.com/apk/res/android" xmlns:tools="http://schemas.android.com/tools" android:layout_width="match_parent" android:layout_height="match_parent" tools:context="com.personal.xiaoshuai.countdowndemo.MainActivity">
<TextView android:id="@+id/tv_show" android:layout_width="match_parent" android:layout_height="wrap_content" android:textSize="25sp" android:layout_centerInParent="true" android:text="hello world!" android:gravity="center" />
<Button android:id="@+id/btn_start" android:layout_width="match_parent" android:layout_height="wrap_content" android:layout_alignParentBottom="true" android:text="开始倒计时"/>
</RelativeLayout>
activity代码:
package com.personal.xiaoshuai.countdowndemo;
import android.os.Bundle;
import android.os.CountDownTimer;
import android.os.Handler;
import android.os.Message;
import android.support.v7.app.AppCompatActivity;
import android.util.Log;
import android.view.View;
import android.widget.Button;
import android.widget.TextView;
public class MainActivity extends AppCompatActivity implements View.OnClickListener{
private TextView mTv_show;
private Button mBtn_start;
private Handler mHandler=new Handler(){
@Override
public void handleMessage(Message msg) {
super.handleMessage(msg);
mTv_show.setText(msg.what + "s");
if(msg.what==1){
//倒计时结束让按钮可用 mBtn_start.setEnabled(true);
mBtn_start.setText("开始倒计时");
}
}
};
@Override
protected void onCreate(Bundle savedInstanceState) {
super.onCreate(savedInstanceState);
setContentView(R.layout.activity_main);
mTv_show= (TextView) findViewById(R.id.tv_show);
mBtn_start= (Button) findViewById(R.id.btn_start);
mBtn_start.setOnClickListener(this);
}
@Override
public void onClick(View v) {
//让按钮不可用 防止二次点击 mBtn_start.setEnabled(false);
mBtn_start.setText("倒计时中。。。");
//开启线程每隔一秒发送一次发送消息 new Thread(new Runnable() {
@Override
public void run() {
for(int i=60;i>=1;i--){
mHandler.sendEmptyMessage(i);
try {
Thread.sleep(1000);
} catch (InterruptedException e) {
e.printStackTrace();
}
}
}
}).start();
}
}
如上是大家平常比较多的写法,其实你按这种写法写完之后是不是自己都觉得很low,而且这种写法也存在不少缺陷,比如说当我们再开始倒计时比较快的退出当前activity的时候,线程是无法终止的,它还会继续走for循环部分,这样的结果当然不是我们所希望的,当然,现在我们在子线程并没有做什么耗性能的事情对运行来讲没什么影响,假如说我们在里面进行了一些访问网络的操作呢。这时,可能会有人提出,我可以设置标志位呀在退出的时候让标志位置为false不就可以了吗,嗯这样是可以,但是线程的引用还存在呢,还没有释放。好了,不分析这种写法的各种low的地方了,接下来,我就说一下,怎么用CountDownTimer简单的来实现倒计时效果。
package com.personal.xiaoshuai.countdowndemo;
import android.os.Bundle;
import android.os.CountDownTimer;
import android.support.v7.app.AppCompatActivity;
import android.view.View;
import android.widget.Button;
import android.widget.TextView;
public class MainActivity extends AppCompatActivity implements View.OnClickListener {
private TextView mTv_show;
private Button mBtn_start;
private long millisInFuture = 60000;//60s private long countDownInterval = 1000;//每隔一秒 private MyCountDownTimer myCountDownTimer;
@Override
protected void onCreate(Bundle savedInstanceState) {
super.onCreate(savedInstanceState);
setContentView(R.layout.activity_main);
mTv_show = (TextView) findViewById(R.id.tv_show);
mBtn_start = (Button) findViewById(R.id.btn_start);
mBtn_start.setOnClickListener(this);
}
@Override
public void onClick(View v) {
//让按钮不可用 防止二次点击 mBtn_start.setEnabled(false);
mBtn_start.setText("倒计时中。。。");
if (myCountDownTimer == null) {
myCountDownTimer = new MyCountDownTimer(millisInFuture, countDownInterval);
}
myCountDownTimer.start();
}
public class MyCountDownTimer extends CountDownTimer {
/** * @param millisInFuture 总共持续的时间 * @param countDownInterval 倒计时的时间间隔 */ public MyCountDownTimer(long millisInFuture, long countDownInterval) {
super(millisInFuture, countDownInterval);
}
/** * @param millisUntilFinished 还剩下的时间 */ @Override
public void onTick(long millisUntilFinished) {
mTv_show.setText(millisUntilFinished / countDownInterval + "s");
}
/** * 倒计时结束时候回调 */ @Override
public void onFinish() {
//倒计时结束让按钮可用 mBtn_start.setEnabled(true);
mBtn_start.setText("开始倒计时");
}
}
@Override
protected void onDestroy() {
super.onDestroy();
if (myCountDownTimer != null) {
myCountDownTimer.cancel();
}
}
}
看一下,是不是很简单,我们只需要将在倒计时中的逻辑放在onTick方法中,倒计时结束后的逻辑放到onFinish方法中。有的同学可能会注意到,这倒计时,肯定是走子线程了,但是它为什么可以直接更改view的属性呢,答案很简单,在CountDownTimer里面封装了Handler,在上面的使用上,我对方法参数也都简单的加了介绍,假如大家还有什么不明白的地方可以参考一下CountDownTimer的源码:
/* * Copyright (C) 2008 The Android Open Source Project * * Licensed under the Apache License, Version 2.0 (the "License"); * you may not use this file except in compliance with the License. * You may obtain a copy of the License at * * http://www.apache.org/licenses/LICENSE-2.0 * * Unless required by applicable law or agreed to in writing, software * distributed under the License is distributed on an "AS IS" BASIS, * WITHOUT WARRANTIES OR CONDITIONS OF ANY KIND, either express or implied. * See the License for the specific language governing permissions and * limitations under the License. */ package android.os;
/** * Schedule a countdown until a time in the future, with * regular notifications on intervals along the way. * * Example of showing a 30 second countdown in a text field: * * <pre class="prettyprint"> * new CountDownTimer(30000, 1000) { * * public void onTick(long millisUntilFinished) { * mTextField.setText("seconds remaining: " + millisUntilFinished / 1000); * } * * public void onFinish() { * mTextField.setText("done!"); * } * }.start(); * </pre> * * The calls to {@link #onTick(long)} are synchronized to this object so that * one call to {@link #onTick(long)} won't ever occur before the previous * callback is complete. This is only relevant when the implementation of * {@link #onTick(long)} takes an amount of time to execute that is significant * compared to the countdown interval. */ public abstract class CountDownTimer {
/** * Millis since epoch when alarm should stop. */ private final long mMillisInFuture;
/** * The interval in millis that the user receives callbacks */ private final long mCountdownInterval;
private long mStopTimeInFuture;
/** * boolean representing if the timer was cancelled */ private boolean mCancelled = false;
/** * @param millisInFuture The number of millis in the future from the call * to {@link #start()} until the countdown is done and {@link #onFinish()} * is called. * @param countDownInterval The interval along the way to receive * {@link #onTick(long)} callbacks. */ public CountDownTimer(long millisInFuture, long countDownInterval) {
mMillisInFuture = millisInFuture;
mCountdownInterval = countDownInterval;
}
/** * Cancel the countdown. */ public synchronized final void cancel() {
mCancelled = true;
mHandler.removeMessages(MSG);
}
/** * Start the countdown. */ public synchronized final CountDownTimer start() {
mCancelled = false;
if (mMillisInFuture <= 0) {
onFinish();
return this;
}
mStopTimeInFuture = SystemClock.elapsedRealtime() + mMillisInFuture;
mHandler.sendMessage(mHandler.obtainMessage(MSG));
return this;
}
/** * Callback fired on regular interval. * @param millisUntilFinished The amount of time until finished. */ public abstract void onTick(long millisUntilFinished);
/** * Callback fired when the time is up. */ public abstract void onFinish();
private static final int MSG = 1;
// handles counting down private Handler mHandler = new Handler() {
@Override
public void handleMessage(Message msg) {
synchronized (CountDownTimer.this) {
if (mCancelled) {
return;
}
final long millisLeft = mStopTimeInFuture - SystemClock.elapsedRealtime();
if (millisLeft <= 0) {
onFinish();
} else if (millisLeft < mCountdownInterval) {
// no tick, just delay until done sendMessageDelayed(obtainMessage(MSG), millisLeft);
} else {
long lastTickStart = SystemClock.elapsedRealtime();
onTick(millisLeft);
// take into account user's onTick taking time to execute long delay = lastTickStart + mCountdownInterval - SystemClock.elapsedRealtime();
// special case: user's onTick took more than interval to // complete, skip to next interval while (delay < 0) delay += mCountdownInterval;
sendMessageDelayed(obtainMessage(MSG), delay);
}
}
}
};
}
看见没有 我们只需要调一下cancel方法,就可以把线程终止了。
睡觉了0.0~~~
