zabbix3.0 azure云上rpm包安装从入门到放弃
--azure云背景没有自动发送email短信报警功能
azure云上的linux vm没有自动发送email短信报警服务,所以准备用开源的zabbix来实现,原来用nagios,但是听说zabbix有自动识别的功能,不需要nagios配置那么多东西,zabbix更加人性化,所以准备用用zabbix。
1,准备安装环境
参考安装文档地址:
https://www.zabbix.com/documentation/3.0/manual/installation/install_from_packages#red_hat_enterprise_linuxcentos
清空原来的缓存:
[root@hch_test_121_90 zabbix]# yum clean all Loaded plugins: security Cleaning repos: base extras openlogic updates zabbix zabbix-non-supported Cleaning up Everything [root@hch_test_121_90 zabbix]# |
安装新的zabbixyum源,由于版本更新,这个连接地址可能会失效,需要自己去zabbix官网去找下:
下载zabbix: wget http://repo.zabbix.com/zabbix/3.0/rhel/6/x86_64/zabbix-release-3.0-1.el6.noarch.rpm
开始安装: [root@hch_test_121_90 zabbix]# rpm -ivh zabbix-release-3.0-1.el6.noarch.rpm Preparing... ########################################### [100%] 1:zabbix-release ########################################### [100%] [root@hch_test_121_90 zabbix]#
|
安装文档地址:https://www.zabbix.com/documentation/3.0/
下载地址:http://repo.zabbix.com/zabbix/3.0/rhel/6/x86_64/
2,Yum安装
开始安装基础组件包:
yum -y install gcc OpenIPMI-devel net-snmp-devel.x86_64 libxml2-devel mysql-devel |
开始yum安装zabbix-server:
yum install -y zabbix zabbix-get zabbix-server zabbix-web-mysql zabbix-web zabbix-agent #如果你想省事,可以这样直接安装所有的zabbix yum install -y zabbix* |
原blog地址:http://blog.csdn.net/mchdba/article/details/51226751,原博主mchdba,谢绝转载
Check是否已经安装了zabbix-server,发现没有安装mysql-server,需要自己去手动安装:
[root@hch_test_121_90 zabbix]# yum install -y zabbix zabbix-get zabbix-server zabbix-web-mysql zabbix-web zabbix-agent Loaded plugins: security Setting up Install Process No package zabbix available. Package zabbix-get-3.0.1-2.el6.x86_64 already installed and latest version Package zabbix-server-mysql-3.0.1-2.el6.x86_64 already installed and latest version Package zabbix-web-mysql-3.0.1-2.el6.noarch already installed and latest version Package zabbix-web-3.0.1-2.el6.noarch already installed and latest version Package zabbix-agent-3.0.1-2.el6.x86_64 already installed and latest version Nothing to do [root@hch_test_121_90 zabbix]# |
PS:犹豫rhel系统(centos系统不存在问题)缺少php-bcmath和php-mbstring这两个包,会导致Web页面的安装提示缺少组件,所以可以在centos源中下载这2个包安装即可。
3,准备mysql数据库
安装mysql数据库:
http://blog.csdn.net/mchdba/article/details/51138063
创建zabbix的数据库:
mysql> create database zabbix charset set utf8; Query OK, 1 row affected (0.00 sec)
mysql> grant all privileges on zabbix.* to zabbix@'10.%' identified by 'zabbix0418'; Query OK, 0 rows affected (0.00 sec)
mysql> grant all privileges on zabbix.* to zabbix@'192.%' identified by 'zabbix0418'; Query OK, 0 rows affected (0.01 sec)
mysql> |
PS:字符集要设置为utf8mb4,防止界面切换到中文的时候乱码。
导入create.sql.gz文件,建立zabbix-server的数据库(ps,以前的版本可能叫啥schema.sql之类的):
[root@hch_test_121_90 zabbix-server-mysql-3.0.1]# cd /usr/share/doc/zabbix-server-mysql-3.0.1 [root@hch_test_121_90 zabbix-server-mysql-3.0.1]# zcat create.sql.gz | mysql -uroot zabbix -p Warning: Using a password on the command line interface can be insecure. Enter password: ERROR 1071 (42000) at line 142: Specified key was too long; max key length is 767 bytes [root@hch_test_121_90 zabbix-server-mysql-3.0.1]# [root@hch_test_121_90 zabbix-server-mysql-3.0.1]# zcat create.sql.gz | mysql -uroot zabbix -p Warning: Using a password on the command line interface can be insecure. Enter password: [root@hch_test_121_90 zabbix-server-mysql-3.0.1]# |
4,开始配置数据库
编辑数据库配置文件,一般默认在/etc/zabbix/目录下:
|
# vim /etc/zabbix/zabbix_server.conf DBHost=localhost DBName=zabbix DBUser=zabbix DBPassword=zabbix0418 DBPort=3307 |
5,启动zabbix进程服务
[root@hch_test_121_90 zabbix-server-mysql-3.0.1]# systemctl start zabbix-server -bash: systemctl: command not found # 这里官网用systemctl启动是因为在centos7下,我这里是centos6.5,所以还是用以前的service的方式启动。 [root@hch_test_121_90 zabbix-server-mysql-3.0.1]# service zabbix-server start Starting Zabbix server: [确定] [root@hch_test_121_90 zabbix-server-mysql-3.0.1]# |
6,安装apache
# 如果以前已经安装过httpd,最好卸载掉 yum –y remove httpd* yum –y install php yum -y install httpd service httpd start # 添加开机自动启动 chkconfig httpd on chkconfig zabbix-server on |
7,关闭selinux
手动关闭selinux:
[root@hch_test_121_90 zabbix-server-mysql-3.0.1]# setenforce 0 setenforce: SELinux is disabled [root@hch_test_121_90 zabbix-server-mysql-3.0.1]# getenforce Disabled [root@hch_test_121_90 zabbix-server-mysql-3.0.1]# |
安装web源:
rpm -ivh http://repo.zabbix.com/zabbix/3.0/rhel/6/x86_64/deprecated/zabbix-web-3.0.1-2.el6.noarch.rpm |
安装apache:
[root@hch_test_121_90 zabbix]# service httpd restart Stopping httpd: [ OK ] Starting httpd: httpd: Could not reliably determine the server's fully qualified domain name, using 127.0.0.1 for ServerName [ OK ] [root@hch_test_121_90 zabbix]# |
解决办法:
vim /etc/httpd/conf/httpd.conf # 添加下面一行,然后重启httpd ServerName localhost:80 |
8,Zabbix管理界面打开失败。
如1.png所示:D:\study\zabbix\1.png:
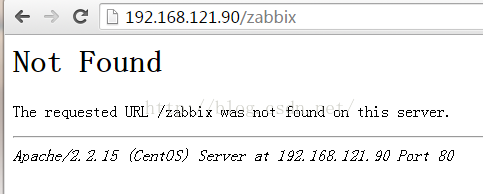
去httpd默认的web工程目录查看,没有zabbix应用:
[root@hch_test_121_90 html]# ll /var/www/html total 4 drwxr-xr-x. 2 root root 4096 Apr 20 23:35 test [root@hch_test_121_90 html]# |
问题来了,rpm包安装方式中的zabbix web打开的工程在哪里?是如何和httpd配合一起工作的?官方rpm安装文档里面没有相应的记录,或者在别的地方有但是我没有找到它吧,不过这个rpm的方式安装,只能暂时搁浅放弃了,等待下次有空继续研究下其中流程和原理。