How to Properly Remove Datastore or LUN from ESXi 5.x hosts
This post might be sounds simple that removing datastore from ESXi host but it is not actually simple as it sounds. VMware Administrators might think that right-click the datastore and unmounting. It is not only the process to remove LUN from ESXi hosts but there are few additional pre-checks and post tasks like detaching the device from the host is must before we request storage administrator to unpresenting the LUN from the backend storage array. This process needs to be followed properly otherwise it may cause bad issues like APD (All Paths Down) condition on the ESXi host. Lets review what is All Path Device (APD) condition.
AS per VMware “APD is when there are no longer any active paths to a storage device from the ESX, yet the ESX continues to try to access that device. When hostd tries to open a disk device, a number of commands such as read capacity and read requests to validate the partition table are sent. If the device is in APD, these commands will be retried until they time out. The problem is that hostd is responsible for a number of other tasks as well, not just opening devices. One task is ESX to vCenter communication, and if hostd is blocked waiting for a device to open, it may not respond in a timely enough fashion to these other tasks. One consequence is that you might observe your ESX hosts disconnecting from vCenter.“
VMware has did lot of improvements to how to handle APD conditions over the last number of releases, but prevention is better than cure, so I wanted to use this post to explain you the best practices of removing the LUN from ESXi host.
Pre-Checks before unmounting the Datastore:
1.If the LUN is being used as a VMFS datastore, all objects (such as virtual machines, snapshots, and templates) stored on the VMFS datastore are unregistered or moved to another datastore using storage vMotion. You can Browse the datastore and verify no objects are placed on the datatsore.
2. Ensure the Datastore is not used for vSphere HA heartbeat.
3. Ensure the Datastore is not part of a Datastore cluster and not managed by Storage DRS.
4. Datastore should not be used as a Diagnostic coredump partition.
5. Storage I/O control should be disabled for the datastore.
6. No third-party scripts or utilities are accessing the datastore.
7. If the LUN is being used as an RDM, remove the RDM from the virtual machine. Click Edit Settings, highlight the RDM hard disk, and click Remove. Select Delete from disk if it is not selected, and click OK. Note: This destroys the mapping file, but not the LUN content.
Procedure to Remove Datastore or LUN from ESXi 5.X hosts:
1. Ensure you have reviewed all the pre-checks as mentioned above for the datastore ,which you are going to unmount.
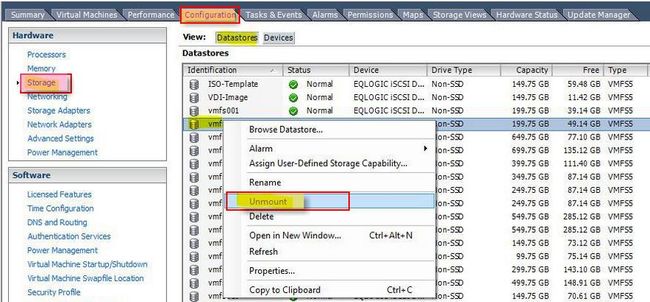
2. Select the ESXi host-> Configuration-> Storage-> Datastores. Note down the naa id for that datastore. Which starts something like naa.XXXXXXXXXXXXXXXXXXXXX.
 Image thanks to shabiryusuf.wordpress.com
3.Right-click the Datatsore, which you want to unmount and Select Unmount.
 Image thanks to shabiryusuf.wordpress.com
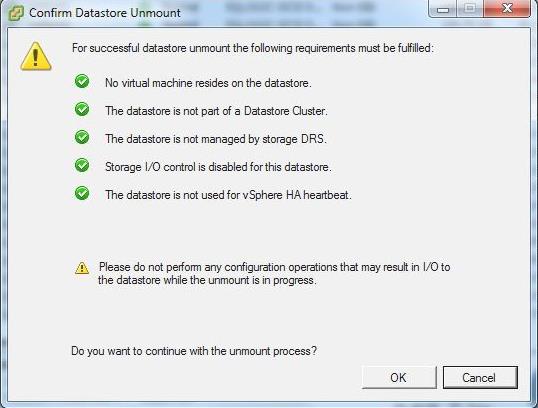
4. Confirm Datastore unmount pre-check is all marked with Green Check mark and click on OK. Monitor the recent tasks and Wait till the VMFS volume shows as “unmounted”.
 Image thanks to shabiryusuf.wordpress.com
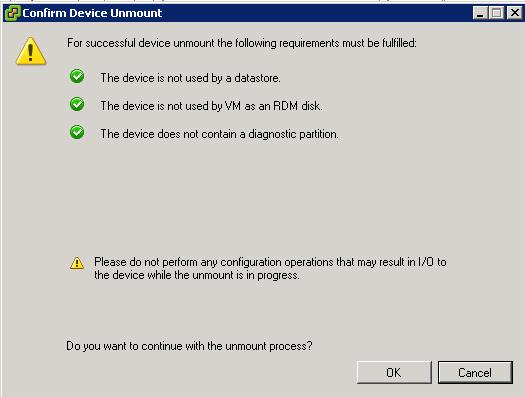
5.Select the ESXi host-> Configuration-> Storage-> Devices. Match the devices with the naa.id (naa.XXXXXXXX) which you have noted down in step 2 with the Identifier. Select the device which has same naa.id as the unmounted datastore. Right-click the device and Detach. Verify all the Green checks and click on Ok to detach the LUN
 Image thanks to shabiryusuf.wordpress.com

6. Repeat the same steps for all ESXi hosts, where you want to unpresent this datastore.
7. Inform your storage administrator to physically unpresent the LUN from the ESXi host using the appropriate array tools. You can even share naa.id of the LUN with your storage administrator to easily identify from the storage end.
8. Rescan the ESXi host and verify detached LUNs are disappeared from the ESXi host.
That’s it. I hope this post helps you understand the detailed procedure to properly remove the Datastore or LUN from your ESXi host. Thanks for Reading!!!. Be Social and Share it in Social media. if you feel worth sharing it.