自定义带Button的通知,并实现对Button的监听
近来在做一个类似音乐播放器的手机软件,在基本功能实现后,想在添加一个通知,里面包含Button可以控制歌曲的播放。
在查阅相关资料后,总结一下如何自定义带Button的通知吧。
为了更好的说明自定义通知实现的过程,在这里我们用一个demo的说明问题:
- 首先肯定要新建一个xml的自定义布局吧,这里我就直接给出代码
<?xml version="1.0" encoding="utf-8"?>
<LinearLayout xmlns:android="http://schemas.android.com/apk/res/android" android:layout_width="match_parent" android:layout_height="match_parent">

    <ImageView  android:layout_width="wrap_content" android:layout_height="wrap_content" android:id="@+id/image" android:background="@mipmap/ic_launcher" />
    <LinearLayout  android:layout_width="wrap_content" android:layout_height="wrap_content" android:orientation="vertical">
        <TextView  android:layout_width="wrap_content" android:layout_height="wrap_content" android:text="Titile"/>
        <TextView  android:layout_width="wrap_content" android:layout_height="wrap_content" android:text="Context"/>
    </LinearLayout>

  <LinearLayout  android:layout_width="match_parent" android:layout_height="wrap_content" android:layout_gravity="center" android:orientation="horizontal">

      <ImageButton  android:layout_marginLeft="20dp" android:id="@+id/bu_last" android:layout_width="wrap_content" android:layout_height="wrap_content" android:background="@drawable/last_sel" />
      <ImageButton  android:id="@+id/bu_pause" android:layout_marginLeft="20dp" android:layout_width="wrap_content" android:layout_height="wrap_content" android:background="@drawable/pause_sel" />
      <ImageButton  android:id="@+id/bu_next" android:layout_marginLeft="20dp" android:layout_width="wrap_content" android:layout_height="wrap_content" android:background="@drawable/next_sel" />
  </LinearLayout>


</LinearLayout>
2.然后我们需要在MainActivity中实现我们的显示自定义通知的方法了,这里我们把我们的代码全部给出来,下面再进行解释。
package com.create.notitest;
import android.app.Activity;
import android.app.Notification;
import android.app.NotificationManager;
import android.app.PendingIntent;
import android.content.BroadcastReceiver;
import android.content.Context;
import android.content.Intent;
import android.content.IntentFilter;
import android.support.v4.app.NotificationCompat;
import android.os.Bundle;
import android.util.Log;
import android.view.View;
import android.widget.ImageButton;
import android.widget.RemoteViews;
import android.widget.Toast;
public class MainActivity extends Activity {
private ImageButton last;
private ImageButton play;
private ImageButton next;
private ButtonBroadcastReceiver mReceiver;
@Override
protected void onCreate(Bundle savedInstanceState) {
super.onCreate(savedInstanceState);
setContentView(R.layout.activity_main);
last = (ImageButton) findViewById(R.id.bu_last);
play = (ImageButton) findViewById(R.id.bu_pause);
next = (ImageButton) findViewById(R.id.bu_next);
initButtonReceiver();
}
private final static String ACTION_BUTTON = "com.text";
private final static String INTENT_BUTTONID_TAG = "com.reoger";
private final static int BUTTON_PREV_ID = 1;
private final static int BUTTON_PALY_ID = 2;
private final static int BUTTON_NEXT_ID = 3;
public void showButtonNofi() {
NotificationCompat.Builder builder = new NotificationCompat.Builder(this);
//一个描述了可以在其他进程中显示的view层,它inflate于layout资源文件,并且这个类对提供一些基本操作修改view内容。
//http://www.cnblogs.com/over140/archive/2011/11/28/2265736.html 可以参加这篇文章
//getPackageName() 获取当前包名
RemoteViews remoteViews = new RemoteViews(getPackageName(), R.layout.layout_view);
remoteViews.setImageViewResource(R.id.bu_last, R.drawable.last_sel);
//点击事件处理,广播
Intent intent = new Intent(ACTION_BUTTON);
//上一首按钮
intent.putExtra(INTENT_BUTTONID_TAG, BUTTON_PREV_ID);
//这里添加了广播,需要getBroadcast方法
PendingIntent intentLast = PendingIntent.getBroadcast(this, BUTTON_PREV_ID, intent,
PendingIntent.FLAG_UPDATE_CURRENT);
remoteViews.setOnClickPendingIntent(R.id.bu_last, intentLast);
intent.putExtra(INTENT_BUTTONID_TAG, BUTTON_PALY_ID);
PendingIntent intent_paly = PendingIntent.getBroadcast(this, 2, intent, PendingIntent.FLAG_UPDATE_CURRENT);
remoteViews.setOnClickPendingIntent(R.id.bu_pause, intent_paly);
/* 下一首 按钮 */
intent.putExtra(INTENT_BUTTONID_TAG, BUTTON_NEXT_ID);
PendingIntent intent_next = PendingIntent.getBroadcast(this, 3, intent, PendingIntent.FLAG_UPDATE_CURRENT);
remoteViews.setOnClickPendingIntent(R.id.bu_next, intent_next);
builder.setContent(remoteViews)
.setContentIntent(getDefalutIntent(Notification.FLAG_ONGOING_EVENT))
.setWhen(System.currentTimeMillis())
.setPriority(Notification.PRIORITY_DEFAULT)//设置该通知的优先级
.setOngoing(true)
.setSmallIcon(R.drawable.last_sel);
Notification notification = builder.build();
notification.flags = Notification.FLAG_ONGOING_EVENT;
NotificationManager manager = (NotificationManager) getSystemService(Context.NOTIFICATION_SERVICE);
manager.notify(200, notification);
}
public PendingIntent getDefalutIntent(int flags) {
PendingIntent pendingIntent = PendingIntent.getActivity(this, 1, new Intent(), flags);
return pendingIntent;
}
public void initButtonReceiver() {
mReceiver = new ButtonBroadcastReceiver();
IntentFilter intentFilter = new IntentFilter();
/** * IntentFilter对象负责过滤掉组件无法响应和处理的Intent,只将自己关心的Intent接收进来进行处理 * 。 IntentFilter实行“白名单”管理,即只列出组件乐意接受的Intent,但IntentFilter只会过滤 * 隐式Intent,显式的Intent会直接传送到目标组件。 Android组件可以有一个或多个IntentFilter * ,每个IntentFilter之间相互独立,只需要其中一个验证通过则可。除了用于过滤广播的IntentFilter * 可以在代码中创建外,其他的IntentFilter必须在AndroidManifest.xml文件中进行声明 */
intentFilter.addAction(ACTION_BUTTON);
registerReceiver(mReceiver, intentFilter);
}
/*** * 监听广播 * * @param view */
public class ButtonBroadcastReceiver extends BroadcastReceiver {
@Override
public void onReceive(Context context, Intent intent) {
String action = intent.getAction();
if (action.equals(ACTION_BUTTON)) {
int buId = intent.getIntExtra(INTENT_BUTTONID_TAG, 0);
switch (buId) {
case BUTTON_PREV_ID://上一首的逻辑
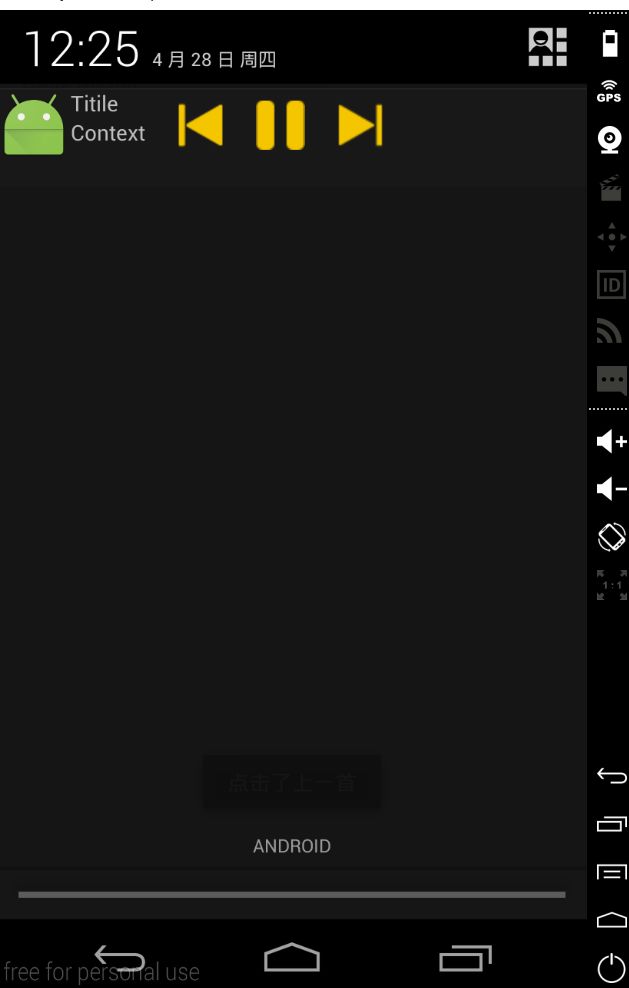
Toast.makeText(getApplicationContext(), "点击了上一首", Toast.LENGTH_SHORT).show();
Log.d("TAG", "上一首");
break;
case BUTTON_PALY_ID:
Toast.makeText(getApplicationContext(), "点击了播放按钮", Toast.LENGTH_SHORT).show();
Log.d("TAG", "播放");
break;
case BUTTON_NEXT_ID :
Toast.makeText(getApplicationContext(), "点击了下一曲按钮", Toast.LENGTH_SHORT).show();
Log.d("TAG", "下一曲");
break;
default:
break;
}
}
}
}
public void shownotification(View view) {
showButtonNofi();
}
@Override
protected void onStop() {
super.onStop();
NotificationManager manager = (NotificationManager) getSystemService(Context.NOTIFICATION_SERVICE);
manager.cancel(200);
}
@Override
protected void onDestroy() {
super.onDestroy();
if (mReceiver != null) {
unregisterReceiver(mReceiver);
}
}
}
好了 ,代码上面的注释我写的很是详细,在这里我还是详细的说一下步骤吧,
首先,我们通过 showButtonNofi()方法实现将自定义通知显示出来,并且在这个方法里面我们通过.setOnClickPendingIntent方法将点击事件广播出去,那么我们下面要做的事情就很简单明了啦。
然后,我们就需要捕获我们之前发出的广播,并且执行相应的逻辑,在ButtonBroadcastReceiver类中,我们就很好的实现了这一功能。
最后,我们只需要初始化我们已经写好的广播接收器的就OK了,initButtonReceiver()方法就是实现这一内容的,具体参见代码。
pS:注意几点,在注册广播后一定要记得在退出程序钱解除绑定。
自定义通知显示后,一定要有相应的让通知消失的方法。
最后 附上通知类学习源码下载的链接吧 通知类学习源码