今天开始记录自学android的历程
今天开始记录自己的android自学历程
版权声明:原创博文,未经啸尘允许不得转载
软件版本:Android Studio1.5.1稳定版 +Win7
描述:文章只是我课余的自学笔记欢迎大神的批评指正
Android中的六种布局
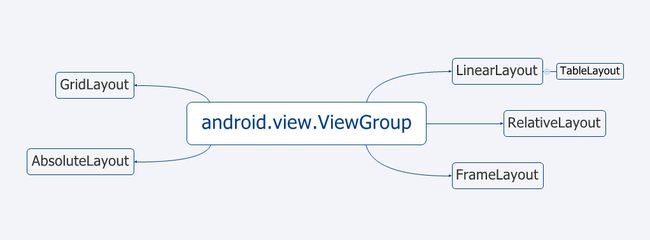
线性布局
- Android的线性布局不会自己换行
- android:divider属性代表分隔条
- android:gravity代表控件自身的内容相对自己的对其方式,而android:layout_gravity代表控件相对父元素的对齐方式
- android:weight是线性布局的权重
<?xml version="1.0" encoding="utf-8"?>
<LinearLayout xmlns:android="http://schemas.android.com/apk/res/android" android:layout_width="match_parent" android:layout_height="match_parent" android:gravity="center_horizontal" android:orientation="vertical">
    <!--gravity属性也可以多个重叠比如 android:gravity="center_horizontal|bottom" -->
    <Button  android:layout_width="wrap_content" android:layout_height="wrap_content"/>

    <Button  android:layout_width="wrap_content" android:layout_height="wrap_content"/>

    <LinearLayout  android:layout_width="match_parent" android:layout_height="wrap_content" android:orientation="horizontal">
        <!--在使用layout_weight属性时要把width设置成0dp-->
        <Button  android:layout_width="0dp" android:layout_height="wrap_content" android:layout_weight="3"/>

        <Button  android:layout_width="0dp" android:layout_height="wrap_content" android:layout_weight="1"/>

    </LinearLayout>

</LinearLayout>
Android Studio快捷键选中代码Ctrl +D 快复制
Ctrl +Alt +L 格式化代码
表格布局
- 如果直接向表格中添加控件,那么它会直接占用一行
- 单元格可以设置三种属性:Shrinkable 可以被收缩、Stretchable可以被拉伸、Collapsed隐藏
<?xml version="1.0" encoding="utf-8"?>
<TableLayout xmlns:android="http://schemas.android.com/apk/res/android" android:layout_width="match_parent" android:layout_height="match_parent" android:shrinkColumns="0" android:stretchColumns="1">

    <Button/>

    <TableRow>
        <Button  android:layout_width="match_parent" android:layout_height="wrap_content"/>
        <Button  android:layout_width="match_parent" android:layout_height="wrap_content"/>
        <Button  android:layout_width="match_parent" android:layout_height="wrap_content"/>

    </TableRow>

</TableLayout>
FrameLayout布局
<?xml version="1.0" encoding="utf-8"?>
<FrameLayout xmlns:android="http://schemas.android.com/apk/res/android" android:layout_width="match_parent" android:layout_height="match_parent" >

    <TextView  android:id="@+id/text0" android:layout_width="380dp" android:layout_height="380dp" android:layout_gravity="center" android:background="#f00"/>

    <TextView  android:id="@+id/text1" android:layout_width="340dp" android:layout_height="340dp" android:layout_gravity="center" android:background="#0f0"/>

    <TextView  android:id="@+id/text2" android:layout_width="300dp" android:layout_height="300dp" android:layout_gravity="center" android:background="#00f"/>

    <TextView  android:id="@+id/text3" android:layout_width="260dp" android:layout_height="260dp" android:layout_gravity="center" android:background="#f0f"/>

    <TextView  android:id="@+id/text4" android:layout_width="220dp" android:layout_height="220dp" android:layout_gravity="center" android:background="#0ff"/>

</FrameLayout>
package com.phone.hty.myapplication;
import android.os.Bundle;
import android.os.Handler;
import android.os.Message;
import android.support.v7.app.AppCompatActivity;
import android.widget.TextView;
import java.util.Timer;
import java.util.TimerTask;
public class MainActivity extends AppCompatActivity {
private int currentColor = 0;
final int[] colors = new int[]{
R.color.color1, R.color.color2, R.color.color3, R.color.color4, R.color.color5,
};
final int[] names = new int[]{
R.id.text0,
R.id.text1,
R.id.text2,
R.id.text3,
R.id.text4,
};
TextView[] textViews = new TextView[names.length];
Handler handler = new Handler() {
@Override
public void handleMessage(Message msg) {
if (msg.what == 0123) {
for (int i = 0; i < names.length; i++) {
textViews[i].setBackgroundResource(colors[(i
+ currentColor) % names.length]); }
currentColor++;
}
super.handleMessage(msg);
}
};
@Override
protected void onCreate(Bundle savedInstanceState) {
super.onCreate(savedInstanceState);
setContentView(R.layout.smxc_demo_linearlayout);
for (int i = 0; i < names.length; i++)
{
textViews[i] = (TextView) findViewById(names[i]);
}
// 定义一个线程周期性的改变currentColor变量值
new Timer().schedule(new TimerTask()
{
@Override
public void run()
{
// 发送一条空消息通知系统改变6个TextView组件的背景色
handler.sendEmptyMessage(0123);
}
}, 0, 200);
}
}一个错误出现了

空指针异常哎
一起来找error,最后是setContentView(R.layout.smxc_demo_linearlayout);
加载错布局了、粗心呢!
setContentView(R.layout.smxc_demo_framelayout);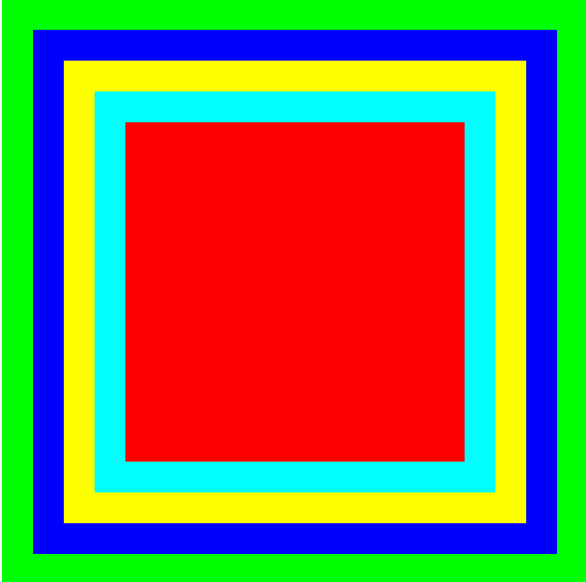
RelativeLayout布局
相对于父控件的属性,只能写true或者false
android:layout_alignParentBottom=””
android:layout_alignParentTop=””
android:layout_alignParentEnd=””
android:layout_alignParentLeft=””
android:layout_alignParentRight=””
android:layout_alignParentStart=””
android:layout_centerInParent=””
android:layout_centerHorizontal=””
android:layout_centerVertical=””
有两类一个是alignParent然后是center类填写其他控件的id
android:layout_alignTop=””
android:layout_toEndOf=””
android:layout_toLeftOf=””
android:layout_toRightOf=””
android:layout_toStartOf=””
android:layout_marginTop=””
android:layout_above=””
android:layout_below=””
android:layout_alignBottom=””
android:layout_alignLeft=””
大致分为3类一是layout—to类然后是above、below最后一类是layout_align
<RelativeLayout
    xmlns:android="http://schemas.android.com/apk/res/android"
    xmlns:tools="http://schemas.android.com/tools"
    android:layout_width="match_parent"
    android:layout_height="match_parent"
    android:paddingBottom="@dimen/activity_vertical_margin"
    android:paddingLeft="@dimen/activity_horizontal_margin"
    android:paddingRight="@dimen/activity_horizontal_margin"
    android:paddingTop="@dimen/activity_vertical_margin"
    tools:context="com.phone.hty.myapplication.MainActivity">

    <ImageView
        android:id="@+id/center"
        android:layout_width="wrap_content"
        android:layout_height="wrap_content"
        android:src="@drawable/中心"
        android:layout_centerInParent="true"/>
    <ImageView
        android:layout_width="wrap_content"
        android:layout_height="wrap_content"
        android:background="@drawable/下"
        android:layout_below="@id/center"
        android:layout_alignRight="@id/center"/>
    <ImageView
        android:id="@+id/right"
        android:layout_width="wrap_content"
        android:layout_height="wrap_content"
        android:background="@drawable/右"
        android:layout_toRightOf="@id/center"
        android:layout_alignBottom="@id/center"/>
    <ImageView
        android:id="@+id/left"
        android:layout_width="wrap_content"
        android:layout_height="wrap_content"
        android:background="@drawable/左"
        android:layout_toLeftOf="@id/center"
        android:layout_alignBottom="@id/center"/>
    <ImageView
        android:layout_width="wrap_content"
        android:layout_height="wrap_content"
        android:background="@drawable/上"
        android:layout_above="@id/center"
        android:layout_alignRight="@id/center"/>
    <ImageView
        android:layout_width="wrap_content"
        android:layout_height="wrap_content"
        android:background="@drawable/右上"
        android:layout_above="@id/right"
        android:layout_alignRight="@id/right"/>
    <ImageView
        android:layout_width="wrap_content"
        android:layout_height="wrap_content"
        android:background="@drawable/右下"
        android:layout_below="@id/right"
        android:layout_alignRight="@id/right"/>
    <ImageView
        android:layout_width="wrap_content"
        android:layout_height="wrap_content"
        android:background="@drawable/左上"
        android:layout_above="@id/left"
        android:layout_alignRight="@id/left"/>
    <ImageView
        android:layout_width="wrap_content"
        android:layout_height="wrap_content"
        android:background="@drawable/左下"
        android:layout_below="@id/left"
        android:layout_alignRight="@id/left"/>
</RelativeLayout> 
<?xml version="1.0" encoding="utf-8"?>
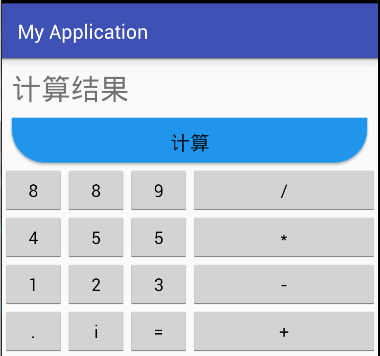
<GridLayout xmlns:android="http://schemas.android.com/apk/res/android" android:layout_width="match_parent" android:layout_height="wrap_content" android:columnCount="4" android:rowCount="6" android:id="@+id/gl">
<TextView android:layout_width="match_parent" android:layout_height="wrap_content" android:layout_columnSpan="4" android:text="计算结果" android:textSize="30dp" android:padding="10dp"/>
<Button android:layout_columnSpan="4" android:layout_height="50dp" android:layout_width="match_parent" android:padding="10dp" android:text="计算" android:textSize="20sp" android:background="@drawable/a"/>
</GridLayout> private GridLayout mGridLayout;
String[] strings = new String[]{
"8", "8", "9", "/", "4", "5", "5", "*", "1", "2", "3", "-", ".", "i", "=", "+"
};
@Override
protected void onCreate(Bundle savedInstanceState) {
super.onCreate(savedInstanceState);
setContentView(R.layout.smxc_demo_gridlayout);
mGridLayout = (GridLayout) findViewById(R.id.gl);
for (int i = 0; i < strings.length; i++) {
Button button = new Button(this);
button.setText(strings[i]);
GridLayout.Spec rowSpace = GridLayout.spec(i / 4 + 2);
GridLayout.Spec columnSpace = GridLayout.spec(i % 4);
GridLayout.LayoutParams params = new GridLayout.LayoutParams(rowSpace, columnSpace);
params.setGravity(Gravity.FILL);
mGridLayout.addView(button, params);
}
本着把博客当成学习笔记来写的精神,每次在最后都写点小闲话
祝福妹妹在即到来的高考中金榜题名!!!!!!!!
今天不点名,不点名,不点名 哈哈哈哈