Android-启用系统相机拍摄图片并且显示
Android-启用系统相机拍摄图片并且显示
在安卓App里面最常用的就是拍摄图片,然后引用该图片,比如微信换头像,朋友圈发图片等
等之类的,最近复习到这个点了,写个demo复习一下。
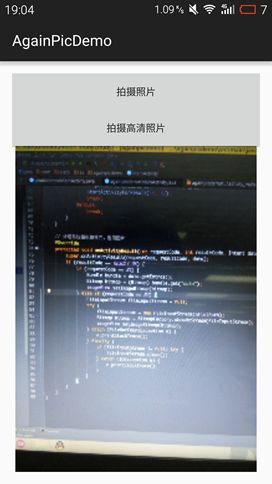
先来使用第一种方式,返回结果是缩略图的方式,并不是原图
布局文件:
activity_main.xml
<LinearLayout xmlns:android="http://schemas.android.com/apk/res/android" xmlns:tools="http://schemas.android.com/tools" android:layout_width="match_parent" android:layout_height="match_parent" android:paddingLeft="@dimen/activity_horizontal_margin" android:paddingRight="@dimen/activity_horizontal_margin" android:paddingTop="@dimen/activity_vertical_margin" android:paddingBottom="@dimen/activity_vertical_margin" android:orientation="vertical" tools:context=".MainActivity">

   <Button  android:id="@+id/id_photo1" android:text="拍摄照片" android:layout_width="match_parent" android:layout_height="wrap_content" />

    <Button  android:id="@+id/id_photo2" android:text="拍摄高清照片" android:layout_width="match_parent" android:layout_height="wrap_content" />

    <ImageView  android:id="@+id/id_image" android:layout_width="match_parent" android:layout_height="match_parent" />

</LinearLayout>
首先使用Intent来调用相机
 it = new Intent(MediaStore.ACTION_IMAGE_CAPTURE);
startActivityForResult(it, R1);之后在重写onActivityResult方法接收返回的图片结果
   // 处理系统相机拍摄完,返回图片
    @Override
    protected void onActivityResult(int requestCode, int resultCode, Intent data) {
        super.onActivityResult(requestCode, resultCode, data);
        if (resultCode == RESULT_OK) {
            if (requestCode == R1) {
                Bundle bundle = data.getExtras();
                Bitmap bitmap = (Bitmap) bundle.get("data");
                imageView.setImageBitmap(bitmap);
            }
        }
    }
MainActivity.java
package com.xieth.as.againpicdemo;

import android.content.Intent;
import android.graphics.Bitmap;
import android.os.Bundle;
import android.provider.MediaStore;
import android.support.v7.app.AppCompatActivity;
import android.view.View;
import android.widget.Button;
import android.widget.ImageView;

public class MainActivity extends AppCompatActivity implements View.OnClickListener {

    private Button btn1;
    private Button btn2;
    private ImageView imageView;
    private Intent it;

    private static final int R1 = 1; // 缩略图标志
    private static final int R2 = 2; // 高清图标志

    @Override
    protected void onCreate(Bundle savedInstanceState) {
        super.onCreate(savedInstanceState);
        setContentView(R.layout.activity_main);
        initViews();
    }

    private void initViews() {
        btn1 = (Button) findViewById(R.id.id_photo1);
        btn2 = (Button) findViewById(R.id.id_photo2);
        btn1.setOnClickListener(this);
        btn2.setOnClickListener(this);
        imageView = (ImageView) findViewById(R.id.id_image);
    }

    @Override
    public void onClick(View v) {
        int id = v.getId();
        switch (id) {
            case R.id.id_photo1:
                // 返回结果是缩略图
                it = new Intent(MediaStore.ACTION_IMAGE_CAPTURE);
                startActivityForResult(it, R1);
                break;
            case R.id.id_photo2:
                break;
            default:
                break;
        }
    }

    // 处理系统相机拍摄完,返回图片
    @Override
    protected void onActivityResult(int requestCode, int resultCode, Intent data) {
        super.onActivityResult(requestCode, resultCode, data);
        if (resultCode == RESULT_OK) {
            if (requestCode == R1) {
                Bundle bundle = data.getExtras();
                Bitmap bitmap = (Bitmap) bundle.get("data");
                imageView.setImageBitmap(bitmap);
            }
        }
    }
}但是这只是一张缩略图而已,并不是原图。
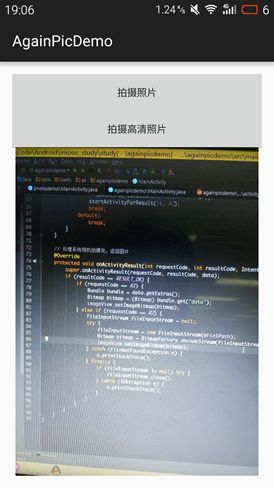
得到原图的方式
首先是获取SD卡的目录:
  mFielPath = Environment.getExternalStorageDirectory().getPath();
  mFielPath += "/t1.png";
然后进行事件监听
case R.id.id_photo2:
 // 返回结果是高清的原图
 it = new Intent(MediaStore.ACTION_IMAGE_CAPTURE);
 Uri uri = Uri.fromFile(new File(mFielPath));
 it.putExtra(MediaStore.EXTRA_OUTPUT, uri);
 startActivityForResult(it, R2);
break;最后再进行图片的获取,返回结果是Bitmap
    FileInputStream fileInputStream = null;
    try {
        fileInputStream = new FileInputStream(mFielPath);
        Bitmap bitmap = BitmapFactory.decodeStream(fileInputStream);
        imageView.setImageBitmap(bitmap);
    } catch (FileNotFoundException e) {
        e.printStackTrace();
    } finally {
        if (fileInputStream != null) try {
            fileInputStream.close();
        } catch (IOException e) {
            e.printStackTrace();
        }
    }
全部代码:
package com.xieth.as.againpicdemo;

import android.content.Intent;
import android.graphics.Bitmap;
import android.graphics.BitmapFactory;
import android.net.Uri;
import android.os.Bundle;
import android.os.Environment;
import android.provider.MediaStore;
import android.support.v7.app.AppCompatActivity;
import android.view.View;
import android.widget.Button;
import android.widget.ImageView;

import java.io.File;
import java.io.FileInputStream;
import java.io.FileNotFoundException;
import java.io.IOException;

public class MainActivity extends AppCompatActivity implements View.OnClickListener {

    private Button btn1;
    private Button btn2;
    private ImageView imageView;
    private Intent it;

    private static final int R1 = 1; // 缩略图标志
    private static final int R2 = 2; // 高清图标志

    private String mFielPath;

    @Override
    protected void onCreate(Bundle savedInstanceState) {
        super.onCreate(savedInstanceState);
        setContentView(R.layout.activity_main);
        initViews();

        mFielPath = Environment.getExternalStorageDirectory().getPath();
        mFielPath += "/t1.png";

    }

    private void initViews() {
        btn1 = (Button) findViewById(R.id.id_photo1);
        btn2 = (Button) findViewById(R.id.id_photo2);
        btn1.setOnClickListener(this);
        btn2.setOnClickListener(this);
        imageView = (ImageView) findViewById(R.id.id_image);
    }

    @Override
    public void onClick(View v) {
        int id = v.getId();
        switch (id) {
            case R.id.id_photo1:
                // 返回结果是缩略图
                it = new Intent(MediaStore.ACTION_IMAGE_CAPTURE);
                startActivityForResult(it, R1);
                break;
            case R.id.id_photo2:
                // 返回结果是高清的原图
                it = new Intent(MediaStore.ACTION_IMAGE_CAPTURE);
                Uri uri = Uri.fromFile(new File(mFielPath));
                it.putExtra(MediaStore.EXTRA_OUTPUT, uri);
                startActivityForResult(it, R2);
                break;
            default:
                break;
        }
    }

    // 处理系统相机拍摄完,返回图片
    @Override
    protected void onActivityResult(int requestCode, int resultCode, Intent data) {
        super.onActivityResult(requestCode, resultCode, data);
        if (resultCode == RESULT_OK) {
            if (requestCode == R1) {
                Bundle bundle = data.getExtras();
                Bitmap bitmap = (Bitmap) bundle.get("data");
                imageView.setImageBitmap(bitmap);
            } else if (requestCode == R2) {
                FileInputStream fileInputStream = null;
                try {
                    fileInputStream = new FileInputStream(mFielPath);
                    Bitmap bitmap = BitmapFactory.decodeStream(fileInputStream);
                    imageView.setImageBitmap(bitmap);
                } catch (FileNotFoundException e) {
                    e.printStackTrace();
                } finally {
                    if (fileInputStream != null) try {
                        fileInputStream.close();
                    } catch (IOException e) {
                        e.printStackTrace();
                    }
                }
            }
        }
    }
}
最后在配置文件加上权限:
<uses-permission android:name="android.permission.WRITE_EXTERNAL_STORAGE"></uses-permission>

