Struts+Spring整合
整合Struts+Spring框架:
步骤:1)用MyEclipse搭建Struts框架和Spring框架,自动生成响应的配置文件
2)编写前台和后台简易的逻辑,实现框架的整合,理解整合要点。
利用MyEclipse工具实现环境搭建非常简单,搜一下相应文档资料,大胆尝试。
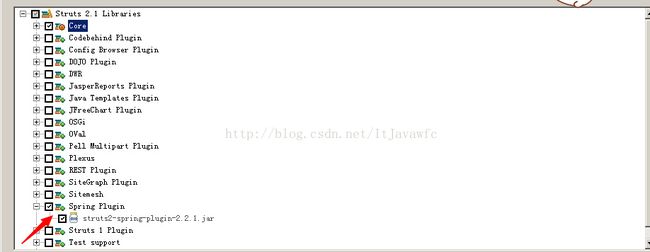
在生成Struts框架的时候,一定要将Spring的插件选中:
框架搭建以后,生成的struts.xml文件、applicationContext.xml、web.xml文件如下:
<?xml version="1.0" encoding="UTF-8" ?>
<!DOCTYPE struts PUBLIC "-//Apache Software Foundation//DTD Struts Configuration 2.1//EN" "http://struts.apache.org/dtds/struts-2.1.dtd">
<struts>

</struts>
<?xml version="1.0" encoding="UTF-8"?>
<beans
	xmlns="http://www.springframework.org/schema/beans"
	xmlns:xsi="http://www.w3.org/2001/XMLSchema-instance"
	xmlns:p="http://www.springframework.org/schema/p"
	xsi:schemaLocation="http://www.springframework.org/schema/beans http://www.springframework.org/schema/beans/spring-beans-3.1.xsd">


</beans>
<?xml version="1.0" encoding="UTF-8"?>
<web-app xmlns:xsi="http://www.w3.org/2001/XMLSchema-instance" xmlns="http://java.sun.com/xml/ns/javaee" xsi:schemaLocation="http://java.sun.com/xml/ns/javaee http://java.sun.com/xml/ns/javaee/web-app_3_0.xsd" version="3.0">
  <display-name>w</display-name>
  <filter>
    <filter-name>struts2</filter-name>
    <filter-class>org.apache.struts2.dispatcher.ng.filter.StrutsPrepareAndExecuteFilter</filter-class>
  </filter>
  <filter-mapping>
    <filter-name>struts2</filter-name>
    <url-pattern>/*</url-pattern>
  </filter-mapping>
 <strong> <listener>
    <listener-class>org.springframework.web.context.ContextLoaderListener</listener-class>
  </listener>
  <context-param>
    <param-name>contextConfigLocation</param-name>
    <param-value>classpath:applicationContext.xml</param-value>
  </context-param></strong>
</web-app>
理解一下Struts2中struts2-spring-plugin-2.3--.jar包的必要性:一旦web应用中安装了spring 插件,即可充分利用该插件的功能。
1)可以通过Spring来创建所有的Action
2)在Struts创建了某个对象之后,Spring将其以来的组件自动注入该对象。
3)提供拦截器来完成自动装配
除此之外,在使用Spring之前,必须完成Spring容器的初始化。为了完成 Spring的初始化,Spring提供了一个ContextLoaderListener类,该类可以作为Web应用的Listener使用,它会在Web应用启动时自动查找WEB-INF/下的applicationContext.xml配置文件,根据配置创建容器。
 <listener>
    <listener-class>org.springframework.web.context.ContextLoaderListener</listener-class>
  </listener>
多个配置文件时:
有这样的配置即可
<context-param>
    <param-name>contextConfigLocation</param-name>
    <param-value>classpath:applicationContext.xml</param-value>
</context-param>
知道了配置之后,下面举个实际的小框架实现框架整合效果:
项目包图
代码:
LoginAction.java
package org.crazyit.struts2.action;

import com.opensymphony.xwork2.Action;

import org.crazyit.struts2.service.*;
public class LoginAction implements Action
{
	// 下面是用于封装用户请求参数的两个属性
	private String username;
	private String password;
	// 用于封装处理结果的属性
	private String tip;
	// 系统所用的业务逻辑组件
	private MyService ms;
	// 设值注入业务逻辑组件所必需的setter方法
	public void setMs(MyService ms)
	{
		this.ms = ms;
	}

	// username属性的setter和getter方法
	public void setUsername(String username)
	{
		this.username = username;
	}
	public String getUsername()
	{
		return this.username;
	}

	// password属性的setter和getter方法
	public void setPassword(String password)
	{
		this.password = password;
	}
	public String getPassword()
	{
		return this.password;
	}

	// tip属性的setter和getter方法
	public void setTip(String tip)
	{
		this.tip = tip;
	}
	public String getTip()
	{
		return this.tip;
	}

	// 处理用户请求的execute方法
	public String execute() throws Exception
	{
		// 调用业务逻辑组件的valid方法来验证用户输入的用户名和密码是否正确
		if (ms.valid(getUsername(), getPassword()))
		{
			setTip("哈哈,整合成功!");
			return SUCCESS;
		}
		else
		{
			return ERROR;
		}
	}
}
MyService接口
package org.crazyit.struts2.service;
// 定义业务逻辑组件的接口
public interface MyService
{
	boolean valid(String username , String pass);
}
MyService接口实现类 ,实现业务逻辑
package org.crazyit.struts2.service.impl;

import org.crazyit.struts2.service.*;

// 业务逻辑组件实现类,实现了业务逻辑组件接口
public class MyServiceImpl implements MyService
{
	// 根据用户输入的用户名、密码来判断登录是否成功
	// 实际应用中可能需要通过数据库记录进行判断
	public boolean valid(String username , String pass)
	{
		if (username.equals("wfc")
			&& pass.equals("wfc") )
		{
			return true;
		}
		return false;
	}
}
配置文件applicationContext.xml
<?xml version="1.0" encoding="UTF-8"?>
<beans
	xmlns="http://www.springframework.org/schema/beans"
	xmlns:xsi="http://www.w3.org/2001/XMLSchema-instance"
	xmlns:p="http://www.springframework.org/schema/p"
	xsi:schemaLocation="http://www.springframework.org/schema/beans http://www.springframework.org/schema/beans/spring-beans-3.1.xsd">
	<!-- 部署一个业务逻辑组件 -->
	<bean id="myService" class=
		"org.crazyit.struts2.service.impl.MyServiceImpl"/>
	<!-- 配置Struts 2控制器对应的Bean实例
	依赖注入业务逻辑组件 -->
	<bean id="loginAction" class="org.crazyit.struts2.action.LoginAction">
		<property name="ms" ref="myService"/>
	</bean>

	<!--
	<bean id="loginAction" class="org.crazyit.struts2.action.LoginAction" scope="prototype"
	p:ms-ref="myService"/>
		-->

</beans>
struts.xml
<?xml version="1.0" encoding="UTF-8" ?>
<!DOCTYPE struts PUBLIC "-//Apache Software Foundation//DTD Struts Configuration 2.1//EN" "http://struts.apache.org/dtds/struts-2.1.dtd">
<!-- Struts 2配置文件的根元素 -->
<struts>
	<constant name="struts.i18n.encoding" value="GBK"/>
	<package name="lee" extends="struts-default">
		<!-- 定义处理用户请求的Action,因此该Action由Spring负责创建
			所以此处的class属性不是实际处理类 -->
		<action name="loginPro" class="loginAction">
			<!-- 配置了两个视图页 -->
			<result name="error">/content/error.jsp</result>
			<result>/content/welcome.jsp</result>
		</action>
		<action name="*">
			<result>/content/{1}.jsp</result>
		</action>
	</package>
</struts>
登陆页面:Loginform.jsp
<%@ page contentType="text/html; charset=GBK" language="java" errorPage="" %>
<%@ taglib prefix="s" uri="/struts-tags"%>
<!DOCTYPE html>
<html>
<head>
	<meta http-equiv="Content-Type" content="text/html; charset=GBK" />
	<title>登录页面</title>
</head>
<body>
<h3>用户登录</h3>
<s:form action="loginPro">
	<s:textfield name="username" label="用户名"/>
	<s:textfield name="password" label="密码"/>
	<s:submit value="登录"/>
</s:form>
</body>
</html>
成功登陆:welcome.jsp
<%@ page contentType="text/html; charset=GBK" language="java" errorPage="" %>
<%@ taglib prefix="s" uri="/struts-tags"%>
<!DOCTYPE html>
<html>
<head>
	<meta name="author" content="Yeeku.H.Lee(CrazyIt.org)" />
	<meta http-equiv="Content-Type" content="text/html; charset=GBK" />
	<title>成功页面</title>
</head>
<body>
	您已经登录!
	<s:property value="tip"/>
</body>
</html>
登陆失败页面:error.jsp
<%@ page contentType="text/html; charset=GBK" language="java" errorPage="" %>
<!DOCTYPE html>
<html>
<head>
	<meta name="author" content="Yeeku.H.Lee(CrazyIt.org)" />
	<meta http-equiv="Content-Type" content="text/html; charset=GBK" />
	<title>错误页面</title>
</head>
<body>
	您不能登录!
</body>
</html>
实现效果:


