Android图片相关学习
Android中图片相关学习主要是动手实践,实现相关的功能需要参考API
案例1:加载图片到内存
如果我们让图片特别是高清图片加载到内存,处理方式如下:
Bitmap bitmap=BitmapFactory.decodeFile("/mnt/sdcard/photo.jpg");
iv.setImageBitmap(bitmap);
那么肯定会报内存溢出的。
对于高清图片来说,这个溢出不仅仅是容量不够【图片5m,而一个进程的内存只有4m】,还跟屏幕大小有关,如果说高清图片是2000*2000的分辨率,而手机屏幕知识480*320,那么手机瞬间就吃不消,图片是无法加载的。
解决:
WindowManager wm=getWindowManager();
		int screenWidth=wm.getDefaultDisplay().getWidth();
		int screenHeight=wm.getDefaultDisplay().getHeight();
		System.out.println("屏幕宽高:"+screenWidth+"-"+screenHeight);

		//2.得到图片的宽高。
				BitmapFactory.Options opts = new Options();//解析位图的附加条件
				opts.inJustDecodeBounds = true;//不去解析真实的位图,只是获取这个位图的头文件信息
				Bitmap bitmap = BitmapFactory.decodeFile("/mnt/sdcard/photo.jpg", opts);
				int bitmapWidth = opts.outWidth;
				int bitmapHeight = opts.outHeight;
				System.out.println("图片宽高: "+bitmapWidth+"-"+bitmapHeight);

		//3.计算缩放的比例
		int dx=bitmapWidth/screenWidth;
		int dy=bitmapHeight/screenHeight;
		int scale=1;
		if(dx>dy&&dy>1){
			System.out.println("按照水平方法缩放,缩放比例为"+dx);
			scale=dx;
		}

		if(dy>dx&&dx>1){
			System.out.println("按照垂直方法缩放,缩放比例:"+dy);
			scale = dy;
		}

		//4.缩放加载图片到内存
		opts.inSampleSize=scale;
		opts.inJustDecodeBounds=false;//真正去解析这个位图
		bitmap=BitmapFactory.decodeFile("/mnt/sdcard/photo.jpg", opts);
		iv.setImageBitmap(bitmap);

	}

}
这个地方时通过API,通过计算横屏与竖屏与机子屏幕比例的大小来缩放。
案例2:实现图片的拷贝
实例代码
public class MainActivity extends Activity {
	private ImageView iv1,iv2;
	private Bitmap srcBmp;
	private Bitmap alterBitmap;
	@Override
	protected void onCreate(Bundle savedInstanceState) {
		super.onCreate(savedInstanceState);
		setContentView(R.layout.activity_main);
        iv1=(ImageView) findViewById(R.id.iv1);
        iv2=(ImageView) findViewById(R.id.iv2);
	    //给第一个imageview默认设置一个位图
		srcBmp=BitmapFactory.decodeResource(getResources(),R.drawable.ic_launcher);
        iv1.setImageBitmap(srcBmp);
        //创建一个原图的副本,可修改创建的是一个空白的图形
        alterBitmap=Bitmap.createBitmap(srcBmp.getWidth()*2, srcBmp.getHeight()*2,srcBmp.getConfig());
	}
	/*
	 * 创建原图bm的一个拷贝,副本
	 */

	public void click(View view){
		//1.准备一个画板,在上面放上准备好的空白的位图
		Canvas canvas=new Canvas(alterBitmap);
		//2.准备一支画笔
		Paint paint=new Paint();
		paint.setColor(Color.BLACK);
		//3.画画
		Matrix m=new Matrix();
		m.setScale(2.0f, 2.0f);
		canvas.drawBitmap(srcBmp, m, paint);
		//把原图的副本设置到界面上
		iv2.setImageBitmap(alterBitmap);
	}

}
这个案例或者图片的很多案例代码都需要了解API,即可,然后熟悉编码步骤。
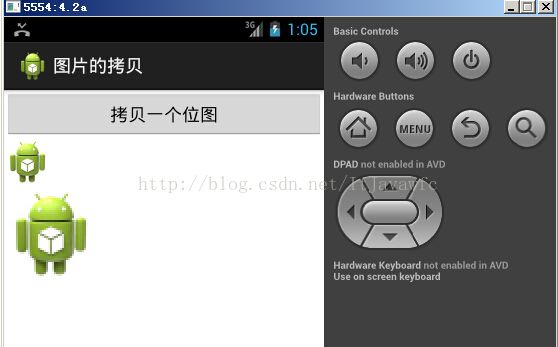
实现效果如下:
案例3:撕衣服,实现鼠标按在屏幕上后,图片透明然后显示图片下面默认的图片,当松开鼠标后,发出声音
public class MainActivity extends Activity {
	private ImageView iv;
	// 可以修改的位图
	private Bitmap alertBitmap;
	private Canvas canvas;

	@Override
	protected void onCreate(Bundle savedInstanceState) {
		super.onCreate(savedInstanceState);
		setContentView(R.layout.activity_main);
		iv = (ImageView) findViewById(R.id.iv);
		Bitmap bitmap = BitmapFactory.decodeResource(getResources(),
				R.drawable.pre);
		// 创建一个空白的原图的拷贝
		alertBitmap = Bitmap.createBitmap(bitmap.getWidth(),
				bitmap.getHeight(), bitmap.getConfig());
		canvas = new Canvas(alertBitmap);
		Paint paint = new Paint();
		paint.setColor(Color.BLACK);
		canvas.drawBitmap(bitmap, new Matrix(), paint);
		iv.setImageBitmap(alertBitmap);
		iv.setOnTouchListener(new OnTouchListener() {
			@Override
			public boolean onTouch(View v, MotionEvent event) {
				switch (event.getAction()) {
				case MotionEvent.ACTION_DOWN:// 手指按下屏幕
					System.out.println("action down");
					break;
				case MotionEvent.ACTION_MOVE:// 手指在屏幕上移动
					int x = (int) event.getX();
					int y = (int) event.getY();
					System.out.println("设置("+x+","+y+")透明颜色");
					for(int i=-4;i<5;i++){
						for(int j=-4;j<5;j++){
							try{
							alertBitmap.setPixel(x+i, y+j, Color.TRANSPARENT);
							}catch (Exception e) {
								// TODO: handle exception
							}
						}
					}
					iv.setImageBitmap(alertBitmap);
					break;
				case MotionEvent.ACTION_UP:// 手指离开屏幕
					MediaPlayer.create(getApplicationContext(), R.raw.higirl).start();
					break;
				}
				return true;//可以重复循环的处理事件
			}
		});
	}

}
运行效果:
小结一下:
Load图形到内存
1.数码相机照片特别大3m以上,内存吃不消,只显示原图的1/8
通过BitmapFactory.Options 来实现
BitmapFactory.Options bmpFactoryOptions = new BitmapFactory.Options();
bmpFactoryOptions.inSampleSize = 8;
Bitmap bmp = BitmapFactory.decodeFile(imageFilePath, bmpFactoryOptions);
imv.setImageBitmap(bmp);

2.根据当前屏幕分辨率的大小,加载图片
Display currentDisplay = getWindowManager().getDefaultDisplay();
int dw = currentDisplay.getWidth();
int dh = currentDisplay.getHeight();

BitmapFactory.Options bmpFactoryOptions = new BitmapFactory.Options();
bmpFactoryOptions.inJustDecodeBounds = true;
Bitmap bmp = BitmapFactory.decodeFile(imageFilePath, bmpFactoryOptions);
int heightRatio = (int)Math.ceil(bmpFactoryOptions.outHeight/(float)dh);
int widthRatio = (int)Math.ceil(bmpFactoryOptions.outWidth/(float)dw);
Log.v("HEIGHTRATIO",""+heightRatio);
Log.v("WIDTHRATIO",""+widthRatio);
//判断是否要进行缩放
if (heightRatio > 1 && widthRatio > 1)
{
if (heightRatio > widthRatio)
{
//高度变化大,按高度缩放
bmpFactoryOptions.inSampleSize = heightRatio;
}
else
{
// 宽度变化大,按宽度缩放
bmpFactoryOptions.inSampleSize = widthRatio;
}
}
bmpFactoryOptions.inJustDecodeBounds = false;
bmp = BitmapFactory.decodeFile(imageFilePath, bmpFactoryOptions);
创建bitmap拷贝
Bitmap bmp = BitmapFactory.decodeStream(getContentResolver().


