详解Gson使用(五)实现百度翻译功能
项目地址:
Github : https://github.com/smileysx/GsonTestOschina:https://git.oschina.net/ysx_xx/GsonText
详解Gson使用(一)简单对象转化
http://blog.csdn.net/a249900679/article/details/51385913
详解Gson使用(二)带泛型的List转化
http://blog.csdn.net/a249900679/article/details/51386028
详解Gson使用(三)使用注解
http://blog.csdn.net/a249900679/article/details/51386509
http://blog.csdn.net/a249900679/article/details/51386660
详解Gson使用(五)实现百度翻译功能
http://blog.csdn.net/a249900679/article/details/51386727
前几篇介绍了Gson的使用,json数据都是自己定义的,现在来实战一下,就用百度翻译为例子。
要用百度翻译api,我们先要注册百度账号,然后注册成为开发者,获得appid跟秘钥等信息。
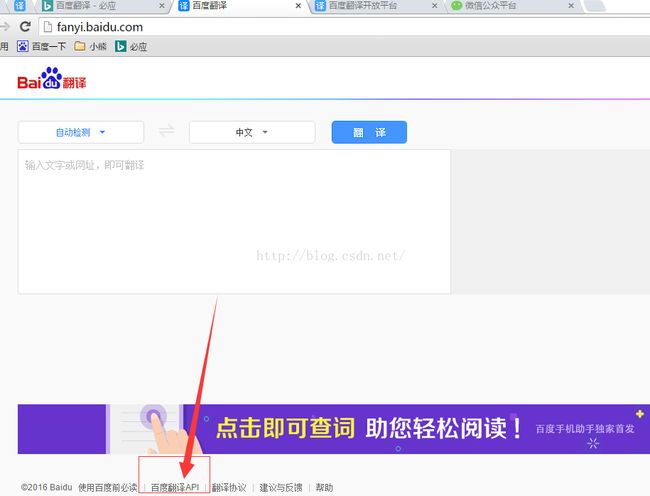
搜索百度翻译,点击百度翻译api
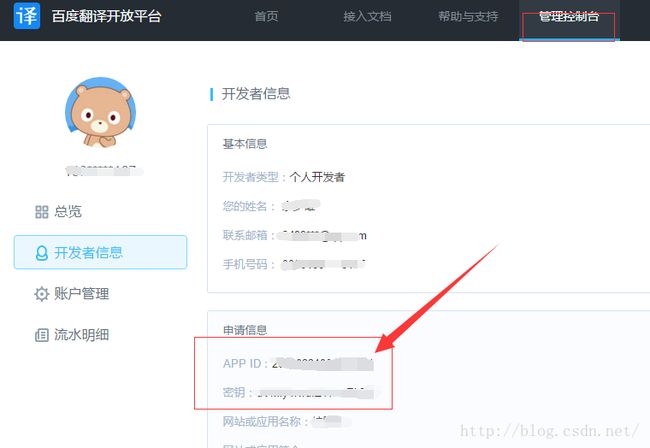
注册完成,在管理控制台->开发者信息页面就能看到appid跟秘钥,在后面会用到
接下来看看接入文档:

找到下面的签名生成方法:

根据方法生成sign的值,请求数据时用到。
下面有个拼接的例子:
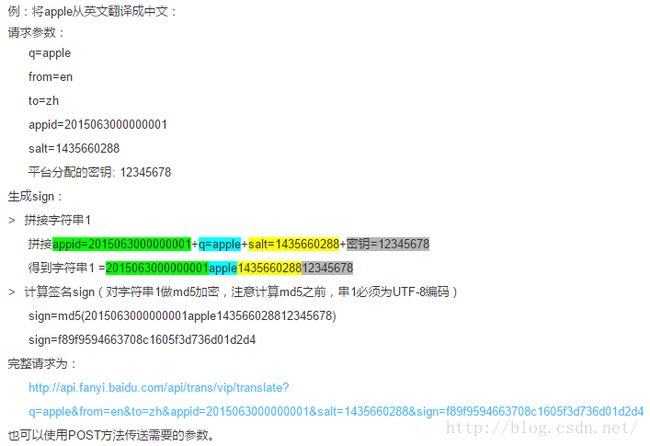
Salt是随机数,可以自己生成一个随机数
知道请求方法后,我们就可以来写代码了:
拼接生成MD5字符串/**
* 进行MD5加密
*/
params.add(new BasicNameValuePair("sign", MD5Utils.md5(APPID + "apple" + "1234567890" + PASSWORD)));
Post请求发送数据:
HttpPost httpPost = new HttpPost(URL);
List<NameValuePair> params = new ArrayList<NameValuePair>();
params.add(new BasicNameValuePair("q", "apple"));
params.add(new BasicNameValuePair("from", "zh"));
params.add(new BasicNameValuePair("to", "en"));
params.add(new BasicNameValuePair("appid", APPID));
params.add(new BasicNameValuePair("salt", "1234567890"));
先把结果打印出来看看:

发现用from,to,trans_result字段,其中trans_result字段是一个数组,里面有src跟dst字段,我们就可以根据这些设计一个bean:
ResultBean.java
public class ResultBean {
	private String from;
	private String to;
	private List<TransResultBean> trans_result;

	public ResultBean(String from, String to, List<TransResultBean> trans_result) {
		super();
		this.from = from;
		this.to = to;
		this.trans_result = trans_result;
	}

	public String getFrom() {
		return from;
	}

	public String getTo() {
		return to;
	}

	public List<TransResultBean> getTransResult() {
		return trans_result;
	}

	public void setFrom(String from) {
		this.from = from;
	}

	public void setTo(String to) {
		this.to = to;
	}

	public void setTransResult(List<TransResultBean> trans_result) {
		this.trans_result = trans_result;
	}

}
TransResultBean.java
public class TransResultBean {
	private String src;
	private String dst;

	public TransResultBean(String src, String dst) {
		super();
		this.src = src;
		this.dst = dst;
	}

	public String getSrc() {
		return src;
	}

	public String getDst() {
		return dst;
	}

	public void setSrc(String src) {
		this.src = src;
	}

	public void setDst(String dst) {
		this.dst = dst;
	}

}
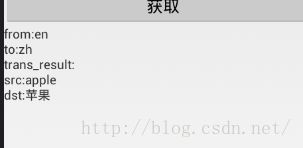
然后就可以开始解析了:
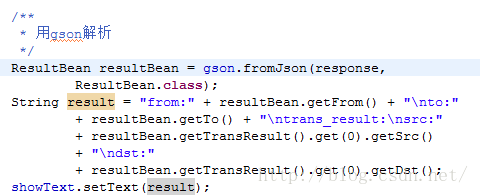
结果是这样:
完整代码:
public class MainActivity extends Activity implements OnClickListener {

	/**
	 * 请求成功
	 */
	private final static int SUCCESS = 1;
	/**
	 * 请求失败
	 */
	private final static int FAILE = 0;
	/**
	 * 显示数据
	 */
	private TextView showText;
	/**
	 * 发送按钮
	 */
	private Button send;
	private Gson gson;
	/**
	 * 请求地址
	 */
	private final static String URL = "http://api.fanyi.baidu.com/api/trans/vip/translate";
	/**
	 * 百度翻译appid
	 */
	private final static String APPID = "你的appid";
	/**
	 * 百度翻译秘钥
	 */
	private final static String PASSWORD = "你的秘钥";

	@Override
	protected void onCreate(Bundle savedInstanceState) {
		super.onCreate(savedInstanceState);
		setContentView(R.layout.activity_main);

		initData();
	}

	private void initData() {
		gson = new Gson();
		showText = (TextView) findViewById(R.id.showtext);
		send = (Button) findViewById(R.id.send);
		send.setOnClickListener(this);
	}

	@Override
	public void onClick(View v) {
		switch (v.getId()) {
		case R.id.send:
			send();
			break;
		}
	}

	@SuppressLint("HandlerLeak")
	private Handler mHandler = new Handler() {
		public void handleMessage(Message msg) {
			String response;
			switch (msg.what) {
			case SUCCESS:
				Log.d("status", "success");
				response = msg.obj.toString();

				/**
				 * 用gson解析
				 */
				ResultBean resultBean = gson.fromJson(response,
						ResultBean.class);
				String result = "from:" + resultBean.getFrom() + "\nto:"
						+ resultBean.getTo() + "\ntrans_result:\nsrc:"
						+ resultBean.getTransResult().get(0).getSrc()
						+ "\ndst:"
						+ resultBean.getTransResult().get(0).getDst();
				showText.setText(result);
				break;
			case FAILE:
				Log.d("status", "fail");
				response = msg.obj.toString();
				showText.setText(response);
				break;
			}
		};
	};

	private void send() {
		new Thread(new Runnable() {

			@Override
			public void run() {
				try {
					HttpClient httpClient = new DefaultHttpClient();

					HttpPost httpPost = new HttpPost(URL);
					List<NameValuePair> params = new ArrayList<NameValuePair>();
					params.add(new BasicNameValuePair("q", "apple"));
					params.add(new BasicNameValuePair("from", "en"));
					params.add(new BasicNameValuePair("to", "zh"));
					params.add(new BasicNameValuePair("appid", APPID));
					params.add(new BasicNameValuePair("salt", "1234567890"));

					/**
					 * 进行MD5加密
					 */
					params.add(new BasicNameValuePair("sign", MD5Utils
							.md5(APPID + "apple" + "1234567890" + PASSWORD)));
					UrlEncodedFormEntity urlEncodedFormEntity = new UrlEncodedFormEntity(
							params, "utf-8");
					httpPost.setEntity(urlEncodedFormEntity);

					HttpResponse httpResponse = httpClient.execute(httpPost);
					if (httpResponse.getStatusLine().getStatusCode() == 200) {
						HttpEntity entity = httpResponse.getEntity();
						String response = EntityUtils.toString(entity, "utf-8");

						Message message = new Message();
						message.what = SUCCESS;
						message.obj = response;
						mHandler.sendMessage(message);
					} else {
						Message message = new Message();
						message.what = FAILE;
						message.obj = "请求失败";
						mHandler.sendMessage(message);
					}
				} catch (Exception e) {
					Message message = new Message();
					message.what = FAILE;
					message.obj = "请求失败";
					mHandler.sendMessage(message);
					e.printStackTrace();
				}
			}

		}).start();
	}

}