ExtJs4学习(十二)layout布局
Fit布局
在Fit布局中,子元素将自动填满整个父容器。注意:在fit布局下,对其子元素设置宽度是无效的。如果在fit布局中放置了多个组件,则只会显示第一个子元素。典型的案例就是当客户要求一个window或panel中放置一个GRID组件,grid组件的大小会随着父容器的大小改变而改变。
示例代码:
Ext.application({
	name : 'HelloExt',
	launch : function() {
		Ext.create('Ext.container.Viewport', {
			layout : 'fit',
			items : [ {
				title : 'Hello Ext',
				html : 'Hello! Welcome to Ext JS.'
			} ]
		});
	}
});
Border布局
border布局:border布局也称边界布局,他将页面分隔为west,east,south,north,center这五个部分,我们需要在在其items中指定使用region参数为其子元素指定具体位置。
注意:north和south部分只能设置高度(height),west和east部分只能设置宽度(width)。north south west east区域变大,center区域就变小了。
参数 split:true 可以调整除了center四个区域的大小。
参数 collapsible:true 将激活折叠功能, title必须设置,因为折叠按钮是出现标题部分的。
center区域是必须使用的,而且center 区域不允许折叠。Center区域会自动填充其他区域的剩余空间。尤其在Extjs4.0中,当指定布局为border时,没有指定center区域时,会出现报错信息。
示例代码:
Ext.application({
	name : "HelloExt",
	launch : function() {
		Ext.create('Ext.panel.Panel', {
			width : 1024,
			height : 720,
			layout : 'border',
			items : [ {
				region : 'south',
				xtype : 'panel',
				height : 20,
				split : false,
				html : '欢迎登陆!',
				margins : '0 5 5 5'
			}, {
				title : 'West Region is collapsible',
				region : 'west',
				xtype : 'panel',
				margins : '5 0 0 5',
				width : 200,
				collapsible : true,
				id : 'west-region-container',
				layout : 'fit'
			}, {
				title : 'Center Region',
				region : 'center',
				xtype : 'panel',
				layout : 'fit',
				margins : '5 5 0 0',
				html : '在Extjs4中,center区域必项指定,否则会报错。'
			} ],
			renderTo : Ext.getBody()
		});
	}
});
Accordion布局
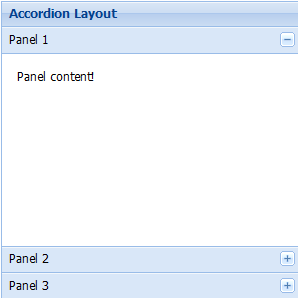
accordion布局:accordion布局也称手风琴布局,在accordion布局下,在任何时间里,只有一个面板处于激活状态。其中每个面边都支持展开和折叠。注意:只有Ext.Panels 和所有Ext.panel.Panel 子项,才可以使用accordion布局。
Ext.application({
	name : "HelloExt",
	launch : function() {
		Ext.create('Ext.panel.Panel', {
			title : 'Accordion Layout',
			width : 300,
			height : 300,
			x : 20,
			y : 20,
			layout : 'accordion',
			defaults : {
				bodyStyle : 'padding:15px'
			},
			layoutConfig : {
				titleCollapse : false,
				animate : true,
				activeOnTop : true
			},
			items : [ {
				title : 'Panel 1',
				html : 'Panel content!'
			}, {
				title : 'Panel 2',
				html : 'Panel content!'
			}, {
				title : 'Panel 3',
				html : 'Panel content!'
			} ],
			renderTo : Ext.getBody()
		});
	}
});
Card布局
Card布局:这种布局用来管理多个子组件,并且在任何时刻只能显示一个子组件。这种布局最常用的情况是向导模式,也就是我们所说的分布提交。
Card布局可以使用layout:'card'来创建。注意:由于此布局本身不提供分步导航功能,所以需要用户自己开发该功能。由于只有一个面板处于显示状态,那么在初始时,我们可以使用setActiveItem功能来指定某一个面板的显示。当要显示下一个面板或者上一个面板的时候,我们可以使用getNext()或getPrev()来得到下一个或上一个面板。然后使用setDisabled方法来设置面板的显示。另外,如果面板中显示的是FORM布局,我们在点击下一个面板的时候,处理FORM中提交的元素,通过AJAX将表单中的内容保存到数据库中或者SESSION中。

下面的示例代码展示了一个基本的Card布局,布局中并没有包含form元素,具体情况,还要根据实际情况进行处理:
Ext.application({
	name : 'HelloExt',
	launch : function() {
		var navigate = function(panel, direction) {
			var layout = panel.getLayout();
			layout[direction]();
			Ext.getCmp('move-prev').setDisabled(!layout.getPrev());
			Ext.getCmp('move-next').setDisabled(!layout.getNext());
		};
		Ext.create('Ext.panel.Panel', {
			title : 'Card布局示例',
			width : 300,
			height : 202,
			layout : 'card',
			activeItem : 0,
			x : 30,
			y : 60,
			bodyStyle : 'padding:15px',
			defaults : {
				border : false
			},
			bbar : [ {
				id : 'move-prev',
				text : 'Back',
				handler : function(btn) {
					navigate(btn.up("panel"), "prev");
				},
				disabled : true
			}, '->', {
				id : 'move-next',
				text : 'Next',
				handler : function(btn) {
					navigate(btn.up("panel"), "next");
				}
			} ],
			items : [ {
				id : 'card-0',
				html : '<h1>Welcome to the Wizard!</h1><p>Step 1 of 3</p>'
			}, {
				id : 'card-1',
				html : '<p>Step 2 of 3</p>'
			}, {
				id : 'card-2',
				html : '<h1>Congratulations!</h1><p>Step 3 of 3 - Complete</p>'
			} ],
			renderTo : Ext.getBody()
		});
	}
});
Anchor布局
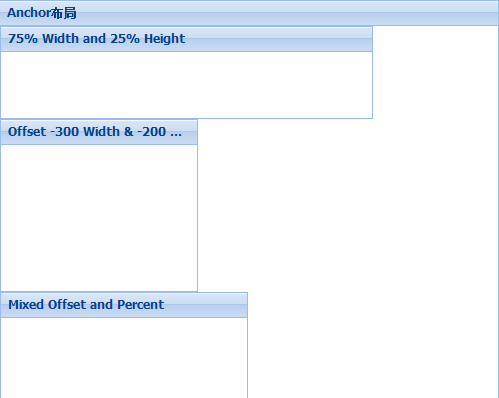
anchor布局将使组件固定于父容器的某一个位置,使用anchor布局的子组件尺寸相对于容器的尺寸,即父容器容器的大小发生变化时,使用anchor布局的组件会根据规定的规则重新渲染位置和大小。
AnchorLayout布局没有任何的直接配置选项(继承的除外),然而在使用AnchorLayout布局时,其子组件都有一个anchor属性,用来配置此子组件在父容器中所处的位置。
anchor属性为一组字符串,可以使用百分比或者是-数字来表示。配置字符串使用空格隔开,例如
anchor:'75% 25%',表示宽度为父容器的75%,高度为父容器的25%
anchor:'-300 -200',表示组件相对于父容器右边距为300,相对于父容器的底部位200
anchor:'-250 20%',混合模式,表示组件党对于如容器右边为250,高度为父容器的20%
Ext.application({
	name : 'HelloExt',
	launch : function() {
		Ext.create('Ext.Panel', {
			width : 500,
			height : 400,
			title : "Anchor布局",
			layout : 'anchor',
			x : 60,
			y : 80,
			renderTo : Ext.getBody(),
			items : [ {
				xtype : 'panel',
				title : '75% Width and 25% Height',
				anchor : '75% 25%'
			}, {
				xtype : 'panel',
				title : 'Offset -300 Width & -200 Height',
				anchor : '-300 -200'
			}, {
				xtype : 'panel',
				title : 'Mixed Offset and Percent',
				anchor : '-250 30%'
			} ]
		});
	}
});
Absolute布局
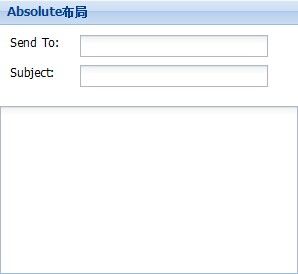
Absolute布局继承Ext.layout.container.Anchor 布局方式,并增加了X/Y配置选项对子组件进行定位,Absolute布局的目的是为了扩展布局的属性,使得布局更容易使用。
Ext.application({
	name : "HelloExt",
	launch : function() {
		Ext.create('Ext.form.Panel', {
			title : 'Absolute布局',
			width : 300,
			height : 275,
			x : 20,
			y : 90,
			layout : 'absolute',
			defaultType : 'textfield',
			items : [ {
				x : 10,
				y : 10,
				xtype : 'label',
				text : 'Send To:'
			}, {
				x : 80,
				y : 10,
				name : 'to',
				anchor : '90%'
			}, {
				x : 10,
				y : 40,
				xtype : 'label',
				text : 'Subject:'
			}, {
				x : 80,
				y : 40,
				name : 'subject',
				anchor : '90%'
			}, {
				x : 0,
				y : 80,
				xtype : 'textareafield',
				name : 'msg',
				anchor : '100% 100%'
			} ],
			renderTo : Ext.getBody()
		});
	}
});
Column布局
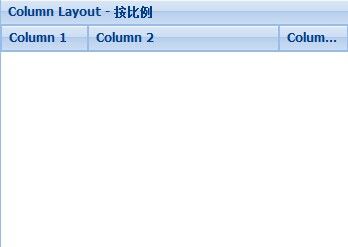
Column布局一般被称为列布局,这种布局的目的是为了创建一个多列的格式。其中每列的宽度,可以为其指定一个百分比或者是一个固定的宽度。
Column布局没有直接的配置选项(继承的除外),但Column布局支持一个columnWidth属性,在布局过程中,使用columnWidth指定每个面板的宽度。
注意:使用Column布局布局时,其子面板的所有columnWidth值加起来必须介于0~1之间或者是所占百分比。他们的总和应该是1。
另外,如果任何子面板没有指定columnWidth值,那么它将占满剩余的空间。
Ext.application({
	name : "HelloExt",
	launch : function() {
		Ext.create('Ext.panel.Panel', {
			title : 'Column Layout - 按比例',
			width : 350,
			height : 250,
			x : 20,
			y : 100,
			layout : 'column',
			items : [ {
				title : 'Column 1',
				columnWidth : .25
			}, {
				title : 'Column 2',
				columnWidth : .55
			}, {
				title : 'Column 3',
				columnWidth : .20
			} ],
			renderTo : Ext.getBody()
		});
	}
});
HBOX布局
要使用HBox布局方式,首先的熟悉下一下几个主要属性:
一、align:字符类型,指示组件在容器内的对齐方式。有如下几种属性。
1、top(默认):排列于容器顶端。
2、middle:垂直居中排列于容器中。
3、stretch:垂直排列且拉伸义填补容器高度
4、stretchmax:垂直拉伸,并且组件以最高高度的组件为准。
二、flex:数字类型,指示组件在容器中水平呈现方式,通俗的讲,就是指示组件在容器中的相对宽度。
三、pack : 字符类型,指示组件在容器的位置,有如下几种属性。
1、start(默认):组件在容器左边
2、center:组件在容器中间
3、end:组件在容器的右边
实例代码:
<!DOCTYPE html PUBLIC "-//W3C//DTD XHTML 1.0 Transitional//EN" "http://www.w3.org/TR/xhtml1/DTD/xhtml1-transitional.dtd">
<html xmlns="http://www.w3.org/1999/xhtml">
<head>
<meta http-equiv="Content-Type" content="text/html; charset=gb2312" />
<title>HBox实例</title>
<link rel="stylesheet" type="text/css" href="../extjs/resources/css/ext-all.css" />
<script type="text/javascript" src="../extjs/bootstrap.js"></script>
<script type="text/javascript" src="../extjs/locale/ext-lang-zh_CN.js"></script>
<script type="text/javascript" src="hbox.js"></script>
</head>
<body>
	<div id="d1"></div>
	<div id="d2"></div>
	<div id="d3"></div>
</body>
Ext.onReady(function() {
	var d1 = Ext.create('Ext.Panel', {
		title : 'HBox 顶对齐,且组件在容器的左边',
		frame : true,
		width : 600,
		height : 100,
		items : [ {
			anchor : '100%',
			layout : {
				type : 'hbox',
				padding : '10',
				pack : 'start',
				align : 'top'
			},
			defaults : {
				margins : '0 5 0 0'
			},
			items : [ {
				xtype : 'button',
				text : 'Button 1'
			}, {
				xtype : 'button',
				text : 'Button 2'
			}, {
				xtype : 'button',
				text : 'Button 3'
			}, {
				xtype : 'button',
				text : 'Button 4'
			} ]
		} ]
	})
	d1.render('d1');
	var d2 = Ext.create('Ext.Panel', {
		title : 'HBox 垂直对齐,且组件在容器的右边',
		frame : true,
		width : 600,
		height : 100,
		items : [ {
			anchor : '100%',
			layout : {
				type : 'hbox',
				padding : '10',
				align : 'middle',
				pack : 'end'
			},
			defaults : {
				margins : '0 5 0 0'
			},
			items : [ {
				xtype : 'button',
				text : 'Button 1'
			}, {
				xtype : 'button',
				text : 'Button 2'
			}, {
				xtype : 'button',
				text : 'Button 3'
			}, {
				xtype : 'button',
				text : 'Button 4'
			} ]
		} ]
	})
	d2.render('d2');
	var d3 = Ext.create('Ext.Panel', {
		title : 'HBox 垂直水平居中,幵且所有控件高度为最高控件的高度',
		frame : true,
		width : 600,
		height : 100,
		items : [ {
			anchor : '100%',
			layout : {
				type : 'hbox',
				padding : '5',
				align : 'stretchmax',
				pack : 'center'
			},
			defaults : {
				margins : '0 5 0 0'
			},
			items : [ {
				xtype : 'button',
				text : 'Small Size'
			}, {
				xtype : 'button',
				scale : 'medium',
				text : 'Medium Size'
			}, {
				xtype : 'button',
				scale : 'large',
				text : 'Large Size'
			} ]
		} ]
	})
	d3.render('d3');
});
VBOX布局
要使用VBox布局方式,首先的熟悉下一下几个主要属性:
一、align:字符类型,指示组件在容器内的对齐方式。有如下几种属性。
1、left(默认):排列于容器左侧。
2、center :控件在容器水平居中。
3、stretch:控件横向拉伸至容器大小
4、stretchmax:控件横向拉伸,宽度为最宽控件的宽。
二、flex:数字类型,指示组件在容器中水平呈现方式,通俗的讲,就是指示组件在容器中的相对宽度。
三、pack : 字符类型,指示组件在容器的位置,有如下几种属性。
1、start(默认):组件在容器上边
2、center:组件在容器中间
3、end:组件在容器的下边
Html代码
<!DOCTYPE html PUBLIC "-//W3C//DTD XHTML 1.0 Transitional//EN" "http://www.w3.org/TR/xhtml1/DTD/xhtml1-transitional.dtd">
<html xmlns="http://www.w3.org/1999/xhtml">
<head>
<meta http-equiv="Content-Type" content="text/html; charset=utf-8" />
<title>VBox实例</title>
<link rel="stylesheet" type="text/css" href="../extjs/resources/css/ext-all.css" />
<script type="text/javascript" src="../extjs/bootstrap.js"></script>
<script type="text/javascript" src="../extjs/locale/ext-lang-zh_CN.js"></script>
<script type="text/javascript" src="vbox.js"></script>
<style type="text/css">
html, body {
	font: normal 12px verdana;
	margin: 0;
	padding: 0;
	border: 0 none;
}
</style>
</head>
<body>
</body>
</html></span>
<span style="font-family:Courier New;">Ext.onReady(function() {
	var currentName;
	var replace = function(config, name) {
		var btns = Ext.getCmp('btns');
		if (name && name != currentName) {
			currentName = name;
			btns.remove(0);
			btns.add(Ext.apply(config));
		}
	};
	var viewport = Ext.create('Ext.Viewport', {
		layout:'border',
		items: [{
			id:'btns',
			region:'west',
			baseCls:'x-plain',
			split:true,
			width:150,
			minWidth: 100,
			maxWidth: 250,
			layout:'fit',
			margins: '5 0 5 5',
			items: {
				baseCls: 'x-plain',
				html: '<p style="padding:10px;color:#556677;font-size:11px;">点击右边的按钮查看效果</p>'
			}
		},{
			region:'center',
			margins: '5 5 5 0',
			layout: 'anchor',
			items:[{
				anchor: '100%',
				baseCls:'x-plain',
				layout: {
					type:'hbox',
					padding: 10
				},
				defaults:{
					margins:'0 5 0 0',
					pressed: false,
					toggleGroup:'btns',
					allowDepress: false
				},
				items: [{
					xtype:'button',
					text: 'Spaced / Align: left',
					handler: function(){
						replace({
							layout: {
								type:'vbox',
								padding:'5',
								align:'left'
							},
							defaults:{margins:'0 0 5 0'},
							items:[{
								xtype:'button',
								text: 'Button 1'
							},{
								xtype:'tbspacer',
								flex:1
							},{
								xtype:'button',
								text: 'Button 2'
							},{
								xtype:'button',
								text: 'Button 3'
							},{
								xtype:'button',
								text: 'Button 4',
								margins:'0'
							}]
						},
						'spaced');
					}
				},{
					xtype:'button',
					text: 'Multi-Spaced / Align: left',
					handler: function(){
						replace({
							layout: {
								type:'vbox',
								padding:'5',
								align:'left'
							},
							defaults:{margins:'0 0 5 0'},
							items:[{
								xtype:'button',
								text: 'Button 1'
							},{
								xtype:'tbspacer',
								flex:1
							},{
								xtype:'button',
								text: 'Button 2'
							},{
								xtype:'tbspacer',
								flex:1
							},{
								xtype:'button',
								text: 'Button 3'
							},{
								xtype:'tbspacer',
								flex:1
							},{
								xtype:'button',
								text: 'Button 4',
								margins:'0'
							}]
						}, 'multi spaced - align left');
					}
				},{
					xtype:'button',
					text: 'Align: left',
					handler: function(){
						replace({
							layout: {
								type:'vbox',
								padding:'5',
								align:'left'
							},
							defaults:{margins:'0 0 5 0'},
							items:[{
								xtype:'button',
								text: 'Button 1'
							},{
								xtype:'button',
								text: 'Button 2'
							},{
								xtype:'button',
								text: 'Button 3'
							},{
								xtype:'button',
								text: 'Button 4'
							}]
						}, 'align left');
					}
				},{
					xtype:'button',
					text: 'Align: center',
					handler: function(){
						replace({
							layout: {
								type:'vbox',
								padding:'5',
								align:'center'
							},
							defaults:{margins:'0 0 5 0'},
							items:[{
								xtype:'button',
								text: 'Button 1'
							},{
								xtype:'button',
								text: 'Button 2'
							},{
								xtype:'button',
								text: 'Button 3'
							},{
								xtype:'button',
								text: 'Button 4'
							}]
						}, 'align center');
					}
				},{
					xtype:'button',
					text: 'Align: stretch',
					handler: function(){
						replace({
							layout: {
								type:'vbox',
								padding:'5',
								align:'stretch'
							},
							defaults:{margins:'0 0 5 0'},
							items:[{
								xtype:'button',
								text: 'Button 1'
							},{
								xtype:'button',
								text: 'Button 2'
							},{
								xtype:'button',
								text: 'Button 3'
							},{
								xtype:'button',
								text: 'Button 4'
							}]
						}, 'align stretch');
					}
				},{
					xtype:'button',
					text: 'Align: stretchmax',
					handler: function(){
						replace({
							layout: {
								type:'vbox',
								padding:'5',
								align:'stretchmax'
							},
							defaults:{margins:'0 0 5 0'},
							items:[{
								xtype:'button',
								text: 'Jamie'
							},{
								xtype:'button',
								text: 'Aaron'
							},{
								xtype:'button',
								text: 'Tommy'
							},{
								xtype:'button',
								text: 'Ed '
							}]
						}, 'align stretchmax');
					}
				}]
			},{
				anchor: '100%',
				baseCls:'x-plain',
				layout: {
					type:'hbox',
					padding: '0 10 10'
				},
				defaults:{
					margins:'0 5 0 0',
					pressed: false,
					toggleGroup:'btns',
					allowDepress: false
				},
				items: [{
					xtype:'button',
					text: 'Flex: Even / Align: center',
					handler: function(){
						replace({
							layout: {
								type:'vbox',
								padding:'5',
								align:'center'
							},
							defaults:{margins:'0 0 5 0'},
							items:[{
								xtype:'button',
								text: 'Button 1',
								flex:1
							},{
								xtype:'button',
								text: 'Button 2',
								flex:1
							},{
								xtype:'button',
								text: 'Button 3',
								flex:1
							},{
								xtype:'button',
								text: 'Button 4',
								flex:1,
								margins:'0'
							}]
						}, 'align flex even');
					}
				},{
					xtype:'button',
					text: 'Flex: Ratio / Align: center',
					handler: function(){
						replace({
							layout: {
								type:'vbox',
								padding:'5',
								align:'center'
							},
							defaults:{margins:'0 0 5 0'},
							items:[{
								xtype:'button',
								text: 'Button 1',
								flex:1
							},{
								xtype:'button',
								text: 'Button 2',
								flex:1
							},{
								xtype:'button',
								text: 'Button 3',
								flex:1
							},{
								xtype:'button',
								text: 'Button 4',
								flex:3,
								margins:'0'
							}]
						}, 'align flex ratio');
					}
				},{
					xtype:'button',
					text: 'Flex + Stretch',
					handler: function(){
						replace({
							layout: {
								type:'vbox',
								padding:'5',
								align:'stretch'
							},
							defaults:{margins:'0 0 5 0'},
							items:[{
								xtype:'button',
								text: 'Button 1',
								flex:1
							},{
								xtype:'button',
								text: 'Button 2',
								flex:1
							},{
								xtype:'button',
								text: 'Button 3',
								flex:1
							},{
								xtype:'button',
								text: 'Button 4',
								flex:3,
								margins:'0'
							}]
						}, 'align flex + stretch');
					}
				},{
					xtype:'button',
					text: 'Pack: start / Align: center',
					handler: function(){
						replace({
							layout: {
								type:'vbox',
								padding:'5',
								pack:'start',
								align:'center'
							},
							defaults:{margins:'0 0 5 0'},
							items:[{
								xtype:'button',
								text: 'Button 1'
							},{
								xtype:'button',
								text: 'Button 2'
							},{
								xtype:'button',
								text: 'Button 3'
							},{
								xtype:'button',
								text: 'Button 4'
							}]
						}, 'align pack start + align center');
					}
				},{
					xtype:'button',
					text: 'Pack: center / Align: center',
					handler: function(){
						replace({
							layout: {
								type:'vbox',
								padding:'5',
								pack:'center',
								align:'center'
							},
							defaults:{margins:'0 0 5 0'},
							items:[{
								xtype:'button',
								text: 'Button 1'
							},{
								xtype:'button',
								text: 'Button 2'
							},{
								xtype:'button',
								text: 'Button 3'
							},{
								xtype:'button',
								text: 'Button 4',
								margins:'0'
							}]
						}, 'align pack center + align center');
					}
				},{
					xtype:'button',
					text: 'Pack: end / Align: center',
					handler: function(){
						replace({
							layout: {
								type:'vbox',
								padding:'5',
								pack:'end',
								align:'center'
							},
							defaults:{margins:'0 0 5 0'},
							items:[{
								xtype:'button',
								text: 'Button 1'
							},{
								xtype:'button',
								text: 'Button 2'
							},{
								xtype:'button',
								text: 'Button 3'
							},{
								xtype:'button',
								text: 'Button 4',
								margins:'0'
							}]
						}, 'align pack end + align center');
					}
				}]
			}]
		}]
	});
});


