最近在研究Unity3D脚本批量打包,比如在Android平台下各种不同分辨率和不同内存大小的机器,可能还有不同的渠道包,不同渠道可能用的SDK都不一样,这一切的一切都表明你的代码无法做到自适应的,除非批量打包提供各个平台的预定义标签#define 。
Unity默认提供了一些预定义标签如:
UNITY_EDITOR : 编辑器模式下。
UNITY_STANDALONE:PC Mac Linux模型下。
UNITY_IPHONE:IOS模式下。
UNITY_ANDROID:ANDROID模式下。
还有很多预定义标签、大家可以在这里看到:http://docs.unity3d.com/Documentation/Manual/PlatformDependentCompilation.html
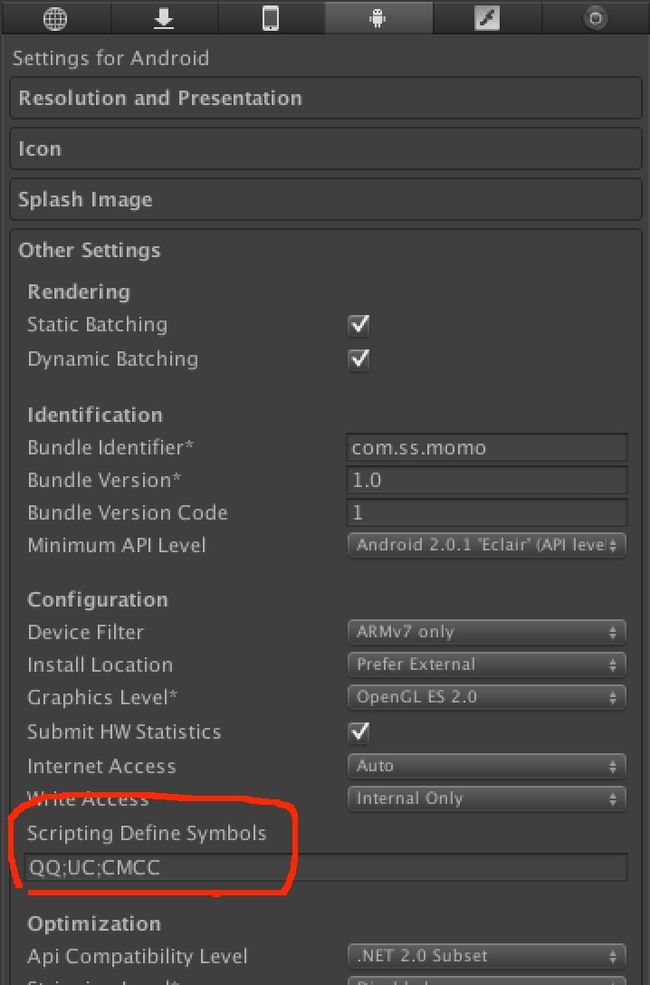
官方提供的标签属于比较大的范围标签,比如我希望在UNITY_ANDROID下面在写一些自定义的标签、类似 QQ UC CMCC这样的渠道标签该如何呢?如下图所示,ProjectSetting打包界面每个平台都会有Scripting Define Symbols这个选项,可以在这里添加每个平台下对应的自定义标签(多个标签用“;”号隔开),这里我设置的是Android平台,如果IOS也需要打这样的渠道标签那么也要在IOS页面Scripting Define Symbols选项处添加对应的标签。

标签做出来了就好办了,然后在代码中我们可以这样来写。如果在Scripting Define Symbols中没有出现的标签默认是不启用的,就像 #define Test 一样,会自动被注释掉。

然后我们看看如何实现脚本批量打包。
003 |
using System.Collections; |
004 |
using System.Collections.Generic; |
008 |
public class MyEditorScript |
011 |
static string[] SCENES = FindEnabledEditorScenes(); |
013 |
[MenuItem ("Custom/Build Android QQ")] |
014 |
static void PerformAndroidQQBuild () |
016 |
BulidTarget("QQ","Android"); |
019 |
[MenuItem ("Custom/Build Android UC")] |
020 |
static void PerformAndroidUCBuild () |
022 |
BulidTarget("UC","Android"); |
025 |
[MenuItem ("Custom/Build Android CMCC")] |
026 |
static void PerformAndroidCMCCBuild () |
028 |
BulidTarget("CMCC","Android"); |
031 |
[MenuItem ("Custom/Build Android ALL")] |
032 |
static void PerformAndroidALLBuild () |
034 |
BulidTarget("QQ","Android"); |
035 |
BulidTarget("UC","Android"); |
036 |
BulidTarget("CMCC","Android"); |
038 |
[MenuItem ("Custom/Build iPhone QQ")] |
039 |
static void PerformiPhoneQQBuild () |
041 |
BulidTarget("QQ","IOS"); |
044 |
[MenuItem ("Custom/Build iPhone QQ")] |
045 |
static void PerformiPhoneUCBuild () |
047 |
BulidTarget("UC","IOS"); |
050 |
[MenuItem ("Custom/Build iPhone CMCC")] |
051 |
static void PerformiPhoneCMCCBuild () |
053 |
BulidTarget("CMCC","IOS"); |
056 |
[MenuItem ("Custom/Build iPhone ALL")] |
057 |
static void PerformiPhoneALLBuild () |
059 |
BulidTarget("QQ","IOS"); |
060 |
BulidTarget("UC","IOS"); |
061 |
BulidTarget("CMCC","IOS"); |
065 |
static void BulidTarget(string name,string target) |
067 |
string app_name = name; |
068 |
string target_dir = Application.dataPath + "/TargetAndroid"; |
069 |
string target_name = app_name + ".apk"; |
070 |
BuildTargetGroup targetGroup = BuildTargetGroup.Android; |
071 |
BuildTarget buildTarget = BuildTarget.Android; |
072 |
string applicationPath = Application.dataPath.Replace("/Assets",""); |
074 |
if(target == "Android") |
076 |
target_dir = applicationPath + "/TargetAndroid"; |
077 |
target_name = app_name + ".apk"; |
078 |
targetGroup = BuildTargetGroup.Android; |
082 |
target_dir = applicationPath + "/TargetIOS"; |
083 |
target_name = app_name; |
084 |
targetGroup = BuildTargetGroup.iPhone; |
085 |
buildTarget = BuildTarget.iPhone; |
089 |
if(Directory.Exists(target_dir)) |
091 |
if (File.Exists(target_name)) |
093 |
File.Delete(target_name); |
097 |
Directory.CreateDirectory(target_dir); |
104 |
PlayerSettings.bundleIdentifier = "com.game.qq"; |
105 |
PlayerSettings.bundleVersion = "v0.0.1"; |
106 |
PlayerSettings.SetScriptingDefineSymbolsForGroup(targetGroup,"QQ"); |
109 |
PlayerSettings.bundleIdentifier = "com.game.uc"; |
110 |
PlayerSettings.bundleVersion = "v0.0.1"; |
111 |
PlayerSettings.SetScriptingDefineSymbolsForGroup(targetGroup,"UC"); |
114 |
PlayerSettings.bundleIdentifier = "com.game.cmcc"; |
115 |
PlayerSettings.bundleVersion = "v0.0.1"; |
116 |
PlayerSettings.SetScriptingDefineSymbolsForGroup(targetGroup,"CMCC"); |
123 |
GenericBuild(SCENES, target_dir + "/" + target_name, buildTarget,BuildOptions.None); |
127 |
private static string[] FindEnabledEditorScenes() { |
128 |
List<string> EditorScenes = new List<string>(); |
129 |
foreach(EditorBuildSettingsScene scene in EditorBuildSettings.scenes) { |
130 |
if (!scene.enabled) continue; |
131 |
EditorScenes.Add(scene.path); |
133 |
return EditorScenes.ToArray(); |
136 |
static void GenericBuild(string[] scenes, string target_dir, BuildTarget build_target, BuildOptions build_options) |
138 |
EditorUserBuildSettings.SwitchActiveBuildTarget(build_target); |
139 |
string res = BuildPipeline.BuildPlayer(scenes,target_dir,build_target,build_options); |
141 |
if (res.Length > 0) { |
142 |
throw new Exception("BuildPlayer failure: " + res); |
这里面忘说了一点,如果我们希望在性能高的手机上用一套好的资源,在性能低的手机上用一套差一点的资源该怎么办?那么首先我们先搞清楚Unity会把什么资源打包,什么资源不打包?
1.Resources文件夹
Resources文件夹是一个只读的文件夹,通过Resources.Load()来读取对象。因为这个文件夹下的所有资源都可以运行时来加载,所以Resources文件夹下的所有东西都会被无条件的打到发布包中。建议这个文件夹下只放Prefab或者一些Object对象,因为Prefab会自动过滤掉对象上不需要的资源。举个例子我把模型文件还有贴图文件都放在了Resources文件夹下,但是我有两张贴图是没有在模型上用的,那么此时这两张没用的贴图也会被打包到发布包中。假如这里我用Prefab,那么Prefab会自动过滤到这两张不被用的贴图,这样发布包就会小一些了。
2.StreamingAssets
StreamingAssets文件夹也是一个只读的文件夹,但是它和Resources有点区别,Resources文件夹下的资源会进行一次压缩,而且也会加密,不使用点特殊办法是拿不到原始资源的。但是StreamingAssets文件夹就不一样了,它下面的所有资源不会被加密,然后是原封不动的打包到发布包中,这样很容易就拿到里面的文件。所以StreamingAssets适合放一些二进制文件,而Resources更适合放一些GameObject和Object文件。StreamingAssets 只能用过www类来读取!!
3. 最后凡是在Hierarchy视图对象引用过的资源文件也会被无条件打包到发布包中。如果有一部分文件可能没有在Resources文件夹下也没有在StreamingAssets文件夹下,也没有被Hierarchy视图游戏对象引用,那么这类资源是不会被打包到发布包中的。
OK!搞清楚这一点就好办了!在处理不同包对应不同资源包的时候,尽量让可配置的资源放在Resources 或StreamingAssets文件夹下,运行的时候程序动态的来读取它们,最后显示在游戏中就可以了。在批量打包前,在Project视图下创建不同包的资源文件夹, 然后脚本 AssetDatabase 动态的将资源拷贝至Resources或StreamingAssets 文件夹中,
http://docs.unity3d.com/Documentation/Manual/StreamingAssets.html
1 |
[MenuItem ("Custom/Build Android QQ")] |
2 |
static void PerformAndroidQQBuild () |
5 |
AssetDatabase.CopyAsset("path","newPath"); |
7 |
BulidTarget("QQ","Android"); |
代码中说到还有一个重要的东西就是PlayerSettings类。因为在Build的时候不同平台下可能会有一些PlatformSettings是不一样的,所以需要在脚本里面动态的设置它,强大的参数列表在这里:http://docs.unity3d.com/Documentation/ScriptReference/PlayerSettings.html。根据情况来批量构建自己的工程吧~

另外,由于IOS工程比较特殊,使用这样的方法我们只能生成出来多个IOS的工程文件,但是这并不是最终发布的版本。如果想一键生成.ipa文件的话。
1.通过命令行来Build IOS http://docs.unity3d.com/Documentation/Manual/CommandLineArguments.html
2.通过shell来自动打包 1生成的xcode工程,最终生成渠道包。
这两种方法我已经在网上找到了答案,今天太晚了就不在研究了,下一篇的时候我在补上。 祝大家学习愉快!!不早了,晚安!欢迎大家一起来讨论与学习,嘿嘿!!!
代码下载地址:http://vdisk.weibo.com/s/HUf2W


