Android之使用HttpURLConnection类查看网络图片以及网络源码
1.首先,来介绍一下HttpURLConnection类,HttpURLConnection类位于java.net包中,用于发送HTTP请求和获取HTTP响应。由于此类是抽象类,不能直接实例化对象,所以需要使用URL的openConnection()方法来获得。
例如,要创建一个http://www.baidu.com 网站对应的HttpURLConnection对象,可以使用下列代码:
URL url=new URL("http://www.baidu.com");
HttpURLConnection urlConnection=(HttpURLConnection)url.openConnection();
注:上述代码通过openConnection()方法创建的HttpURLConnection对象,并没有真正执行连接操作,只是创建了一个新的实例,在进行连接前,还可以设置一些属性。
例如,连接超时的时间和请求方式等,代码如下:
urlConnection.setConnectTimeout(5000);//设置连接超时时间为5秒
urlConnection.setRequestMethod("GET");//设置连接的方式为get方式
创建了HttpURLConnection对象后,就可以使用该对象发送HTTP请求了。
2.在编写我们的Android项目之前,先做下面几个步骤:
(1).开启Tomcat服务器,如下图所示:
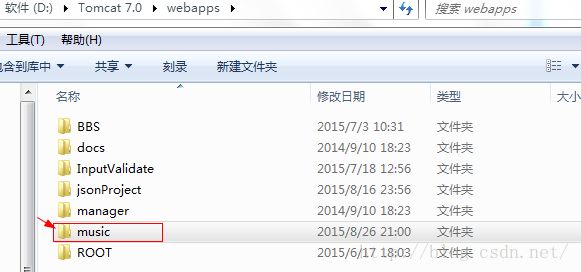
(2).把我们所需要的Web项目部署到Tomcat服务器上,也可以将我们Web项目复制到tomcat服务器的安装目录下的webapps目录底下,即可,如下图所示:
(3).这个Android项目要访问的为music项目,打开此项目,如下图所示:
其中我们Android要访问的为image文件夹下的一张图片,和music项目底下的index.jsp文件,即查看此网络图片和网络源码。
(4).最后,我们必须要知道当前网络的IP地址,因为我们访问的为Windows系统下的tomcat服务器的Web项目,而Android系统的内核为Linux,系统不一样,所以我们在windows系统下访问Web'项目,可以直接输入http://localhost:8083/music/index.jsp 或者http://127.0.0.1:8083/music/index.jsp 以及http://192.168.91.1:8083/music/index.jsp ,而Android访问Web项目只可以通过http://192.168.91.1:8083/music/index.jsp 所以,先查看我们的IP地址,打开命令行窗口,输入ipconfig命令,即可查看,如下图所示:
其中查看到的IPv4地址即为IP地址。
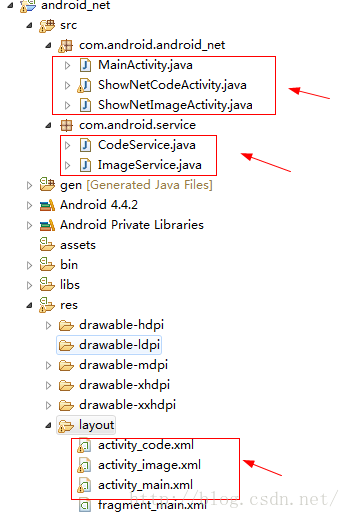
3.接下来就可以编写我们的Android项目了,此Android项目用来查看网络图片和网络源码,新建Android项目,项目名为android_net,主要项目结构如下:
(1).首先,打开我们的activity_main.xml布局文件,此布局文件只放置两个按钮,点击不同的按钮跳转到不同的Activity,代码如下:
<LinearLayout xmlns:android="http://schemas.android.com/apk/res/android"
    xmlns:tools="http://schemas.android.com/tools"
    android:layout_width="match_parent"
    android:layout_height="match_parent"
    android:orientation="vertical" >

    <Button
        android:id="@+id/net_image"
        android:layout_width="match_parent"
        android:layout_height="wrap_content"
        android:text="查看网络图片" />

    <Button
        android:id="@+id/net_code"
        android:layout_width="match_parent"
        android:layout_height="wrap_content"
        android:text="查看网络源码" />

</LinearLayout>
(2).打开MainActivity.java文件,此类用来点击按钮跳转不同的Activity,代码如下:
package com.android.android_net;

import android.app.Activity;
import android.content.Intent;
import android.os.Bundle;
import android.view.View;
import android.view.View.OnClickListener;
import android.widget.Button;

public class MainActivity extends Activity {

	private Button net_image,net_code;//声明Button对象
	@Override
	protected void onCreate(Bundle savedInstanceState) {
		super.onCreate(savedInstanceState);
		setContentView(R.layout.activity_main);
		/* 获取布局管理器中的两个Button控件 */
		net_image=(Button)findViewById(R.id.net_image);
		net_code=(Button)findViewById(R.id.net_code);

		/* 分别添加按钮点击监听事件 */
		net_image.setOnClickListener(new OnClickListener() {

			@Override
			public void onClick(View v) {
				Intent intent=new Intent(MainActivity.this,ShowNetImageActivity.class);//实例化Intent对象
				startActivity(intent);//开启此Activity,跳转到ShowNetImageActivity类
			}
		});

		net_code.setOnClickListener(new OnClickListener() {

			@Override
			public void onClick(View v) {
				Intent intent=new Intent(MainActivity.this,ShowNetCodeActivity.class);//实例化Intent对象
				startActivity(intent);//开启此Activity,跳转到ShowNetCodeActivity类
			}
		});
	}
}
(3).接下来在layout目录下新建一个activity_image.xml文件,用来显示网络的图片,主要代码如下:
<?xml version="1.0" encoding="utf-8"?>
<LinearLayout xmlns:android="http://schemas.android.com/apk/res/android"
    android:layout_width="match_parent"
    android:layout_height="match_parent"
    android:orientation="vertical" >

	<TextView
	    android:layout_width="match_parent"
	    android:layout_height="wrap_content"
	    android:text="网络图片路径"
	    android:padding="5dp"/>

	<EditText
	    android:id="@+id/imagePath_et"
	    android:layout_width="match_parent"
	    android:layout_height="wrap_content"
	    android:text="http://192.168.91.1:8083/music/image/mm4.jpg"/>

	<Button
	    android:id="@+id/show_netimage"
	    android:layout_width="match_parent"
	    android:layout_height="wrap_content"
	    android:text="查看网络图片"/>

	<ImageView
	    android:id="@+id/imageView"
	    android:layout_width="wrap_content"
	    android:layout_height="wrap_content"
	    android:src="@drawable/ic_launcher"/>
</LinearLayout>
(4).接着,在com.android.android_net包下新建一个ShowNetImageActivity类,其中开启了一个新线程来调用ImageService的getImage()方法,这样才能避免网络主线程异常,代码如下:
package com.android.android_net;


import com.android.service.ImageService;

import android.app.Activity;
import android.graphics.Bitmap;
import android.graphics.BitmapFactory;
import android.os.Bundle;
import android.view.View;
import android.view.View.OnClickListener;
import android.widget.Button;
import android.widget.EditText;
import android.widget.ImageView;

public class ShowNetImageActivity extends Activity {

	private EditText imagePath_et;//声明EditText对象,即图片路径输入框
	private Button show_netimage;//声明Button对象
	private ImageView imageView;//声明ImageView对象
	@Override
	protected void onCreate(Bundle savedInstanceState) {
		// TODO Auto-generated method stub
		super.onCreate(savedInstanceState);
		setContentView(R.layout.activity_image);
		/* 获取布局管理器的各个控件 */
		imagePath_et=(EditText)findViewById(R.id.imagePath_et);
		show_netimage=(Button)findViewById(R.id.show_netimage);
		imageView=(ImageView)findViewById(R.id.imageView);

		//为按钮点击添加事件监听器
		show_netimage.setOnClickListener(new OnClickListener() {

			@Override
			public void onClick(View v) {
				// TODO Auto-generated method stub
				final String imagePath=imagePath_et.getText().toString();//获取图片路径
				//新建一个线程
				new Thread(new Runnable(){

					@Override
					public void run() {
						// TODO Auto-generated method stub
						try {
							byte[] data=ImageService.getImage(imagePath);//调用ImageService类的getImage()方法,返回字节数组
							final Bitmap bitmap=BitmapFactory.decodeByteArray(data, 0, data.length);//创建一个Bitmap对象
							imageView.post(new Runnable() {

								@Override
								public void run() {
									// TODO Auto-generated method stub
									imageView.setImageBitmap(bitmap);//设置显示的图片
								}
							});
						} catch (Exception e) {
							// TODO Auto-generated catch block
							e.printStackTrace();
						}
					}

				}).start();//开启线程
			}
		});
	}

}
(5).接着,主要的一个ImageService类,在com.android.service包下,用来返回网络图片的数据,代码如下:
package com.android.service;

import java.io.ByteArrayOutputStream;
import java.io.InputStream;
import java.net.HttpURLConnection;
import java.net.URL;

public class ImageService {

	public static byte[] getImage(String imagePath) throws Exception {
		// TODO Auto-generated method stub
		URL url=new URL(imagePath);//实例化URL对象url
		HttpURLConnection connection=(HttpURLConnection) url.openConnection();//实例化HttpURLConnection对象connection
		connection.setConnectTimeout(5000);//设置连接超时时间为5秒
		connection.setRequestMethod("GET");//设置请求方法为get方式
		int code=connection.getResponseCode();//获取状态码
		//如果状态码请求成功的话,即code等于HttpURLConnection.HTTP_OK,也可以写成code==200
		if(code==HttpURLConnection.HTTP_OK){
			InputStream inputStream=connection.getInputStream();//获得输入流,返回一个InputStream对象
			ByteArrayOutputStream outputStream=new ByteArrayOutputStream();//实例化一个字节数组输出输入流对象
			byte[] buffer=new byte[1024];//实例化一个字节数组对象
			int len=0;//定义一个变量,初始值为0
			//当获取到的输入流有数据时,循环写入数据
			while((len=inputStream.read(buffer))!=-1){
				outputStream.write(buffer, 0, len);//写入数据
			}
			inputStream.close();//关闭输入流
			return outputStream.toByteArray();//返回数据字节数组
	}
		return null;
	}
}
(6).接着在layout目录下新建一个activity_code.xml文件,用来显示网络源码,代码如下:
<?xml version="1.0" encoding="utf-8"?>
<LinearLayout xmlns:android="http://schemas.android.com/apk/res/android"
    android:layout_width="match_parent"
    android:layout_height="match_parent"
    android:orientation="vertical" >

    <TextView
        android:layout_width="match_parent"
        android:layout_height="wrap_content"
        android:padding="5dp"
        android:text="网络图片路径:" />

    <EditText
        android:id="@+id/codePath_et"
        android:layout_width="match_parent"
        android:layout_height="wrap_content"
        android:text="http://192.168.91.1:8083/music/index.jsp" />

    <Button
        android:id="@+id/show_netcode"
        android:layout_width="match_parent"
        android:layout_height="wrap_content"
        android:text="查看网络源码" />

    <ScrollView
        android:layout_width="match_parent"
        android:layout_height="wrap_content">
        <TextView
            android:id="@+id/textView"
            android:layout_width="match_parent"
            android:layout_height="wrap_content"
            android:text="哈哈..." />
    </ScrollView>

</LinearLayout>
(7).在com.android.android_net包下新建一个ShowNetCodeActivity类,其中开启了一个新线程,使用Handler消息机制来显示我们的网络源码,其中新建线程中调用了CodeService类的getCode()方法,来获取网络源码,ShowNetCodeActivity类代码如下:
package com.android.android_net;

import android.app.Activity;
import android.os.Bundle;
import android.os.Handler;
import android.os.Message;
import android.view.View;
import android.view.View.OnClickListener;
import android.widget.Button;
import android.widget.EditText;
import android.widget.TextView;

import com.android.service.CodeService;

public class ShowNetCodeActivity extends Activity {

	private EditText codePath_et;//声明EditText对象
	private Button show_netcode;//声明Button对象
	private TextView textView;//声明textView对象
	private String result="";//初始化一个空的String类型变量
	private Handler handler;//声明一个Handler对象
	@Override
	protected void onCreate(Bundle savedInstanceState) {
		// TODO Auto-generated method stub
		super.onCreate(savedInstanceState);
		setContentView(R.layout.activity_code);
		/* 获取布局管理器中的各个控件 */
		codePath_et=(EditText)findViewById(R.id.codePath_et);
		show_netcode=(Button)findViewById(R.id.show_netcode);
		textView=(TextView)findViewById(R.id.textView);

		//为按钮点击添加监听事件
		show_netcode.setOnClickListener(new OnClickListener() {

			@Override
			public void onClick(View v) {
				final String codePath=codePath_et.getText().toString();//获取网络源码的路径
				//新建一个线程
				new Thread(new Runnable() {

					@Override
					public void run() {
						// TODO Auto-generated method stub
						try {
							result=CodeService.getCode(codePath);//调用CodeSErvice类的getCode方法,返回字符串数据
							Message msg=handler.obtainMessage();//通过handler对象获得Message消息
							handler.sendMessage(msg);//发送消息
						} catch (Exception e) {
							// TODO Auto-generated catch block
							e.printStackTrace();
						}
					}
				}).start();//开启一个线程

				//实例化一个Handler对象
				handler=new Handler(){

					@Override
					public void handleMessage(Message msg) {
						// TODO Auto-generated method stub
						if(result!=null){
							textView.setText(result);//设置文本视图显示的文本
						}
						super.handleMessage(msg);
					}

				};
			}
		});
	}

}
(8).下面,在com.android.service包下新建一个CodeService类,用来获取网络源码,代码如下:
package com.android.service;

import java.io.ByteArrayOutputStream;
import java.io.InputStream;
import java.net.HttpURLConnection;
import java.net.URL;

public class CodeService {

	public static String getCode(String codePath) throws Exception {
		// TODO Auto-generated method stub
		URL url=new URL(codePath);//实例化一个URL对象
		HttpURLConnection connection=(HttpURLConnection) url.openConnection();//实例化一个HttpURLConnection对象
		connection.setConnectTimeout(5000);//设置连接超时时间为5秒
		connection.setRequestMethod("GET");//设置连接的方式为get方式
		int code=connection.getResponseCode();//获取状态码
		//如果请求成功的话
		if(code==200){
			InputStream inputStream=connection.getInputStream();//获取输入流,返回InputStream对象
			ByteArrayOutputStream outputStream=new ByteArrayOutputStream();//实例化一个ByteArrayOutputStream对象
			byte[] buffer=new byte[1024];//实例化一个字节数组对象
			int len=0;//定义一个变量,初始值为0
			//当获取到的输入流有数据时,循环写入数据
			while((len=inputStream.read(buffer))!=-1){
				outputStream.write(buffer, 0, len);//写入数据
			}
			inputStream.close();//关闭输入流
			byte[] data=outputStream.toByteArray();//获得字节数组
			String result=new String(data, "UTF-8");//通过获取到的字节数组数据实例化一个String对象,编码格式为UTF-8
			return result;//返回写入的数据
		}
		return null;
	}

}
(9).最后,千万要记得在AndroidManifest.xml文件添加访问网络的权限,以及那两个Activity,代码如下:
添加访问网络权限:
<uses-permission android:name="android.permission.INTERNET"/>
声明另外两个activity:
 <activity android:name="com.android.android_net.ShowNetImageActivity"/>
 <activity android:name="com.android.android_net.ShowNetCodeActivity"/>
4.部署我们的项目到Android模拟器上,效果如下:
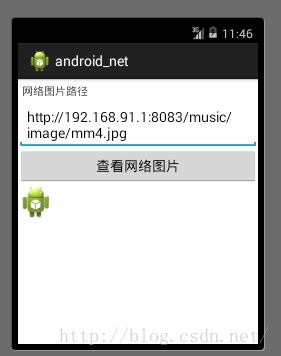
(1).点击查看网络图片按钮,跳转到ShowNetImageActivity,如下图所示:
点击上图的按钮,如下图:
获取到tomcat服务器上的图片。
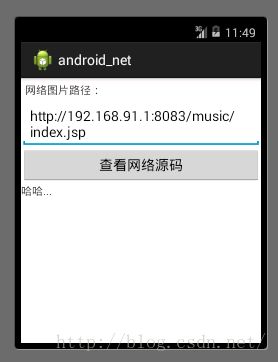
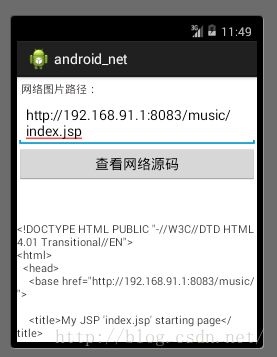
(2).如果点击刚开始运行的那个查看网络源码的按钮,将跳转到ShowNetCodeActivity,如下图所示:
点击网络源码按钮,如下图:
这样便获取到网络的源码了。
注:其中要注意的一点是 我们访问网络文件的源码时,要注意网络jsp文件和获取到的字符串的编码问题,否则会出现中文乱码问题。
5.以上内容仅供大家学习参考,写得不好,请见谅,如有错误,请指出,谢谢!
源码下载地址:http://download.csdn.net/download/u012561176/9054209

