UPDATE: The introduction to this post may seen a little “out there”. For some context, I had just finished watching the South Park Black Friday episodes prior to writing this post so I definitely had some inspiration regarding zombie shoppers, Black Friday chaos, and Game of Thrones.
Black Friday is coming.
Hordes of angry shoppers. Stampedes of middle-aged midwestern women, their toothless gums bloodthirsty for 75% off the latest season of Game of Thrones at the local Wal-Mart.
They’ll lineup outside the Wal-Mat doors on Thanksgiving at midnight. They’ll rally, beating at the locked doors with their hands and heads until their bodies are raw and bloody, like zombies from 28 Days Later. But instead of human flesh, they crave petty consumer sustenance. Their war cries of discounts and sales will reach the heavens. And their thunderous footsteps will cause earthquakes across the Great Plains.
Of course, the media won’t help — they will sensationalize every last little piece. From frostbitten families camping out all night in the blistering cold, to the little old lady trampled by raging bargain hunters as the doors open, akin to the Gallimimus stampede in Jurassic Park. All of this simply because she wanted to purchase the latest Halo game for Timmy, her little 9 year old grandson, who’s parents passed away this time last year. At a Wal-Mart. During Black Friday.
And I have to ask, is all this chaos and bedlam worth it?
Hell. No.
Any shopping I do this Black Friday will be from (safely) behind my laptop screen, likely nursing a hangover from the night before with a cup of coffee and a handful of Tylenol.
But if you decide you are going to venture out into the real-world and brave the bargain hunters, you’ll want to download the source code to this blog post first…
Imagine how silly you would feel, standing in line, waiting to checkout, only to scan the barcode on the latest season of Game of Thrones only to find out that Target has it for $5 cheaper?
In the rest of this blog post I’ll show you how to detect barcodes in images using nothing but Python and OpenCV.
Looking for the source code to this post?
Jump right to the downloads section.
OpenCV and Python versions:
This example will run on Python 2.7 and OpenCV 2.4.X.
Detecting Barcodes in Images using Python and OpenCV
The goal of this blog post is to demonstrate a basic implementation of barcode detection using computer vision and image processing techniques. My implementation of the algorithm is originally based loosely on this StackOverflow question. I have gone through the code and provided some updates and improvements to the original algorithm.
It’s important to note that this algorithm will not work for all barcodes, but it should give you the basic intuition as to what types of techniques you should be applying.
For this example, we will be detecting the barcode in the following image:
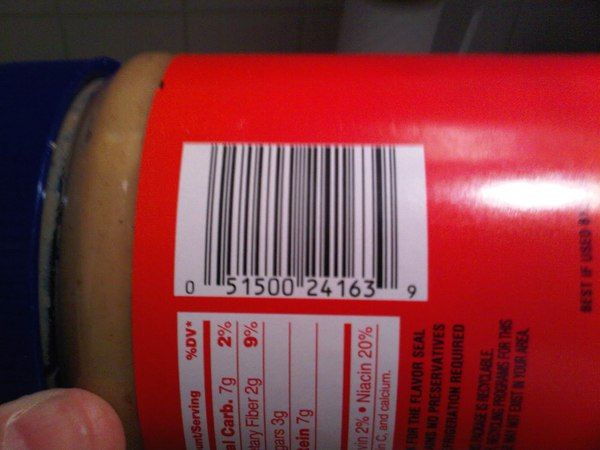
Figure 1: Example image containing a barcode that we want to detect.
Let’s go ahead and start writing some code. Open up a new file, name it detect_barcode.py , and let’s get coding:
# import the necessary packages import numpy as np import argparse import cv2 # construct the argument parse and parse the arguments ap = argparse.ArgumentParser() ap.add_argument("-i", "--image", required = True, help = "path to the image file") args = vars(ap.parse_args())
|
|
# import the necessary packages
import
numpy
as
np
import
argparse
import
cv2
# construct the argument parse and parse the arguments
ap
=
argparse
.
ArgumentParser
(
)
ap
.
add_argument
(
"-i"
,
"--image"
,
required
=
True
,
help
=
"path to the image file"
)
args
=
vars
(
ap
.
parse_args
(
)
)
|
The first thing we’ll do is import the packages we’ll need. We’ll utilize NumPy for numeric processing, argparse for parsing command line arguments, and cv2 for our OpenCV bindings.
Then we’ll setup our command line arguments. We need just a single switch here, --image , which is the path to our image that contains a barcode that we want to detect.
Now, time for some actual image processing:
# import the necessary packages import numpy as np import argparse import cv2 # construct the argument parse and parse the arguments ap = argparse.ArgumentParser() ap.add_argument("-i", "--image", required = True, help = "path to the image file") args = vars(ap.parse_args()) # load the image and convert it to grayscale image = cv2.imread(args["image"]) gray = cv2.cvtColor(image, cv2.COLOR_BGR2GRAY) # compute the Scharr gradient magnitude representation of the images # in both the x and y direction gradX = cv2.Sobel(gray, ddepth = cv2.cv.CV_32F, dx = 1, dy = 0, ksize = -1) gradY = cv2.Sobel(gray, ddepth = cv2.cv.CV_32F, dx = 0, dy = 1, ksize = -1) # subtract the y-gradient from the x-gradient gradient = cv2.subtract(gradX, gradY) gradient = cv2.convertScaleAbs(gradient)
11
12
13
14
15
16
17
18
19
20
21
22
|
# load the image and convert it to grayscale
image
=
cv2
.
imread
(
args
[
"image"
]
)
gray
=
cv2
.
cvtColor
(
image
,
cv2
.
COLOR_BGR2GRAY
)
# compute the Scharr gradient magnitude representation of the images
# in both the x and y direction
gradX
=
cv2
.
Sobel
(
gray
,
ddepth
=
cv2
.
cv
.
CV_32F
,
dx
=
1
,
dy
=
0
,
ksize
=
-
1
)
gradY
=
cv2
.
Sobel
(
gray
,
ddepth
=
cv2
.
cv
.
CV_32F
,
dx
=
0
,
dy
=
1
,
ksize
=
-
1
)
# subtract the y-gradient from the x-gradient
gradient
=
cv2
.
subtract
(
gradX
,
gradY
)
gradient
=
cv2
.
convertScaleAbs
(
gradient
)
|
On Lines 12 and 13 we load our image off disk and convert it to grayscale.
Then, we use the Scharr operator (specified using ksize = -1 ) to construct the gradient magnitude representation of the grayscale image in the horizontal and vertical directions on Lines 17 and 18.
From there, we subtract the y-gradient of the Scharr operator from the x-gradient of the Scharr operator on Lines 21 and 22. By performing this subtraction we are left with regions of the image that have high horizontal gradients and low vertical gradients.
Our gradient representation of our original image above looks like:
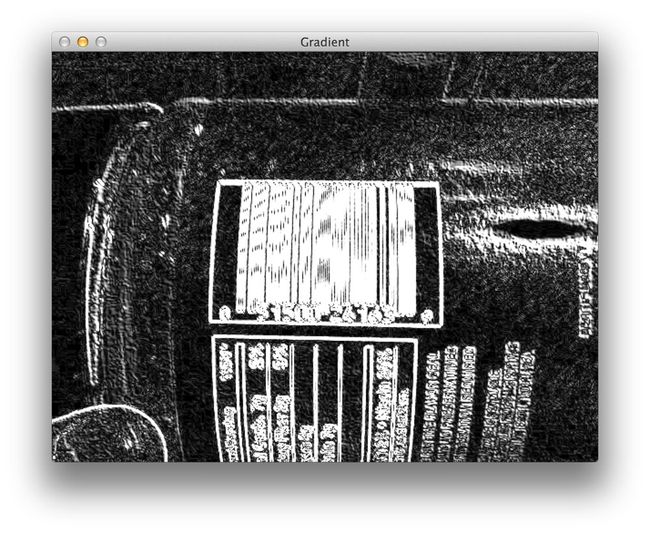
Figure 2: The gradient representation of our barcode image.
Notice how the barcoded region of the image has been detected by our gradient operations. The next steps will be to filter out the noise in the image and focus solely on the barcode region.
# import the necessary packages import numpy as np import argparse import cv2 # construct the argument parse and parse the arguments ap = argparse.ArgumentParser() ap.add_argument("-i", "--image", required = True, help = "path to the image file") args = vars(ap.parse_args()) # load the image and convert it to grayscale image = cv2.imread(args["image"]) gray = cv2.cvtColor(image, cv2.COLOR_BGR2GRAY) # compute the Scharr gradient magnitude representation of the images # in both the x and y direction gradX = cv2.Sobel(gray, ddepth = cv2.cv.CV_32F, dx = 1, dy = 0, ksize = -1) gradY = cv2.Sobel(gray, ddepth = cv2.cv.CV_32F, dx = 0, dy = 1, ksize = -1) # subtract the y-gradient from the x-gradient gradient = cv2.subtract(gradX, gradY) gradient = cv2.convertScaleAbs(gradient) # blur and threshold the image blurred = cv2.blur(gradient, (9, 9)) (_, thresh) = cv2.threshold(blurred, 225, 255, cv2.THRESH_BINARY)
|
|
# blur and threshold the image
blurred
=
cv2
.
blur
(
gradient
,
(
9
,
9
)
)
(
_
,
thresh
)
=
cv2
.
threshold
(
blurred
,
225
,
255
,
cv2
.
THRESH_BINARY
)
|
The first thing we’ll do is apply an average blur on Line 25 to the gradient image using a 9 x 9 kernel. This will help smooth out high frequency noise in the gradient representation of the image.
We’ll then threshold the blurred image on Line 26. Any pixel in the gradient image that is not greater than 225 is set to 0 (black). Otherwise, the pixel is set to 255 (white).
The output of the blurring and thresholding looks like this:
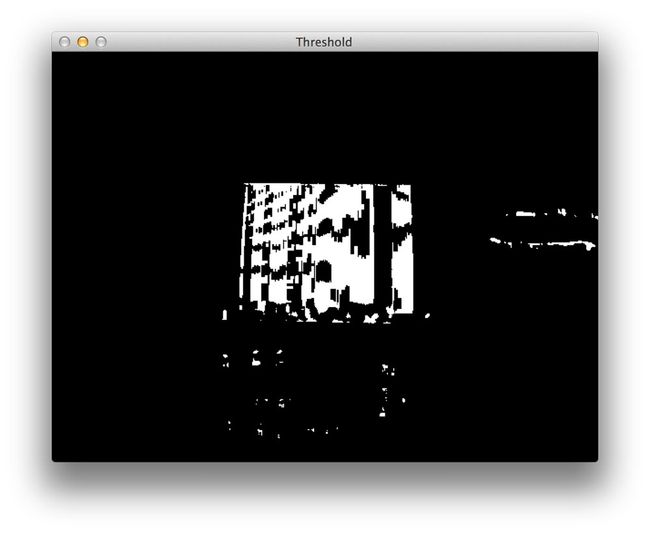
Figure 3: Thresholding the gradient image to obtain a rough approximation to the rectangular barcode region.
However, as you can see in the threshold image above, there are gaps between the vertical bars of the barcode. In order to close these gaps and make it easier for our algorithm to detect the “blob”-like region of the barcode, we’ll need to perform some basic morphological operations:
# import the necessary packages import numpy as np import argparse import cv2 # construct the argument parse and parse the arguments ap = argparse.ArgumentParser() ap.add_argument("-i", "--image", required = True, help = "path to the image file") args = vars(ap.parse_args()) # load the image and convert it to grayscale image = cv2.imread(args["image"]) gray = cv2.cvtColor(image, cv2.COLOR_BGR2GRAY) # compute the Scharr gradient magnitude representation of the images # in both the x and y direction gradX = cv2.Sobel(gray, ddepth = cv2.cv.CV_32F, dx = 1, dy = 0, ksize = -1) gradY = cv2.Sobel(gray, ddepth = cv2.cv.CV_32F, dx = 0, dy = 1, ksize = -1) # subtract the y-gradient from the x-gradient gradient = cv2.subtract(gradX, gradY) gradient = cv2.convertScaleAbs(gradient) # blur and threshold the image blurred = cv2.blur(gradient, (9, 9)) (_, thresh) = cv2.threshold(blurred, 225, 255, cv2.THRESH_BINARY) # construct a closing kernel and apply it to the thresholded image kernel = cv2.getStructuringElement(cv2.MORPH_RECT, (21, 7)) closed = cv2.morphologyEx(thresh, cv2.MORPH_CLOSE, kernel)
|
|
# construct a closing kernel and apply it to the thresholded image
kernel
=
cv2
.
getStructuringElement
(
cv2
.
MORPH_RECT
,
(
21
,
7
)
)
closed
=
cv2
.
morphologyEx
(
thresh
,
cv2
.
MORPH_CLOSE
,
kernel
)
|
We’ll start by constructing a rectangular kernel using the cv2.getStructuringElement on Line 29. This kernel has a width that is larger than the height, thus allowing us to close the gaps between vertical stripes of the barcode.
We then perform our morphological operation on Line 30 by applying our kernel to our thresholded image, thus attempting to close the the gaps between the bars.
You can now see that the gaps are substantially more closed, as compared to the thresholded image above:
Figure 4: Applying closing morphological operations to close the gap between barcode stripes.
Of course, now we have small blobs in the image that are not part of the actual barcode, but may interfere with our contour detection.
Let’s go ahead and try to remove these small blobs:
# import the necessary packages import numpy as np import argparse import cv2 # construct the argument parse and parse the arguments ap = argparse.ArgumentParser() ap.add_argument("-i", "--image", required = True, help = "path to the image file") args = vars(ap.parse_args()) # load the image and convert it to grayscale image = cv2.imread(args["image"]) gray = cv2.cvtColor(image, cv2.COLOR_BGR2GRAY) # compute the Scharr gradient magnitude representation of the images # in both the x and y direction gradX = cv2.Sobel(gray, ddepth = cv2.cv.CV_32F, dx = 1, dy = 0, ksize = -1) gradY = cv2.Sobel(gray, ddepth = cv2.cv.CV_32F, dx = 0, dy = 1, ksize = -1) # subtract the y-gradient from the x-gradient gradient = cv2.subtract(gradX, gradY) gradient = cv2.convertScaleAbs(gradient) # blur and threshold the image blurred = cv2.blur(gradient, (9, 9)) (_, thresh) = cv2.threshold(blurred, 225, 255, cv2.THRESH_BINARY) # construct a closing kernel and apply it to the thresholded image kernel = cv2.getStructuringElement(cv2.MORPH_RECT, (21, 7)) closed = cv2.morphologyEx(thresh, cv2.MORPH_CLOSE, kernel) # perform a series of erosions and dilations closed = cv2.erode(closed, None, iterations = 4) closed = cv2.dilate(closed, None, iterations = 4)
|
|
# perform a series of erosions and dilations
closed
=
cv2
.
erode
(
closed
,
None
,
iterations
=
4
)
closed
=
cv2
.
dilate
(
closed
,
None
,
iterations
=
4
)
|
All we are doing here is performing 4 iterations of erosions, followed by 4 iterations of dilations. An erosion will “erode” the white pixels in the image, thus removing the small blobs, whereas a dilation will “dilate” the remaining white pixels and grow the white regions back out.
Provided that the small blobs were removed during the erosion, they will not reappear during the dilation.
After our series of erosions and dilations you can see that the small blobs have been successfully removed and we are left with the barcode region:
Figure 5: Removing small, irrelevant blobs by applying a series of erosions and dilations.
Finally, let’s find the contours of the barcoded region of the image:
# import the necessary packages import numpy as np import argparse import cv2 # construct the argument parse and parse the arguments ap = argparse.ArgumentParser() ap.add_argument("-i", "--image", required = True, help = "path to the image file") args = vars(ap.parse_args()) # load the image and convert it to grayscale image = cv2.imread(args["image"]) gray = cv2.cvtColor(image, cv2.COLOR_BGR2GRAY) # compute the Scharr gradient magnitude representation of the images # in both the x and y direction gradX = cv2.Sobel(gray, ddepth = cv2.cv.CV_32F, dx = 1, dy = 0, ksize = -1) gradY = cv2.Sobel(gray, ddepth = cv2.cv.CV_32F, dx = 0, dy = 1, ksize = -1) # subtract the y-gradient from the x-gradient gradient = cv2.subtract(gradX, gradY) gradient = cv2.convertScaleAbs(gradient) # blur and threshold the image blurred = cv2.blur(gradient, (9, 9)) (_, thresh) = cv2.threshold(blurred, 225, 255, cv2.THRESH_BINARY) # construct a closing kernel and apply it to the thresholded image kernel = cv2.getStructuringElement(cv2.MORPH_RECT, (21, 7)) closed = cv2.morphologyEx(thresh, cv2.MORPH_CLOSE, kernel) # perform a series of erosions and dilations closed = cv2.erode(closed, None, iterations = 4) closed = cv2.dilate(closed, None, iterations = 4) # find the contours in the thresholded image, then sort the contours # by their area, keeping only the largest one (cnts, _) = cv2.findContours(closed.copy(), cv2.RETR_EXTERNAL, cv2.CHAIN_APPROX_SIMPLE) c = sorted(cnts, key = cv2.contourArea, reverse = True)[0] # compute the rotated bounding box of the largest contour rect = cv2.minAreaRect(c) box = np.int0(cv2.cv.BoxPoints(rect)) # draw a bounding box arounded the detected barcode and display the # image cv2.drawContours(image, [box], -1, (0, 255, 0), 3) cv2.imshow("Image", image) cv2.waitKey(0)
36
37
38
39
40
41
42
43
44
45
46
47
48
49
50
|
# find the contours in the thresholded image, then sort the contours
# by their area, keeping only the largest one
(
cnts
,
_
)
=
cv2
.
findContours
(
closed
.
copy
(
)
,
cv2
.
RETR_EXTERNAL
,
cv2
.
CHAIN_APPROX_SIMPLE
)
c
=
sorted
(
cnts
,
key
=
cv2
.
contourArea
,
reverse
=
True
)
[
0
]
# compute the rotated bounding box of the largest contour
rect
=
cv2
.
minAreaRect
(
c
)
box
=
np
.
int0
(
cv2
.
cv
.
BoxPoints
(
rect
)
)
# draw a bounding box arounded the detected barcode and display the
# image
cv2
.
drawContours
(
image
,
[
box
]
,
-
1
,
(
0
,
255
,
0
)
,
3
)
cv2
.
imshow
(
"Image"
,
image
)
cv2
.
waitKey
(
0
)
|
Luckily, this is the easy part. On Lines 38-40 we simply find the largest contour in the image, which if we have done our image processing steps correctly, should correspond to the barcoded region.
We then determine the minimum bounding box for the largest contour on Lines 43 and 44 and finally display the detected barcode on Lines 48-50.
As you can see in the following image, we have successfully detected the barcode:
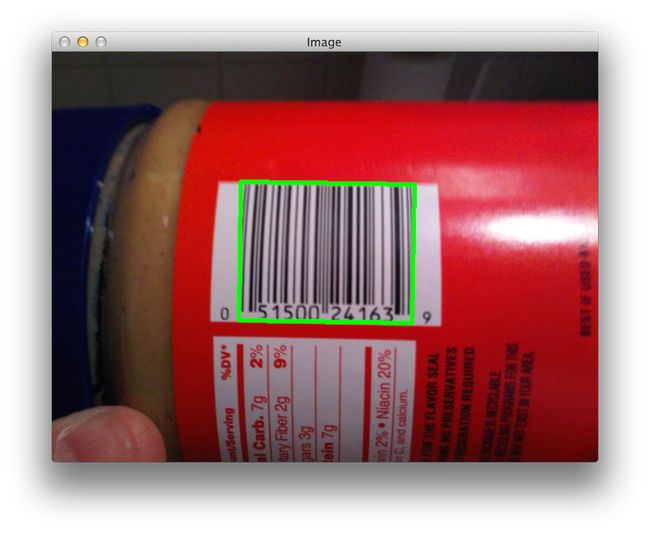
Figure 6: Successfully detecting the barcode in our example image.
In the next section we’ll try a few more images.
Successful Barcode Detections
To follow along with these results, use the form at the bottom of this post to download the source code and accompanying images for this blog post.
Once you have the code and images, open up a terminal and execute the following command:
$ python detect_barcode.py --image images/barcode_02.jpg
|
|
$
python
detect_barcode
.py
--
image
images
/
barcode_02
.jpg
|
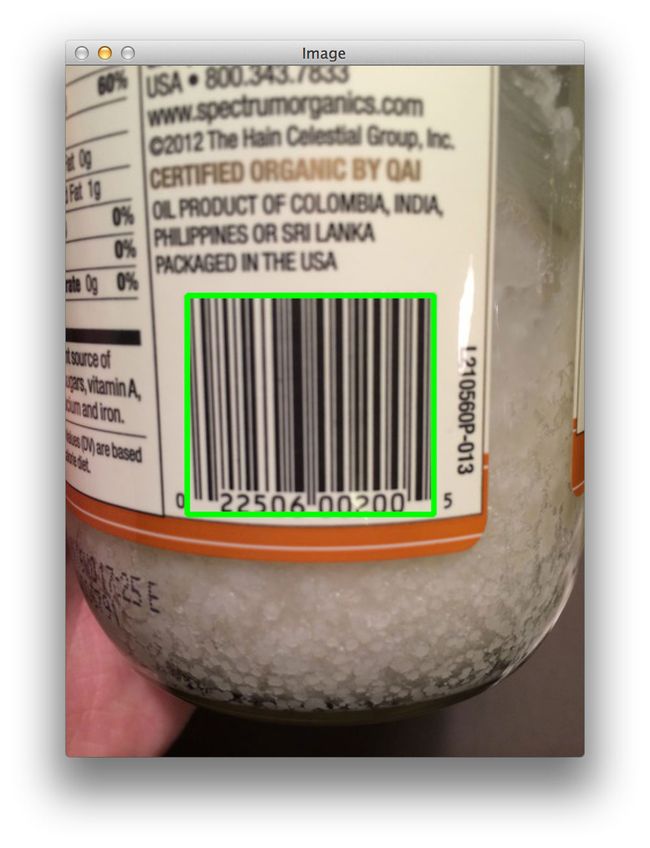
Figure 7: Using OpenCV to detect a barcode in an image.
No problem detecting the barcode on that jar of coconut oil!
Let’s try another image:
$ python detect_barcode.py --image images/barcode_03.jpg
|
|
$
python
detect_barcode
.py
--
image
images
/
barcode_03
.jpg
|
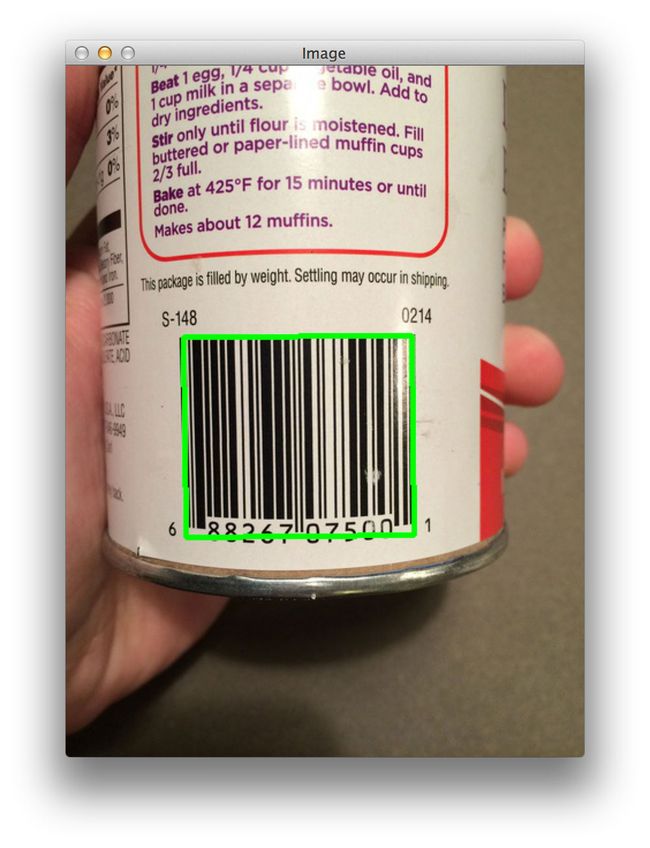
Figure 8: Using computer vision to detect a barcode in an image.
We were able to find the barcode in that image too!
But enough of the food products, what about the barcode on a book:
$ python detect_barcode.py --image images/barcode_04.jpg
|
|
$
python
detect_barcode
.py
--
image
images
/
barcode_04
.jpg
|
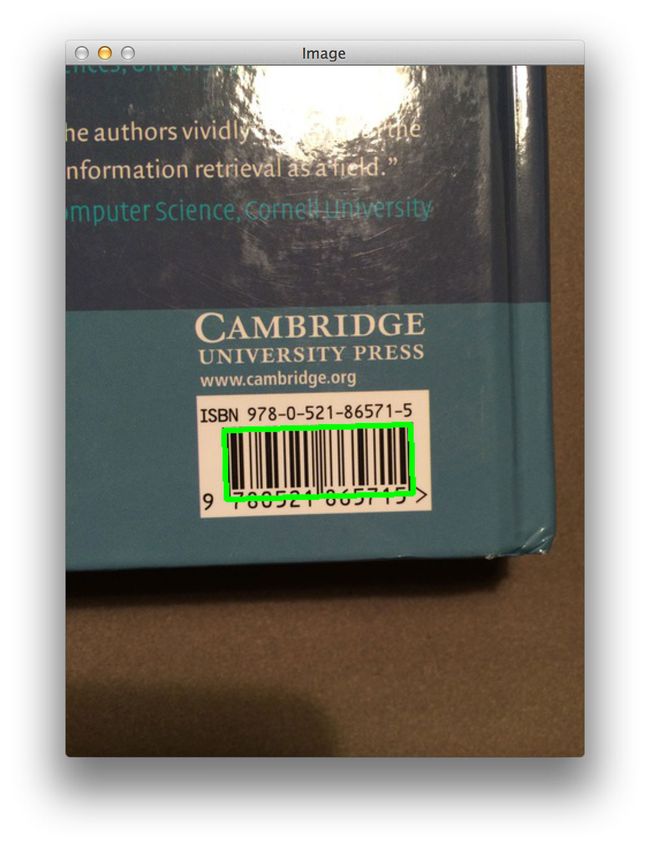
Figure 9: Detecting a barcode on a book using Python and OpenCV.
Again, no problem!
How about the tracking code on a package?
$ python detect_barcode.py --image images/barcode_05.jpg
|
|
$
python
detect_barcode
.py
--
image
images
/
barcode_05
.jpg
|
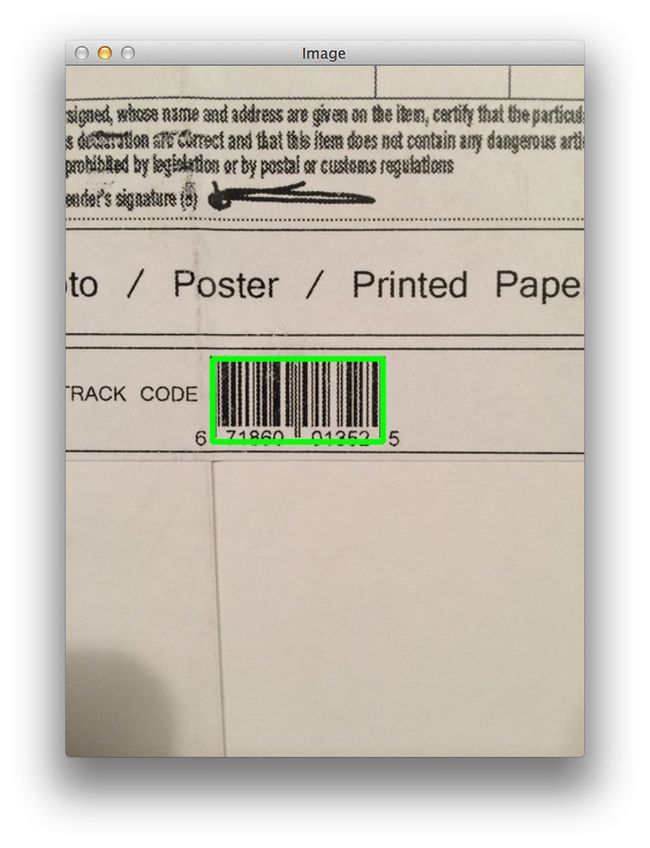
Figure 10: Detecting the barcode on a package using computer vision and image processing.
Again, our algorithm is able to successfully detect the barcode.
Finally, let’s try one more image This one is of my favorite pasta sauce, Rao’s Homemade Vodka Sauce:
$ python detect_barcode.py --image images/barcode_06.jpg
|
|
$
python
detect_barcode
.py
--
image
images
/
barcode_06
.jpg
|
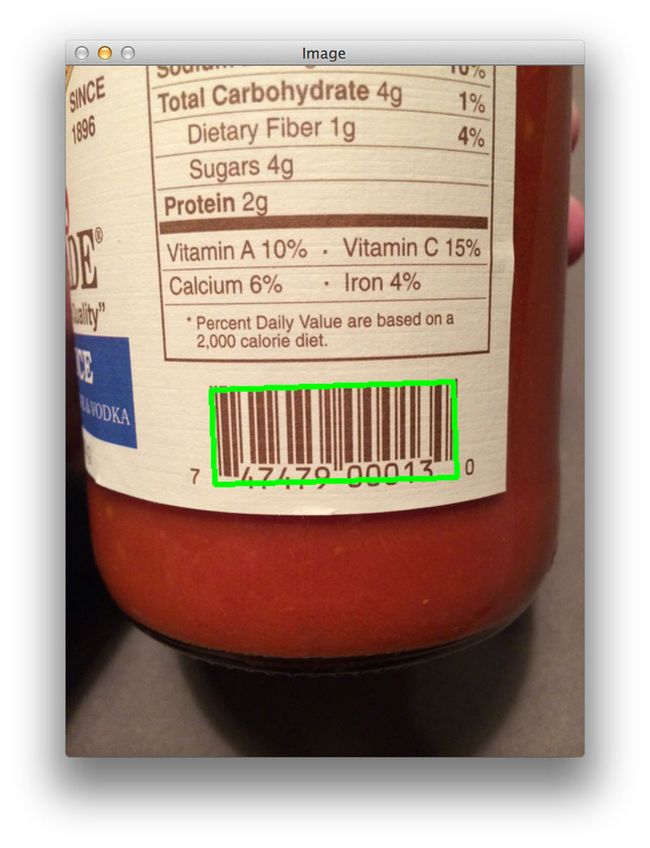
Figure 11: Barcode detection is easy using Python and OpenCV!
We were once again able to detect the barcode!
Summary
In this blog post we reviewed the steps necessary to detect barcodes in images using computer vision techniques. We implemented our algorithm using the Python programming language and the OpenCV library.
The general outline of the algorithm is to:
- Compute the Scharr gradient magnitude representations in both the x and y direction.
- Subtract the y-gradient from the x-gradient to reveal the barcoded region.
- Blur and threshold the image.
- Apply a closing kernel to the thresholded image.
- Perform a series of dilations and erosions.
- Find the largest contour in the image, which is now presumably the barcode.
It is important to note that since this method makes assumptions regarding the gradient representations of the image, and thus will only work for horizontal barcodes.
If you wanted to implement a more robust barcode detection algorithm, you would need to take the orientation of the image into consideration, or better yet, apply machine learning techniques such as Haar cascades or HOG + Linear SVM to “scan” the image for barcoded regions.
from: http://www.pyimagesearch.com/2014/11/24/detecting-barcodes-images-python-opencv/
中文版:http://blog.jobbole.com/80448/


