使用悬浮框监听内存的使用状态 -- 附源码
源码下载地址:http://download.csdn.net/detail/hewence1/8176601
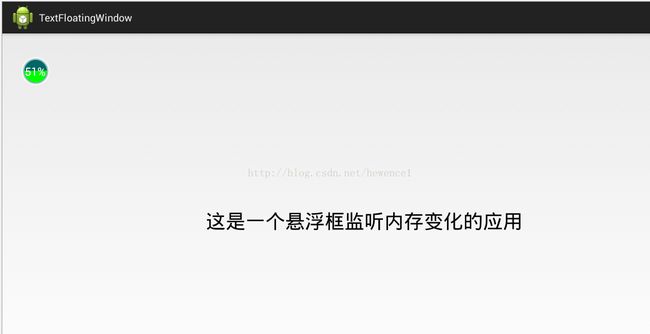
<span style="font-family: Arial, Helvetica, sans-serif; background-color: rgb(255, 255, 255);">先看一下效果: 显示当前内存使用率55% ,每一秒都刷新一次</span>
实现原理,在Service中创建一个悬浮框就可,在service中每秒钟访问计算一次单曲使用了多少的内存,并更新对应的控件
实现步骤:
1 创建一个Activity,此Activty自启动service即可,当然也可以加上其他界面
Activity代码:
	@Override
	protected void onCreate(Bundle savedInstanceState) {
		super.onCreate(savedInstanceState);
		setContentView(R.layout.activity_main);

		Intent show = new Intent(this, FloatService.class);
        startService(show);
	}
Xml代码就不贴了占篇幅,service代码现在也是空的也不贴了。
Manifest文件要注意:
加入权限:
<uses-permission android:name="android.permission.SYSTEM_ALERT_WINDOW"/>
<uses-permission android:name="android.permission.GET_TASKS"/>
跟service
<service android:name="com.example.testfloating.FloatService"></service>
2. 增加悬浮框
要增加的悬浮框跟上图一样要重写一个圆形的View 并且可以使阴影(现在是使用绿色)来表示百分百,如50% 那么绿色就只有一半。另一半显示背景色
先看这个View的代码:
	int width ;
	int height;
	int precent;
	Bitmap mBitmap ;
	int viewCorol = 0xff00ff00;


	public CircleView(Context context, AttributeSet attrs) {
		super(context, attrs);
	}

	@Override
	protected void onDraw(Canvas canvas) {
		// 先获得一个 bitmap吧  再
		super.onDraw(canvas);
		width = getMeasuredWidth();
		height = getMeasuredHeight();
		mBitmap = Bitmap.createBitmap(width, height,
                Config.ARGB_8888);
		Canvas mCanvas = new Canvas(mBitmap);
		Paint mPaint = new Paint();
        mPaint.setColor(viewCorol);
        mPaint.setAntiAlias(true);
        mCanvas.drawCircle(width / 2, height / 2, width / 2, mPaint);

		canvas.drawBitmap(mBitmap, new Rect(0, height * (100 - precent) / 100, width, height) ,
				new Rect(0, height * (100 - precent) / 100, width, height), null);
	}

	public void setPrecent(int precent) {
		this.precent = precent;
		invalidate();
	}
方法的实现请自己看代码, 不难理解
在setPrecent就是设计百分百比,这这里可以延伸一下的,
可以加入根据precent的大少来更改阴影的颜色,颜色的值要有一个递变的过程()
public void setPrecent(int precent) {
		this.precent = precent;
		if (precent >= 90){
			viewColor = .....
		}else if (precent >= 80){
			viewColor = .....
		}else if (precent >= 70){
			viewColor = .....

		}
		.precent........
		else{

		}
		invalidate();
	}
</pre><pre name="code" class="java">现在看布局文件:
<?xml version="1.0" encoding="utf-8"?>
<RelativeLayout xmlns:android="http://schemas.android.com/apk/res/android"
    android:layout_width="match_parent"
    android:layout_height="match_parent"
    android:id="@+id/window"

     >
<!-- android:descendantFocusability="blocksDescendants" -->

    <RelativeLayout
        android:id="@+id/circle_layout"
        android:layout_width="50dp"
        android:layout_height="50dp"
        android:background="@drawable/window_bg"
        android:orientation="vertical" >

        <com.example.textfloatingwindow.CircleView
            android:id="@+id/window_circle"
            android:layout_width="40dp"
            android:layout_height="40dp"
            android:layout_centerInParent="true" >
        </com.example.textfloatingwindow.CircleView>

        <TextView
            android:id="@+id/precent"
            android:layout_width="wrap_content"
            android:layout_height="wrap_content"
            android:layout_centerInParent="true"
            android:textColor="#ffffffff"
            android:textSize="20sp" />
    </RelativeLayout>

</RelativeLayout>
service代码:
	@Override
	public void onCreate() {
		super.onCreate();
		createFloatView();
		Log.i(TAG , "onCreate");
	}

	@Override
	public void onStart(Intent intent, int startId) {
		super.onStart(intent, startId);
		mHandler.sendEmptyMessage(HANDLE_CHECK_ACTIVITY);
		Log.i(TAG , "onStart");
	}

	@SuppressLint("HandlerLeak")
	private Handler mHandler = new Handler() {
		@Override
		public void handleMessage(Message msg) {
			switch (msg.what) {
			case HANDLE_CHECK_ACTIVITY:
				if (!isAdded) {
					Log.i(TAG , "wm.addView(mainView, params);");
					wm.addView(mainView, params);
					isAdded = true;
				}
				mHandler.sendEmptyMessageDelayed(HANDLE_CHECK_ACTIVITY, 1000);
				break;
			}
		}
	};


	/**
	 * 创建悬浮窗
	 */
	private void createFloatView() {
		wm = (WindowManager) getApplicationContext().getSystemService(
				Context.WINDOW_SERVICE);
		params = new WindowManager.LayoutParams();

		// 设置window type
		params.type = WindowManager.LayoutParams.TYPE_SYSTEM_ALERT;
		/*
		 * 如果设置为params.type = WindowManager.LayoutParams.TYPE_PHONE; 那么优先级会降低一些,
		 * 即拉下通知栏不可见
		 */
		params.format = PixelFormat.RGBA_8888; // 设置图片格式,效果为背景透明

		// 设置Window flag
		params.flags = WindowManager.LayoutParams.FLAG_NOT_TOUCH_MODAL
				| WindowManager.LayoutParams.FLAG_NOT_FOCUSABLE;
		/*
		 * 下面的flags属性的效果形同“锁定”。 悬浮窗不可触摸,不接受任何事件,同时不影响后面的事件响应。
		 * wmParams.flags=LayoutParams.FLAG_NOT_TOUCH_MODAL |
		 * LayoutParams.FLAG_NOT_FOCUSABLE | LayoutParams.FLAG_NOT_TOUCHABLE;
		 */

		// 设置悬浮窗的长得宽
		params.width = params.WRAP_CONTENT;
		params.height = params.WRAP_CONTENT;

		if (null == inflater){
			inflater = LayoutInflater.from(getApplicationContext());
			mainView = inflater.inflate(R.layout.window_view, null);
			precent = (TextView) mainView.findViewById(R.id.precent);
			circleView = (CircleView) mainView.findViewById(R.id.window_circle);
		}

	}
在onCreate里创建一个View ,但是没有加入到WindowManager中,在onStart中启动了Handler 每秒钟执行一次
if (!isAdded) {
					Log.i(TAG , "wm.addView(mainView, params);");
					wm.addView(mainView, params);
					isAdded = true;
				}
通过这个来增加到WindowManager来实现悬浮框。
现在悬浮框中啥都没有,只有一个背景,在这里 我只是使用一个shape当做背景,大家可以使用更pl的UI素材。现在的内存使用率是没有显示出来的是没有设置的!
3. 实时监控内存的变化
在Handler中增加这个更新得到的数据:
得到数据数据的方法如下:
 /**
     * 得到系统总内存 单位KB
     * @param context
     * @return
     */
    public  long getTotalMemory(Context context) {
        String str1 = "/proc/meminfo";// 系统内存信息文件
        String str2;
        String[] arrayOfString;
        long initial_memory = 0;

        try {
            FileReader localFileReader = new FileReader(str1);
            BufferedReader localBufferedReader = new BufferedReader(localFileReader, 8192);
            str2 = localBufferedReader.readLine();// 读取meminfo第一行,系统总内存大小

            arrayOfString = str2.split("\\s+");
         /*   for (String num : arrayOfString) {
                Log.i(str2, num + "\t");
            }*/

            initial_memory = Integer.valueOf(arrayOfString[1]).intValue() * 1024;// 获得系统总内存,单位是KB,乘以1024转换为Byte
            localBufferedReader.close();

        } catch (IOException e) {
        }
        return initial_memory;
    }

    public  long getAvailMemory(Context context) {// 获取android当前可用内存大小

        ActivityManager am = (ActivityManager)context.getSystemService(Context.ACTIVITY_SERVICE);
        MemoryInfo mi = new MemoryInfo();
        am.getMemoryInfo(mi);
        return mi.availMem;
    }

    private int getPrecent(){
    	long totalSize = getTotalMemory(getApplicationContext());
    	long aliSize = getAvailMemory(getApplicationContext());

    	int precent = 100 - (int) (aliSize * 100  / (float)totalSize);

    	return precent;
    }
    Handler修改为:
<pre name="code" class="java">@SuppressLint("HandlerLeak")
	private Handler mHandler = new Handler() {
		@Override
		public void handleMessage(Message msg) {
			switch (msg.what) {
			case HANDLE_CHECK_ACTIVITY:
				if (!isAdded) {
					Log.i(TAG , "wm.addView(mainView, params);");
					wm.addView(mainView, params);
					isAdded = true;
				}

			<span style="background-color: rgb(255, 153, 0);">	precent.setText(getPrecent() + "%");
				circleView.setPrecent(getPrecent());</span>
				mHandler.sendEmptyMessageDelayed(HANDLE_CHECK_ACTIVITY, 1000);
				break;
			}
		}
	};
现在效果就是:

机器的任何都是有它的存在的,所有就实现了实时监听
4. 可拖动到界面任何一个地方
现在的悬浮框中能在最中间,现在我们就把他推动到你要想的位置:
增加onTouch处理

// 设置悬浮窗的Touch监听
		mainView.setOnTouchListener(new OnTouchListener() {
			int lastX, lastY;
			int paramX, paramY;

			public boolean onTouch(View v, MotionEvent event) {
				switch (event.getAction()) {
				case MotionEvent.ACTION_DOWN:
					lastX = (int) event.getRawX();
					lastY = (int) event.getRawY();
					paramX = params.x;
					paramY = params.y;
					break;
				case MotionEvent.ACTION_MOVE:
					int dx = (int) event.getRawX() - lastX;
					int dy = (int) event.getRawY() - lastY;
					params.x = paramX + dx;
					params.y = paramY + dy;
					// 更新悬浮窗位置
					wm.updateViewLayout(mainView, params);
					break;
				}

				// return true的 click事件是没有反应的,至于为什么 大家去了解触摸事件分发与处理 就知道了
				return false;
			}
		});

5.只在主界面显示
现在的悬浮框在所有的界面都显示了,有些不合理,在桌面才显示这个悬浮框(这里可以设置一个设置项 是否只显示在主界面)
判断是否是在桌面的方法如下:
 /** 获得属于桌面的应用的应用包名称
	 *
	 * @return 返回包含所有包名的字符串列表
	 */
	private List<String> getHomes() {
		List<String> names = new ArrayList<String>();
		PackageManager packageManager = this.getPackageManager();
		// 属性
		Intent intent = new Intent(Intent.ACTION_MAIN);
		intent.addCategory(Intent.CATEGORY_HOME);
		List<ResolveInfo> resolveInfo = packageManager.queryIntentActivities(
				intent, PackageManager.MATCH_DEFAULT_ONLY);
		for (ResolveInfo ri : resolveInfo) {
			names.add(ri.activityInfo.packageName);
		}
		return names;
	}

	/**
	 * 判断当前界面是否是桌面
	 */
	public boolean isHome() {
		if (mActivityManager == null) {
			mActivityManager = (ActivityManager) getSystemService(Context.ACTIVITY_SERVICE);
		}
		List<RunningTaskInfo> rti = mActivityManager.getRunningTasks(1);
		return homeList.contains(rti.get(0).topActivity.getPackageName());
	}
@SuppressLint("HandlerLeak")
	private Handler mHandler = new Handler() {
		@Override
		public void handleMessage(Message msg) {
			switch (msg.what) {
			case HANDLE_CHECK_ACTIVITY:
				if (isHome()){
					if (!isAdded) {
						Log.i(TAG , "wm.addView(mainView, params);");
						wm.addView(mainView, params);
						isAdded = true;
					}
					// 只有主界面才更新
					precent.setText(getPrecent() + "%");
					circleView.setPrecent(getPrecent());
				}else{
					if (isAdded){
						wm.removeView(mainView);
						isAdded = false;
					}
				}

				mHandler.sendEmptyMessageDelayed(HANDLE_CHECK_ACTIVITY, 1000);
				break;
			}
		}
	};
</pre><pre name="code" class="java">@Override
	public void onCreate() {
		super.onCreate();
		homeList = getHomes();
		createFloatView();
		Log.i(TAG , "onCreate");
	}
这样可以保证只有在桌面时才显示悬浮框
6.增加悬浮框的响应事件
现在的悬浮框点击是无效的,我们想要点击时 退出 或者跳转到应用,或者启动某个 Intent等
可以在点击悬浮框时弹出一个另外的一排按钮,来适应大家的要求,再次点击时移除这一排按钮
修改布局文件为:
<?xml version="1.0" encoding="utf-8"?>
<RelativeLayout xmlns:android="http://schemas.android.com/apk/res/android"
    android:id="@+id/window"
    android:layout_width="match_parent"
    android:layout_height="match_parent" >
    <RelativeLayout
        android:id="@+id/circle_layout"
        android:layout_width="50dp"
        android:layout_height="50dp"
        android:background="@drawable/window_bg"
        android:orientation="vertical" >

        <com.example.textfloatingwindow.CircleView
            android:id="@+id/window_circle"
            android:layout_width="40dp"
            android:layout_height="40dp"
            android:layout_centerInParent="true" >
        </com.example.textfloatingwindow.CircleView>

        <TextView
            android:id="@+id/precent"
            android:layout_width="wrap_content"
            android:layout_height="wrap_content"
            android:layout_centerInParent="true"
            android:textColor="#ffffffff"
            android:textSize="20sp" />
    </RelativeLayout>

    <LinearLayout
        android:id="@+id/menu_layout"
        android:layout_width="80dp"
        android:layout_height="60dp"
        android:layout_toRightOf="@id/circle_layout"
        android:visibility="gone"
        android:orientation="vertical" >

        <TextView
            android:id="@+id/menu0"
            android:layout_width="fill_parent"
            android:layout_height="wrap_content"
            android:gravity="center_horizontal"
            android:text="打开应用" />

        <TextView
            android:id="@+id/menu1"
            android:layout_width="fill_parent"
            android:layout_height="wrap_content"
            android:gravity="center_horizontal"
            android:text="返回" />

        <TextView
            android:id="@+id/menu2"
            android:layout_width="fill_parent"
            android:layout_height="wrap_content"
            android:gravity="center_horizontal"
            android:text="退出悬浮框" />
    </LinearLayout>

</RelativeLayout>
增加代码:
menu0.setOnClickListener(new OnClickListener() {

			@Override
			public void onClick(View v) {
				Intent it = new Intent(FloatService.this , MainActivity.class);
				it.setFlags(Intent.FLAG_ACTIVITY_NEW_TASK);
				startActivity(it);
			}
		});

		menu1.setOnClickListener(new OnClickListener() {

			@Override
			public void onClick(View v) {
				menu.setVisibility(View.GONE);
			}
		});

		menu2.setOnClickListener(new OnClickListener() {

			@Override
			public void onClick(View v) {
				isAdded  = false;
				wm.removeView(mainView);
				// 记得要移动掉handler  否则还是一秒运行一次
				mHandler.removeMessages(HANDLE_CHECK_ACTIVITY);
				stopSelf();
			}
		});
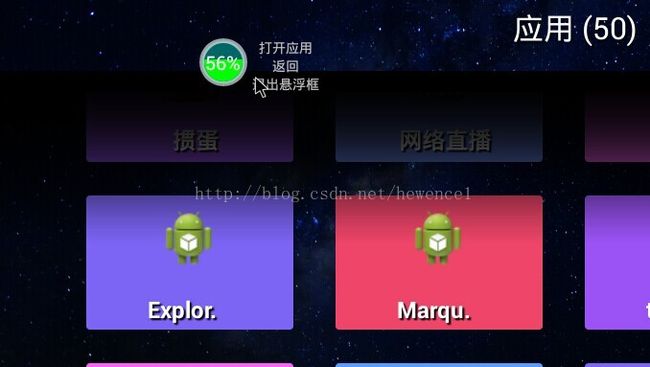
效果如下:
点击都是有作用的!


