Canny算子,Houng变换检测图像轮廓,直线等图像元素
主要内容:
1. 通过Canny算子检测图像轮廓
2. Hough变换检测图像中的直线
3.通过一系列点拟合直线
4.检测组件的轮廓
5. 组件轮廓的描述
一、引言
为了能执行对图形基本内容的分析,从由一系列像素组成的图像中检测出有意义的特点来是有必要的,例如轮廓,直线,斑点等图像的基本组件。本节将教大家怎样检测这些图像中有用的组件。
二、通过Canny算子检测图像轮廓
在前面我们介绍了通过高通滤波器方法(Sobel和Laplace)方法很方便的检测出图像的轮廓。我们对梯度幅值的设置门限来显示一个二进制的图像轮廓。轮廓带有很重要的视觉信息,因此轮廓检测被广泛使用,例如目标识别。但是,简单的二进制边缘图像有两个缺点:一是边缘检测图形有些线条太粗,不适合精准的表达物体的形状。第二点,也是比较重要的一点是,门限值的选择,很难足够低,以致显示所有重要目标的边缘,也很难足够高,使得不包含太多没有用的边缘,这是一个需要权衡的问题,
Canny算法就尝试解决这个问题。
2.1 Canny算法实现目标和步奏
Canny算法实现的目标:
1.低误差率:只检测存在的边缘
2.良好的定位性:边缘比较细,与真实边缘的距离小
3.最小响应:每个边缘只响应一个检测器
Canny边缘检测是John F.Canny 提出的广为人知的边缘检测算法,其实现步奏是
1.高斯滤波
2.通过上下限,分别对图形进行类似Sobel算法的边缘检测,
3.滞后阈值化
1)超过最大阈值的点,是边缘点
2)比最小阈值点小的点,不作为边缘点
3)介于两者之间的的点,与上限相连的点是边缘点
4)上下限阈值推荐比例为3:2
2.2 Canny算子的opencv实现
opencv中提供Canny算子函数,
//! applies Canny edge detector and produces the edge map.
CV_EXPORTS_W void Canny( InputArray image, OutputArray edges,
                         double threshold1, double threshold2,
                         int apertureSize=3, bool L2gradient=false );
使用实例:
cv::Canny(image,contours,125,350);程序实例:
// Read input image
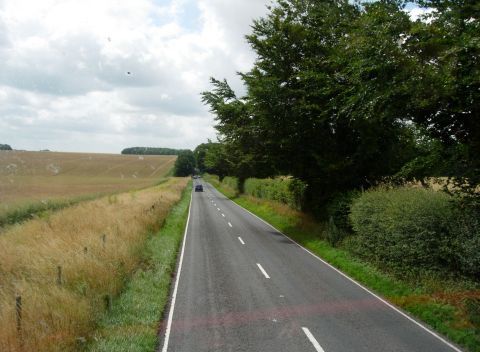
	cv::Mat image= cv::imread("road.jpg",0);
	if (!image.data)
		return 0;

    // Display the image
	cv::namedWindow("Original Image");
	cv::imshow("Original Image",image);
	cv:imwrite("Original Image.jpg",image);

	// Compute Sobel
	EdgeDetector ed;
	ed.computeSobel(image);

    // Display the Sobel orientation
	cv::namedWindow("Sobel (orientation)");
	cv::imshow("Sobel (orientation)",ed.getSobelOrientationImage());
	cv::imwrite("ori.bmp",ed.getSobelOrientationImage());

    // Display the Sobel low threshold
	cv::namedWindow("Sobel (low threshold)");
	cv::imshow("Sobel (low threshold)",ed.getBinaryMap(125));
	cv::imwrite("Sobel (low threshold).jpg",ed.getBinaryMap(125));

    // Display the Sobel high threshold
	cv::namedWindow("Sobel (high threshold)");
	cv::imshow("Sobel (high threshold)",ed.getBinaryMap(350));
	cv::imwrite("Sobel (high threshold).jpg",ed.getBinaryMap(350));

	// Apply Canny algorithm
	cv::Mat contours;
	cv::Canny(image,contours,125,350);
	cv::Mat contoursInv;
	//对Canny算子求出的二进制图形进行翻转,高的梯度值显示为黑色,低梯度值显示为白色
	cv::threshold(contours,contoursInv,128,255,cv::THRESH_BINARY_INV);
    // Display the image of contours
	cv::namedWindow("Canny Contours");
	cv::imshow("Canny Contours",contoursInv);
	cv::imshow("Canny Contours.jpg",contoursInv);
2.3程序结果分析
road.jpg
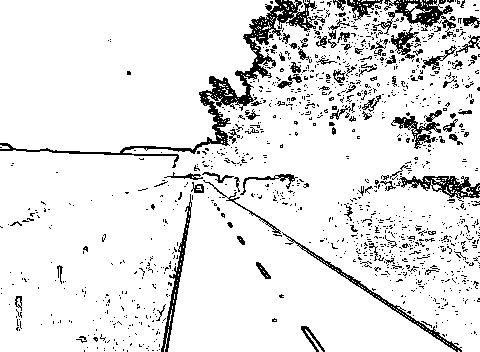
Sobel (low threshold).jpg(显示很多细节)
Sobel (high threshold).jpg(滤掉很多没有用的边界)
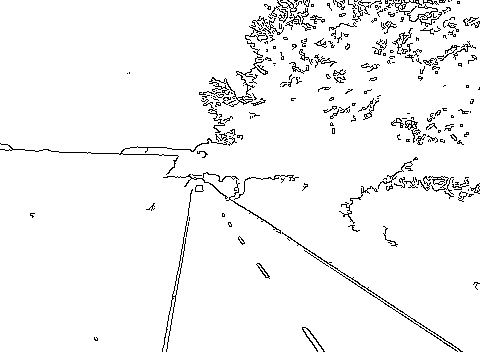
Canny Contours.jpg (边界清晰,轮廓线条比较细,利于目标的定位,主要边界全部显示,而且多余的边界比较少)
三、Hough变换检测图像中的直线
在人们生活的世界里,充满平面和线性结构。所以,图像中也高频率的出现直线。这是很有意义的图像特征,特别是在目标检测和图像理解中应用更多。因此,一个有效地检测这一特征是很有用的。Hough变换就是一个经典的算法,它最初开发是在图像中检测直线,就像我们看见的一样,它也可以检测简单的图像结构。
3.1 huogh变换简介
霍夫变换是图像处理中识别几何形状的一种方法,在图像处理中有着广泛应用,霍夫变换不受图形旋转的影响,易于进行几何图形的快速变换。基于霍夫变换的改进方法也有很多,其中一个重要的方法是广义霍夫变换,可以用来检测任意形状的曲线。
霍夫检测基于极坐标,在这先介绍下直线在极坐标中的表示方法,rho表示图像原点(左上角)与直线的距离,rho有最大值,即图像的对角线长度;theta表示直线垂线的角度,范围0°--π°。给出下面几个例子便于理解:
直线1,theta = 0;直线2 theta = 0.8π,rho为负值;直线3 theta = π/4;直线4 theta = 0.7π;直线5 theta = π/2.
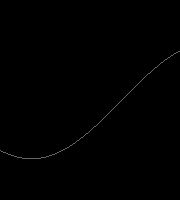
在一个二值非零的图像中,先选择一个点例如(50,30),然后利用极坐标,改变theta的值,以π/180为距离,从0-π循环,计算出对应的一个rho的值,以横坐标为theta,纵坐标为rho,画出theta和rho改变的曲线如左图,再以点(30,10)为基准点,画出theta和rho的变换曲线,如右图:
左图可以看出,theta和rho的变化是正玄曲线,选取两个不同点,曲线相交的地方就是经过两点的theta和rho的值。
在霍夫变换中,如果对一个二值图像中所有的点都进行霍夫变换,得到的图形,只要计算出多少个曲线经过同一点,找出峰值,或者大于设定的门限值,就可以确定直线。这就是霍夫变换的原理。
上图的程序如下:
// Create a Hough accumulator
	cv::Mat acc(200,180,CV_8U,cv::Scalar(0));

	// Choose a point
	int x=50, y=30;

	// loop over all angles
	for (int i=0; i<180; i++) {

		double theta= i*PI/180.;

		// find corresponding rho value
		double rho= x*cos(theta)+y*sin(theta);
		int j= static_cast<int>(rho+100.5);

		std::cout << i << "," << j << std::endl;

		// increment accumulator
		acc.at<uchar>(j,i)++;
	}

	cv::imwrite("hough1.bmp",acc*100);

	// Choose a second point
	x=30, y=10;

	// loop over all angles
	for (int i=0; i<180; i++) {

		double theta= i*PI/180.;
		double rho= x*cos(theta)+y*sin(theta);
		int j= static_cast<int>(rho+100.5);

		acc.at<uchar>(j,i)++;
	}

	cv::namedWindow("Hough Accumulator");
	cv::imshow("Hough Accumulator",acc*100);
	cv::imwrite("hough2.bmp",acc*100);
3.2 opencv中霍夫变换的应用
opencv提供霍夫变换的函数 cv::HoufhLines。
函数定义:
//! finds lines in the black-n-white image using the standard or pyramid Hough transform
CV_EXPORTS_W void HoughLines( InputArray image, OutputArray lines,
                              double rho, double theta, int threshold,
                              double srn=0, double stn=0 );
函数使用实例:
cv::HoughLines(contours,lines,1,PI/180,60);函数参数说明:
double rho:rho的最小变化尺度
double theta: theta的最小变化尺度
int threshold: 相交于一点的曲线数量的门限,超过这个值,才能被认定成直线
3.3 程序实例
// Hough tranform for line detection
	std::vector<cv::Vec2f> lines;
	cv::HoughLines(contours,lines,1,PI/180,80);

	// Draw the lines
	cv::Mat result(contours.rows,contours.cols,CV_8U,cv::Scalar(255));
	image.copyTo(result);

	std::cout << "Lines detected: " << lines.size() << std::endl;

	std::vector<cv::Vec2f>::const_iterator it= lines.begin();
	while (it!=lines.end()) {

		float rho= (*it)[0];   // first element is distance rho
		float theta= (*it)[1]; // second element is angle theta

		if (theta < PI/4. || theta > 3.*PI/4.) { // ~vertical line

			// point of intersection of the line with first row
			cv::Point pt1(rho/cos(theta),0);
			// point of intersection of the line with last row
			cv::Point pt2((rho-result.rows*sin(theta))/cos(theta),result.rows);
			// draw a white line
			cv::line( result, pt1, pt2, cv::Scalar(255), 1);

		} else { // ~horizontal line

			// point of intersection of the line with first column
			cv::Point pt1(0,rho/sin(theta));
			// point of intersection of the line with last column
			cv::Point pt2(result.cols,(rho-result.cols*cos(theta))/sin(theta));
			// draw a white line
			cv::line( result, pt1, pt2, cv::Scalar(255), 1);
		}

		std::cout << "line: (" << rho << "," << theta << ")\n";

		++it;
	}

    // Display the detected line image
	cv::namedWindow("Detected Lines with Hough");
	cv::imshow("Detected Lines with Hough",result);
3.4 程序结果
3.5 直线段的检测
由上图的结果可以看出有些直线不是我们要检测的直线,产生原因一是图像中一些偶然的杂质点构成的直线,另外一个是同一直线轮廓产生多个直线。对于这个问题,我们可以使用opencv中另外一个函数cv::HoughLinesP,检测出直线段。
函数定义:
//! finds line segments in the black-n-white image using probabalistic Hough transform
CV_EXPORTS_W void HoughLinesP( InputArray image, OutputArray lines,
                               double rho, double theta, int threshold,
                               double minLineLength=0, double maxLineGap=0 );
函数参数说明:
double rho 和 double theta 是 设置hough检测中rho和theta的分辨率
int threshold 是 被确定成直线要通过的最小的点的门限
double minLinelength 被确定线段的最小长度
double maxLineGap 被确定直线段中间隔的最大长度
函数使用实例
cv::HoughLinesP(binary,lines,1,π/180,80, 100, 20);程序实例
	// Create LineFinder instance
	LineFinder ld;

	// Set probabilistic Hough parameters
	ld.setLineLengthAndGap(100,20);
	ld.setMinVote(80);

	// Detect lines
	std::vector<cv::Vec4i> li= ld.findLines(contours);
	ld.drawDetectedLines(image);
	cv::namedWindow("Detected Lines with HoughP");
	cv::imshow("Detected Lines with HoughP",image);
程序结果:
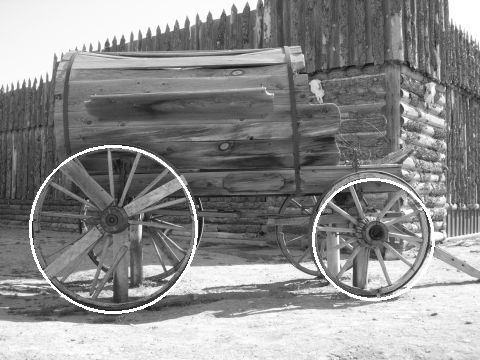
3.6 圆形检测
圆形的参数方程是r=(x-x0)^2+(y-y0)^2,可以看出有三个参数,半径r,圆心位置x0,y0,由于霍夫检测是2维的,直接利用3维霍夫变换,会使程序复杂。所以opencv提供一种圆形检测的方法:霍夫梯度法。
第一步是在二值图像中对一点进行Sobel的x,y求导,计算出该点的梯度,则梯度方向就是该点和圆心的直线方向,所以标记所有通过该直线的点,最后超过门限值的点就是圆心的位置。第二步就是以圆心为基点,以半径为一维霍夫变换参数,找出图形中的圆形。
函数定义:
//! finds circles in the grayscale image using 2+1 gradient Hough transform
CV_EXPORTS_W void HoughCircles( InputArray image, OutputArray circles,
                               int method, double dp, double minDist,
                               double param1=100, double param2=100,
                               int minRadius=0, int maxRadius=0 );
函数使用实例:
	std::vector<cv::Vec3f> circles;
	cv::HoughCircles(image, circles, CV_HOUGH_GRADIENT,
		2,   // accumulator resolution (size of the image / 2)
		50,  // minimum distance between two circles
		200, // Canny high threshold
		100, // minimum number of votes
		25, 100); // min and max radius
函数参数说明:
OutputArray circles:3维,前两个参数是圆心,第三个是半径
int method: 目前只有一个参数 是 CV_HOUGH_GRADIENT
程序实例:
// Detect circles
	image= cv::imread("chariot.jpg",0);
	cv::GaussianBlur(image,image,cv::Size(5,5),1.5);
	std::vector<cv::Vec3f> circles;
	cv::HoughCircles(image, circles, CV_HOUGH_GRADIENT,
		2,   // accumulator resolution (size of the image / 2)
		50,  // minimum distance between two circles
		200, // Canny high threshold
		100, // minimum number of votes
		25, 100); // min and max radius

	std::cout << "Circles: " << circles.size() << std::endl;

	// Draw the circles
	image= cv::imread("chariot.jpg",0);
	std::vector<cv::Vec3f>::const_iterator itc= circles.begin();

	while (itc!=circles.end()) {

	  cv::circle(image,
		  cv::Point((*itc)[0], (*itc)[1]), // circle centre
		  (*itc)[2], // circle radius
		  cv::Scalar(255), // color
		  2); // thickness

	  ++itc;
	}

	cv::namedWindow("Detected Circles");
	cv::imshow("Detected Circles",image);
程序结果:
