coretext
Core Text 是基于 iOS 3.2+ 和 OSX 10.5+ 的一种能够对文本格式和文本布局进行精细控制的文本引擎。
它良好的结合了 UIKit 和 Core Graphics/Quartz:
- UIKit 的 UILabel 允许你通过在 IB 中简单的拖曳添加文本,但你不能改变文本的颜色和其中的单词。
- Core Graphics/Quartz几乎允许你做任何系统允许的事情,但你需要为每个字形计算位置,并画在屏幕上。
- Core Text 正结合了这两者!你可以完全控制位置、布局、类似文本大小和颜色这样的属性,而 Core Text 将帮你完善其它的东西——类似文本换行、字体呈现等等。
Core Text 对于创建杂志和书籍应用十分方便——它们在 iPad 上非常受欢迎!
这篇教程将会引领你使用 Core Text,通过创建一个简单的杂志应用——为僵尸!
你将学会如何:
- 在屏幕上呈现格式化后的文本;
- 微调文本外观;
- 在文本内容中添加图片;
- 最后是创建杂志应用,加载文本标记,对已呈现的文本进行格式化修改。
- 吃掉大脑!这是个玩笑,只对此杂志的读者。
事不宜迟,让我们为僵尸的快乐生活做出自己应有的贡献吧——通过创建他们的专属 iPad 杂志!
创建一个 Core Text 项目
开启 Xcode,点击 File\New\New Project,选择 iOS\Application\View-based Application,并点击 Next,将项目命名为 CoreTextMagazine,选择 iPad 作为设备,点击 Next,选择保存项目的目录,点击 Create。
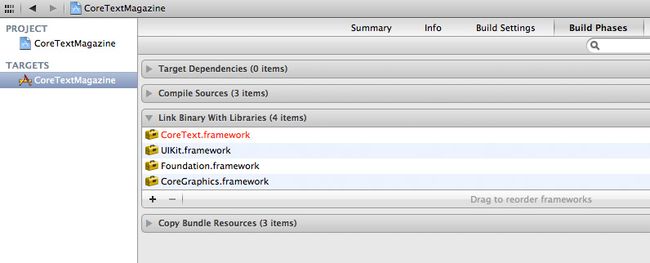
下一步就是为项目添加 Core Text 框架:
- 在项目导航中点击项目文件(左侧栏)
- 在 Target 列中点击项目中唯一的 “CoreTextMagazine”
- 点击 “Build phases” 标签
- 展开 “Link Binary With Libraries” 栏,并点击 “+” 按钮
- 选择列表中的 “CoreText.framework” 并点击 “Add”
添加一个 Core Text 视图
要尽快上手 Core Text,你需要创建一个自定义的 UIView,使用 Core Text 作为其 drawRect: 方法。
点击File\New\New File,选择 iOS\Cocoa Touch\Objective-C class,并点击 Next。输入 UIView 作为 Subclass,点击 Next,将新类命名为 CTView,并点击 Save。
在 CTView.h 文件中,在 @interface 前添加下面的代码,引用 Core Text 框架:
|
1
|
#import <CoreText/CoreText.h>
|
下一步,你将设置这个新的自定义视图为应用的主视图。
在项目浏览器中选择 “CoreTextMagazineViewController.xib” 文件, 并打开 XCode 的实用工具栏 (它在你按下 XCode 顶部工具栏的视图区第三项时显示)。 点击这个实用工具栏上第三个图标选择 Identity 选项卡。
现在点击界面编辑器的空白区域选中窗口的视图 – 您应该看到实用工具栏上有一个 Class 字段显示为“UIView”。 输入 “CTView” 后回车。

现在您的应用将在后显示您的自定义 Core Text 视图了,不过先等等 – 先加入一些绘制文字的代码好用于测试。
打开 CTView.m 删除所有预定义的方法。 输入下面的代码在你的视图上绘制一个“Hello world”:
|
1
2 3 4 5 6 7 8 9 10 11 12 13 14 15 16 17 18 19 20 21 22 23 |
-
(
void
)drawRect
:
(CGRect
)rect
{ [super drawRect :rect ]; CGContextRef context = UIGraphicsGetCurrentContext ( ); CGMutablePathRef path = CGPathCreateMutable ( ); //1 CGPathAddRect (path, NULL, self.bounds ); NSAttributedString * attString = [ [ [ NSAttributedString alloc ] initWithString : @ "Hello core text world!" ] autorelease ]; //2 CTFramesetterRef framesetter = CTFramesetterCreateWithAttributedString ( (CFAttributedStringRef )attString ); //3 CTFrameRef frame = CTFramesetterCreateFrame (framesetter, CFRangeMake ( 0, [attString length ] ), path, NULL ); CTFrameDraw (frame, context ); //4 CFRelease (frame ); //5 CFRelease (path ); CFRelease (framesetter ); } |
让我们来一步一步讨论,使用注释标记上述指定每个节:
- 这里你需要创建一个用于绘制文本的路径区域。Mac 上的 Core Text 支持矩形图形等不同形状,但在 iOS 上只支持矩形。在这个示例中,你将通过 self.bounds 使用整个视图矩形区域创建 CGPath 引用。
- 在 Core Text 中使用 NSAttributedString 而不是 NSString,NSAttributedString 是一个非常强大的 NSString 派生类,它允许你对文本应用格式化属性。 现在我们还没有用到格式化,这里仅仅使用纯文本。
- CTFramesetter 是使用 Core Text 绘制时最重要的类。它管理您的字体引用和文本绘制帧。 目前您需要了解 CTFramesetterCreateWithAttributedString 通过应用属性化文本创建 CTFramesetter 。 本节中,在 framesetter 之后通过一个所选的文本范围(这里我们选择整个文本)与需要绘制到的矩形路径创建一个帧。
- CTFrameDraw 将 frame 描述到设备上下文。
- 最后,释放所有使用的对象。
你可能会想“既然已经又了 Objective-C,为什么我还要用 C ?!”
好吧,为了简捷,iOS 的很多底层库都是用 plain C 编写的。不用担心,Core Text 的函数应用起来很简单。
只有一件事要牢记:在你引用名字中有 “Create” 的函数时,不要忘记使用 CFRelease。
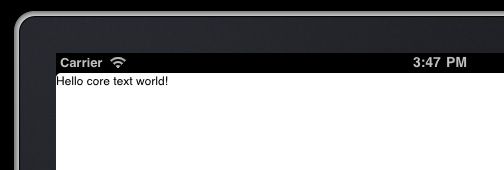
不管你信不信,这就是用 Core Text 画简单文本的所有东西!点击运行,看看结果。

噢,看上去有点不对劲,是吧?跟很多底层 API 一样,Core Text 使用 Y翻转坐标系统。更糟糕的是,内容的呈现也是上下翻转的。注意,当你混合使用 UIKit 绘图和 Core Text 绘图时,你将获得很奇葩的结果。
然后修改内容的方向!在 “CGContextRef context = UIGraphicsGetCurrentContext();” 一行后添加代码如下:
|
1
2 3 4 |
// Flip the coordinate system
CGContextSetTextMatrix (context, CGAffineTransformIdentity ); CGContextTranslateCTM (context, 0, self.bounds.size.height ); CGContextScaleCTM (context, 1.0, - 1.0 ); |
This is very simple code, which just flips the content by applying a transformation to the view’s context. Just copy/paste it each time you do drawing with CT.
代码很简单,只是通过转换内容将其翻转。你只需要在画 CT 时复制/粘帖它们。
再运行一次——恭喜你完成了第一个 Core Text 应用!
Core Text 对象模型
如果您对 CTFramesetter 与 CTFrame 还有些不明白。这里我来做一个有关 Core Text 如何渲染文本内容的简述。
Core Text 对象模型如下:
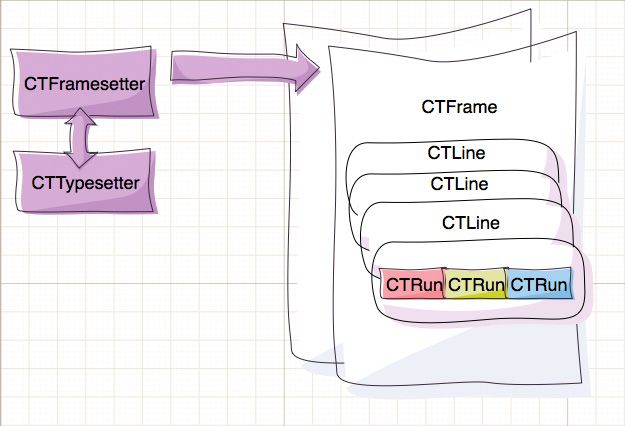
您创建 CTFramesetter 关联您提供的 NSAttributedString 。此时 CTTypesetter 实例将自动创建, 它管理您的字体。下一步使用 CTFramesetter 创建您要用于渲染文本的一个或多个帧。
当您创建帧时,您指定一个用于此帧矩形内的子文本范围。Core Text 为每行文本自动创建一个 CTLine (注意这里) 与并创建多个 CTRun 文本分段,每个 CTRun 内的文本有着同样的格式。
例如,Core Text 可能为您的几个红色单词创建一个 CTRun,其它 CTRun 包括纯文本,另外一些 CTRun 是粗体等。再次重申,你不要自己直接创建 CTRun 实例, Core Text 使用其于您提供的 NSAttributedString 相关属性创建它们。
每个 CTRun 对象可以采用不同的属性,所以你可以精确的控制字距,连字,宽度,高度等更多属性。
映射到杂志应用
要创建这个杂志应用,我们要具备可以将一些文本标记成具有不同属性的性能。我们可以直接使用NSAttributedString的方法来做到这点,比如setAttributes:range,但在实践中这是一种笨拙的处理方式(除非你费力地编写大量代码)。
因此,为了更简单地处理问题,我们将创建一个简单的文本标记解析器,它允许我们在杂志内容中使用简单的标签设置格式。
进到“File\New’New File“下,选择”iOS\Cocoa Touch\Objective-C class”, 然后点击下一步,进入NSObject子类,点击下一步,将新类命名为MarkupParser.m再保存。
切换到 MarkupParser.h 文件删除所有内容并粘贴下面的代码 – 它定义了用于解析的一些属性与方法:
|
1
2 3 4 5 6 7 8 9 10 11 12 13 14 15 16 17 18 19 20 21 22 23 |
#import <Foundation/Foundation.h>
#import <CoreText/CoreText.h> @interface MarkupParser : NSObject { NSString * font; UIColor * color; UIColor * strokeColor; float strokeWidth; NSMutableArray * images; } @property (retain, nonatomic ) NSString * font; @property (retain, nonatomic ) UIColor * color; @property (retain, nonatomic ) UIColor * strokeColor; @property (assign, readwrite ) float strokeWidth; @property (retain, nonatomic ) NSMutableArray * images; - ( NSAttributedString * )attrStringFromMarkup : ( NSString * )html; @end |
接着打开 MarkupParser.m 并使用下面的代码替换:
|
1
2 3 4 5 6 7 8 9 10 11 12 13 14 15 16 17 18 19 20 21 22 23 24 25 26 27 28 29 30 31 32 33 34 35 36 |
#import "MarkupParser.h"
@implementation MarkupParser @synthesize font, color, strokeColor, strokeWidth; @synthesize images; - ( id )init { self = [super init ]; if (self ) { self.font = @ "Arial"; self.color = [UIColor blackColor ]; self.strokeColor = [UIColor whiteColor ]; self.strokeWidth = 0.0; self.images = [ NSMutableArray array ]; } return self; } - ( NSAttributedString * )attrStringFromMarkup : ( NSString * )markup { } - ( void )dealloc { self.font = nil; self.color = nil; self.strokeColor = nil; self.images = nil; [super dealloc ]; } @end |
正如你所看到的,这是个简单的解析器代码 – 它只包括了几个属性用于记录字体,文本颜色,画笔大于与画笔颜色。 后面我将在文字中加入图片,所以需要一个数组保存文字中使用到的图片列表。
编写一个解析器通常是很困难的工作, 在这里我将向你展示使用正则表达示创建一个非常简单的解析器。 本教程中的解析器将非常简单,只支持开放型标签 – 一个标签设置后面文本的样式,直到出现一个新的标签,这种标签化文本看起来就像这样:
These are red and blue words.
对于本教程的目的,这样的标签就足够了。对于您的项目,如果需要,你可以进一步完善。
开始解析!
在 attrStringFromMarkup: 方法中添加:
|
1
2 3 4 5 6 7 8 9 10 |
NSMutableAttributedString
* aString
=
[ [ NSMutableAttributedString alloc ] initWithString : @ "" ]; //1 NSRegularExpression * regex = [ [NSRegularExpression alloc ] initWithPattern : @ "(.*?)(<[^>]+>|\\Z)" options :NSRegularExpressionCaseInsensitive|NSRegularExpressionDotMatchesLineSeparators error : nil ]; //2 NSArray * chunks = [regex matchesInString :markup options : 0 range :NSMakeRange ( 0, [markup length ] ) ]; [regex release ]; |
在这里介绍两部分:
- 首先,设置一个用于增加文本的空返回文本。
- 接着,创建一个匹配文本与标签的正则表达式。 这个正则表达式将匹配一段文本跟着一个标签。 这个正则表达式基本上可以说是“查找任何数量的字符,直到你遇到一个左括号。然后匹配任何数量的字符,直到你找到一个右括号。 或 停止处理当你到了结束的字符串。”
为什么我们要创建这样的正则表达式?我们将用它来搜索的字符串相匹配的每一部分 1)绘制找到的文本块,2)按找到的标签更改当前样式。重复这个过程直到文本结束。
非常简单的解析器不是吗?
现在您有全部文本和格式化标签分块的 “chunks” 数组, 你需要使用它的文字与标签循环创造属性化文本。
在方法体里添加:
|
1
2 3 4 5 6 7 8 9 10 11 12 13 14 15 16 17 18 19 20 21 22 23 24 25 26 27 28 29 30 31 32 33 34 35 36 37 38 39 40 41 42 43 44 45 46 47 48 49 50 51 |
for
(NSTextCheckingResult
* b
in chunks
)
{
NSArray * parts = [ [markup substringWithRange :b.range ] componentsSeparatedByString : @ "<" ]; //1 CTFontRef fontRef = CTFontCreateWithName ( (CFStringRef )self.font, 24.0f, NULL ); //apply the current text style //2 NSDictionary * attrs = [ NSDictionary dictionaryWithObjectsAndKeys : ( id )self.color.CGColor, kCTForegroundColorAttributeName, ( id )fontRef, kCTFontAttributeName, ( id )self.strokeColor.CGColor, ( NSString * ) kCTStrokeColorAttributeName, ( id ) [ NSNumber numberWithFloat : self.strokeWidth ], ( NSString * )kCTStrokeWidthAttributeName, nil ]; [aString appendAttributedString : [ [ [ NSAttributedString alloc ] initWithString : [parts objectAtIndex : 0 ] attributes :attrs ] autorelease ] ]; CFRelease (fontRef ); //handle new formatting tag //3 if ( [parts count ]> 1 ) { NSString * tag = ( NSString * ) [parts objectAtIndex : 1 ]; if ( [tag hasPrefix : @ "font" ] ) { //stroke color NSRegularExpression * scolorRegex = [ [ [NSRegularExpression alloc ] initWithPattern : @ "(?<=strokeColor=\")\\w+" options : 0 error : NULL ] autorelease ]; [scolorRegex enumerateMatchesInString :tag options : 0 range :NSMakeRange ( 0, [tag length ] ) usingBlock :^ (NSTextCheckingResult *match, NSMatchingFlags flags, BOOL *stop ) { if ( [ [tag substringWithRange :match.range ] isEqualToString : @ "none" ] ) { self.strokeWidth = 0.0; } else { self.strokeWidth = - 3.0; SEL colorSel = NSSelectorFromString ( [ NSString stringWithFormat : @ "%@Color", [tag substringWithRange :match.range ] ] ); self.strokeColor = [UIColor performSelector :colorSel ]; } } ]; //color NSRegularExpression * colorRegex = [ [ [NSRegularExpression alloc ] initWithPattern : @ "(?<=color=\")\\w+" options : 0 error : NULL ] autorelease ]; [colorRegex enumerateMatchesInString :tag options : 0 range :NSMakeRange ( 0, [tag length ] ) usingBlock :^ (NSTextCheckingResult *match, NSMatchingFlags flags, BOOL *stop ) { SEL colorSel = NSSelectorFromString ( [ NSString stringWithFormat : @ "%@Color", [tag substringWithRange :match.range ] ] ); self.color = [UIColor performSelector :colorSel ]; } ]; //face NSRegularExpression * faceRegex = [ [ [NSRegularExpression alloc ] initWithPattern : @ "(?<=face=\")[^\"]+" options : 0 error : NULL ] autorelease ]; [faceRegex enumerateMatchesInString :tag options : 0 range :NSMakeRange ( 0, [tag length ] ) usingBlock :^ (NSTextCheckingResult *match, NSMatchingFlags flags, BOOL *stop ) { self.font = [tag substringWithRange :match.range ]; } ]; } //end of font parsing } } return ( NSAttributedString * )aString; |
呼, 这段代码不少!不过别担心,我们一段一段来看。
- 您遍历由之前的正则表达式匹配的块,用 “<"字符(标签开始)分割块。在返回的 parts[0] 中你得到了需要追加的文本内容,在 parts[1] 中包括了接下去的文字格式标签。
- 接下来创建一个保存格式化选项的字典 – 用它来给 NSAttributedString 设置格式化属性。来看看这些键名 – 不用说它们是苹果定义的常量 (您可以查看苹果 Core Text String Attributes Reference 了解详情)。 通过调用 appendAttributedString: 下一个文本块将应用这些属性到结果文本中。
- 最后,您检查是否文本段后找到了一个标签;如果标签名是 “font” ,进一步使用正则读取标签属性。 对于 “face” 属性,将保存字体名称到 self.font, 对于 “color” 我们使用了个小花招:如
1
<font color="red">通过 colorRegex 找到的 “red” 通过选择器直接在 UIColor 类执行 “redColor” – 这(嘿嘿) 返回一个红色的 UIColor 实例。 注意:此招只适用于 UIColor 预定义的颜色的(如果你传递一个不存在的方法选择,甚至可以导致你的代码崩溃),但在本教程中是足够的。画笔颜色属性与颜色属性很类似,特殊的是当 strokecolor 为 “none”时,只是设置画笔大小为 0.0,这样画笔就不会应用于文本。
注意: 如果您对这个段落中所使用的正则表达式还不是太明白,它们基本上可以称为 “查找任何 color=” 打头的文本”。 匹配所有一般字符(不包括引号),直到找到关闭引号。更多详情,查看苹果的 NSRegularExpression class reference.
很好!已经完成了渲染格式化文本的一半工作了 – 现在 attrStringFromMarkup: 可以把标记化的内容解析放置到 NSAttributedString 中为 Core Text 使用它做好了准备。
那么让我们先试试!
打开 CTView.m and 在 @implementation: 之前添加:
|
1
|
#import "MarkupParser.h"
|
找到 attString 定义的位置 – 使用下面的代码替换:
|
1
2 |
MarkupParser
* p
=
[
[
[MarkupParser alloc
] init
] autorelease
];
NSAttributedString * attString = [p attrStringFromMarkup : @ "Hello <font color=\"red\">core text <font color=\"blue\">world!" ]; |
上面的代码实例化了一个新的解析器,并通过解析一段标记文本获取了格式化文本。
真是太棒了! 感谢 50 行的解析代码让我们没有在字符范围与格式上处理大量的代码任何,我们的杂志应用只需要使用一个简单的文本文件保存其内容。同时您刚刚完成的这个简单的解析器可以根据您的杂志应用的需要无限制的扩展。
一个基本的杂志布局
到现在为止,我们已经能够把文字显示出来了,这是一个好的开端。但是对一个杂志来说,我们最好有多栏显示-在这里Core Text要大展身手了。
开始编写布局代码之前,我们先加载一个更长的字符串到应用中,这样我们就有足够长的文章需要回绕多行显示。
打开菜单栏 File\New\New File, 选择 iOS\Other\Empty, 然后点击下一步(Next)。命名新的文件为test.txt, 然后点击保存。
下来把这个文件中的文本拷贝到test.txt并保存。
打开 CTView.m 并找到我们创建MarkupParser 和NSAttributedString 的那两行,然后删除他们。我们把加载文本文件的代码从drawRect: 方法中移出来,因为他们实际上不应该在那里。drawRect: 方法的真正工作是画UIView里的内容-而不是加载内容。我们等会将会把attString变量重构成实例变量,变成这个类的属性。
接下来打开CoreTextMagazineViewController.m, 删除所有存在的内容,添加下面的代码:
|
1
2 3 4 5 6 7 8 9 10 11 12 13 14 15 16 17 18 |
#import "CoreTextMagazineViewController.h"
#import "CTView.h" #import "MarkupParser.h" @implementation CoreTextMagazineViewController - ( void )viewDidLoad { [super viewDidLoad ]; NSString *path = [ [ NSBundle mainBundle ] pathForResource : @ "test" ofType : @ "txt" ]; NSString * text = [ NSString stringWithContentsOfFile :path encoding :NSUTF8StringEncoding error : NULL ]; MarkupParser * p = [ [ [MarkupParser alloc ] init ] autorelease ]; NSAttributedString * attString = [p attrStringFromMarkup : text ]; [ (CTView * )self.view setAttString : attString ]; } @end |
当这个应用的view加载完毕,这个应用读取test.txt的文本,转换为属性字符串(attributed string)然后设置到窗口的view的attString属性中。我们还没有在添加CTView中添加这个属性,现在让我们开始添加吧!
在CTView.h中定义3个实例变量:
|
1
2 3 4 |
float frameXOffset;
float frameYOffset; NSAttributedString * attString; |
然后在CTView.h和CTView.m中添加相应的代码来定义attString属性:
|
1
2 3 4 5 6 7 8 9 10 11 12 13 |
//CTView.h
@property (retain, nonatomic ) NSAttributedString * attString; //CTView.m //just below @implementation ... @synthesize attString; //at the bottom of the file - ( void )dealloc { self.attString = nil; [super dealloc ]; } |
现在我们点击”Run”来看看view是否显示了文本文件的内容。酷!
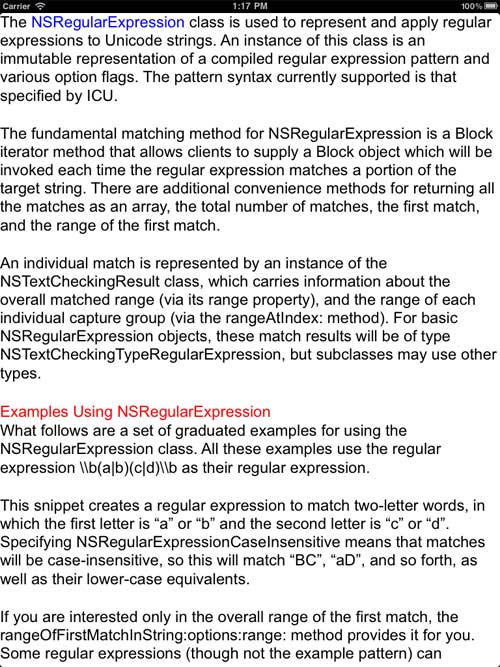
如何给这些文本创建列(columns)? 很幸运,Core Text 提供了一个很方便的函数 – CTFrameGetVisibleStringRange。这个函数告诉你在指定的矩形框里可以显示多少文本。所以想法就是-创建列,看看多少文本可以显示下,如果有更多文本没显示,再创建新的列,如此循环,知道所有文本都可以显示完。 (这里列是个CTFrame实例,因为列只是更高一点的矩形)
首先我们创建列,然后页,然后整个杂志。所以…让我们使CTView继承UIScrollView,这样就继承了分页和滚动的功能了,而不用自己写!
打开 CTView.h ,修改@interface这样代码为:
|
1
|
@interface CTView
: UIScrollView<UIScrollViewDelegate>
{
|
好,我们得到免费的滚动和分页功能了。我们下面会轻松的开启分页功能。
到现在为止,我们在创建了drawRect:中创建了framesetter和frame实例。有多个栏而且有不同的格式,最好的我们在一次把所有的计算做完。所以我们准备创建新的类 “CTColumnView” ,这个类只是呈现(render)传给他的CT内容,在我们的CTView类中我们准备一次创建所有的CTColumnView的实例,并把他们作为subviews加入到CTView中。
总结一下:CTView会处理滚动,分页,创建所有的列;CTColumnView实际呈现内容到屏幕上。
打开菜单栏 File\New\New File, 选择 iOS\Cocoa Touch\Objective-C class, 点击下一步。在”Subclass of”输入框中输入, 点击下一步,把新类命名为 CTColumnView.m, 然后点击保存。下面就是CTColumnView类的初始代码:
|
1
2 3 4 5 6 7 8 9 10 11 12 13 14 15 16 17 18 19 20 21 22 23 24 25 26 27 28 29 30 31 32 33 |
//inside CTColumnView.h
#import <UIKit/UIKit.h> #import <CoreText/CoreText.h> @interface CTColumnView : UIView { id ctFrame; } - ( void )setCTFrame : ( id )f; @end //inside CTColumnView.m #import "CTColumnView.h" @implementation CTColumnView - ( void )setCTFrame : ( id ) f { ctFrame = f; } - ( void )drawRect : (CGRect )rect { CGContextRef context = UIGraphicsGetCurrentContext ( ); // Flip the coordinate system CGContextSetTextMatrix (context, CGAffineTransformIdentity ); CGContextTranslateCTM (context, 0, self.bounds.size.height ); CGContextScaleCTM (context, 1.0, - 1.0 ); CTFrameDraw ( (CTFrameRef )ctFrame, context ); } @end |
这个类包含是我们到现在位置写的所有功能-只是呈现一个CTFrame。我们会为杂志的每个列创建一个这个类的实例。
让我们先添加一个数组属性来保存我们的CTView的CTframes,然后声明 buildFrames 方法,这个方法会创建所有列:
|
1
2 3 4 5 6 7 8 9 10 11 12 13 14 15 16 17 |
//CTView.h - at the top
#import "CTColumnView.h" //CTView.h - as an ivar NSMutableArray * frames; //CTView.h - declare property @property (retain, nonatomic ) NSMutableArray * frames; //CTView.h - in method declarations - ( void )buildFrames; //CTView.m - just below @implementation @synthesize frames; //CTView.m - inside dealloc self.frames = nil; |
现在 buildFrames 可以创建所有文本框(frames)然后存在在”frames”数组。让我们代码如下:
|
1
2 3 4 5 6 7 8 9 10 11 12 13 14 15 16 17 18 19 20 21 22 23 24 25 26 27 28 29 30 31 32 33 34 35 36 37 38 39 40 41 42 43 44 45 46 47 48 49 50 51 |
-
(
void
)buildFrames
{ frameXOffset = 20; //1 frameYOffset = 20; self.pagingEnabled = YES; self.delegate = self; self.frames = [ NSMutableArray array ]; CGMutablePathRef path = CGPathCreateMutable ( ); //2 CGRect textFrame = CGRectInset (self.bounds, frameXOffset, frameYOffset ); CGPathAddRect (path, NULL, textFrame ); CTFramesetterRef framesetter = CTFramesetterCreateWithAttributedString ( (CFAttributedStringRef )attString ); int textPos = 0; //3 int columnIndex = 0; while (textPos < [attString length ] ) { //4 CGPoint colOffset = CGPointMake ( (columnIndex + 1 ) *frameXOffset + columnIndex * (textFrame.size.width / 2 ), 20 ); CGRect colRect = CGRectMake ( 0, 0 , textFrame.size.width / 2 - 10, textFrame.size.height - 40 ); CGMutablePathRef path = CGPathCreateMutable ( ); CGPathAddRect (path, NULL, colRect ); //use the column path CTFrameRef frame = CTFramesetterCreateFrame (framesetter, CFRangeMake (textPos, 0 ), path, NULL ); CFRange frameRange = CTFrameGetVisibleStringRange (frame ); //5 //create an empty column view CTColumnView * content = [ [ [CTColumnView alloc ] initWithFrame : CGRectMake ( 0, 0, self.contentSize.width, self.contentSize.height ) ] autorelease ]; content.backgroundColor = [UIColor clearColor ]; content.frame = CGRectMake (colOffset.x, colOffset.y, colRect.size.width, colRect.size.height ) ; //set the column view contents and add it as subview [content setCTFrame : ( id )frame ]; //6 [self.frames addObject : ( id )frame ]; [self addSubview : content ]; //prepare for next frame textPos += frameRange.length; //CFRelease(frame); CFRelease (path ); columnIndex ++; } //set the total width of the scroll view int totalPages = (columnIndex + 1 ) / 2; //7 self.contentSize = CGSizeMake (totalPages *self.bounds.size.width, textFrame.size.height ); } |
让我们来解释一下代码。
- 这一步我们做一下设置 – 定义 x 和 y 偏移,开启分页功能,创建空的框数组。
- buildFrames 接下来创建一个路径( path )和一个矩形变量等于view的边框,然后稍微偏移一点作为边距(margin).
- 这段声明了textPos, 这个变量用来保存在当前文本的位置,又声明了columnIndex, 这个变量用来计算我们已经创建了多少列。
- 这个while循环直到到达文本结束退出。在循环里面我们创建一个列边界:colRect 是个 CGRect 类型用来保存当前列的起点和尺寸,每个循环它会根据columnIndex重新计算起点。注意列的排列是一直向右而不是回绕向下。
- 这里使用CTFrameGetVisibleStringRange函数找出字符串的那些部分可以完全显示在框里(在这里指的是文本列)。textPos 每次以这个范围的长度递增,所以下一个循环可以构建下一个列(如果还有多余的文本没有显示).
- 这里,不是像以前那样画框,我们把它传递给新创建的CTColumnView,并且我们把它保存在self.frames以供以后使用,然后把CTColumnView作为子View添加到scrollview中。
- 最后,totalPages保存了创建的总页数,然后设置 contentSize属性,这样如果有多页的时候,我们就可以滚动了!
现在,让我在所有的CT设置完成后,调用buildFrames。在CoreTextMagazineViewController.m中的 viewDidLoad的结尾添加下面的代码
|
1
|
[
(CTView
*
)
[self view
] buildFrames
];
|
在我们试运行新代码前还需要做一件事:在 CTView.m 中删除drawRect:。我们现在在CTColumnView类中做所有的显示,所以要保留CTView的drawRect: 方法为标准的 UIScrollView 实现。
好的…点击运行(Run)然后你可以看到文本以列的方式排列了!左右拖拽页面看一下…太棒了!
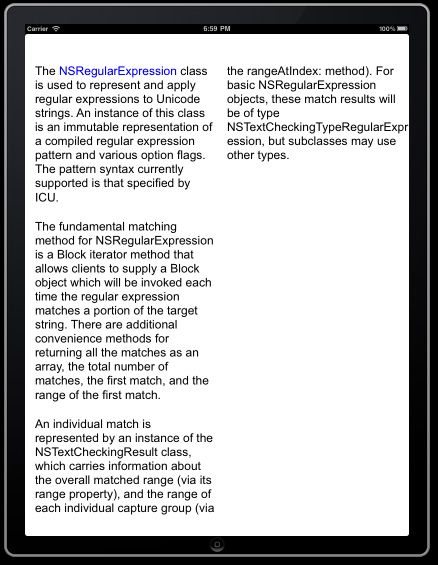
我们有列,很棒排版的文字,但是没有图片。在Core Text显示图片不是那么容易-毕竟这个是文本框架阿。
但是,由于我们已经有个了小的标记(markup)解析器,我们很快速的可以添加文本中显示图片的功能!
使用 Core Text 绘图
一般来说,Core Text 并没有绘制图像的能力。然而,因为它是一个布局引擎,它所能做的是保留一个空间让你在其中绘制图像。同时,因为你的代码中已经有了 drawRect: 方法,绘制一个图像很容易。
让我们看看在文本中保留一个空间是如何工作的: 还记得所有的文本块实际上是 CTRun 的实例吗?你只需为所给的 CTRun 设置委托,委托对象会负责将 CTRun 的上升空间、下降空间和宽度告知 Core Text。如下图:
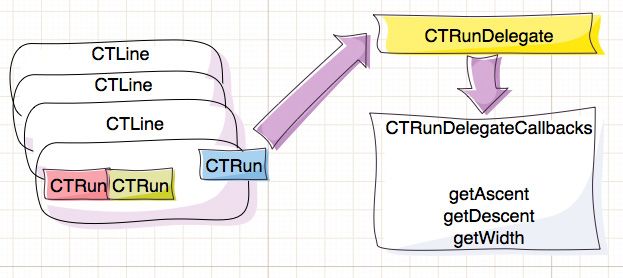
当 Core Text 获知一个拥有 CTRunDelegate 委托的 CTRun 时,它会询问委托对象 —— 我需要为这些块数据保留多少宽度和高度?这样你就在文本中建造了一个洞,然后你把图像在那里绘制出来。
让我们从为词法分析器添加对 “img” 标签的支持开始!打开 MarkupParser.m 并找到 “} //end of font parsing”;在此行之后紧接着添加支持“img”标签的代码:
|
1
2 3 4 5 6 7 8 9 10 11 12 13 14 15 16 17 18 19 20 21 22 23 24 25 26 27 28 29 30 31 32 33 34 35 36 37 38 39 40 41 42 43 44 45 46 47 48 49 50 51 52 53 54 55 56 |
if
(
[tag hasPrefix
:
@
"img"
]
)
{
__block NSNumber * width = [ NSNumber numberWithInt : 0 ]; __block NSNumber * height = [ NSNumber numberWithInt : 0 ]; __block NSString * fileName = @ ""; //width NSRegularExpression * widthRegex = [ [ [NSRegularExpression alloc ] initWithPattern : @ "(?<=width=\")[^\"]+" options : 0 error : NULL ] autorelease ]; [widthRegex enumerateMatchesInString :tag options : 0 range :NSMakeRange ( 0, [tag length ] ) usingBlock :^ (NSTextCheckingResult *match, NSMatchingFlags flags, BOOL *stop ) { width = [ NSNumber numberWithInt : [ [tag substringWithRange : match.range ] intValue ] ]; } ]; //height NSRegularExpression * faceRegex = [ [ [NSRegularExpression alloc ] initWithPattern : @ "(?<=height=\")[^\"]+" options : 0 error : NULL ] autorelease ]; [faceRegex enumerateMatchesInString :tag options : 0 range :NSMakeRange ( 0, [tag length ] ) usingBlock :^ (NSTextCheckingResult *match, NSMatchingFlags flags, BOOL *stop ) { height = [ NSNumber numberWithInt : [ [tag substringWithRange :match.range ] intValue ] ]; } ]; //image NSRegularExpression * srcRegex = [ [ [NSRegularExpression alloc ] initWithPattern : @ "(?<=src=\")[^\"]+" options : 0 error : NULL ] autorelease ]; [srcRegex enumerateMatchesInString :tag options : 0 range :NSMakeRange ( 0, [tag length ] ) usingBlock :^ (NSTextCheckingResult *match, NSMatchingFlags flags, BOOL *stop ) { fileName = [tag substringWithRange : match.range ]; } ]; //add the image for drawing [self.images addObject : [ NSDictionary dictionaryWithObjectsAndKeys : width, @ "width", height, @ "height", fileName, @ "fileName", [ NSNumber numberWithInt : [aString length ] ], @ "location", nil ] ]; //render empty space for drawing the image in the text //1 CTRunDelegateCallbacks callbacks; callbacks.version = kCTRunDelegateVersion1; callbacks.getAscent = ascentCallback; callbacks.getDescent = descentCallback; callbacks.getWidth = widthCallback; callbacks.dealloc = deallocCallback; NSDictionary * imgAttr = [ [ NSDictionary dictionaryWithObjectsAndKeys : //2 width, @ "width", height, @ "height", nil ] retain ]; CTRunDelegateRef delegate = CTRunDelegateCreate ( &callbacks, imgAttr ); //3 NSDictionary *attrDictionaryDelegate = [ NSDictionary dictionaryWithObjectsAndKeys : //set the delegate ( id )delegate, ( NSString * )kCTRunDelegateAttributeName, nil ]; //add a space to the text so that it can call the delegate [aString appendAttributedString : [ [ [ NSAttributedString alloc ] initWithString : @ " " attributes :attrDictionaryDelegate ] autorelease ] ]; } |
让我们看看新代码——实际解析“img”标签同解析 font 标签不尽相同。通过3个正则表达式,你有效的获取了 img 标签的 width、height 和 src 属性。当这些完成后——你在 self.images 上添加了一个新的 NSDictionary 对象用以保存刚刚解析出来的信息,在文本中添加图片。
现在我们来看看第一部分 —— CTRunDelegateCallbacks 是一个保存指向函数的引用的 C 语言结构体,这个结构体提供了你想要传递给 CTRunDelegate 的信息。正如你已经猜到的那样,getWidth 方法提供一个宽度参数给 CTRun,getAscent 方法提供高度参数给 CTRun,等等。在上面的代码中你为那些处理提供了函数名称,马上我们也会添加上函数具体实现。
第二部分非常重要 —— imgAttr 字典保存了图像的维度信息,我们向这个对象发送了 retain 消息因为它将会被传递给函数处理 —— 因此,当 getAscent 触发时,它将作为参数被获得并从中读取出图像的高度并将其提供给 CTRun。干净利落是吧?(马上我们就会谈谈这个。)
第三部分中通过关联与绑定回调和数据使用 CTRunDelegateCreate 创建委托实例。
下一步你需要创建一个属性字典 (和之前字体格式相同的方式),但在格式化属性中放入委托实例。 最后你向属性化文本里加入一个包括委托属性的空格用于之后使用图片绘制。
下一步,你可能已经预料到了,提供用于委托回调的函数:
|
1
2 3 4 5 6 7 8 9 10 11 12 13 14 15 |
//inside MarkupParser.m, just above @implementation
/* Callbacks */ static void deallocCallback ( void * ref ) { [ ( id )ref release ]; } static CGFloat ascentCallback ( void *ref ) { return [ ( NSString * ) [ ( NSDictionary * )ref objectForKey : @ "height" ] floatValue ]; } static CGFloat descentCallback ( void *ref ) { return [ ( NSString * ) [ ( NSDictionary * )ref objectForKey : @ "descent" ] floatValue ]; } static CGFloat widthCallback ( void * ref ) { return [ ( NSString * ) [ ( NSDictionary * )ref objectForKey : @ "width" ] floatValue ]; } |
ascentCallback, descentCallback 与 widthCallback 只是读取了之前放在 CT 的 NSDictionary 里的值。deallocCallback 中为什么要释放保存图片信息的字典呢,因为它在 CTRunDelegate 释放时调用,(译者释:Core Text 中大部分都是 C 函数集实现,它不会主动释放你 ObjC 的对象)所以这里您要管理好你使用的内存。
现在您的解析器能处理 “img” 标签了,那么让 CTView 能渲染它们。 我们需要一个方法将图片数组发给这个视图, 让我们将设置属性化文本与图片合成到一个方法中。 添加以下代码:
|
1
2 3 4 5 6 7 8 9 10 11 12 13 14 15 16 17 18 19 20 21 |
//CTView.h - 在 @interface 声明段添加
NSArray * images; //CTView.h - 定义图片属性 @property (retain, nonatomic ) NSArray * images; //CTView.h - 添加一个方法声明 - ( void )setAttString : ( NSAttributedString * )attString withImages : ( NSArray * )imgs; //CTView.m - 在 @implementation 之后 @synthesize images; //CTView.m - 在 dealloc 方法内 self.images = nil; //CTView.m - 实现段的任意位置 - ( void )setAttString : ( NSAttributedString * ) string withImages : ( NSArray * )imgs { self.attString = string; self.images = imgs; } |
现在 CTView 已经准备好接受一个图片数组,让我们从解析器中设置它们然后绘制!
转到 CoreTextMagazineViewController.m 找到 “[(CTView*)self.view setAttString: attString];” 行,使用下面的代码替换它:
|
1
|
[
(CTView
*
)
[self view
] setAttString
:attString withImages
: p.images
];
|
你可能看到 MarkupParser 类中的 attrStringFromMarkup: 方法,它保存了所有图片标签数据到 self.images 中。这时你可以直接设置到 CTView。
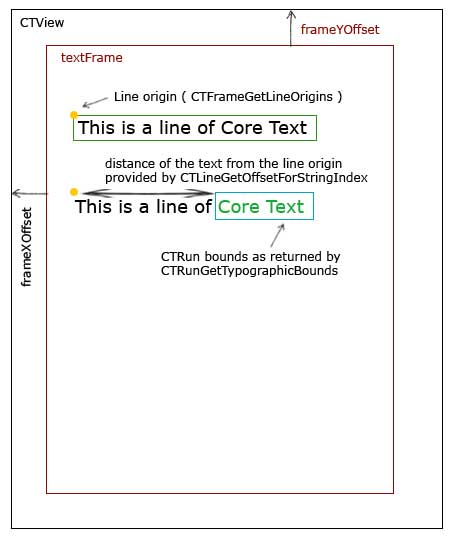
要呈现图片,你需要明确的知道图片将显示在应用中的哪个框架。要找到这个原点,我们需要一系列的值:
- 当内容被滚动时:contentOffset
- CTView 的框架的偏移 (frameXOffset,frameYOffset)
- CTLine 的原点坐标 (CTLine 在段落的开始可能由偏移)
- 最后是 CTRun 和 CTLine 两者原点之间的距离。
现在开始呈现图片!首先我们需要更新 CTColumnView 类:
|
1
2 3 4 5 6 7 8 9 10 11 12 13 14 15 16 17 18 19 20 21 22 23 24 25 26 27 28 29 30 31 |
//inside CTColumnView.h
//as an ivar NSMutableArray * images; //as a property @property (retain, nonatomic ) NSMutableArray * images; //inside CTColumnView.m //after @implementation... @synthesize images; - ( id )initWithFrame : (CGRect )frame { if ( [super initWithFrame :frame ] != nil ) { self.images = [ NSMutableArray array ]; } return self; } - ( void )dealloc { self.images = nil; [super dealloc ]; } //at the end of drawRect: for ( NSArray * imageData in self.images ) { UIImage * img = [imageData objectAtIndex : 0 ]; CGRect imgBounds = CGRectFromString ( [imageData objectAtIndex : 1 ] ); CGContextDrawImage (context, imgBounds, img.CGImage ); } |
通过这些代码,我们添加了一个 ivar 和一个被称为 images 的属性,用以保存每个文本列中要显示的图片列表。为了避免声明另一个用来保存 images 中图片信息的类,我们将使用 NSArray 对象,用来保存:
- 一个 UIImage 实例
- 图像的边界——即文本的原点和图片的大小
现在,计算图像的位置,并将其附加到相应的文本列:
|
1
2 3 4 5 6 7 8 9 10 11 12 13 14 15 16 17 18 19 20 21 22 23 24 25 26 27 28 29 30 31 32 33 34 35 36 37 38 39 40 41 42 43 44 45 46 47 48 49 50 51 52 53 54 55 56 57 58 59 60 61 62 63 64 65 |
//inside CTView.h
- ( void )attachImagesWithFrame : (CTFrameRef )f inColumnView : (CTColumnView * )col; //inside CTView.m - ( void )attachImagesWithFrame : (CTFrameRef )f inColumnView : (CTColumnView * )col { //drawing images NSArray *lines = ( NSArray * )CTFrameGetLines (f ); //1 CGPoint origins [ [lines count ] ]; CTFrameGetLineOrigins (f, CFRangeMake ( 0, 0 ), origins ); //2 int imgIndex = 0; //3 NSDictionary * nextImage = [self.images objectAtIndex :imgIndex ]; int imgLocation = [ [nextImage objectForKey : @ "location" ] intValue ]; //find images for the current column CFRange frameRange = CTFrameGetVisibleStringRange (f ); //4 while ( imgLocation < frameRange.location ) { imgIndex ++; if (imgIndex> = [self.images count ] ) return; //quit if no images for this column nextImage = [self.images objectAtIndex :imgIndex ]; imgLocation = [ [nextImage objectForKey : @ "location" ] intValue ]; } NSUInteger lineIndex = 0; for ( id lineObj in lines ) { //5 CTLineRef line = (CTLineRef )lineObj; for ( id runObj in ( NSArray * )CTLineGetGlyphRuns (line ) ) { //6 CTRunRef run = (CTRunRef )runObj; CFRange runRange = CTRunGetStringRange (run ); if ( runRange.location < = imgLocation && runRange.location +runRange.length > imgLocation ) { //7 CGRect runBounds; CGFloat ascent; //height above the baseline CGFloat descent; //height below the baseline runBounds.size.width = CTRunGetTypographicBounds (run, CFRangeMake ( 0, 0 ), &ascent, &descent, NULL ); //8 runBounds.size.height = ascent + descent; CGFloat xOffset = CTLineGetOffsetForStringIndex (line, CTRunGetStringRange (run ).location, NULL ); //9 runBounds.origin.x = origins [lineIndex ].x + self.frame.origin.x + xOffset + frameXOffset; runBounds.origin.y = origins [lineIndex ].y + self.frame.origin.y + frameYOffset; runBounds.origin.y -= descent; UIImage *img = [UIImage imageNamed : [nextImage objectForKey : @ "fileName" ] ]; CGPathRef pathRef = CTFrameGetPath (f ); //10 CGRect colRect = CGPathGetBoundingBox (pathRef ); CGRect imgBounds = CGRectOffset (runBounds, colRect.origin.x - frameXOffset - self.contentOffset.x, colRect.origin.y - frameYOffset - self.frame.origin.y ); [col.images addObject : //11 [ NSArray arrayWithObjects :img, NSStringFromCGRect (imgBounds ) , nil ] ]; //load the next image //12 imgIndex ++; if (imgIndex < [self.images count ] ) { nextImage = [self.images objectAtIndex : imgIndex ]; imgLocation = [ [nextImage objectForKey : @ "location" ] intValue ]; } } } lineIndex ++; } } |
注意:这个代码基础最终归功于大卫·贝克提供的循环示例。
我知道刚看到这些代码感觉非常低级,但和我一起忍受一下,我们已经到了本教程结尾,这是最后的冲刺!
一段段来说:
- CTFrameGetLines 获取 CTLine 数组对象。
- 获取当前帧中所有行的原点 – 简单说,你得到一个所有文本行的左上点坐标的列表。
- 从 self.images 得到第一个图片的属性数据并在 imgLocation 保存此图片所在文本中的位置。
- CTFrameGetVisibleStringRange 获取在当前帧中可见的文本范围 – 通过对图片数组的循环对比图片在文本中的位置找到将要渲染的第一个可见图片 – 换一种说法 – 你快进到有关您目前呈现的文本块的图像。
- 循环每一行并把行放置到 line 变量。
- 循环行中的每个分段(run) (通过 CTLineGetGlyphRuns 得到 runs)。
- 核查下个图片是否在当前分段(run)内 – 如果是你要进一步确定图片所在的精确位置。
- 使用 CTRunGetTypographicBounds 方法获取此分段(run)的大小。
- 使用 CTLineGetOffsetForStringIndex 加上其它偏移获取分段的起点。
- 通过图片名称加载图片到 “img” 变量的图片并计算图片要渲染的矩形区域。
- 创建一个包括 UIImage 和对应矩形的 NSArray 并把它添加到 CTColumnView 的图片列表。
- 最后读取列表中的下一个图片,直到文本行循环结束。
很棒!就快好了!- 还有很小的一步:找到 CTView.m 中的 “[content setCTFrame:(id)frame];” 行添加如下代码:
|
1
|
[self attachImagesWithFrame
:frame inColumnView
: content
];
|
现在您完成了全部代码工作,不过还没有好的杂志内容…
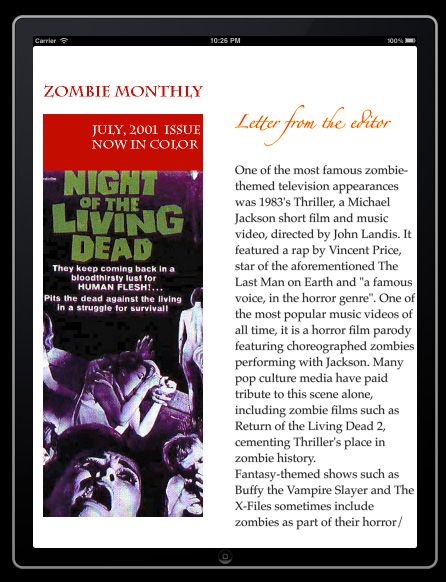
没关系,我已经准备下一期的僵尸月刊 – 每月的流行僵尸杂志 – 你需要做的只是将下面内容导入:
- 在项目浏览器里删除早先创建的 test.txt
- 下载并解压 Zombie mag materials(备用下载地址).
- 把所有文件拖到 Xcode 项目上导入它们。 确定 “Copy items into destination group’s folder (if needed)” 选中,点击 Finish 。
然后切换到 CoreTextMagazineViewController.m 找到使用文件路径的地方切换为使用新的 zombies.txt 文件:
|
1
|
NSString
*path
=
[
[
NSBundle mainBundle
] pathForResource
:
@
"zombies" ofType
:
@
"txt"
];
|
完成了 – 编译并运行,享受最新一期的僵尸月刊!:)
最后一步。假如我们想合理的分配列中的文本,使它们匹配列的宽度。添加下列代码:
|
1
2 3 4 5 6 7 8 9 10 11 12 13 14 15 16 |
//inside CTView.m
//at the end of the setAttString:withImages: method CTTextAlignment alignment = kCTJustifiedTextAlignment; CTParagraphStyleSetting settings [ ] = { {kCTParagraphStyleSpecifierAlignment, sizeof (alignment ), &alignment }, }; CTParagraphStyleRef paragraphStyle = CTParagraphStyleCreate (settings, sizeof (settings ) / sizeof (settings [ 0 ] ) ); NSDictionary *attrDictionary = [ NSDictionary dictionaryWithObjectsAndKeys : ( id )paragraphStyle, ( NSString * )kCTParagraphStyleAttributeName, nil ]; NSMutableAttributedString * stringCopy = [ [ [ NSMutableAttributedString alloc ] initWithAttributedString :self.attString ] autorelease ]; [stringCopy addAttributes :attrDictionary range :NSMakeRange ( 0, [attString length ] ) ]; self.attString = ( NSAttributedString * )stringCopy; |
这样你就可以控制段落式样了;查阅苹果的 Core Text 文档中的 kCTParagraphStyleSpecifierAlignment,你将获得你可以控制的所有段落式样的列表。
何时使用 Core Text ?
现在您使用 Core Text 的杂志应用完成了,也许你要问“为什么我要使用 Core Text 而不是 UIWebView ?”
CT 与 UIWebView 都有它们善于的方面。
不要忘了 UIWebView 是一个完全成熟的网络浏览器,用它来可视化一个单一的多彩文字是巨大的大材小用。
如果您的 UI 上有 10 个多色的标签,是不是说你要放置 10 个 Safaris (好了,差不多了,您知道重点了)。
所以记住:当你需要一个时 UIWebView 是非常好的网络浏览器,而 Core Text 是一种高效的文本渲染引擎。
