【MongoDB&JAVA】MongoDB教程及mongo 3.1+ jar的JAVA应用实例
MongoDB是非关系型数据库,俗称NoSql数据库,是文档存储型的
适用场景:
网站数据:Mongo非常适合实时的插入,更新与查询,并具备网站实时数据存储所需的复制及高度伸缩性。
缓存:由于性能很高,Mongo也适合作为信息基础设施的缓存层。在系统重启之后,由Mongo搭建的持久化缓存层可以避免下层的数据源 过载。
大尺寸,低价值的数据:使用传统的关系型数据库存储一些数据时可能会比较昂贵,在此之前,很多时候程序员往往会选择传统的文件进行存储。
高伸缩性的场景:Mongo非常适合由数十或数百台服务器组成的数据库。Mongo的路线图中已经包含对MapReduce引擎的内置支持。
用于对象及JSON数据的存储:Mongo的BSON数据格式非常适合文档化格式的存储及查询。
下载,安装
注意官网提供的下载与LINUX的版本号有密切联系的,所以请先注意自己LINUX系统的版本号再选择相应版本下载,防止出现一些其它错误。
为mongo创建存放数据的目录和日志文件
启动mongo
./mongodb-linux-x86_64-rhel55-3.0.6/bin/mongod -port 10001 --dbpath data/db/ --logpath log/mongodb.log
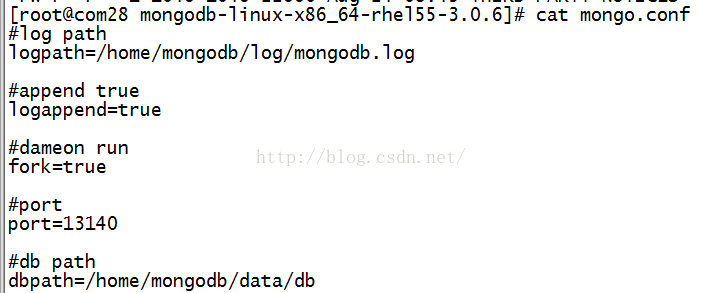
不过这里建议通过配置文件的方式启动
vi /etc/mongod.conf
# 日志文件位置
logpath=/var/log/mongo/mongod.log
# 以追加方式写入日志
logappend=true
# 是否以守护进程方式运行
fork = true
# 默认27017
#port = 27017
# 数据库文件位置
dbpath=/var/lib/mongo
# 启用定期记录CPU利用率和 I/O 等待
#cpu = true
# 是否以安全认证方式运行,默认是不认证的非安全方式
#noauth = true
#auth = true
# 详细记录输出
#verbose = true
# Inspect all client data for validity on receipt (useful for
# developing drivers)用于开发驱动程序时验证客户端请求
#objcheck = true
# Enable db quota management
# 启用数据库配额管理
#quota = true
# 设置oplog记录等级
# Set oplogging level where n is
# 0=off (default)
# 1=W
# 2=R
# 3=both
# 7=W+some reads
#diaglog=0
# Diagnostic/debugging option 动态调试项
#nocursors = true
# Ignore query hints 忽略查询提示
#nohints = true
# 禁用http界面,默认为localhost:28017
#nohttpinterface = true
# 关闭服务器端脚本,这将极大的限制功能
# Turns off server-side scripting. This will result in greatly limited
# functionality
#noscripting = true
# 关闭扫描表,任何查询将会是扫描失败
# Turns off table scans. Any query that would do a table scan fails.
#notablescan = true
# 关闭数据文件预分配
# Disable data file preallocation.
#noprealloc = true
# 为新数据库指定.ns文件的大小,单位:MB
# Specify .ns file size for new databases.
# nssize =
# Replication Options 复制选项
# in replicated mongo databases, specify the replica set name here
#replSet=setname
# maximum size in megabytes for replication operation log
#oplogSize=1024
# path to a key file storing authentication info for connections
# between replica set members
#指定存储身份验证信息的密钥文件的路径
#keyFile=/path/to/keyfile
mongod --config /etc/mongodb.conf
MongoDB与关系型数据库的一些概念对比,方便理解
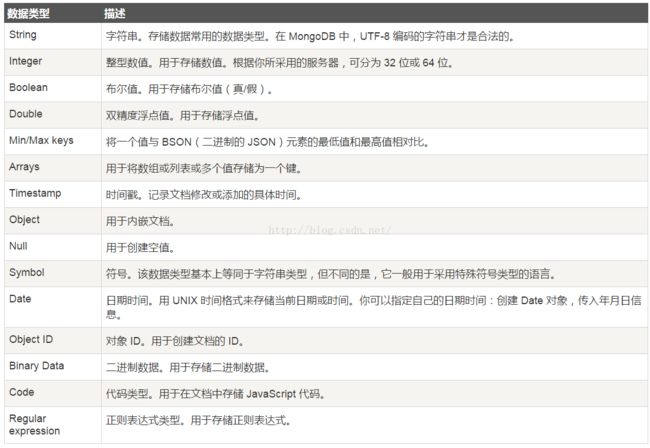
MnogoDB的数据类型
MongoDB的操作
创建数据库
|
use demo
|
|
db.
demo.insert({"name":"chiwei"});db.demo.insert({"name":"chiwei"});
|
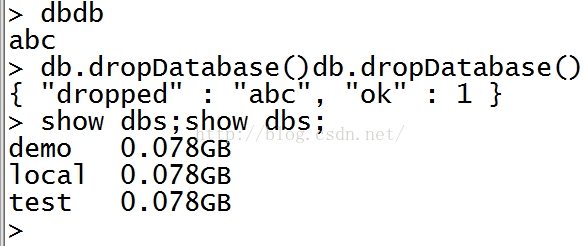
删除数据库
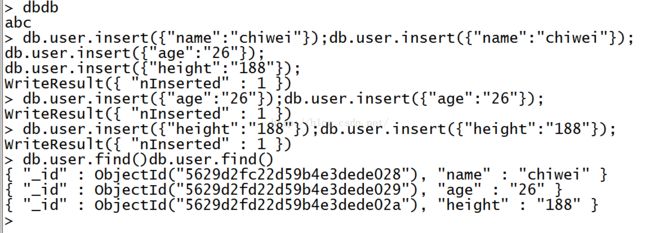
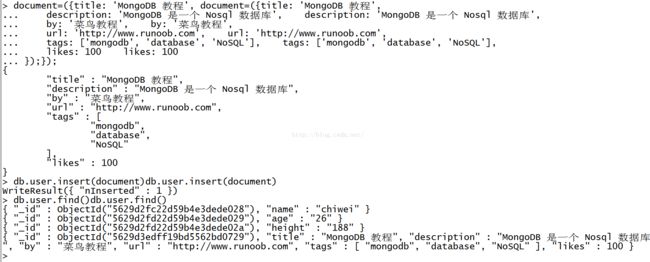
插入数据(一行记录对应这里的一个文档)
db.xxx.update()
update() 方法用于更新已存在的文档。语法格式如下:
db.collection.update(<query>,<update>,{
     upsert:<boolean>,
     multi:<boolean>,
     writeConcern:<document>})
参数说明:
- query : update的查询条件,类似sql update查询内where后面的。
- update : update的对象和一些更新的操作符(如$,$inc...)等,也可以理解为sql update查询内set后面的
- upsert : 可选,这个参数的意思是,如果不存在update的记录,是否插入objNew,true为插入,默认是false,不插入。
- multi : 可选,mongodb 默认是false,只更新找到的第一条记录,如果这个参数为true,就把按条件查出来多条记录全部更新。
- writeConcern :可选,抛出异常的级别。
删除文档,记录db.xxx.remove()
db.collection.remove(<query>,<justOne>)
参数说明:
- query :(可选)删除的文档的条件。
- justOne : (可选)如果设为 true 或 1,则只删除一个文档。默认满足条件的都删了
- writeConcern :(可选)抛出异常的级别。
查询文档,查询数据
带条件查询
findOne查询一个文档
MongoDB与RDBMS的WHERE语句比较
AND查询
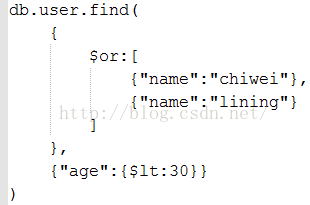
>db.col.find({
      $or:[{key1: value1},{key2:value2}]}).pretty()
条件操作符$type
Limit&Skip
排序
索引
聚合,相当于mysql的分组group by
管道
文件存储
以下是简单的 fs.files 集合文档:
{
   "filename": "test.txt",
   "chunkSize": NumberInt(261120),
   "uploadDate": ISODate("2014-04-13T11:32:33.557Z"),
   "md5": "7b762939321e146569b07f72c62cca4f",
   "length": NumberInt(646)
}
以下是简单的 fs.chunks 集合文档:
{
   "files_id": ObjectId("534a75d19f54bfec8a2fe44b"),
   "n": NumberInt(0),
   "data": "Mongo Binary Data"
}
|
./mongofiles --port 10001 -d abc list 列出本地mongo abc数据库中的文件
|
用户管理
创建一个数据库新用户用db.createUser()方法,如果用户存在则返回一个用户重复错误。
语法:
db.createUser(user, writeConcern)
user这个文档创建关于用户的身份认证和访问信息;
writeConcern这个文档描述保证MongoDB提供写操作的成功报告。
· user文档,定义了用户的以下形式:
{ user: "<name>",
pwd: "<cleartext password>",
customData: { <any information> },
roles: [
{ role: "<role>", db: "<database>" } | "<role>",
...
]
}
user文档字段介绍:
user字段,为新用户的名字;
pwd字段,用户的密码;
cusomData字段,为任意内容,例如可以为用户全名介绍;
roles字段,指定用户的角色,可以用一个空数组给新用户设定空角色;
在roles字段,可以指定内置角色和用户定义的角色。
Built-In Roles(内置角色):
1. 数据库用户角色:read、readWrite;
2. 数据库管理角色:dbAdmin、dbOwner、userAdmin;
3. 集群管理角色:clusterAdmin、clusterManager、clusterMonitor、hostManager;
4. 备份恢复角色:backup、restore;
5. 所有数据库角色:readAnyDatabase、readWriteAnyDatabase、userAdminAnyDatabase、dbAdminAnyDatabase
6. 超级用户角色:root
// 这里还有几个角色间接或直接提供了系统超级用户的访问(dbOwner 、userAdmin、userAdminAnyDatabase)
7. 内部角色:__system
PS:关于每个角色所拥有的操作权限可以点击上面的内置角色链接查看详情。
· writeConcern文档(官方说明)
w选项:允许的值分别是 1、0、大于1的值、"majority"、<tag set>;
j选项:确保mongod实例写数据到磁盘上的journal(日志),这可以确保mongd以外关闭不会丢失数据。设置true启用。
wtimeout:指定一个时间限制,以毫秒为单位。wtimeout只适用于w值大于1。
例如:在products数据库创建用户accountAdmin01,并给该用户admin数据库上clusterAdmin和readAnyDatabase的角色,products数据库上readWrite角色。
use products
db.createUser( { "user" : "accountAdmin01",
"pwd": "cleartext password",
"customData" : { employeeId: 12345 },
"roles" : [ { role: "clusterAdmin", db: "admin" },
{ role: "readAnyDatabase", db: "admin" },
"readWrite"
] },
{ w: "majority" , wtimeout: 5000 } )
验证:
mongo -u accountAdmin01 -p yourpassward --authenticationDatabase products
|
./bin/mongod -port 10001 -dbpath ../data/db/ -logpath ../log/mongodb.log -logappend
-auth -fork
|
Mongo 3.1 jar及JAVA应用实例
网上大部分都是mongo 2.x jar的应用实例,3.x变化很大
普通文档的存储操作
public static void main(String[] args) {
        List<ServerAddress> serverList = new ArrayList<ServerAddress>();
        serverList.add(new ServerAddress("192.168.11.171", 10001));
        MongoClient  mongoClient = null;
        MongoClientOptions.Builder build = new MongoClientOptions.Builder();
        build.connectionsPerHost(50);   //与目标数据库能够建立的最大connection数量为50
        build.heartbeatConnectTimeout(1000);//和集群的心跳连接超时的时间
        build.heartbeatFrequency(10000);//心跳频率,默认10000ms
        build.heartbeatSocketTimeout(1000);//socket连接的心跳超时时间
        build.threadsAllowedToBlockForConnectionMultiplier(50); //如果当前所有的connection都在使用中,则每个connection上可以有50个线程排队等待
        /*
         * 一个线程访问数据库的时候,在成功获取到一个可用数据库连接之前的最长等待时间为2分钟
         * 这里比较危险,如果超过maxWaitTime都没有获取到这个连接的话,该线程就会抛出Exception
         * 故这里设置的maxWaitTime应该足够大,以免由于排队线程过多造成的数据库访问失败
         */
        build.maxWaitTime(1000*60*2);
        build.connectTimeout(1000*60*1);    //与数据库建立连接的timeout设置为1分钟

        MongoClientOptions myOptions = build.build();
        char[] pwd = {'1','2','3','4','5','6'};
        MongoCredential credential = MongoCredential.createCredential("root", "abc", pwd);
        List<MongoCredential> creList = new ArrayList<MongoCredential>();
        creList.add(credential);
        try {
            mongoClient = new MongoClient(    serverList, creList,myOptions);
        } catch (Exception e){
            e.printStackTrace();
        }
        MongoDatabase db = mongoClient.getDatabase("abc");//获取数据库实例
        MongoCollection<Document> mc = db.getCollection("user");
        Document bdo = new Document();
        bdo.append("name", "eclipse");
        bdo.append("age", 20);
        bdo.append("sex", 1);
        mc.insertOne(bdo);
    }
文件存储操作
- {
- "_id" : ObjectId("4f4608844f9b855c6c35e298"), //唯一id,可以是用户自定义的类型
- "filename" : "CPU.txt", //文件名
- "length" : 778, //文件长度
- "chunkSize" : 262144, //chunk的大小
- "uploadDate" : ISODate("2012-02-23T09:36:04.593Z"), //上传时间
- "md5" : "e2c789b036cfb3b848ae39a24e795ca6", //文件的md5值
- "contentType" : "text/plain" //文件的MIME类型
- "meta" : null //文件的其它信息,默认是没有”meta”这个key,用户可以自己定义为任意BSON对象
- }
- {
- "_id" : ObjectId("4f4608844f9b855c6c35e299"), //chunk的id
- "files_id" : ObjectId("4f4608844f9b855c6c35e298"), //文件的id,对应fs.files中的对象,相当于fs.files集合的外键
- "n" : 0, //文件的第几个chunk块,如果文件大于chunksize的话,会被分割成多个chunk块
- "data" : BinData(0,"QGV...") //文件的二进制数据,这里省略了具体内容
- }
|
MongoDatabase db = mongoClient.getDatabase("abc");
GridFS fs = new GridFS(mongoClient.getDB("abc"),"wlan");
GridFSInputFile inputFile = fs.createFile(file);
inputFile.save();
System.out.println(inputFile.getFilename());
|
|
MongoDatabase db = mongoClient.getDatabase("abc");
GridFSBucket bucket = GridFSBuckets.create(db, "wlan");
GridFSUploadOptions options = new GridFSUploadOptions().chunkSizeBytes(1024);
FileOutputStream out = new FileOutputStream(new File("d:/xxx.jpg"));
bucket.downloadToStreamByName("
sample", out);
out.close();
|
|
FileOutputStream streamToDownloadTo =
new
FileOutputStream(
"/tmp/mongodb-tutorial.pdf"
);
gridFSBucket.downloadToStream(fileId, streamToDownloadTo);
streamToDownloadTo.close();
System.out.println(streamToDownloadTo.toString());
|
|
MongoDatabase db = mongoClient.getDatabase("abc");
GridFSBucket bucket = GridFSBuckets.create(db, "wlan");
ObjectId id = new ObjectId("565421e8f0d52f2124ee74d0");
bucket.rename(id, "sample-rename");
|
|
MongoDatabase db = mongoClient.getDatabase("abc");
GridFSBucket bucket = GridFSBuckets.create(db, "wlan");
ObjectId id = new ObjectId("56542158f0d52f70c0908b80");
bucket.delete(id);
|
