Creating a Static Library in iOS Tutorial
If you’ve been developing for iOS for some time, you probably have a decent set of your own classes and utility functions that you reuse in most of your projects.
The easiest way to reuse code is simply to copy/paste the source files. However, this can quickly become a maintenance nightmare. Since each app gets its own copy of the shared code, it’s difficult to keep all the copies in synch for bugfixes and updates.
This is where static libraries come to the rescue! A static library is a package of classes, functions, definitions and resources, which you can pack together and easily share between your projects.
In this tutorial you will get hands-on experience creating your own universal static library, using two different methods.
To get the most of this tutorial, you should be familiar with Objective-C and iOS programming.
Knowledge of Core Image is not needed, but it would help if you’re curious about how the sample application and the filtering code in the library works.
Get ready to reduce, reuse, and recycle your code in the name of efficiency!
Why Use Static Libraries?
You might want to create a static library for different reasons. For example:
- You want to bundle a number of classes that you and/or your colleagues in your team use regularly and share those easily around.
- You want to be able to keep some common code centralized so you can easily add bugfixes or updates.
- You’d like to share a library with a number of people, but not allow them to see your code.
- You’d like to make a version snapshot of a library that develops over time.
In this tutorial, imagine that you went through our Core Image Tutorial, and thought some of the code in there that shows you how to apply some photo effects looked handy.
You’ll take that code and add it into a static library, and then use use that static library in a modified version of the app. The result will be the same application, but with all of the benefits listed above.
Let’s dive in!
Getting Started
Launch Xcode, and choose File\New\Project. When the Choose a template dialog appears, select iOS\Framework & Library\Cocoa Touch Static Library, as shown below:
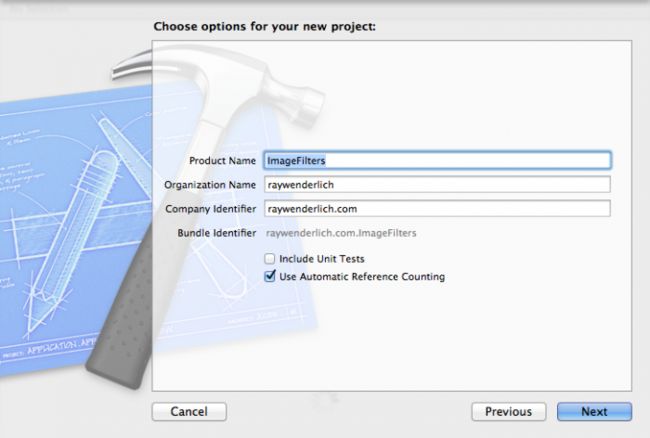
Click Next. In the project options dialog, type ImageFilters as the product name. Then, enter a unique company identifier and make sure Use Automatic Reference Counting is checked, and Include Unit Tests is unchecked, as so:
Click Next. Finally, choose a location where you’d like to save your new project, and click Create.
Xcode has just created a ready to use static library project, and even added a class ImageFilters for you. (Wasn’t that nice of Xcode?) That’s where your filter implementation code will live.
Note: You can add as many classes to a static library as you want, or even delete the original class. In this tutorial, everything will be added to the starter ImageFilters class.
Since your Xcode project is still pretty much empty let’s add some code in!
Image Filters
This library is designed for iOS and uses UIKit, so the first thing you need to do is import UIKit in the header file. Open ImageFilters.hand add the following import to the top of the file:
#import <UIKit/UIKit.h> |
Next, paste the following declarations below the line @interface ImageFilters : NSObject
@property (nonatomic,readonly) UIImage *originalImage; - (id)initWithImage:(UIImage *)image; - (UIImage *)grayScaleImage; - (UIImage *)oldImageWithIntensity:(CGFloat)level; |
These header file declarations define the public interface of the class. When other developers (including yourself!) use this library, they’ll know the name of the class and the methods that are exported in the static library just by reading this header.
Now, it’s time to add the implementation. Open ImageFilters.m and paste the following code just below the line: #import "ImageFilters.h":
@interface ImageFilters() @property (nonatomic,strong) CIContext *context; @property (nonatomic,strong) CIImage *beginImage; @end |
The code above declares some properties used internally by the class. These properties are not public, so any app that uses this library won’t have access to them.
Finally, you need to implement the class methods. Paste the following code just below the line @implementation ImageFilters:
- (id)initWithImage:(UIImage *)image { self = [super init]; if (self) { _originalImage = image; _context = [CIContext contextWithOptions:nil]; _beginImage = [[CIImage alloc] initWithImage:_originalImage]; } return self; } - (UIImage*)imageWithCIImage:(CIImage *)ciImage { CGImageRef cgiImage = [self.context createCGImage:ciImage fromRect:ciImage.extent]; UIImage *image = [UIImage imageWithCGImage:cgiImage]; CGImageRelease(cgiImage); return image; } - (UIImage *)grayScaleImage { if( !self.originalImage) return nil; CIImage *grayScaleFilter = [CIFilter filterWithName:@"CIColorControls" keysAndValues:kCIInputImageKey, self.beginImage, @"inputBrightness", [NSNumber numberWithFloat:0.0], @"inputContrast", [NSNumber numberWithFloat:1.1], @"inputSaturation", [NSNumber numberWithFloat:0.0], nil].outputImage; CIImage *output = [CIFilter filterWithName:@"CIExposureAdjust" keysAndValues:kCIInputImageKey, grayScaleFilter, @"inputEV", [NSNumber numberWithFloat:0.7], nil].outputImage; UIImage *filteredImage = [self imageWithCIImage:output]; return filteredImage; } - (UIImage *)oldImageWithIntensity:(CGFloat)intensity { if( !self.originalImage ) return nil; CIFilter *sepia = [CIFilter filterWithName:@"CISepiaTone"]; [sepia setValue:self.beginImage forKey:kCIInputImageKey]; [sepia setValue:@(intensity) forKey:@"inputIntensity"]; CIFilter *random = [CIFilter filterWithName:@"CIRandomGenerator"]; CIFilter *lighten = [CIFilter filterWithName:@"CIColorControls"]; [lighten setValue:random.outputImage forKey:kCIInputImageKey]; [lighten setValue:@(1 - intensity) forKey:@"inputBrightness"]; [lighten setValue:@0.0 forKey:@"inputSaturation"]; CIImage *croppedImage = [lighten.outputImage imageByCroppingToRect:[self.beginImage extent]]; CIFilter *composite = [CIFilter filterWithName:@"CIHardLightBlendMode"]; [composite setValue:sepia.outputImage forKey:kCIInputImageKey]; [composite setValue:croppedImage forKey:kCIInputBackgroundImageKey]; CIFilter *vignette = [CIFilter filterWithName:@"CIVignette"]; [vignette setValue:composite.outputImage forKey:kCIInputImageKey]; [vignette setValue:@(intensity * 2) forKey:@"inputIntensity"]; [vignette setValue:@(intensity * 30) forKey:@"inputRadius"]; UIImage *filteredImage = [self imageWithCIImage:vignette.outputImage]; return filteredImage; } |
This code implements the initialization and the methods that perform the Core Image filtering. Since explaining the function of the Core Image code above it outside of the scope of this tutorial, you can learn more about Core Images and filters in the Core Image Tutorial.
At this point, you have a static library with a public class ImageFilters that exposes the following three methods:
- initWithImage: Initializes the filtering class
- grayScaleImage: Creates a grayscale version of the image
- oldImageWithIntensity: Creates an old-looking image
Now build and run your library. You will notice the usual Xcode “Run” button just performs a build; you can’t actually run your library to see the results as there’s no app behind it!
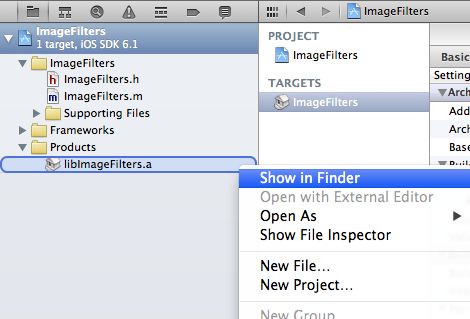
Rather than a .app or a .ipa file, a static library has the .a extension. You can find the generated static library in the Products folder in the project navigator. Right-click or control-click libImageFilters.a and select Show in Finder in the contextual menu.
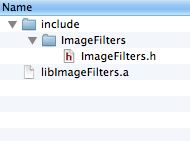
Xcode will open the folder in Finder, where you’ll see something like this:
There are two parts to the end product of a shared library:
Header files: In the include folder, you will find all the public headers of the library. In this case, there’s only one public class so this folder only has the single ImageFilters.h file. You’ll need to use this header file later in your app’s project so that Xcode knows about the exported classes at compile time.
Binary Library: The static library file that Xcode generates is ImageFilters.a. When you want to use this library in an application, you’ll need to link it using this file.
These two pieces are similar to the things you need when including a new framework into your app; you simply import the framework header and the framework code gets linked into the app.
The shared library is ready to be used — with one small caveat. By default, the library file will be built only for the current architecture. If you build for the simulator, the library will contain object code for the i386 architecture; and if you build for the device you’ll get code for the ARM architecture. You would need to build two versions of the library and pick which one to link as you change targets from simulator to device.
What to do?
Fortunately, there’s a better way to support multiple platforms without the need to create multiple configurations or build products in your application’s project. You can create a universal binary that contains the object code for both architectures.
Universal Binaries
A universal binary is a special kind of binary file that contains object code for multiple architectures. You might be familiar with universal binaries from the transition from PowerPC (PPC) to Intel (i386) in the Mac computers line. During that transition, Mac apps usually shipped with universal binaries containing both executables in a single binary file so that the application could work with both Intel and PowerPC Macs.
The concept for supporting ARM and i386 isn’t that much different. In this case, the static library file will include the object code for your iOS device’s (ARM) and your simulator’s (i386) architectures. Xcode will recognize the library as universal, and every time you build the app it will choose the appropriate architecture based on the target.
In order to create a universal binary library, you need to use a system tool called lipo.
Don’t worry kitten, it’s not that kind of lipo! :]
lipo is a command line tool that allows you to perform operations on universal files (operations like creating universal binaries, listing universal file contents and more). What you are going to use lipo for in this tutorial is combine different architecture binary files into a single output binary for multiple architectures. You could use lipo directly from the command line, but in this tutorial you will make Xcode do the work for you by running a command line script that creates a universal library.
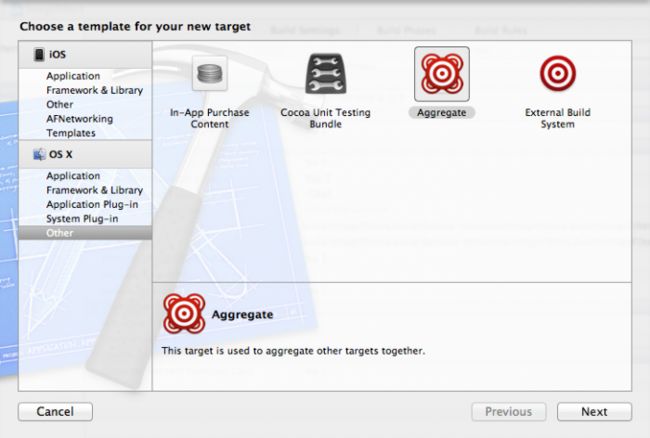
An Aggregate Target in Xcode will build multiple targets at once, including command-line scripts. Navigate to File/New/Target in the Xcode menu. Choose iOS/Other and click on Aggregate, like so:
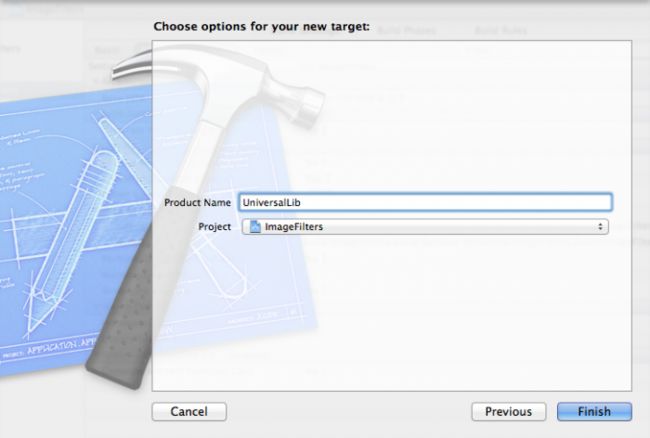
Call the target UniversalLib, and make sure ImageFilters is the selected project, as shown below:
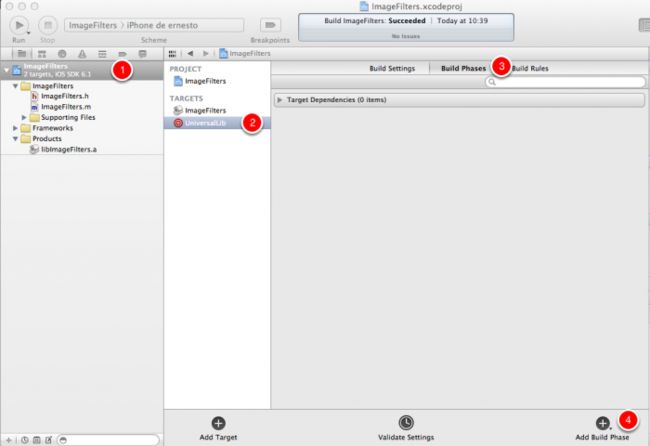
Click on the ImageFilters project in the project navigator, then select the UniversalLib target. Switch to the Build Phases tab; this is where you will set up the actions that will run when the target is built.
Click on the Add Build Phase button, and select Add Run Script in the menu that pops up, as shown below:
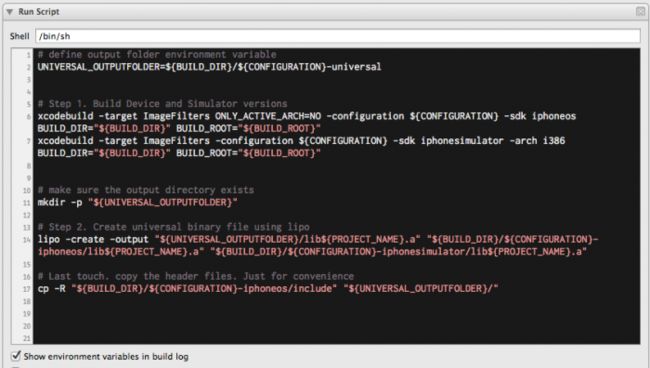
Now you have a script item to set up. Expand the Run Script module, and paste in the following text under the Shell line:
# define output folder environment variable UNIVERSAL_OUTPUTFOLDER=${BUILD_DIR}/${CONFIGURATION}-universal # Step 1. Build Device and Simulator versions xcodebuild -target ImageFilters ONLY_ACTIVE_ARCH=NO -configuration ${CONFIGURATION} -sdk iphoneos BUILD_DIR="${BUILD_DIR}" BUILD_ROOT="${BUILD_ROOT}" xcodebuild -target ImageFilters -configuration ${CONFIGURATION} -sdk iphonesimulator -arch i386 BUILD_DIR="${BUILD_DIR}" BUILD_ROOT="${BUILD_ROOT}" # make sure the output directory exists mkdir -p "${UNIVERSAL_OUTPUTFOLDER}" # Step 2. Create universal binary file using lipo lipo -create -output "${UNIVERSAL_OUTPUTFOLDER}/lib${PROJECT_NAME}.a" "${BUILD_DIR}/${CONFIGURATION}-iphoneos/lib${PROJECT_NAME}.a" "${BUILD_DIR}/${CONFIGURATION}-iphonesimulator/lib${PROJECT_NAME}.a" # Last touch. copy the header files. Just for convenience cp -R "${BUILD_DIR}/${CONFIGURATION}-iphoneos/include" "${UNIVERSAL_OUTPUTFOLDER}/" |
The code is not so complicated, this is how it goes line-by-line:
- UNIVERSAL_OUTPUTFOLDER contains the name of the folder where the universal binary will be copied: “Debug-universal”
- Step 1. On the second line you call xcodebuild and instruct it to build the ARM architecture binary (you will see on this line the parameter -sdk iphoneos)
- Next line calls xcodebuild again and builds in a separate folder the iPhone Simulator binary for an Intel architecure, the key params here are: -sdk iphonesimulator -arch i386. (If you’re interested, you can learn more about xcodebuild on its man page)
- Step 2. Now that you already have the two .a files for the two architectures you just invoke lipo -create and set it to create a universal binary out of them
- In the last line you copy the header files over to the universal build folder (using the cp shell command)
Your Run Script window should look like the following:
Now you’re ready to build the universal version of the static library. Select the aggregate target UniversalLib in the Scheme Selection drop down, as so (unlike on the screenshot below instead of “iOS Device” you might see your device’s name):
Press the Play button to build the target for the aggregate scheme.
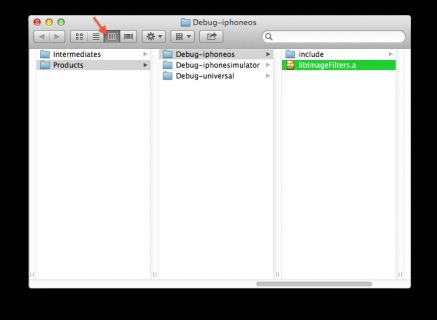
To see the result, use the Show in Finder option on the libImageFilters.a product again. Switch to Finder’s column view to see the folders in the hierarchy and you’ll see a new folder called Debug-Universal (or Release-Universal if you built the Release version), which contains the Universal version of the library, as shown below:
You’ll find the usual headers and static library files are present, except this one links with both the simulator and the device.
And that is all you needed to learn in order to create your very own universal static library!
To recap, a static library project is very similar to an app. You can have one or many classes, and the final build products are the header files and a .a file with the code. This .a file is the static library which can be linked into several applications.
Using a Static Library in Your App
Using the ImageFilters class in your own app is not very different from using it directly from source: you import the header file and start using the class! The problem is that Xcode doesn’t know the location of the header or the library file.
There are two methods to include your static library in your project:
- Method 1: Reference the headers and the library binary file (.a) directly.
- Method 2: Include the library project as a Subproject.
Choosing one or the other method really depends on your own preferences and whether you have the source code and the project file of the static library at your disposal.
Both methods are described independently in this tutorial. You can try either the first or second method, although it’s best to try both in the order described. At the beginning of both method Sections, you will be asked to download a zip file with a modified version of the application created in the Core Image Tutorial, which uses the new ImageFilters class from the library.
Since the main goal of this tutorial is to teach you how to use the static library, the modified version includes all the source code required for the app. That way you can focus on the project configuration needed to use the library.
Method 1: Header and Library Binary Files
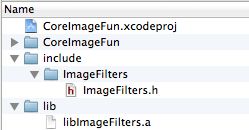
For this part of the tutorial, you’ll need to download the starter project for this section . Copy the zipped file to any folder on your hard drive, and unzip it. You’ll see the following folder structure:
For your convenience, copies of the universal library .a file and header files are included, but the project isn’t configured to use them. That’s where you come in.
Note: The typical Unix convention for includes is an include folder for the header files, and a lib folder for the library files (.a). This folder structure is only a convention; it’s not mandatory in any way. You don’t need to follow this structure or copy the files inside your project’s folder. In your own apps, you can have the header and library files in any location of your choice, as long as you set the proper directories when you configure the Xcode project later on.
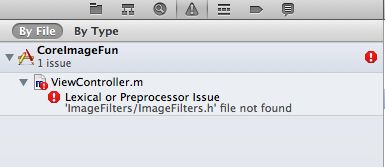
Open the project, and build and run your app. You’ll see the following build error:
As expected, the app has no idea where to find the header file. In order to solve this, you need to add a new Header Search Path to the project that points to the folder where the header is located. Configuring the Header Search Path is always the first step when using code from a static library.
As demonstrated in the image below, click on the project root node in the project navigator (1), and select the CoreImageFun target (2). Select Build Settings (3), and locate the Header Search Paths setting in the list. You can type “header search” in the search box to filter the big list of settings if necessary (4).
Double click on the Header Search Paths item, and a popover will appear. Click the + button, and enter the following:
$SOURCE_ROOT/include |
The popover should look like the following image:
$SOURCE_ROOT is an Xcode environment variable, which points to the project’s root folder. Xcode will replace this variable with the actual folder which contains your project, which means stays up to date when you move the project to another folder or drive.
Click outside the popover to dismiss, and you’ll see that Xcode has automatically translated it to the actual location of the project, as shown below:
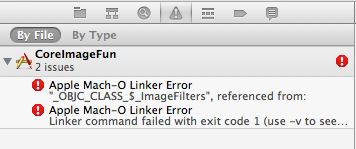
Build and run your app, and see what kind of result you get. Hmm — some linker errors appear:
That doesn’t look great, but it gives you one more piece of information that you need. If you look closely, you’ll see that all the compile error is gone, and has been replaced with the linker errors. This means that Xcode found the header file and used it to compile the app, but in the linking phase, it couldn’t find the object code for the ImageFilter class. Why?
That’s simple — you haven’t yet told Xcode where to find the library file which contains the class implementation. (See, it wasn’t anything too serious.)
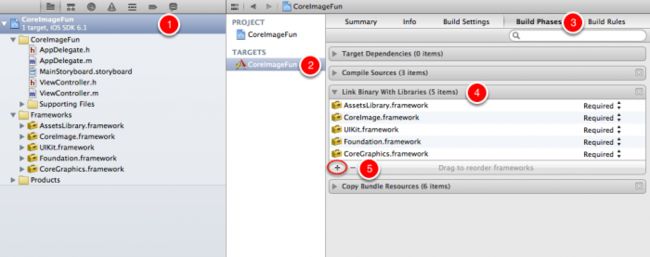
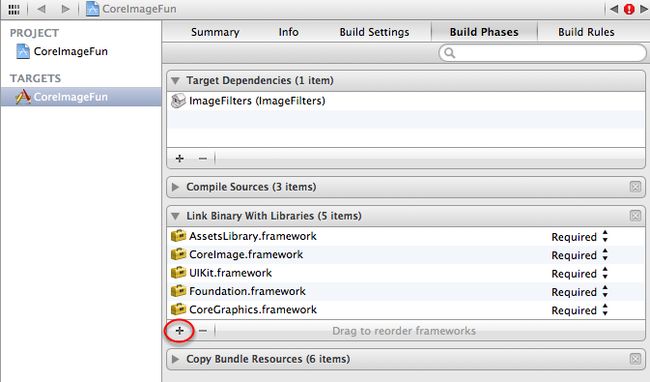
As shown in the screenshot below, return to the build settings (1) for the CoreImageFun target (2). Select the Build Phases tab (3), and expand the Link Binary With Libraries section (4). Finally, click the + button in that section (5).
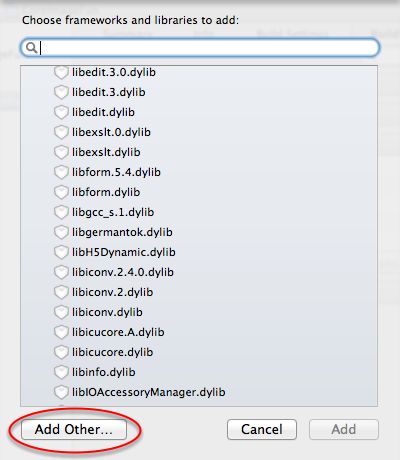
In the window that appears, click on the Add Other… button and locate the libImageFilters.a library file in the lib subdirectory inside the project’s root folder, as so:
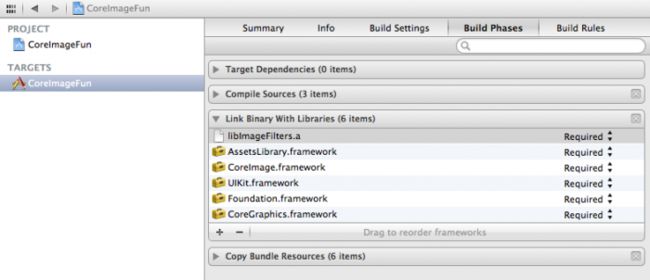
This is how the Build Phase of your project should look when you’re all done:
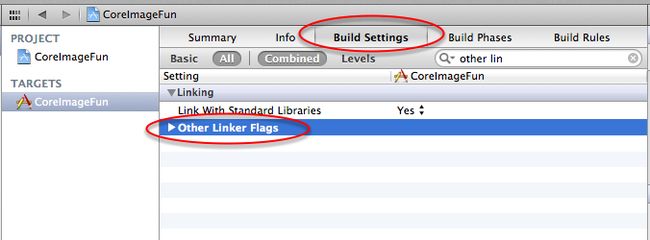
The final step is to add the -ObjC linker flag. The linker tries to be efficient about only including needed code, which can sometimes exclude static library code. With this flag, all the Objective-C classes and categories in the library are loaded properly. You can learn more about this in Apple’s Technical Q&A QA1490
Click on the Build Settings tab, and locate the Other linker Flags setting, as shown below:
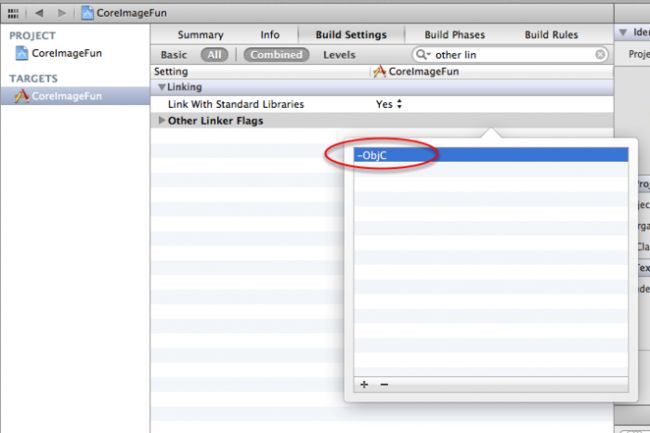
In the popover, click on the + button and type -ObjC, as such:
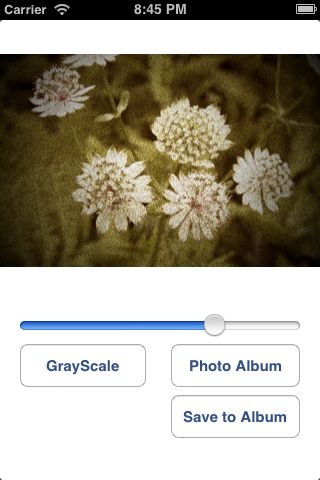
Finally, build and run your app; you should not receive any build errors, and the app will open in all it’s glory, like so:
Drag the slider to change the filter level, or tap on the GrayScale button. The code used to perform those image filters is coming not from the app, but from the static library.
Congratulations — you just built and used your first static library in a real application! You’ll see this method of including the header and library used in many third-party libraries such as AdMob, TestFlight or any other commercial libraries that don’t provide the source code.
Method 2: Subprojects
For this part of the tutorial, you’ll need to download the starter project for this section here
Copy it to any folder in your hard drive, and unzip it. You’ll see the following folder structure:
If you followed the first method of this tutorial, you will notice a difference in the base project. This project does not have any header or static library files — that’s because they aren’t needed. Instead, you’ll take the ImageFilters library project you created at the beginning of the tutorial and add it to this project as a dependency.
Before doing anything else, build and run your application. You should be greeted with the following error:
If you followed along with the first method, then you might already know how to fix this issue. In the sample project, you’re using theImageFilters class in the ViewController class, but you still haven’t told Xcode where the header files are located. Xcode is trying to find the ImageFilters.h file, but it fails.
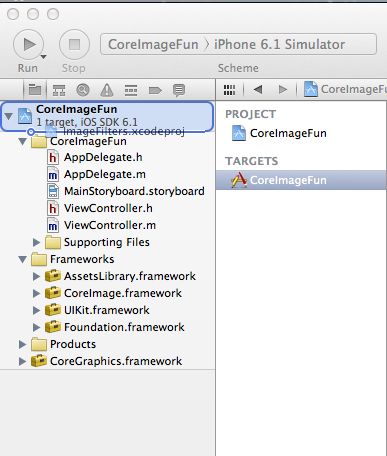
To include the ImageFilters library project as a subproject, all you need to do is drag the library project file to the Project File Tree. Xcode will not add a subproject properly if it’s already open in another Xcode window. So, before going on with the tutorial, make sure the ImageFilters library project is closed.
In the Finder, find the project file of the library project; it’s named ImageFilters.xcodeproj. Drag that file into the Project Explorer of the CoreImageFun project, located on the left side of the window, as so:
After dragging and dropping the file, your Project Explorer view should look like the following:
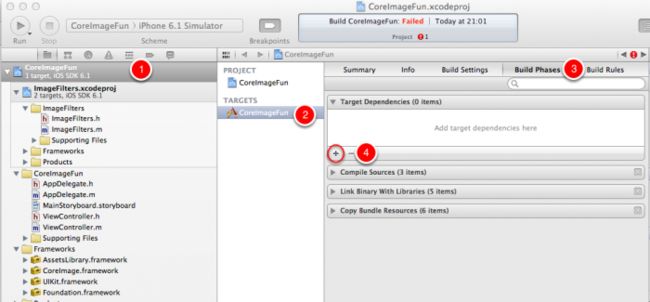
Now that Xcode knows about the library subproject, you can add the library to the project Dependencies. This means Xcode will make sure that the Library is up to date before building the main app.
Click on the project root (1), and select the CoreImageFun target (2). Click on the Build Phases tab (3), and expand the Target Dependencies (4), like so:
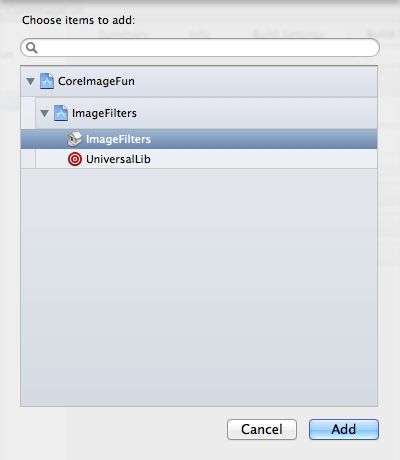
Click on the + button to add a new dependency. As shown below, make sure you choose the ImageFilters target (not universalLib) from the popup:
After adding it, this is how the dependency section should look:
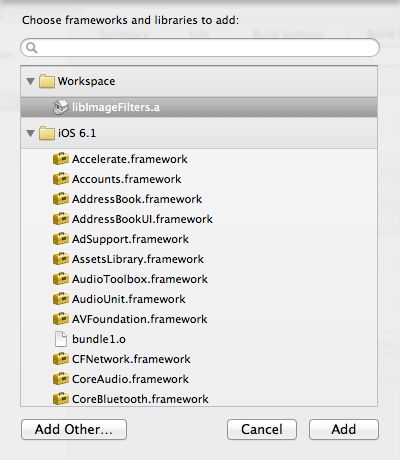
The last step is configuring the project to link the app with the static library. Expand the Link Binary with libraries section, and click the + button, as shown below:
Choose the libImageFilters.a item and click Add:
This is how the Link Binary with Libraries section should look after adding the library:
As with the first method, the final step is to add the -ObjC linker flag. Click on the Build Settings tab, and locate the Other linker Flags setting, as shown below:
In the popover, click on the + button and type -ObjC, as so:
Build and run your app; you shouldn’t get any errors, and the app will open once again:
Drag the slider or tap on the GrayScale button to see the results of the image filters. Once again, the filter logic is totally contained within your library.
If you followed the first method to add the library to your app (using the header and library files), you’ll have noticed some differences in the approach for the second method. In the second method, you haven’t added any header search paths to the project configuration. Another difference is that you’re not using the Universal library.
Why the difference? When adding the library as a subproject, Xcode takes care of almost everything for you. After adding the subproject and the dependency, Xcode knows where to search for the header and binary files, and which architecture of the library needs to be built for your app based on the selected configuration. That’s pretty handy.
If you’re using your own library, or if you have access to the source and project files, adding the library as a subproject provides a convenient way to import a static library in your app. You get closer build integration as a project dependency, with fewer things to worry about doing yourself. Win-win!
Where To Go From Here?
You can download the projects that contain all the code from this tutorial here.
Hopefully this tutorial has given you some insight into the basic concepts of static libraries and how to use them in your own apps.
The next step is to use this knowledge to build your own libraries! You surely have some common classes that you add to all your projects. Those can be good candidates to be included in your own reusable library. You could also think about creating multiple libraries based on functionality: one with your networking code, a different one for your UI classes, etc. That way, you could add to your projects only the modules that you need.
In order to reinforce or further explore the concepts you’ve learned in this tutorial, I’d also recommend Apple’s Introduction to Using Static Libraries in iOS.
I hope you enjoyed this tutorial, and as always if you have any questions or comments please join the forum discussion below!
