多线程开发
1.同步方法与同步代码块
在博文多线程开发中提到使用synchronized实现同步有两种方法,一种是同步方法,另外一种是同步代码块。现在根据同样一个问题,分别给出同步方法和同步代码块的实现方法。
1.1同步方法
package test;

public class ThreadDeadLock3 {
    public static void main(String args[]) {
        Info info = new Info();
        // info作为参数传入两个线程当中
        ProducerThread pt = new ProducerThread(info);
        ConsumerThread ct = new ConsumerThread(info);

        Thread producer = new Thread(pt, "producer");
        Thread consumer = new Thread(ct, "consumer");
        Thread consumer2 = new Thread(ct, "consumer2");
        producer.start();
        consumer.start();
        //consumer2.start();
    }

    // 资源类
    static class Info {
        private String name;
        private String content;
        boolean flag=false;

        //getter and setter
        public String getName() {
            return name;
        }
        public void setName(String name) {
            this.name = name;
        }
        public String getContent() {
            return content;
        }
        public void setContent(String content) {
            this.content = content;
        }

        // 获取name与content信息
        public synchronized void get() {
            if(!flag)
            {
                try {
                    this.wait();
                } catch (InterruptedException e) {
                    // TODO Auto-generated catch block
                    e.printStackTrace();
                }
            }
            System.out.println(Thread.currentThread().getName()+": "+this.getName() + ":-->" + this.getContent());
            flag=false;
            this.notify();

        }

        // 设置name与content信息
        public synchronized void set(String name, String content) {
            if(flag)
            {
                try {
                    this.wait();
                } catch (InterruptedException e) {
                    // TODO Auto-generated catch block
                    e.printStackTrace();
                }
            }
            this.setName(name);
            this.setContent(content);
            //System.out.println(Thread.currentThread().getName());
            flag=true;
            //this.notify();
            this.notify();
        }
    }

    // 生产者线程
    static class ProducerThread implements Runnable {
        private Info info = null;

        // 构造函数,其参数是资源
        public ProducerThread(Info info) {
            this.info = info;
        }

        @Override
        public void run() {
            for (int i = 0; i < 10; i++) {
                this.info.set("name" + i, "content" + i);
            }
        }
    }

    static class ConsumerThread implements Runnable {
        private Info info = null;

        // 构造函数,其参数是资源
        public ConsumerThread(Info info) {
            this.info = info;
        }

        @Override
        public void run() {
            for (int i = 0; i < 10; i++) {
                this.info.get();
            }
        }
    }
}
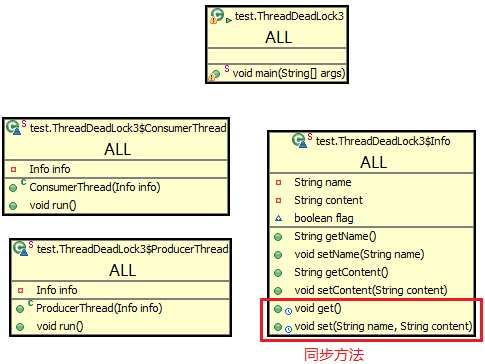
上面这个程序的类图如下所示。通过这里类图我们来分析多线程的概念。
- 有两个不同线程,他们分别是ConsumerThread和ProducerThread,他们要访问同一个资源Info。因为get和set方法都是同步方法,所以一次就只能有一个线程可以调用这个方法。调用同步方法需要获得对象的锁,也就是获得info这个对象的锁。只有当同步方法执行完以后才会释放对象所。
- 而在同步代码块中,我们可以看到synchronized (this) {},其实就是获得当前这个对象的锁。synchronized (this) {}代码块在哪一个类中,就要获取这个类的对象的锁。
- 如果是static方法或者synchronized (this) {}在static方法内部,那么就需要获取类锁。因为静态方法不属于某一个对象,而属于这个类,被所有对象所共有。
- 如果一个线程A获得一个对象obj的锁,则线程B将无法“调用obj中的所有同步方法或者执行同步代码块中代码”,但是假如线程A在获取对象锁以后,发现某个条件不满足,则可以通过调用this.wait();这个方法,让线程A释放掉这个对象的锁。之前因为线程A获得了obj的锁,所以在线程B中调用obj的同步方法的时候被阻塞了。此时线程A已经释放发了obj的锁,则线程B可以继续执行,但是线程B不会自动检测obj上的锁是否被释放,而是需要线程A去提醒说自己已经不在用obj了,因此需要调用this.notify();这个方法。这个方法的作用是让一个等待obj锁的线程由阻塞状态变为就绪状态。如果是this.notifyAll();则是让所有等待obj锁的线程都处于就绪状态。虽然有许多线程处于就绪状态,但是最后只会有一个线程处于运行状态,也就是只有一个线程可以抢到obj锁,但是具体哪一个线程抢到obj锁并不确定。
1.2同步代码块
package test;

public class ThreadDeadLock4 {
    public static void main(String args[]) {
        Info info = new Info();
        // info作为参数传入两个线程当中
        ProducerThread pt = new ProducerThread(info);
        ConsumerThread ct = new ConsumerThread(info);

        Thread producer = new Thread(pt, "producer");
        Thread consumer = new Thread(ct, "consumer");
        Thread consumer2 = new Thread(ct, "consumer2");
        producer.start();
        consumer.start();
        // consumer2.start();
    }

    // 资源类
    static class Info {
        private String name;
        private String content;
        boolean flag = false;

        // getter and setter
        public String getName() {
            return name;
        }

        public void setName(String name) {
            this.name = name;
        }

        public String getContent() {
            return content;
        }

        public void setContent(String content) {
            this.content = content;
        }

        // 获取name与content信息
        public void get() {
            synchronized (this) {
                if (!flag) {
                    try {
                        this.wait();
                    } catch (InterruptedException e) {
                        // TODO Auto-generated catch block
                        e.printStackTrace();
                    }
                }
                System.out.println(Thread.currentThread().getName() + ": "
                        + this.getName() + ":-->" + this.getContent());
                flag = false;
                this.notify();
            }

        }

        // 设置name与content信息
        public void set(String name, String content) {
            synchronized (this) {
                if (flag) {
                    try {
                        this.wait();
                    } catch (InterruptedException e) {
                        // TODO Auto-generated catch block
                        e.printStackTrace();
                    }
                }
                this.setName(name);
                this.setContent(content);
                // System.out.println(Thread.currentThread().getName());
                flag = true;
                // this.notify();
                this.notify();
            }
        }

    }

    // 生产者线程
    static class ProducerThread implements Runnable {
        private Info info = null;

        // 构造函数,其参数是资源
        public ProducerThread(Info info) {
            this.info = info;
        }

        @Override
        public void run() {
            for (int i = 0; i < 10; i++) {
                this.info.set("name" + i, "content" + i);
            }
        }
    }

    static class ConsumerThread implements Runnable {
        private Info info = null;

        // 构造函数,其参数是资源
        public ConsumerThread(Info info) {
            this.info = info;
        }

        @Override
        public void run() {
            for (int i = 0; i < 10; i++) {
                this.info.get();
            }
        }
    }
}
1.3两种方法的对比
通过对比我们可以看出,同步方法
        public synchronized void set(String name, String content) {
            if(flag)
            {
                try {
                    this.wait();
                } catch (InterruptedException e) {
                    // TODO Auto-generated catch block
                    e.printStackTrace();
                }
            }
            this.setName(name);
            this.setContent(content);
            //System.out.println(Thread.currentThread().getName());
            flag=true;
            //this.notify();
            this.notify();
        }
要转变为同步代码块只需要将synchronized关键字提到方法内部即可。
public void set(String name, String content) {
            synchronized (this) {
                if (flag) {
                    try {
                        this.wait();
                    } catch (InterruptedException e) {
                        // TODO Auto-generated catch block
                        e.printStackTrace();
                    }
                }
                this.setName(name);
                this.setContent(content);
                // System.out.println(Thread.currentThread().getName());
                flag = true;
                // this.notify();
                this.notify();
            }
        }
2.wait()/notify()
wait和notify方法是object的final方法,因此这个方法不能被重写。所以在程序中我们运行wait(),this.wait(),super.wait()都是一样的。都是执行超类Objcet的方法。
通常,多线程之间需要协调工作。例如,浏览器的一个显示图片的线程displayThread想要执行显示图片的任务,必须等待下载线程downloadThread将该图片下载完毕。如果图片还没有下载完,displayThread可以暂停,当downloadThread完成了任务后,再通知displayThread“图片准备完毕,可以显示了”,这时,displayThread继续执行。
以上逻辑简单的说就是:如果条件不满足,则等待。当条件满足时,等待该条件的线程将被唤醒。在Java中,这个机制的实现依赖于wait/notify。等待机制与锁机制是密切关联的。例如:
synchronized(obj) {
while(!condition) {
obj.wait();
}
obj.doSomething();
}
当线程A获得了obj锁后,发现条件condition不满足,无法继续下一处理,于是线程A就wait(),此时释放obj锁。在另一线程B中,如果B更改了某些条件,使得线程A的condition条件满足了,就可以唤醒线程A:
synchronized(obj) {
condition = true;
obj.notify();
}
具体例子如上述“同步代码块”中的代码,单独摘录如下:
// 获取name与content信息
        public void get() {
            synchronized (this) {
                if (!flag) {
                    try {
                        this.wait();
                    } catch (InterruptedException e) {
                        // TODO Auto-generated catch block
                        e.printStackTrace();
                    }
                }
                System.out.println(Thread.currentThread().getName() + ": "
                        + this.getName() + ":-->" + this.getContent());
                flag = false; this.notify();
            }

        }

        // 设置name与content信息
        public void set(String name, String content) {
            synchronized (this) {
                if (flag) {
                    try {
                        this.wait();
                    } catch (InterruptedException e) {
                        // TODO Auto-generated catch block
                        e.printStackTrace();
                    }
                }
                this.setName(name);
                this.setContent(content);
                // System.out.println(Thread.currentThread().getName());
                flag = true;//改变条件,则get方法中的if(!flag)条件不再满足,通过notify可执行if(!flag){}后面的代码
                this.notify();//唤醒
            }
        }
需要注意的概念是:
- # 调用obj的wait(), notify()方法前,必须获得obj锁,也就是必须写在synchronized(obj) {...} 代码段内。
- # 调用obj.wait()后,线程A就释放了obj的锁,否则线程B无法获得obj锁,也就无法在synchronized(obj) {...} 代码段内唤醒A。
- # 当obj.wait()方法返回后,线程A需要再次获得obj锁,才能继续执行。
- # 如果A1,A2,A3都在obj.wait(),则B调用obj.notify()只能唤醒A1,A2,A3中的一个(具体哪一个由JVM决定)。
- # obj.notifyAll()则能全部唤醒A1,A2,A3,但是要继续执行obj.wait()的下一条语句,必须获得obj锁,因此,A1,A2,A3只有一个有机会获得锁继续执行,例如A1,其余的需要等待A1释放obj锁之后才能继续执行。
- # 当B调用obj.notify/notifyAll的时候,B正持有obj锁,因此,A1,A2,A3虽被唤醒,但是仍无法获得obj锁。直到B退出synchronized块,释放obj锁后,A1,A2,A3中的一个才有机会获得锁继续执行。
