Harris角点检测
原创文章,转载请注明出处:http://blog.csdn.net/crzy_sparrow/article/details/7391511
文章目录:
一、Harris角点检测基本理论
二、opencv代码实现
三、改进的Harris角点检测
四、FAST角点检测
五、参考文献
六、附录(资料和源码)
一、Harris角点检测基本理论(要讲清楚东西太多,附录提供文档详细说明)
1.1 简略表达:
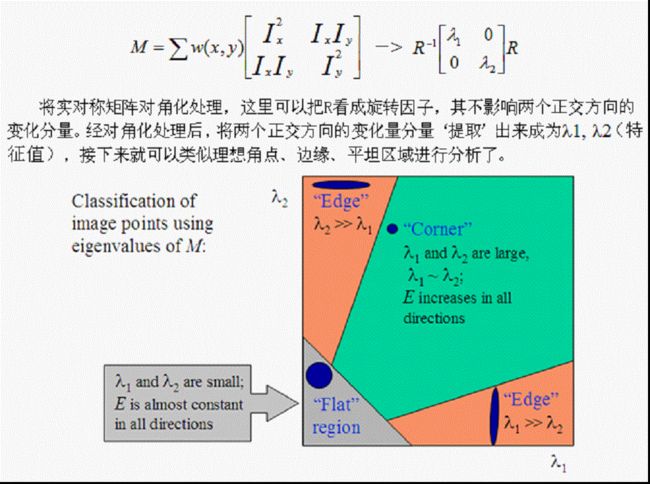
角点:最直观的印象就是在水平、竖直两个方向上变化均较大的点,即Ix、Iy都较大
边缘:仅在水平、或者仅在竖直方向有较大的变化量,即Ix和Iy只有其一较大
平坦地区:在水平、竖直方向的变化量均较小,即Ix、Iy都较小
角点响应
R=det(M)-k*(trace(M)^2) (附录资料给出k=0.04~0.06,opencv指出是0.05-0.5,浮动较大)
det(M)=λ1*λ2 trace(M)=λ1+λ2
R取决于M的特征值,对于角点|R|很大,平坦的区域|R|很小,边缘的R为负值。
1.2 详细描述:见附录里的ppt
1.3 算法步骤
其中,局部极大值可用先膨胀后与原图比较的方法求得,具体见二中源码。
二、opencv代码实现
harris类
- #ifndef HARRIS_H
- #define HARRIS_H
- #include "opencv2/opencv.hpp"
- class harris
- {
- private:
- cv::Mat cornerStrength; //opencv harris函数检测结果,也就是每个像素的角点响应函数值
- cv::Mat cornerTh; //cornerStrength阈值化的结果
- cv::Mat localMax; //局部最大值结果
- int neighbourhood; //邻域窗口大小
- int aperture;//sobel边缘检测窗口大小(sobel获取各像素点x,y方向的灰度导数)
- double k;
- double maxStrength;//角点响应函数最大值
- double threshold;//阈值除去响应小的值
- int nonMaxSize;//这里采用默认的3,就是最大值抑制的邻域窗口大小
- cv::Mat kernel;//最大值抑制的核,这里也就是膨胀用到的核
- public:
- harris():neighbourhood(3),aperture(3),k(0.01),maxStrength(0.0),threshold(0.01),nonMaxSize(3){
- };
- void setLocalMaxWindowsize(int nonMaxSize){
- this->nonMaxSize = nonMaxSize;
- };
- //计算角点响应函数以及非最大值抑制
- void detect(const cv::Mat &image){
- //opencv自带的角点响应函数计算函数
- cv::cornerHarris (image,cornerStrength,neighbourhood,aperture,k);
- double minStrength;
- //计算最大最小响应值
- cv::minMaxLoc (cornerStrength,&minStrength,&maxStrength);
- cv::Mat dilated;
- //默认3*3核膨胀,膨胀之后,除了局部最大值点和原来相同,其它非局部最大值点被
- //3*3邻域内的最大值点取代
- cv::dilate (cornerStrength,dilated,cv::Mat());
- //与原图相比,只剩下和原图值相同的点,这些点都是局部最大值点,保存到localMax
- cv::compare(cornerStrength,dilated,localMax,cv::CMP_EQ);
- }
- //获取角点图
- cv::Mat getCornerMap(double qualityLevel) {
- cv::Mat cornerMap;
- // 根据角点响应最大值计算阈值
- threshold= qualityLevel*maxStrength;
- cv::threshold(cornerStrength,cornerTh,
- threshold,255,cv::THRESH_BINARY);
- // 转为8-bit图
- cornerTh.convertTo(cornerMap,CV_8U);
- // 和局部最大值图与,剩下角点局部最大值图,即:完成非最大值抑制
- cv::bitwise_and(cornerMap,localMax,cornerMap);
- return cornerMap;
- }
- void getCorners(std::vector<cv::Point> &points,
- double qualityLevel) {
- //获取角点图
- cv::Mat cornerMap= getCornerMap(qualityLevel);
- // 获取角点
- getCorners(points, cornerMap);
- }
- // 遍历全图,获得角点
- void getCorners(std::vector<cv::Point> &points,
- const cv::Mat& cornerMap) {
- for( int y = 0; y < cornerMap.rows; y++ ) {
- const uchar* rowPtr = cornerMap.ptr<uchar>(y);
- for( int x = 0; x < cornerMap.cols; x++ ) {
- // 非零点就是角点
- if (rowPtr[x]) {
- points.push_back(cv::Point(x,y));
- }
- }
- }
- }
- //用圈圈标记角点
- void drawOnImage(cv::Mat &image,
- const std::vector<cv::Point> &points,
- cv::Scalar color= cv::Scalar(255,255,255),
- int radius=3, int thickness=2) {
- std::vector<cv::Point>::const_iterator it=points.begin();
- while (it!=points.end()) {
- // 角点处画圈
- cv::circle(image,*it,radius,color,thickness);
- ++it;
- }
- }
- };
- #endif // HARRIS_H
#ifndef HARRIS_H
#define HARRIS_H
#include "opencv2/opencv.hpp"

class harris
{
private:
    cv::Mat  cornerStrength;  //opencv harris函数检测结果,也就是每个像素的角点响应函数值
    cv::Mat cornerTh; //cornerStrength阈值化的结果
    cv::Mat localMax; //局部最大值结果
    int neighbourhood; //邻域窗口大小
    int aperture;//sobel边缘检测窗口大小(sobel获取各像素点x,y方向的灰度导数)
    double k;
    double maxStrength;//角点响应函数最大值
    double threshold;//阈值除去响应小的值
    int nonMaxSize;//这里采用默认的3,就是最大值抑制的邻域窗口大小
    cv::Mat kernel;//最大值抑制的核,这里也就是膨胀用到的核
public:
    harris():neighbourhood(3),aperture(3),k(0.01),maxStrength(0.0),threshold(0.01),nonMaxSize(3){

    };

    void setLocalMaxWindowsize(int nonMaxSize){
        this->nonMaxSize = nonMaxSize;
    };

    //计算角点响应函数以及非最大值抑制
    void detect(const cv::Mat &image){
            //opencv自带的角点响应函数计算函数
            cv::cornerHarris (image,cornerStrength,neighbourhood,aperture,k);
            double minStrength;
            //计算最大最小响应值
            cv::minMaxLoc (cornerStrength,&minStrength,&maxStrength);

            cv::Mat dilated;
            //默认3*3核膨胀,膨胀之后,除了局部最大值点和原来相同,其它非局部最大值点被
            //3*3邻域内的最大值点取代
            cv::dilate (cornerStrength,dilated,cv::Mat());
            //与原图相比,只剩下和原图值相同的点,这些点都是局部最大值点,保存到localMax
            cv::compare(cornerStrength,dilated,localMax,cv::CMP_EQ);
    }

    //获取角点图
    cv::Mat getCornerMap(double qualityLevel) {
            cv::Mat cornerMap;
            // 根据角点响应最大值计算阈值
            threshold= qualityLevel*maxStrength;
            cv::threshold(cornerStrength,cornerTh,
            threshold,255,cv::THRESH_BINARY);
            // 转为8-bit图
            cornerTh.convertTo(cornerMap,CV_8U);
            // 和局部最大值图与,剩下角点局部最大值图,即:完成非最大值抑制
            cv::bitwise_and(cornerMap,localMax,cornerMap);
            return cornerMap;
    }

    void getCorners(std::vector<cv::Point> &points,
            double qualityLevel) {
            //获取角点图
            cv::Mat cornerMap= getCornerMap(qualityLevel);
            // 获取角点
            getCorners(points, cornerMap);
    }

    // 遍历全图,获得角点
    void getCorners(std::vector<cv::Point> &points,
    const cv::Mat& cornerMap) {

            for( int y = 0; y < cornerMap.rows; y++ ) {
                    const uchar* rowPtr = cornerMap.ptr<uchar>(y);
                    for( int x = 0; x < cornerMap.cols; x++ ) {
                    // 非零点就是角点
                          if (rowPtr[x]) {
                                points.push_back(cv::Point(x,y));
                          }
                     }
                }
          }

    //用圈圈标记角点
    void drawOnImage(cv::Mat &image,
    const std::vector<cv::Point> &points,
            cv::Scalar color= cv::Scalar(255,255,255),
            int radius=3, int thickness=2) {
                    std::vector<cv::Point>::const_iterator it=points.begin();
                    while (it!=points.end()) {
                    // 角点处画圈
                    cv::circle(image,*it,radius,color,thickness);
                    ++it;
            }
    }

};

#endif // HARRIS_H
相关测试代码:
- cv::Mat image, image1 = cv::imread ("test.jpg");
- //灰度变换
- cv::cvtColor (image1,image,CV_BGR2GRAY);
- // 经典的harris角点方法
- harris Harris;
- // 计算角点
- Harris.detect(image);
- //获得角点
- std::vector<cv::Point> pts;
- Harris.getCorners(pts,0.01);
- // 标记角点
- Harris.drawOnImage(image,pts);
- cv::namedWindow ("harris");
- cv::imshow ("harris",image);
- cv::waitKey (0);
- return 0;
 cv::Mat  image, image1 = cv::imread ("test.jpg");
    //灰度变换
    cv::cvtColor (image1,image,CV_BGR2GRAY);


    // 经典的harris角点方法
    harris Harris;
    // 计算角点
    Harris.detect(image);
    //获得角点
    std::vector<cv::Point> pts;
    Harris.getCorners(pts,0.01);
    // 标记角点
    Harris.drawOnImage(image,pts);

    cv::namedWindow ("harris");
    cv::imshow ("harris",image);
    cv::waitKey (0);
    return 0;
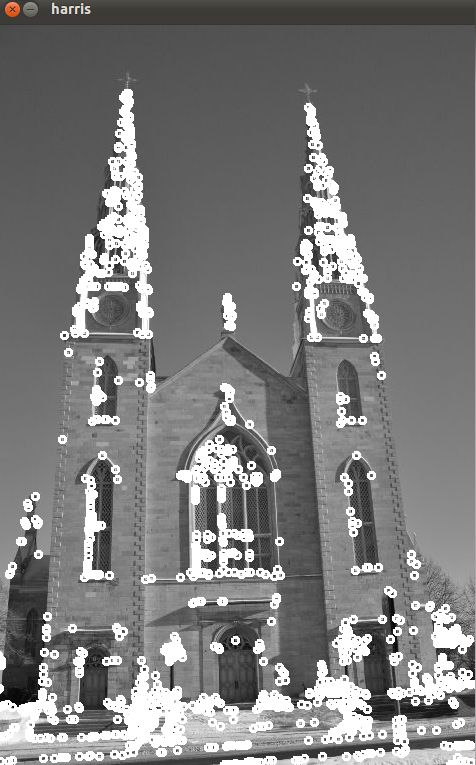
相关测试结果:
三、改进的Harris角点检测
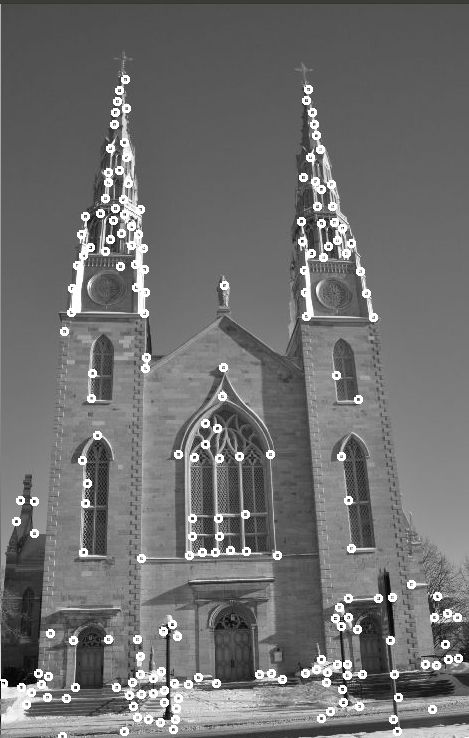
从经典的Harris角点检测方法不难看出,该算法的稳定性和k有关,而k是个经验值,不好把握,浮动也有可能较大。鉴于此,改进的Harris方法()直接计算出两个特征值,通过比较两个特征值直接分类,这样就不用计算Harris响应函数了。
另一方面,我们不再用非极大值抑制了,而选取容忍距离:容忍距离内只有一个特征点。
该算法首先选取一个具有最大 最小特征值的点(即:max(min(e1,e2)),e1,e2是harris矩阵的特征值)作为角点,然后依次按照最大最小特征值顺序寻找余下的角点,当然和前一角点距离在容忍距离内的新角点呗忽略。
opencv测试该算法代码如下:
- cv::Mat image, image1 = cv::imread ("test.jpg");
- //灰度变换
- cv::cvtColor (image1,image,CV_BGR2GRAY);
- // 改进的harris角点检测方法
- std::vector<cv::Point> corners;
- cv::goodFeaturesToTrack(image,corners,
- 200,
- //角点最大数目
- 0.01,
- // 质量等级,这里是0.01*max(min(e1,e2)),e1,e2是harris矩阵的特征值
- 10);
- // 两个角点之间的距离容忍度
- harris().drawOnImage(image,corners);//标记角点
    cv::Mat  image, image1 = cv::imread ("test.jpg");
    //灰度变换
    cv::cvtColor (image1,image,CV_BGR2GRAY);
    // 改进的harris角点检测方法
    std::vector<cv::Point> corners;
    cv::goodFeaturesToTrack(image,corners,
    200,
    //角点最大数目
    0.01,
    // 质量等级,这里是0.01*max(min(e1,e2)),e1,e2是harris矩阵的特征值
    10);
    // 两个角点之间的距离容忍度
    harris().drawOnImage(image,corners);//标记角点
测试结果如下:

四、FAST角点检测
算法原理比较简单,但实时性很强。
该算法的角点定义为:若某像素点圆形邻域圆周上有3/4的点和该像素点不同(编程时不超过某阈值th),则认为该点就是候选角点。opencv更极端,选用半径为3的圆周上(上下左右)四个点,若超过三个点和该像素点不同,则该点为候选角点。
和Harris算法类似,该算法需要非极大值抑制。
opencv代码:
- cv::Mat image, image1 = cv::imread ("test.jpg");
- cv::cvtColor (image1,image,CV_BGR2GRAY);
- //快速角点检测
- std::vector<cv::KeyPoint> keypoints;
- cv::FastFeatureDetector fast(40,true);
- fast .detect (image,keypoints);
- cv::drawKeypoints (image,keypoints,image,cv::Scalar::all(255),cv::DrawMatchesFlags::DRAW_OVER_OUTIMG);
    cv::Mat  image, image1 = cv::imread ("test.jpg");
    cv::cvtColor (image1,image,CV_BGR2GRAY);
    //快速角点检测
    std::vector<cv::KeyPoint> keypoints;
    cv::FastFeatureDetector fast(40,true);
    fast .detect (image,keypoints);
    cv::drawKeypoints (image,keypoints,image,cv::Scalar::all(255),cv::DrawMatchesFlags::DRAW_OVER_OUTIMG);
测试结果如下:
五、参考文献
【1】The classical article describing the Harris operator: C. Harris and M.J. Stephens, A combined corner and edge detector, by Alvey Vision Conference, pp. 147–152, 1988.
【2】The article by J. Shi and C. Tomasi, Good features to track, Int. Conference on Computer Vision and Pattern Recognition, pp. 593-600, 1994 which introduced these features.
【3】The article by K. Mikolajczyk and C. Schmid, Scale and Affine invariant interest point detectors, International Journal of Computer Vision, vol 60, no 1, pp. 63-86, 2004, which proposes a multi-scale and affine-invariant Harris operator.
【4】The article by E. Rosten and T. Drummond, Machine learning for high-speed corner detection, in In European Conference on Computer Vision, pp. 430-443, 2006 that describes the FAST feature algorithm in detail
我传的资源链接,源码和相关文档。
http://download.csdn.net/detail/crzy_sparrow/417031


