建立一个简单的servlet controller
简述:
搭一个简单的servlet框架,Eclipse Java EE IDE for Web Developers
步骤:
1. 新建一个web project =》 WebProj2.5
2. 添加servlet2.5的包,我使用的是ivy插件,修改它的 ivy.xml 文件就能自动添加对应文件
(ivy插件添加可参考配置里的一篇文章,或者不用ivy插件而是直接手动加入包)
文件如下
ivy.xml
<?xml version="1.0" encoding="ISO-8859-1"?>
<!--
   Licensed to the Apache Software Foundation (ASF) under one
   or more contributor license agreements.  See the NOTICE file
   distributed with this work for additional information
   regarding copyright ownership.  The ASF licenses this file
   to you under the Apache License, Version 2.0 (the
   "License"); you may not use this file except in compliance
   with the License.  You may obtain a copy of the License at

     http://www.apache.org/licenses/LICENSE-2.0

   Unless required by applicable law or agreed to in writing,
   software distributed under the License is distributed on an
   "AS IS" BASIS, WITHOUT WARRANTIES OR CONDITIONS OF ANY
   KIND, either express or implied.  See the License for the
   specific language governing permissions and limitations
   under the License.
-->
<ivy-module version="2.0" xmlns:xsi="http://www.w3.org/2001/XMLSchema-instance"
       xsi:noNamespaceSchemaLocation="http://ant.apache.org/ivy/schemas/ivy.xsd">
    <info
        organisation=""
        module="WebProj"
        status="integration">
	</info>

	<dependencies>
		<dependency org="javax.servlet" name="servlet-api" rev="2.5" />
	</dependencies>
</ivy-module>
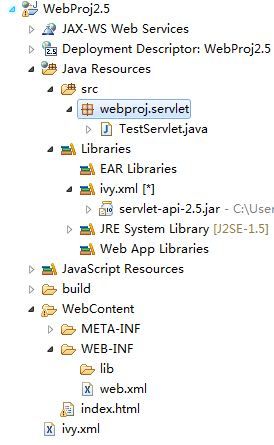
之后该插件会自动导入了相应的servlet包
如图:
3. 新建一个servlet包: webproj.servlet
在里面新建一个servlet类: TestServlet
TestServlet.java
package webproj.servlet;

import java.io.IOException;

import javax.servlet.ServletException;
import javax.servlet.http.HttpServlet;
import javax.servlet.http.HttpServletRequest;
import javax.servlet.http.HttpServletResponse;

public class TestServlet extends HttpServlet{
	private static final long serialVersionUID = 1L;

	public void doGet(HttpServletRequest request, HttpServletResponse response)
	throws ServletException, IOException {
		response.setContentType("text/html;charset=utf-8");
		response.getWriter().append("TestServlet works");
	}

}
4. 为了使得servlet能够相应服务器的请求,还需要配置xml
url-pattern就是servlet的入口
web.xml
<?xml version="1.0" encoding="UTF-8"?>
<web-app xmlns:xsi="http://www.w3.org/2001/XMLSchema-instance" xmlns="http://java.sun.com/xml/ns/javaee" xmlns:web="http://java.sun.com/xml/ns/javaee/web-app_2_5.xsd" xsi:schemaLocation="http://java.sun.com/xml/ns/javaee http://java.sun.com/xml/ns/javaee/web-app_2_5.xsd" id="WebApp_ID" version="2.5">
  <display-name>WebProj2.5</display-name>

	<servlet>
		<servlet-name>TestServlet</servlet-name>
		<servlet-class>webproj.servlet.TestServlet</servlet-class>
	</servlet>

	<servlet-mapping>
		<servlet-name>TestServlet</servlet-name>
		<url-pattern>/Test</url-pattern>
	</servlet-mapping>
</web-app>
5. 整个文件的样子是
最后run in server(Tomcat 6.0.32版本)
我的端口修改过,没有修改的话是8080


