开源Jamendo在线音乐播放器源码
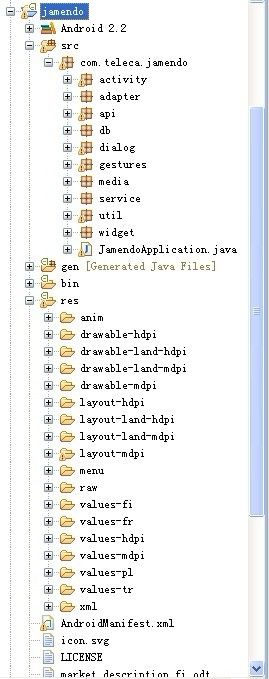
Jamendo是一个开源的在线音乐播放器。项目结构如图所示:
粗略介绍每个包作用:
com.teleca.jamendo.widget.*:用户自定义组建,主要包括进度条、错误条、专辑倒影图片控件、以及相关接口。
com.teleca.jamendo.util.:用户自定义视图切换器、图片缓存、自定义触摸监听器(播放进度)、以及分享,计算音乐时间,设置语言等工具帮助类。
com.teleca.jamendo.util.download.:提供下载远程音乐任务,以及相关接口回调,同时定义操作数据库相关接口,以及观察类。
com.teleca.jamendo.service.*:音乐的播放服务,以及下载服务。
com.teleca.jamendo.media.*:音乐播放器引擎以及相关接口(自定义类继承播放器MediaPlayer)。
com.teleca.jamendo.gestures.*:读取raw文件存取手势类,以及相关接口,同时自定义手势识别界面,用于手势操作播放音乐。
com.teleca.jamendo.dialog.*:自定义对话框基类,以及相关对话框。
com.teleca.jamendo.db.*:sqlite数据库操作相关类以及方法,包括相关基类,泛型。
com.teleca.jamendo.api.*:提供对象实体,歌曲、歌曲条目列表,歌曲专辑,歌手,以及相关IO异常处理等
com.teleca.jamendo.api.impl.*:通过服务端解析JSON格式数据并转化为相应实体对象,列表等。
com.teleca.jamendo.api.util:提供访问网络之工具类,url请求缓存,封装http请求等等。
com.teleca.jamendo.adapter.*:提供适配ListView列表适配器基类,以及相关子类.
com.teleca.jamendo.activity.*:提供操作界面activity,欢迎页,关于,播放浏览,播放,以及搜索,显示歌曲等界面。
当然我们可以粗略知道UI布局文件夹,包括UI布局,菜单布局,动画,xml(设置界面),值文件(不同语言版本),raw(手势文件)
首先我们对其包结构以及相关包用途有个大致的了解,接下来,再慢慢来看看这些界面,做到心中有数。
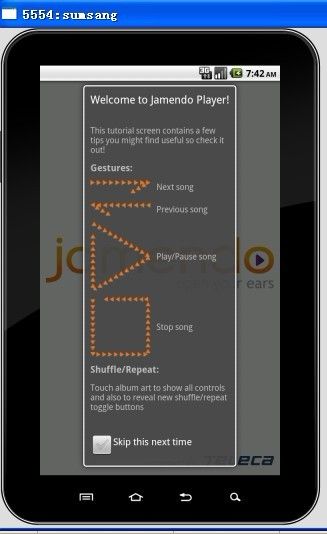
首先是:软件说明,以及欢迎界面。
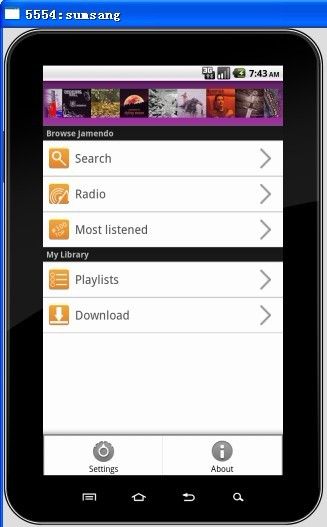
然后是操作主界面(有音乐文件前,SD卡保存音乐文件后):
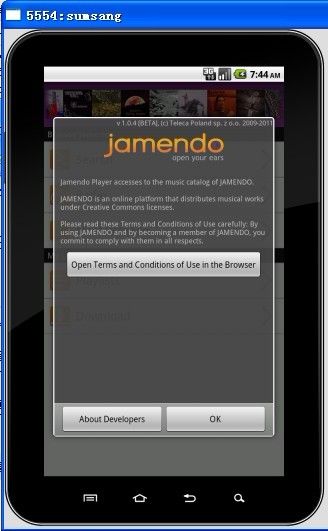
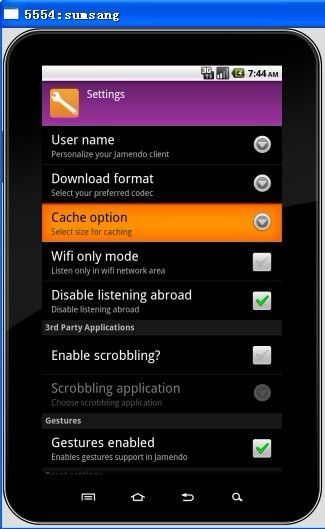
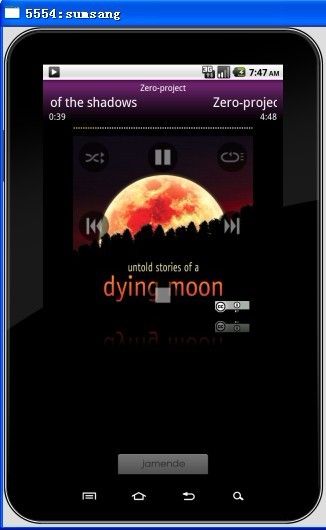
然后是设置以及关于,播放界面
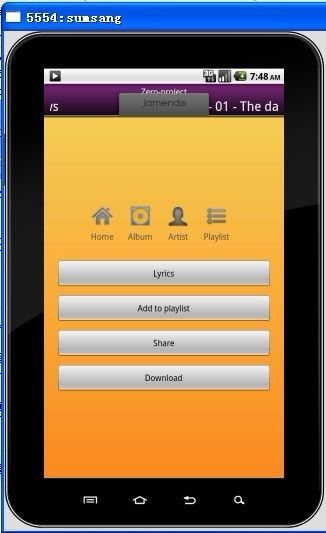
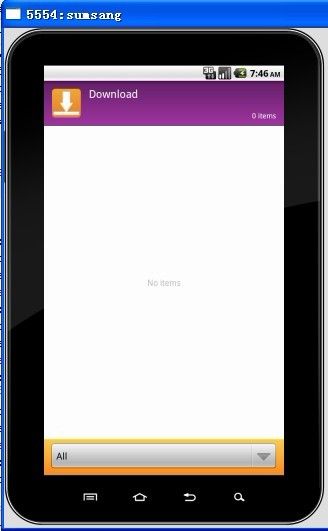
搜索、专辑列表、播放列表,下载等界面
好了,就先到这里,接下来再慢慢根据UI分析布局,以及相对应的activity,以及一些主要类方法,因为很多内容都重复了,因此有一些基本的类就不再分析,大家可以用举一反三,我们这里主要是根据UI,以及模块功能分析,主要是按全局角度。
我们从AndroidManifest.xml文件中看到有这么一段。
<activity android:name=".activity.SplashscreenActivity">
            <intent-filter>
                <action android:name="android.intent.action.MAIN"></action>
                <category android:name="android.intent.category.LAUNCHER"></category>
            </intent-filter>
        </activity>
知道欢迎界面为SplashscreenActivity,然后我们再来看看其类结构,以及依赖项,如下:
我们可以看到有一个showTutorial()方法来弹出软件说明对话框,以及Animation,Handler,Runnable等属性,用来产生动画,以及动画后与主UI线程通信。
首先我们来看OnCreate方法
@Override
    protected void onCreate(Bundle savedInstanceState) {
        super.onCreate(savedInstanceState);
        requestWindowFeature(Window.FEATURE_NO_TITLE);
        setContentView(R.layout.splashscreen);
        findViewById(R.id.splashlayout);

        endAnimation = AnimationUtils.loadAnimation(this, R.anim.fade_out);
        endAnimation.setFillAfter(true);

        endAnimationHandler = new Handler();
        endAnimationRunnable = new Runnable() {
            @Override
            public void run() {
                findViewById(R.id.splashlayout).startAnimation(endAnimation);
            }
        };

        endAnimation.setAnimationListener(new AnimationListener() {
            @Override
            public void onAnimationStart(Animation animation) {    }

            @Override
            public void onAnimationRepeat(Animation animation) { }

            @Override
            public void onAnimationEnd(Animation animation) {
                HomeActivity.launch(SplashscreenActivity.this);
                SplashscreenActivity.this.finish();
            }
        });

        showTutorial();
    }
首先通过AnimationUtils.loadAnimation静态方法加载anim下的淡出动画文件fade_out,并设置动画完成后填充(这里还未播放动画)。
然后通过一个定义Runnable对象,在线程中开始这个动画,同时添加动画监听。回调方法有:onAnimationStart,onAnimationRepeat,onAnimationEnd。(这里还未开启线程)。
当然它直接调用了showTutorial();弹出软件说明对话框。
final void showTutorial() {
        boolean showTutorial = PreferenceManager.getDefaultSharedPreferences(this).getBoolean(FIRST_RUN_PREFERENCE, true);
        if (showTutorial) {
            final TutorialDialog dlg = new TutorialDialog(this);
            dlg.setOnDismissListener(new DialogInterface.OnDismissListener() {
                @Override
                public void onDismiss(DialogInterface dialog) {
                    CheckBox cb = (CheckBox) dlg.findViewById(R.id.toggleFirstRun);
                    if (cb != null && cb.isChecked()) {
                        SharedPreferences prefs = PreferenceManager.getDefaultSharedPreferences(SplashscreenActivity.this);
                        prefs.edit().putBoolean(FIRST_RUN_PREFERENCE, false).commit();
                    }
                    endAnimationHandler.removeCallbacks(endAnimationRunnable);
                    endAnimationHandler.postDelayed(endAnimationRunnable, 2000);
                }
            });
            dlg.show();

        } else {
            endAnimationHandler.removeCallbacks(endAnimationRunnable);
            endAnimationHandler.postDelayed(endAnimationRunnable, 1500);
        }
    }
看到boolean showTutorial = PreferenceManager.getDefaultSharedPreferences(this).getBoolean(FIRST_RUN_PREFERENCE, true);这一句,从Preference中得到共享的全局配置信息,这里是保存是否弹出对话框。
至于PreferenceManager怎么使用,可以参考下我的一篇Preference设置文章。主要是以键值对方式保存值。
然后实例化对话框TutorialDialog,并且添加关闭对话框setOnDismissListener监听,在关闭对话框时候触发回调,我们再回调函数public void onDismiss(DialogInterface dialog)中,可以看到首先获取是否选中选项并且保存到Preference中,然后移除回调endAnimationRunnable,同时执行了endAnimationRunnable线程。
这里的执行方法是:endAnimationHandler.postDelayed(endAnimationRunnable, 2000); 就是间隔2秒后执行我们的线程,通过Handler执行。
执行线程,在线程中我们重写它的run方法,在这个方法中,我们可以看到它执行的是播放anim动画。
同时在播放动画完毕后,跳转到另外一个界面,就是我们的主界面。HomeActivity
@Override
            public void onAnimationEnd(Animation animation) {
                HomeActivity.launch(SplashscreenActivity.this);
                SplashscreenActivity.this.finish();
            }
当然,我们可以进入这个launch方法,可以看到它都是通过Intent进行界面跳转的。
其中: intent.setFlag(Intent.FLAG_ACTIVITY_CLEAR_TOP) 表示,开启目标activity时,会清理栈中的其他activity.
public static void launch(Context c){
        Intent intent = new Intent(c, HomeActivity.class);
        intent.setFlags(Intent.FLAG_ACTIVITY_CLEAR_TOP );
        c.startActivity(intent);
    }
接下来,我们看看软件说明这个对话框。
public class TutorialDialog extends Dialog {

    /**
     * @param context
     */
    public TutorialDialog(Context context) {
        super(context);
        initialize(context);
    }

    /**
     * @param context
     * @param theme
     */
    public TutorialDialog(Context context, int theme) {
        super(context, theme);
        initialize(context);
    }

    /**
     * @param context
     * @param cancelable
     * @param cancelListener
     */
    public TutorialDialog(Context context, boolean cancelable,
            OnCancelListener cancelListener) {
        super(context, cancelable, cancelListener);
        initialize(context);
    }

    /**
     * Common initialization code
     */
    private final void initialize(final Context context) {
        setContentView(R.layout.tutorial);
        setTitle(R.string.tutorial_title);

        Button mCloseButton = (Button)findViewById(R.id.closeTutorial);
        if (mCloseButton != null) {
            mCloseButton.setOnClickListener(new View.OnClickListener() {

                @Override
                public void onClick(View v) {
                    dismiss();
                }
            });
        }
    }
}
继承之Dialog类,然后在初始化方法initialize中找到相关的内容以及标题,并设置Button按钮点击监听,在监听方法中关闭本对话框。作者封装了一系列的对话框在com.teleca.jamendo.dialog包中。
本文相关的界面如下:
这里首先显示我们的主界面图片共大家理解。
一步步走到了我们的主界面,首先我们看看主界面的布局文件main.xml
<?xml version="1.0" encoding="utf-8"?>
    <!--
        Copyright (C) 2009 Teleca Poland Sp. z o.o. <[email protected]>

        Licensed under the Apache License, Version 2.0 (the "License"); you
        may not use this file except in compliance with the License. You may
        obtain a copy of the License at

        http://www.apache.org/licenses/LICENSE-2.0 Unless required by
        applicable law or agreed to in writing, software distributed under the
        License is distributed on an "AS IS" BASIS, WITHOUT WARRANTIES OR
        CONDITIONS OF ANY KIND, either express or implied. See the License for
        the specific language governing permissions and limitations under the
        License.
    -->
<LinearLayout xmlns:android="http://schemas.android.com/apk/res/android"
    android:orientation="vertical" android:layout_width="fill_parent"
    android:layout_height="fill_parent" android:background="#ffffff">

    <com.teleca.jamendo.util.FixedViewFlipper
        android:orientation="vertical" android:id="@+id/ViewFlipper"
        android:layout_width="fill_parent" android:layout_height="75dip"
        android:background="@drawable/gradient_dark_purple">

        <!-- (0) Loading -->
        <LinearLayout android:orientation="vertical"
            android:layout_width="fill_parent" android:layout_height="fill_parent"
            android:layout_marginLeft="15dip" android:gravity="left|center_vertical">
            <com.teleca.jamendo.widget.ProgressBar
                android:id="@+id/ProgressBar" android:layout_width="wrap_content"
                android:layout_height="wrap_content">
            </com.teleca.jamendo.widget.ProgressBar>
        </LinearLayout>

        <!-- (1) Gallery -->
        <LinearLayout android:orientation="vertical"
            android:layout_width="fill_parent" android:layout_height="fill_parent"
            android:gravity="center">
            <Gallery android:id="@+id/Gallery" android:layout_width="fill_parent"
                android:layout_height="wrap_content" android:spacing="0px" />
        </LinearLayout>

        <!-- (2) Failure -->
        <LinearLayout android:orientation="vertical"
            android:layout_width="fill_parent" android:layout_height="fill_parent"
            android:layout_marginLeft="15dip" android:gravity="left|center_vertical">
            <com.teleca.jamendo.widget.FailureBar
                android:id="@+id/FailureBar" android:layout_width="wrap_content"
                android:layout_height="wrap_content">
            </com.teleca.jamendo.widget.FailureBar>
        </LinearLayout>
    </com.teleca.jamendo.util.FixedViewFlipper>

    <android.gesture.GestureOverlayView
        xmlns:android="http://schemas.android.com/apk/res/android" android:id="@+id/gestures"
        android:layout_width="fill_parent" android:layout_height="fill_parent"

        android:gestureStrokeType="multiple"
        android:eventsInterceptionEnabled="false" android:orientation="vertical">

        <ListView android:id="@+id/HomeListView"
            android:layout_width="fill_parent" android:layout_height="fill_parent"
            android:divider="#000" />
    </android.gesture.GestureOverlayView>

</LinearLayout>
我们可以看到在LinearLayout中嵌套了2栏,第一个是com.teleca.jamendo.util.FixedViewFlipper,第二个是手势视图android.gesture.GestureOverlayView,。默认是垂直显示分栏。
首先来看看com.teleca.jamendo.util.FixedViewFlipper,这是一个自定义控件,继承之ViewFlipper,是作为切换视图所用,一次只能显示一个View内容。
FixedViewFlipper代码如下:
public class FixedViewFlipper extends ViewFlipper {

    public FixedViewFlipper(Context context) {
        super(context);
    }

    public FixedViewFlipper(Context context, AttributeSet attrs) {
        super(context, attrs);
    }

    @Override
    protected void onDetachedFromWindow() {

        int apiLevel = Build.VERSION.SDK_INT;

        if (apiLevel >= 7) {
            try {
                super.onDetachedFromWindow();
            } catch (IllegalArgumentException e) {
                Log.w("Jamendo", "Android project  issue 6191  workaround.");
                /* Quick catch and continue on api level 7, the Eclair 2.1 */
            } finally {
                super.stopFlipping();
            }
        } else {
            super.onDetachedFromWindow();
        }
    }
}
我们看到它基本没有什么特殊之处,只是重写了onDetachedFromWindow方法。该方法的作用是当view离开窗口时调用。这里判断了SDK版本,同时停止切换View.
我们已经知道ViewFlipper类似于FrameLayout,一次只显示一个View的内容。知道这一点后,我们再看看我们的布局文件中com.teleca.jamendo.util.FixedViewFlipper内部布局:
我们可以看到,里面共有三部分内容:Loading,Gallery,Failure。分别是加载中,显示Gallery图像列表,加载失败界面。
刚进来的时候当然默认显示加载界面,加载Gallery数据时,但是由于网络太快,基本上一闪而过,如果网络太慢,它就显示出来了,如果加载失败,就会显示加载失败界面。
我们怎么知道它是显示哪部分界面的呢?
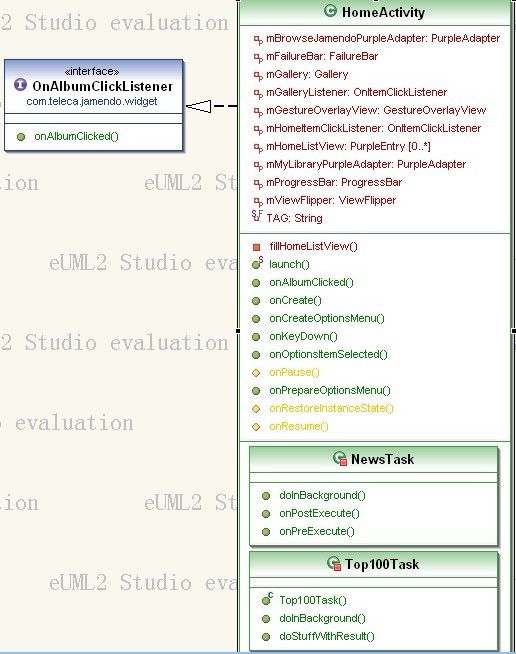
我们先来看看HomeActivity的类结构以及继承关系吧。
它实现了OnAlbumClickListener接口,还有2个内部任务类。一个是获取最新专辑,一个是获取最近前100手歌曲。
好了现在看看onCreate方法:
/** Called when the activity is first created. */
    @Override
    public void onCreate(Bundle savedInstanceState) {
        super.onCreate(savedInstanceState);
        requestWindowFeature(Window.FEATURE_NO_TITLE);
        setContentView(R.layout.main);

        mHomeListView = (ListView)findViewById(R.id.HomeListView);
        mGallery = (Gallery)findViewById(R.id.Gallery);
        mProgressBar = (ProgressBar)findViewById(R.id.ProgressBar);
        mFailureBar = (FailureBar)findViewById(R.id.FailureBar);
        mViewFlipper = (ViewFlipper)findViewById(R.id.ViewFlipper);

        mGestureOverlayView = (GestureOverlayView) findViewById(R.id.gestures);
        mGestureOverlayView.addOnGesturePerformedListener(JamendoApplication
                .getInstance().getPlayerGestureHandler());

        new NewsTask().execute((Void)null);
    }
方法中主要是实例化布局文件main.xml中的控件,当然最重要的有2点,第1点:实例化手势图层,并添加手势感知监听。第2点:执行NewsTask任务获取专辑列表。
这里首先讲解NewsTask任务类,因为这里决定我们显示的是加载还是Gallery列表界面或者是失败界面。代码如:
/**
     * Executes news download, JamendoGet2Api.getPopularAlbumsWeek
     *
     * @author Lukasz Wisniewski
     */
    private class NewsTask extends AsyncTask<Void, WSError, Album[]> {

        @Override
        public void onPreExecute() {
            mViewFlipper.setDisplayedChild(0);
            mProgressBar.setText(R.string.loading_news);
            super.onPreExecute();
        }

        @Override
        public Album[] doInBackground(Void... params) {
            JamendoGet2Api server = new JamendoGet2ApiImpl();
            Album[] albums = null;
            try {
                albums = server.getPopularAlbumsWeek();
            } catch (JSONException e) {
                e.printStackTrace();
            } catch (WSError e){
                publishProgress(e);
            }
            return albums;
        }

        @Override
        public void onPostExecute(Album[] albums) {

            if(albums != null && albums.length > 0){
                mViewFlipper.setDisplayedChild(1);
                ImageAdapter albumsAdapter = new ImageAdapter(HomeActivity.this);
                albumsAdapter.setList(albums);
                mGallery.setAdapter(albumsAdapter);
                mGallery.setOnItemClickListener(mGalleryListener);
                mGallery.setSelection(albums.length/2, true); // animate to center

            } else {
                mViewFlipper.setDisplayedChild(2);
                mFailureBar.setOnRetryListener(new OnClickListener(){

                    @Override
                    public void onClick(View v) {
                        new NewsTask().execute((Void)null);
                    }

                });
                mFailureBar.setText(R.string.connection_fail);
            }
            super.onPostExecute(albums);
        }

        @Override
        protected void onProgressUpdate(WSError... values) {
            Toast.makeText(HomeActivity.this, values[0].getMessage(), Toast.LENGTH_LONG).show();
            super.onProgressUpdate(values);
        }
NewsTask继承AsyncTask,异步任务,通常我们获取后台数据就是通过继承这个任务类,在任务中获取后台数据,而不是新建个Thread,然后再结合Handler,然后通过Handler与主UI线程交互显示数据,这样比较麻烦,使用AsyncTask简单多了,虽然它内部也是由Thread等等封装的。
我们先看看执行任务前做了什么,
mViewFlipper.setDisplayedChild(0);
mProgressBar.setText(R.string.loading_news);
执行前?默认显示ViewFlipper中第一个界面,同时设置进度条文字。
执行中呢?
@Override
        public Album[] doInBackground(Void... params) {
            JamendoGet2Api server = new JamendoGet2ApiImpl();
            Album[] albums = null;
            try {
                albums = server.getPopularAlbumsWeek();
            } catch (JSONException e) {
                e.printStackTrace();
            } catch (WSError e){
                publishProgress(e);
            }
            return albums;
        }
哦,它是调用接口方法获取服务器端专辑列表数据啊,这里他们进行了封装获取服务的接口以及实现,我们暂时不关注,只需知道它分离了获取服务数据就行了。
执行后呢?
@Override
        public void onPostExecute(Album[] albums) {

            if(albums != null && albums.length > 0){
                mViewFlipper.setDisplayedChild(1);
                ImageAdapter albumsAdapter = new ImageAdapter(HomeActivity.this);
                albumsAdapter.setList(albums);
                mGallery.setAdapter(albumsAdapter);
                mGallery.setOnItemClickListener(mGalleryListener);
                mGallery.setSelection(albums.length/2, true); // animate to center

            } else {
                mViewFlipper.setDisplayedChild(2);
                mFailureBar.setOnRetryListener(new OnClickListener(){

                    @Override
                    public void onClick(View v) {
                        new NewsTask().execute((Void)null);
                    }

                });
                mFailureBar.setText(R.string.connection_fail);
            }
            super.onPostExecute(albums);
        }
原来获取到专辑列表数据后,显示ViewFlipper中第二个界面,也就是Gallery列表,当然显示Gallery列表是通过Adpater设配器的,我们还看到如果获取不到数据或者获取数据失败,那么它就会显示ViewFlipper中第三个界面,就是我们的失败界面,同时提供方法让它可以再次执行任务来获取服务端数据。
逻辑非常清晰。
接下来就来看看下一部分内容。
上文中我们介绍了com.teleca.jamendo.util.FixedViewFlipper的用法以及作用,现在我们再介绍ListView中的内容,相关布局如下:
<android.gesture.GestureOverlayView
        xmlns:android="http://schemas.android.com/apk/res/android" android:id="@+id/gestures"
        android:layout_width="fill_parent" android:layout_height="fill_parent"

        android:gestureStrokeType="multiple"
        android:eventsInterceptionEnabled="false" android:orientation="vertical">

        <ListView android:id="@+id/HomeListView"
            android:layout_width="fill_parent" android:layout_height="fill_parent"
            android:divider="#000" />
</android.gesture.GestureOverlayView>
我们会看到手势容器android.gesture.GestureOverlayView中只有一个ListView,那么跟上图多个ListView组是怎么对应的呢?答案是一个ListView可分不同组,不同组是通过Adapter实现的。这个跟通讯录中联系人列表中分组是一样的。
在学习这个之前,我们先来看看自定义的抽象基类ArrayListAdapter<T>
public abstract class ArrayListAdapter<T> extends BaseAdapter{

    /**
     * @uml.property  name="mList"
     * @uml.associationEnd  multiplicity="(0 -1)" elementType="com.teleca.jamendo.api.Album"
     */
    protected ArrayList<T> mList;
    /**
     * @uml.property  name="mContext"
     * @uml.associationEnd  multiplicity="(0 -1)" elementType="com.teleca.jamendo.adapter.AlbumAdapter$ViewHolder"
     */
    protected Activity mContext;
    /**
     * @uml.property  name="mListView"
     * @uml.associationEnd
     */
    protected ListView mListView;

    public ArrayListAdapter(Activity context){
        this.mContext = context;
    }

    @Override
    public int getCount() {
        if(mList != null)
            return mList.size();
        else
            return 0;
    }

    @Override
    public Object getItem(int position) {
        return mList == null ? null : mList.get(position);
    }

    @Override
    public long getItemId(int position) {
        return position;
    }

    @Override
    abstract public View getView(int position, View convertView, ViewGroup parent);

    public void setList(ArrayList<T> list){
        this.mList = list;
        notifyDataSetChanged();
    }

    public ArrayList<T> getList(){
        return mList;
    }

    public void setList(T[] list){
        ArrayList<T> arrayList = new ArrayList<T>(list.length);
        for (T t : list) {
            arrayList.add(t);
        }
        setList(arrayList);
    }

    public ListView getListView(){
        return mListView;
    }

    public void setListView(ListView listView){
        mListView = listView;
    }

}
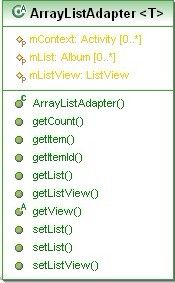
因为我们只需要传递实体对象到Adapter中,因此可以定义一个抽象的泛型类ArrayListAdapter<T>,并继承BaseAdapter,因为BaseAdapter提供了更高的灵活性。类模型图如下:
这里定义了三个保护属性,
protected ArrayList<T> mList;
protected Activity mContext;
protected ListView mListView;
同时重写了相关的方法,并在添加进泛型类列表并刷新。
public void setList(ArrayList<T> list){
        this.mList = list;
        notifyDataSetChanged();
}
在
@Override
abstract public View getView(int position, View convertView, ViewGroup parent);中并未重写,因为不同UI需求,因此交予子类实现。
然后我们再来看看作为分组ListView的Adapter是怎么写的。
public class PurpleAdapter extends ArrayListAdapter<PurpleEntry> {

    public PurpleAdapter(Activity context) {
        super(context);
    }

    @Override
    public View getView(int position, View convertView, ViewGroup parent) {
        View row=convertView;

        ViewHolder holder;

        if (row==null) {
            LayoutInflater inflater = mContext.getLayoutInflater();
            row=inflater.inflate(R.layout.purple_row, null);

            holder = new ViewHolder();
            holder.image = (ImageView)row.findViewById(R.id.PurpleImageView);
            holder.text = (TextView)row.findViewById(R.id.PurpleRowTextView);

            row.setTag(holder);
        }
        else{
            holder = (ViewHolder) row.getTag();
        }

        if(mList.get(position).getText() != null){
            holder.text.setText(mList.get(position).getText());
        } else if(mList.get(position).getTextId() != null){
            holder.text.setText(mList.get(position).getTextId());
        }
        if(mList.get(position).getDrawable() != null){
            holder.image.setImageResource(mList.get(position).getDrawable());
        } else {
            holder.image.setVisibility(View.GONE);
        }

        return row;
    }

    /**
     * Class implementing holder pattern,
     * performance boost
     *
     * @author Lukasz Wisniewski
     */
    static class ViewHolder {
        ImageView image;
        TextView text;
    }

}
因为基本的逻辑已经封装在基类的ArrayListAdapter<T>中,在这里这需要绘制ListView 项即可,我们看到它是是实例化了一个布局文件purple_row,我们再来看看这个布局文件是怎么做的。
<LinearLayout xmlns:android="http://schemas.android.com/apk/res/android"
    android:layout_width="fill_parent" android:orientation="horizontal"
    android:layout_height="wrap_content" android:background="@drawable/purple_entry_bg"
    android:gravity="left|center_vertical" android:minHeight="60dip"
    android:paddingRight="20dip" android:paddingLeft="10dip">

    <com.teleca.jamendo.widget.RemoteImageView
        android:id="@+id/PurpleImageView" android:layout_width="wrap_content"
        android:layout_height="wrap_content" android:paddingRight="10dip"></com.teleca.jamendo.widget.RemoteImageView>
    <TextView android:id="@+id/PurpleRowTextView"
        android:layout_height="wrap_content" android:layout_width="fill_parent"
        android:layout_weight="1" android:textSize="20dip"
        android:textColor="@drawable/purple_entry_color"></TextView>
    <ImageView android:id="@+id/PurpleRowArrow"
        android:layout_width="wrap_content" android:layout_height="wrap_content"
        android:src="@drawable/arrow"></ImageView>
</LinearLayout>
很明显他是由2张图片一个文本横排布局,作为一个ListView项的,但是这里先要注意一点,其中一个图片类使用的是自定义的com.teleca.jamendo.widget.RemoteImageView类,而不是我们的ImageView类,为什么呢?因为这个是从网络上下载下来的图片作为专辑图片,因此需要缓存,避免浪费流量,于是自定义个类主要用于缓存,com.teleca.jamendo.widget.RemoteImageView类已经做了缓存的封装。这个以后再慢慢讲解。
子类实现了父类规定的抽象方法public View getView(int position, View convertView, ViewGroup parent) ,当然这个方法是解析我们的ListView项,同时设置相对应的图片以及文字说明。这里需要注意的是它把ViewHolder缓存在Tag中,避免重复性渲染ListView项,一定程度上进行了优化。
既然又了上面的讲解,那么我们就来看看如何为ListView添加多组的分栏。
我们可以定义一个BaseAdapter,并在里面定义接受不同的BaseAdapter,然后将多个BaseAdapter合并为一个,再提供给ListView.。代码如下:
public class SeparatedListAdapter extends BaseAdapter {

    /**
     * @uml.property  name="sections"
     * @uml.associationEnd  qualifier="section:java.lang.String android.widget.Adapter"
     */
    public final Map<String,Adapter> sections = new LinkedHashMap<String,Adapter>();
    /**
     * @uml.property  name="headers"
     * @uml.associationEnd  multiplicity="(0 -1)" elementType="java.lang.String"
     */
    public final ArrayAdapter<String> headers;
    public final static int TYPE_SECTION_HEADER = 0;

    public SeparatedListAdapter(Context context) {
        headers = new ArrayAdapter<String>(context, R.layout.list_header);
    }

    public void addSection(String section, Adapter adapter) {
        this.headers.add(section);
        this.sections.put(section, adapter);
    }

    public Object getItem(int position) {
        for(Object section : this.sections.keySet()) {
            Adapter adapter = sections.get(section);
            int size = adapter.getCount() + 1;

            // check if position inside this section
            if(position == 0) return section;
            if(position < size) return adapter.getItem(position - 1);

            // otherwise jump into next section
            position -= size;
        }
        return null;
    }

    public int getCount() {
        // total together all sections, plus one for each section header
        int total = 0;
        for(Adapter adapter : this.sections.values())
            total += adapter.getCount() + 1;
        return total;
    }

    public int getViewTypeCount() {
        // assume that headers count as one, then total all sections
        int total = 1;
        for(Adapter adapter : this.sections.values())
            total += adapter.getViewTypeCount();
        return total;
    }

    public int getItemViewType(int position) {
        int type = 1;
        for(Object section : this.sections.keySet()) {
            Adapter adapter = sections.get(section);
            int size = adapter.getCount() + 1;

            // check if position inside this section
            if(position == 0) return TYPE_SECTION_HEADER;
            if(position < size) return type + adapter.getItemViewType(position - 1);

            // otherwise jump into next section
            position -= size;
            type += adapter.getViewTypeCount();
        }
        return -1;
    }

    public boolean areAllItemsSelectable() {
        return false;
    }

    public boolean isEnabled(int position) {
        return (getItemViewType(position) != TYPE_SECTION_HEADER);
    }

    @Override
    public View getView(int position, View convertView, ViewGroup parent) {
        int sectionnum = 0;
        for(Object section : this.sections.keySet()) {
            Adapter adapter = sections.get(section);
            int size = adapter.getCount() + 1;

            // check if position inside this section
            if(position == 0) return headers.getView(sectionnum, convertView, parent);
            if(position < size) return adapter.getView(position - 1, convertView, parent);

            // otherwise jump into next section
            position -= size;
            sectionnum++;
        }
        return null;
    }

    @Override
    public long getItemId(int position) {
        return position;
    }

}
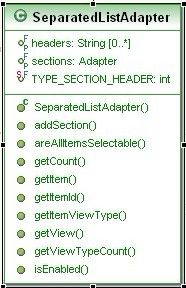
从代码以及类结构图我们可以知道
public final ArrayAdapter<String> headers;是用来标明不同的组,
public final Map<String,Adapter> sections = new LinkedHashMap<String,Adapter>(); 用来存贮不同Adapter
当然它还提供了public void addSection(String section, Adapter adapter)方法来添加Adpater,这样就可以扩展成多组的ListView了。
不过最重要的还是getView方法,这里才是绘制不同组的实现逻辑。根据不同adapter返回不同的ListView项,同时返回了分组说明。
介绍完最重要的SeparatedListAdapter后,我们再来看看它的使用。
我们一旦进入主界面是怎么显示分组ListView的呢?
看看这段代码:
@Override
    protected void onResume() {
        fillHomeListView();
        boolean gesturesEnabled = PreferenceManager.getDefaultSharedPreferences(this).getBoolean("gestures", true);
        mGestureOverlayView.setEnabled(gesturesEnabled);
        super.onResume();
    }
它重写恢复这个方法中填充了ListView同时根据Preference设置是否启用手势。
接下啦看看fillHomeListView();方法
/**
     * Fills ListView with clickable menu items
     */
    private void fillHomeListView(){
        mBrowseJamendoPurpleAdapter = new PurpleAdapter(this);
        mMyLibraryPurpleAdapter = new PurpleAdapter(this);
        ArrayList<PurpleEntry> browseListEntry = new ArrayList<PurpleEntry>();
        ArrayList<PurpleEntry> libraryListEntry = new ArrayList<PurpleEntry>();

        // BROWSE JAMENDO

        browseListEntry.add(new PurpleEntry(R.drawable.list_search, R.string.search, new PurpleListener(){
            @Override
            public void performAction() {
                SearchActivity.launch(HomeActivity.this);
            }
        }));

        browseListEntry.add(new PurpleEntry(R.drawable.list_radio, R.string.radio, new PurpleListener(){
            @Override
            public void performAction() {
                RadioActivity.launch(HomeActivity.this);
            }
        }));

        browseListEntry.add(new PurpleEntry(R.drawable.list_top, R.string.most_listened, new PurpleListener(){
            @Override
            public void performAction() {
                new Top100Task(HomeActivity.this, R.string.loading_top100, R.string.top100_fail).execute();
            }
        }));

        // MY LIBRARY

        libraryListEntry.add(new PurpleEntry(R.drawable.list_playlist, R.string.playlists, new PurpleListener(){
            @Override
            public void performAction() {
                BrowsePlaylistActivity.launch(HomeActivity.this, Mode.Normal);
            }
        }));

        // check if we have personalized client then add starred albums
        final String userName = PreferenceManager.getDefaultSharedPreferences(this).getString("user_name", null);
        if(userName != null && userName.length() > 0){
            libraryListEntry.add(new PurpleEntry(R.drawable.list_cd, R.string.albums, new PurpleListener(){
                @Override
                public void performAction() {
                    StarredAlbumsActivity.launch(HomeActivity.this, userName);
                }
            }));
        }

        /* following needs jamendo authorization (not documented yet on the wiki)
         * listEntry.add(new PurpleEntry(R.drawable.list_mail, "Inbox"));
         */

        // show this list item only if the SD Card is present
        if(Environment.getExternalStorageState().equals(Environment.MEDIA_MOUNTED)){
            libraryListEntry.add(new PurpleEntry(R.drawable.list_download, R.string.download, new PurpleListener(){
                @Override
                public void performAction() {
                    DownloadActivity.launch(HomeActivity.this);
                }
            }));
        }

//        listEntry.add(new PurpleEntry(R.drawable.list_star, R.string.favorites, new PurpleListener(){
//
//            @Override
//            public void performAction() {
//                Playlist playlist = new DatabaseImpl(HomeActivity.this).getFavorites();
//                JamendroidApplication.getInstance().getPlayerEngine().openPlaylist(playlist);
//                PlaylistActivity.launch(HomeActivity.this, true);
//            }
//
//        }));

        // attach list data to adapters
        mBrowseJamendoPurpleAdapter.setList(browseListEntry);
        mMyLibraryPurpleAdapter.setList(libraryListEntry);

        // separate adapters on one list
        SeparatedListAdapter separatedAdapter = new SeparatedListAdapter(this);
        separatedAdapter.addSection(getString(R.string.browse_jamendo), mBrowseJamendoPurpleAdapter);
        separatedAdapter.addSection(getString(R.string.my_library), mMyLibraryPurpleAdapter);

        mHomeListView.setAdapter(separatedAdapter);
        mHomeListView.setOnItemClickListener(mHomeItemClickListener);
    }
虽然很长,但都是做重复性的东西,即是添加PurpleEntry实体项,当然这个实体项中还有监听器,是为了再点击ListView项时候触发而根据不同的PurpleEntry对象执行不同的方法。
核心的东西也是只有几行代码而已。
// separate adapters on one list
        SeparatedListAdapter separatedAdapter = new SeparatedListAdapter(this);
        separatedAdapter.addSection(getString(R.string.browse_jamendo), mBrowseJamendoPurpleAdapter);
        separatedAdapter.addSection(getString(R.string.my_library), mMyLibraryPurpleAdapter);

        mHomeListView.setAdapter(separatedAdapter);
        mHomeListView.setOnItemClickListener(mHomeItemClickListener);
定义一个SeparatedListAdapter适配器作为主Adapter然后向Map中添加不同的子adapter,最后绑定这个SeparatedListAdapter到ListView中,同时设置ListView的项点击事件监听。
我们再来看看这个监听吧。
/**
     * Launches menu actions
     * @uml.property  name="mHomeItemClickListener"
     * @uml.associationEnd  multiplicity="(1 1)"
     */
    private OnItemClickListener mHomeItemClickListener = new OnItemClickListener(){

        @Override
        public void onItemClick(AdapterView<?> adapterView, View view, int index,
                long time) {
            try{
                PurpleListener listener = ((PurpleEntry)adapterView.getAdapter().getItem(index)).getListener();
                if(listener != null){
                    listener.performAction();
                }
            }catch (ClassCastException e) {
                Log.w(TAG, "Unexpected position number was occurred");
            }
        }
    };
我们可以看到在这个监听器中获得实体PurpleEntry的PurpleListener接口,并执行接口定义的方法。这就是让相关的实体对象处理它自身的内容了。分离了实现。
关于ListView方面的已经介绍完毕了,接下来就是菜单部分。
