龙书D3D11章节习题答案(第八章)
以下答案仅供参考,有错欢迎留言。
Chapter 8 : Texturing
1. Experiment with the “Crate” demo by changing the texture coordinates and using different address mode combinations and filtering options. In particular, reproduce the images in Figures 8.7, 8.9, 8.10, 8.11, 8.12, and 8.13.
通过修改CrateDemo中的Box的uv纹理坐标和切换不同的address mode和filtering options来重新实现Figures 8.7, 8.9, 8.10, 8.11, 8.12, and 8.13的效果。
8.7: 是两张对比Magification情况下constant interpolating和linear interpolating的差异图,前者像素间过度没有后者平滑。当我们在Basic.fx中把SampleState结构体中的Fileter改完以后,会发现在拉远拉近镜头的时候,始终不能得到magnification的情况,这是因为我们之前设置的PerSpective Matrix的Y方向的视野夹角太大了,应修改为:
void CrateApp::OnResize()
{
	D3DApp::OnResize();

	XMMATRIX P = XMMatrixPerspectiveFovLH(0.01f*MathHelper::Pi, AspectRatio(), 1.0f, 1000.0f);
	XMStoreFloat4x4(&mProj, P);
}
MAG_POINT: MAG_LINEAR:

8.9: 这里Filter设置和MAG无关,与MIN和MIP有关。
POINT: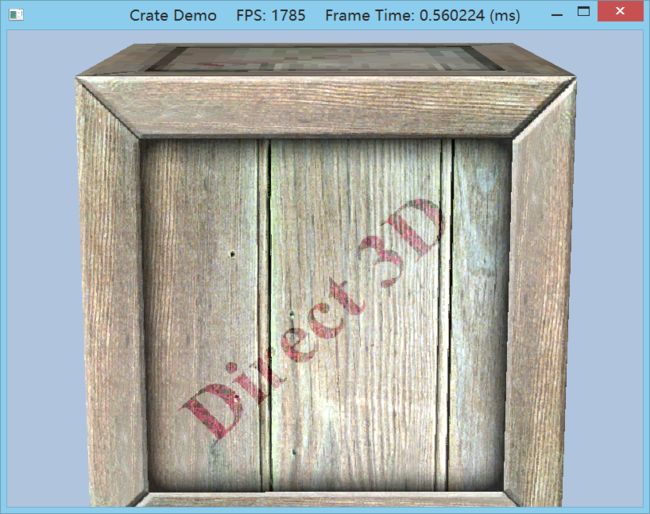 LINEAR:
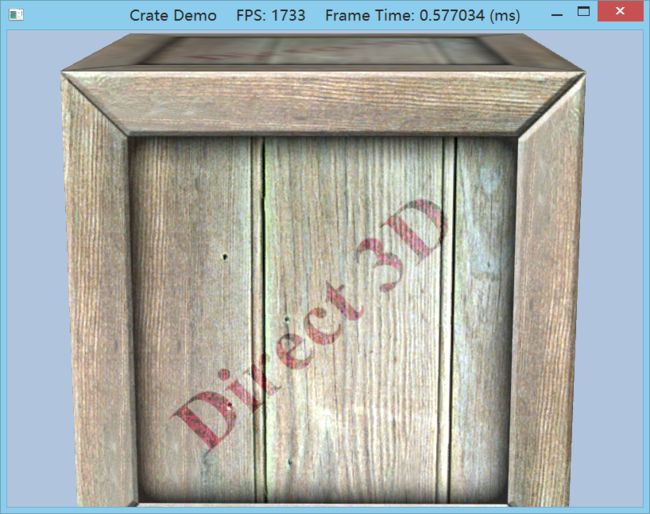
ANISOTROPIC:
8.10,11,12,13:
// 在类中添加关于Box纹理拉伸的成员变量
       	XMFLOAT4X4 mBoxTexScale;

// Init的时候赋值
	XMMATRIX boxTexScale = XMMatrixScaling(4.0f,4.0f,0.0f);
	XMStoreFloat4x4(&mBoxTexScale, boxTexScale);

// DrawScene的时候用Effects11设置到FX文件
Effects::BasicFX->SetTexTransform(XMLoadFloat4x4(&mBoxTexScale));</span>
Basic.fx:修改SampleState里的AddressU、AddressV即可,注意使用Border时需要指定BorderColor,格式是Float4的RGBA。
Wrap: Mirror:
Clamp: Border: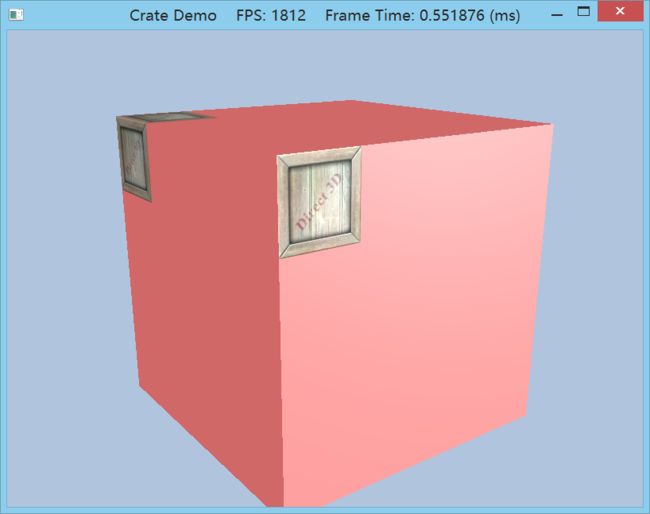
AddressU和AddressV可以设置不同的Address Mode来达到混合效果:
比如AddressU: Wrap + Address: Border = 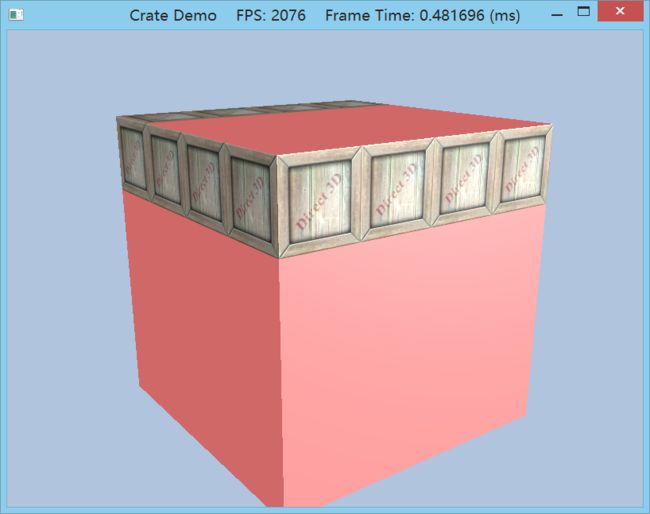 ...etc...
2. Using the DirectX Texture Tool, we can manually specify each mipmap level (File->Open Onto This Surface). Create a DDS file with a mipmap chain like the one in Figure 8.19, with a different textual description or color on each level so that you can easily distinguish between each mipmap level.
Modify the Crate demo by using this texture and have the camera zoom in and out so that you can explicitly see the mipmap levels changing. Try both point and linear mipmap filtering.
打开DX SDK文件夹目录下Utilities\Bin里的dxtex.exe(源码在Source文件夹下, 目测是MFC写的),使用起来非常简单,先File->Open某个图片,或者鼠标拖进来,然后Format->Generate Mip Maps, 会自动生成一串Mip Chains, 按PgUp和PgDn即可切换到Mip Chains的不同Level上,这时候File->Open Onto This Surface来选择其他图片即可修改这一Level的Texture~,Save,OK。
。。录了好几次gif,要么是文件太大无法上传,要么是开头的nico被软件忽略了。。2333
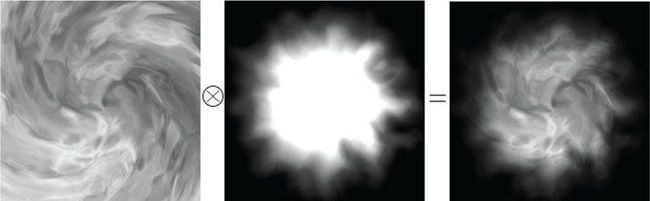
3.3. Given two textures of the same size, we can combine them via different operations to obtain a new image. More generally, this is called multitexturing, where multiple textures are used to achieve a result. For example, we can add, subtract,or (component-wise) multiply the corresponding texels of two textures.
Figure 8.20 shows the result of component-wise multiplying two textures to get a fireball-like result. For this exercise, modify the “Crate” demo by combining the two source textures in Figure 8.20 in a pixel shader to produce the fireball texture over each cube face. (The image files for this exercise may be downloaded from the book’s website.) Note that you will have to modify the Basic.fx to support more than one texture.
简单但步骤还挺多的,你可以查找mDiffuseMap的所有引用,然后依次改过来,我的做法如下:
Basic.fx:
1.新建两个全局变量Texture2D gDiffuseMapFlare, gDiffuseMapFlareAlpha;,非基本数据类型不能放在cbuffer里面。
2.修改Pixel Shader:在PS函数内:
    // Default to multiplicative identity.
    float4 texColor = float4(1, 1, 1, 1);
	float4 texFlareColor = float4(1, 1, 1, 1);
	float4 texFlareAlphaColor = float4(1, 1, 1, 1);
    if(gUseTexure)
	{
		// Sample texture.
		// texColor = gDiffuseMap.Sample( samAnisotropic, pin.Tex );
		texFlareColor = gDiffuseMapFlare.Sample( samAnisotropic, pin.Tex);
		texFlareAlphaColor = gDiffuseMapFlareAlpha.Sample( samAnisotropic, pin.Tex );
		texColor = texFlareColor*texFlareAlphaColor;
	}
CrateDemo.cpp:
1.添加新的成员变量ID3D11ShaderResourceView *mDiffuseMapFlare, *mDiffuseMapFlareAlpha.
2.构造函数初始化为0,析构函数ReleaseCOM释放接口。
3.调用D3DX11CreateShaderResourceViewFromFile从文件导入相应的dds文件到上述两个变量中,HR宏起个异常处理的作用。
4.这一章代码中,原先的BuildFX函数调用的相关变量及操作封装在了Effect类中,故绑定到Basic.fx里的gDiffuseMapFlare, gDiffuseMapFlareAlpha过程在Effects类中完成:
在Effects.h中添加两个新的public方法:
	 void SetDiffuseMapFlare(ID3D11ShaderResourceView* tex)   { DiffuseMapFlare->SetResource(tex); }
	 void SetDiffuseMapFlareAlpha(ID3D11ShaderResourceView* tex)   { DiffuseMapFlareAlpha->SetResource(tex); }
类内定义,默认为内联,所以这种封装效率还行。
在Effects.cpp内,Effects类的构造函数中:
	// DiffuseMap        = mFX->GetVariableByName("gDiffuseMap")->AsShaderResource();
	DiffuseMapFlare   = mFX->GetVariableByName("gDiffuseMapFlare")->AsShaderResource();
	DiffuseMapFlareAlpha   = mFX->GetVariableByName("gDiffuseMapFlareAlpha")->AsShaderResource();
5.最后回到DrawScene内:
		// Effects::BasicFX->SetDiffuseMap(mDiffuseMapSRV);
		Effects::BasicFX->SetDiffuseMapFlare(mDiffuseMapSRVFlare);
		Effects::BasicFX->SetDiffuseMapFlareAlpha(mDiffuseMapSRVFlareAlpha);
这样,与.fx文件中两个全局变量的绑定工作完成,结束。
如果说需要加载的纹理有很多张的话,可以用dxtex工具拼成一张大一点的纹理图,这样在DrawScene的时候会少调用几次重复的函数,书中提及的术语是Texture Atlas。
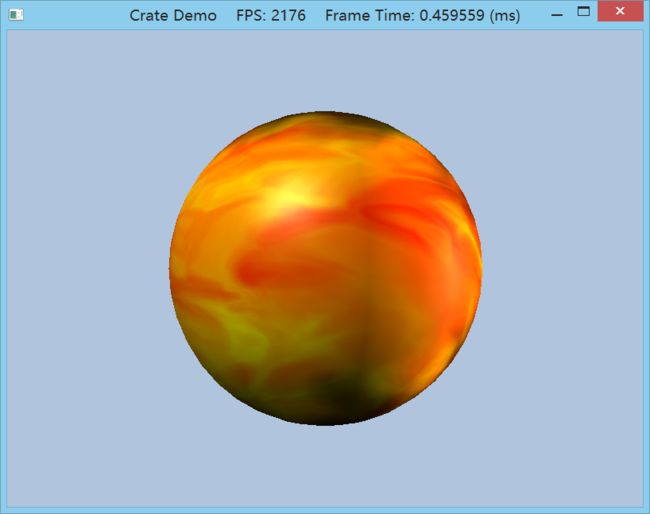
4. Modify the solution to Exercise 3 by rotating the fireball texture as a function of time over each cube face.
添加新成员变量XMMATRIX mBoxTexRotate;,并在UpdateScene中添加代码:
同时修改u、v分量相当于同时修改(x, y, z)的x和y,即绕z轴旋转。
	static float Z = 0.0f;
	Z += dt;


	if(Z > 6.28f)
		Z = 0.0f;

	mBallTexRotate = XMMatrixRotationZ(Z);
随后在DrawScene中将对纹理的缩放、旋转等处理的矩阵相乘Store到Float4X4类型的mTexTransform中:
XMStoreFloat4x4(&mTexTransform, mBallTexScale*mBallTexRotate);并传给Shader:
Effects::BasicFX->SetTexTransform(XMLoadFloat4x4(&mTexTransform));
显然,有一个问题:即旋转中心点应该设置在纹理坐标(0.5, 0.5), 而非(0,0)来达到正常的火焰旋转效果。
=.=,我的方案是在Vertex Shader里处理顶点坐标的uv坐标时,以(0.5, 0.5)为原点建立uv坐标系,这时原先的(0, 0)现在是(-0.5, -0.5), 原先的(1.0, 1.0)现在是(0.5, 0.5),然后再乘以Rotate矩阵,最后再把坐标系还原到以(0, 0)为原点的uv坐标系,即为每个顶点的tex坐标+=0.5; 代码如下:
VertexOut VS(VertexIn vin)
{
	VertexOut vout;

	// Transform to world space space.
	vout.PosW    = mul(float4(vin.PosL, 1.0f), gWorld).xyz;
	vout.NormalW = mul(vin.NormalL, (float3x3)gWorldInvTranspose);

	// Transform to homogeneous clip space.
	vout.PosH = mul(float4(vin.PosL, 1.0f), gWorldViewProj);


	// Output vertex attributes for interpolation across triangle.
	vout.Tex = mul(float4(vin.Tex.x - 0.5f, vin.Tex.y - 0.5f, 0.0f, 1.0f), gTexTransform).xy;

	vout.Tex += 0.5f;

	return vout;
}
Note:我这里的gTexTransform只包含了旋转矩阵,如果gTexTransform中还带了偏移,缩放,那么注意:这些变换都将会以(0,5, 0.5)为中心进行。
(毫无波动的小火球)
5. This chapter’s downloadable directory contains a folder with 120 frames of a fire animation designed to be played over 4 seconds (30 frames per second). Figure 8.21 shows the first 30 frames.
Modify the “Crate” demo by playing this animation over each face of the cube. (Hint: Load the images into an array of 120 texture objects. Start by using the first frame texture, and every 1/30th of a second, increment to the next frame texture. After the 120th frame texture, roll back to the first texture and repeat the process.)
This is sometimes called page flipping, because it is reminiscent of flipping the pages in a flip book.
Note: Working with individual texture animation frames one-by-one like this is inefficient. It would be better to put all the frames in one texture atlas, and then offset the texture coordinates every 1/30th of a second to the next frame of the animation. But for the sake of the exercise, the inefficient method is fine.
1.添加新的成员变量ID3D11ShaderResourceView* mDiffuseMapSRVArray[120]; , 构造函数初始化,析构函数释放接口。
2.在Init内加载120张不同的bmp纹理到mDiffuseMapSRVArray数组里:
	for(int i=0; i<120; ++i){
		wchar_t bmpPath[50];
		if(i+1<10)
			swprintf_s(bmpPath, L"FireAnim/Fire00%u.bmp", i+1);
		else if(i+1<100)
			swprintf_s(bmpPath, L"FireAnim/Fire0%u.bmp", i+1);
		else
			swprintf_s(bmpPath, L"FireAnim/Fire%u.bmp", i+1);
		//OutputDebugStringW(bmpPath);

		HR(D3DX11CreateShaderResourceViewFromFile(md3dDevice,
			bmpPath, 0, 0, &mDiffuseMapSRVArray[i], 0 ));
	}
这里我刚开始没注意,Fire001.bmp ---> Fire010.bmp ---> Fire120.bmp,要注意bmp文件的命名格式,数字索引为个位数、十位数、百位数时前面的0的个数是不同的。当然..我觉得用批处理命令处理下文件命名为1-120会方便。
3.UpdateScene:
	static float t = 0.0f;
	t += dt;

	if(t > 0.03f){
		++mIndex;
		t = 0.0f;
	}

	if(mIndex >= 120)
		mIndex = 0;
4.DrawScene:
Effects::BasicFX->SetDiffuseMap(mDiffuseMapSRVArray[mIndex]);
6. Let p0, p1, and p2 be the vertices of a 3D triangle with respective texture coordinates q0, q1, and q2. Recall from §8.2 that for an arbitrary point on a 3D triangle p(s, t) = p0 + s(p1 − p0) + t(p2 − p0) where s ≥ 0, t ≥ 0, s + t ≤ 1, its texture
coordinates (u, v) are found by linearly interpolating the vertex texture coordinates across the 3D triangle by the same s, t parameters:
(u, v) = q0 + s(q1 − q0) + t(q2 − q0)
(a) Given (u, v) and q0, q1, and q2, solve for (s, t) in terms of u and v.
Consider the vector equation (u, v) − q0 = s(q1 − q0) + t(q2 − q0).
(b) Express p as a function of u and v; that is, find a formula p = p(u, v).
(c) Compute ∂p/∂u and ∂p/∂v and give a geometric interpretation of what these vectors mean.
...花了很久时间才想出来,惭愧。
注意 :下列式子中符号q0u、q0v分别表示q0点的u、v坐标,q1u...q2v类似。
(a)
将q0移动到等式左边化为(u, v) − q0 = s(q1 − q0) + t(q2 − q0)后,写成矩阵形式:
 ,符号q0u、q0v分别表示q0点的u、v坐标,其他符号同理。其实就是2D坐标变换的形式:
 ,所以求得逆,令两边同时右乘之即可:
(b)
p(s, t)的意思是自变量为s和t,因变量为p的式子 :
为了得到p(u, v),我们要将s和t转换为u,v,所以代入(a)的结论即可, 略。
(c) 将(b)得到的式子求关于u和v的偏导并给出几何意义的解释,不确定自己理解是否正确,留待思考。
7. Modify the “Lit Skull” demo from the previous chapter by adding textures to the ground, columns, and spheres (Figure 8.22). The textures can be found in this chapters code directory.
简单但需要仔细,这里我用Chapter7的LitSkullDemo.cpp开始修改(注: Vertex和Effect类使用Chapter8的代码):
1.查找代码中出现的PosNormal,修改为Basic32,还有在创建VertexBuffer之前,对Vertices[i].Tex赋值。
2.添加ID3D11ShaderResourceView*类型的mDiffuseMapSRVBox\Grid\Sphere\Cylinder, 以及XMFLOAT4X4 mTextrans(虽然不需要对纹理坐标进行变换,但Basic.fx中Vertex Shader内计算vout.Tex需要乘以gTexTransform,当然你也可以直接改Shader代码,会少写几行)成员变量。
3.初始化这些变量后,使用Effect类Set各种需要的参数到Shader,进行绘制即可。
过程类似于P.319的内容(For example, suppose we use the texture atlas as in Figure 8.3 that ... 勘误: Figure 8.3应改为Figure 8.4),可以使用texture atlas来改善性能。