android-----View工作原理系列(三)
前面两篇博客我介绍了invalidate、postInvalidate、requestLayout的源码分析以及解释了从调用setContentView开始是怎么一步一步走到performTraversals来进行视图绘制的。这篇博客我将对performTraversals之后的measure、layout、draw三个过程通过伪代码的方式来个总结;
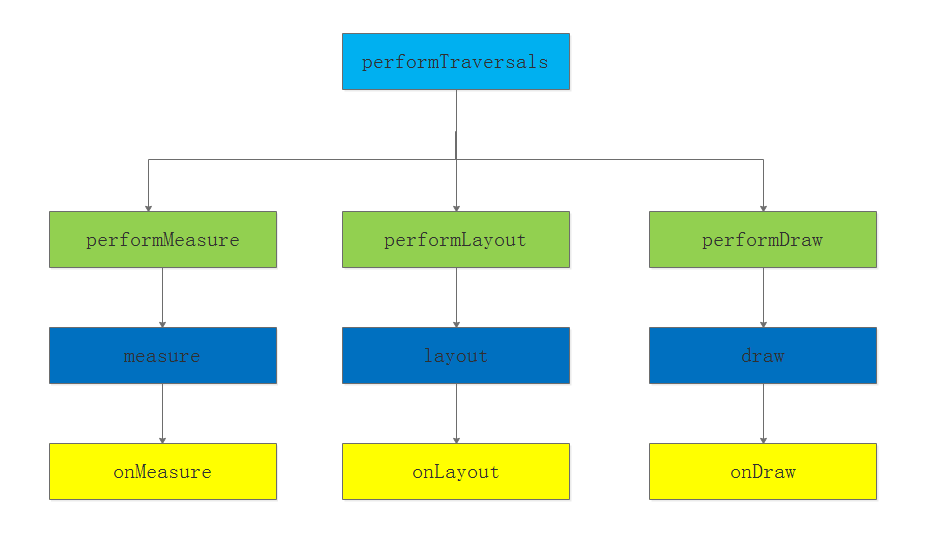
首先用一张图来直观的展示出View绘制过程中涉及到的大部分方法:
注意我们这张图只是表示执行流程,并没有对当前View是View还是ViewGroup进行区分;
首先从performTraversals方法开始,他的伪代码可以表示成:
private void performTraversals() {

	//开始执行measure测量过程
	performMeasure(childWidthMeasureSpec, childHeightMeasureSpec);

	//开始执行layout布局过程
	performLayout(lp,childWidthMeasureSpec, childHeightMeasureSpec);

	//开始执行draw绘制过程
	performDraw();
}
先来看performMeasure过程伪代码:
private void performMeasure(childWidthMeasureSpec, childHeightMeasureSpec) {
	measure(childWidthMeasureSpec, childHeightMeasureSpec);
}

//注意到measure是一个final类型的方法,所以子类不能进行覆写
public final void measure(int widthMeasureSpec, int heightMeasureSpec) {
	onMeasure(childWidthMeasureSpec, childHeightMeasureSpec);
}

//所以我们平常在自定义View的时候覆写的是omMeasure
protected void onMeasure(int widthMeasureSpec, int heightMeasureSpec){
	if(当前View是View不包含子view的话)
	{
		//设置当前View的宽高测量值
		setMeasuredDimension(int measuredWidth, int measuredHeight);
	}else
	{
		//说明当前View是ViewGroup
		//通过for循环遍历子View
		for(int i = 0;i < childCount;i++)
		{
			View child = getChildAt(i);
			//调用measureChild或者measureChildWithMargins方法
			measureChild(child,widthMeasureSpec,heightMeasureSpec);
		}
	}
}

//内部还是会调用measure方法
protected void measureChildWithMargins(View child,int parentWidthMeasureSpec, int widthUsed,int parentHeightMeasureSpec, int heightUsed)
{
    int childWidthMeasureSpec = getChildMeasureSpec(parentWidthMeasureSpec,mPaddingLeft + mPaddingRight + lp.leftMargin + lp.rightMargin+ widthUsed, lp.width);
    int childHeightMeasureSpec = getChildMeasureSpec(parentHeightMeasureSpec,mPaddingTop + mPaddingBottom + lp.topMargin + lp.bottomMargin+ heightUsed, lp.height);
    child.measure(childWidthMeasureSpec, childHeightMeasureSpec);
}

//内部同样也会调用measure方法
 protected void measureChild(View child, int parentWidthMeasureSpec,int parentHeightMeasureSpec)
{
    LayoutParams lp = child.getLayoutParams();
    int childWidthMeasureSpec = getChildMeasureSpec(parentWidthMeasureSpec,mPaddingLeft + mPaddingRight, lp.width);
    int childHeightMeasureSpec = getChildMeasureSpec(parentHeightMeasureSpec, mPaddingTop + mPaddingBottom, lp.height);
    child.measure(childWidthMeasureSpec, childHeightMeasureSpec);
}
我来解释下这段伪代码:
首先执行performMeasure实际上执行的是measure,而measure随后调用的是onMeasure,这点对于View和ViewGroup是一致的,随后在执行onMeasure的时候两者是有差别的,对于View来说,直接执行setMeasuredDimension来设置view的测量宽高即可,但是对于ViewGroup来说,因为它里面还有子View所以在测量的时候我们需要先测量他的子View,也就出现了代码的第20行遍历当前ViewGroup下面View树的代码了,因为子View中的MeasureSpec测量值和父View有很大的关系,所以在这里我们通过measureChild或者measureChildWithMargins计算MeasureSpec的时候都要将子View本身以及父View的MeasureSpec传递进去,具体在measureChild或者measureChildWithMargins里面得到MeasureSpec之后还是通过measure方法来进行测量的,接着就会继续回调我们的onMeasure,直到View树中的View不再是ViewGroup为止;
在上面的代码中我们涉及到了MeasureSpec的计算,这里简单提一下,MeasureSpec的计算结果不仅由当前View的LayoutParams属性决定,还受父容器的影响,他的值的获得有两种情况,一种是顶级View也就是DecorView的MeasureSpec值的获取,一种是普通View的MeasureSpec值的获取,为什么要将顶级View单独处理呢?原因很简单,顶级View的MeasureSpec值获取是和窗体大小有关系的,普通View是和上级有关系,所以在获得顶级View的MeasureSpec我们使用的是getRootMeasureSpec(int windowSize,int rootDimension),传入的参数是窗体大小以及自身的LayoutParams宽或者高的属性值,而普通View的MeasureSpec我们使用的是getChildMeasureSpec(int spec, int padding, int childDimension),传入的参数分别是父View的MeasureSpec值,父View已经使用的空间大小以及自身LayoutParams宽或者高的属性值;
接下来就是performLayout的伪代码了:
 private void performLayout(WindowManager.LayoutParams lp, int desiredWindowWidth,int desiredWindowHeight)
 {
	  //1.获得当前View
	  final View host = mView;
	  //2.调用确定当前View的布局
	  host.layout(0, 0, host.getMeasuredWidth(), host.getMeasuredHeight());
 }

 public void layout(int l, int t, int r, int b)
 {
	 //执行setFrame主要是设定View的四个顶点位置
     setFrame(l,t,r,b);
	 if(当前View是View不包含子view的话)
	 {
		 //执行一些别的操作之后返回
	 }else
	 {
		 //表示当前View是ViewGroup
		 //执行onLayout方法
		 onLayout(changed, l, t, r, b);
	 }
}

protected void onLayout(boolean changed, int left, int top, int right, int bottom)
{
	for(int i = 0;i < childCount;i++)
	{
		View child = getChildAt(i);
		//执行setChildFrame,定位子View的四个顶点位置
		setChildFrame(child,left,top,right,bottom);
	}
}

private void setChildFrame(View child, int left, int top, int width, int height) {
           //实际上就是调用layout方法而已
      child.layout(left, top, left + width, top + height);
}
下面对performLayout伪代码进行简单解释:
首先执行的是layout方法,这个方法会根据当前View是否是ViewGroup来决定是否执行onLayout方法,如果不是ViewGroup的话,执行setFrame设定四个顶点位置,随后执行一些别的操作之后返回,如果是ViewGroup的话,需要执行onLayout方法,这个方法里面会遍历该ViewGroup的子View,并且对每个子View调用setChileFrame方法,这个方法实际上执行的就是layout方法,这样相当于形成了间接递归,知道当前View不再是ViewGroup为止;
performDraw伪代码实现:
private void performDraw()
{
	draw(canvas);
}
 public void draw(Canvas canvas)
{
	     * 1. Draw the background
         * 2. If necessary, save the canvas' layers to prepare for fading
         * 3. Draw view's content
         * 4. Draw children
         * 5. If necessary, draw the fading edges and restore layers
         * 6. Draw decorations (scrollbars for instance)
		//最重要的就是第3步调用onDraw绘制自己
		//第4步调用dispatchDraw绘制子View
		if(当前View是View不包含子view的话)
	    {
			//绘制自己
			onDraw(canvas);
		}else
	    {
			dispatchDraw(canvas);
		}
}

//绘制ViewGroup的子View
protected void dispatchDraw(Canvas canvas)
{
	for(int i = 0;i < childCount;i++)
	{
		View child = getChildAt(i);
		//绘制子View
		drawChild(child,canvas);
	}
}

//绘制子View
protected void drawChild(View child,Canvas canvas)
{
	child.draw(canvas);
}
下面对这段伪代码进行简单解释一下:
首先调用performDraw之后执行draw方法,如果当前View不是ViewGroup的话,执行onDraw方法,直接绘制自己就可以了,如果当前View是ViewGroup的话,那么我们需要通过dispatchDraw绘制当前View的子View,可以看到在dispatchDraw里面实际上是循环调用drawChild绘制ViewGroup的子View,而drawChild里面实际上执行的还是draw方法,这样也同样形成了递归,直到不再是ViewGroup为止;
至此,我对View绘制过程中的三个过程用伪代码的方式总结结束了,如果其中有什么错误的地方,欢迎大家留言探讨!!!!
