Dynamic Table View Cell Height and Auto Layout
Dynamic Table View Cell Height and Auto Layout
If you wanted to create a customized table view complete with dynamic table view cell height in the past, you had to write a lot of sizing code. You had to calculate the height of every label, image view, text field, and everything else within the cell–manually.
Frankly, this was arduous, drool-inducing and error-prone.
In this dynamic table view cell height tutorial, you’ll learn how to create custom cells and dynamically size them to fit their contents. If you’ve worked with custom cells before, you’re probably thinking, “That’s going to take a lot of sizing code.”
However, what if we told you that you’re not going to write any sizing code at all?
“Preposterous!” you might say. Oh, but you can. Furthermore, you will!
By the time you’re at the end of this tutorial, you’ll know how to save yourself from hundreds of lines of code by leveraging auto layout.
Note: This tutorial works with existing iOS 7 apps and Xcode 5. It does not cover the iOS 8 Beta features for auto-sizing table view cells.
This tutorial assumes you have basic familiarity with using both auto layout and UITableView (including its data source and delegate methods). If you need to brush up on these topics before continuing, we’ve got you covered!
- Video Tutorial: Beginning Auto Layout
- Beginning Auto Layout Tutorial
- Table View series of video tutorials
Getting Started
iOS 6 introduced a wonderful new technology: auto layout. Developers rejoiced; parties commenced in the streets; bands performed songs to recognize its greatness…
Okay, so those might be overstatements, but it was a big deal.
While it inspired hope for countless developers, initially, auto layout was cumbersome to use. Manually writing auto layout code was, and still is, a great example of the verbosity of Objective-C, and Interface Builder was often counter-productive in terms of its helpfulness with constraints.
With the introduction of Xcode 5.1 and iOS 7, auto layout support in Interface Builder took a great leap forward. In addition to that, iOS 7 introduced a very important delegate method in UITableViewDelegate:
- (CGFloat)tableView:(UITableView *)tableView estimatedHeightForRowAtIndexPath:(NSIndexPath *)indexPath; |
This method allows a table view to calculate the actual height of each cell lazily, even deferring until the moment that table’s needed. At long last, auto layout can do the heavy lifting in dynamically calculating cell height. (Cue the bands!)
But, you probably don’t want to get bogged down in theory right now, do you? You’re probably ready to get down to coding, so let’s get down to business with the tutorial app.
Tutorial App Overview
Imagine that your top client has come to you and said, “Our users are clamoring for a way to view their favorite Deviant Artists’ submissions.”
Did you mention that you’ve not heard of Deviant Art?
“Well, it’s a popular social networking platform where artists can share their art creations, called deviations and blog posts too.” your client explains. “You really should check out the Deviant Art website.”
Fortunately, Deviant Art offers a Media RSS endpoint, which you can use to access deviations and posts by artist.
“We started making the app, but we’re stumped at how to display the content in a table view,” your client admits. “Can you make it work?”
Suddenly you feel the urge to slide into the nearest phone booth and change into your cape. Now, you just need the tools to make it happen, so you can be your client’s hero.
First download the “client’s code” (the starter project for this tutorial) here.
This project uses CocoaPods, so open DeviantArtBrowser.xcworkspace (not the .xcodeproj file). The pods are included in the zip for you, so you don’t need to run pod install.
If you’d like to learn more about CocoaPods, you should go through our Introduction to CocoaPods tutorial.
The starter project successfully downloads content from the Deviant Art RSS feed, but doesn’t have a way of displaying any of that yet. That’s where you come in :]
Open Main.storyboard (under the Views group), and you’ll see four scenes:
From left to right, they are:
- A top-level navigation controller
-
RWFeedViewController, titled Deviant Browser - Two scenes for
RWDetailViewController(one displays only text content and the other displays both text and an image); their titles are Deviant Article and Deviant Media
Build and run. You’ll see the console log output, but nothing else works yet.
The log output should look like this:
2014-05-28 00:52:01.588 DeviantArtBrowser[1191:60b] GET 'http://backend.deviantart.com/rss.xml?q=boost%3Apopular'

2014-05-28 00:52:03.144 DeviantArtBrowser[1191:60b] 200 'http://backend.deviantart.com/rss.xml?q=boost%3Apopular' [1.5568 s]
The app is making a network request and getting a response, but does nothing with the response data.
Now, open RWFeedViewController.m. This is where most of the new code will go. Have a look at this snippet from parseForQuery::
[self.parser parseRSSFeed:RWDeviantArtBaseURLString parameters:[self parametersForQuery:query] success:^(RSSChannel *channel) { [weakSelf convertItemsPropertiesToPlainText:channel.items]; [weakSelf setFeedItems:channel.items]; [weakSelf reloadTableViewContent]; [weakSelf hideProgressHUD]; } failure:^(NSError *error) { [weakSelf hideProgressHUD]; NSLog(@"Error: %@", error); }]; |
self.parser is an instance of RSSParser, which is part of MediaRSSParser.
This method initiates a network request to Deviant Art to get the RSS feed, and then it returns an RSSChannel to the success block. After formatting , which is simply converting HTML to plain text, the success stores the channel.items as a local property called feedItems.
The channel.items array populates with RSSItem objects, each of which represents a single item element in an RSS feed. Great, you now know what you’ll need to display in the table view: the feedItems array!
Lastly, notice that there are three warnings in the project. What are these about?
It looks like someone put #warning statements showing what to implement. Well, that’s convenient, now isn’t it?
Create a Basic Custom Cell
After a quick dive into the source code, you’ve found the app is already fetching data, but it’s not displaying anything. To do that, you first need to create a custom table view cell to show the data.
Add a new class to the DeviantArtBrowser project and name it RWBasicCell. Make it a subclass of UITableViewCell; and make sure Also create xib file is not checked.
Open RWBasicCell.h, and add the following properties right after @interface RWBasicCell : UITableViewCell :
@property (nonatomic, weak) IBOutlet UILabel *titleLabel; @property (nonatomic, weak) IBOutlet UILabel *subtitleLabel; |
Next open Main.storyboard, and drag and drop a new UITableViewCell onto the table view of RWFeedViewController.
Set the Custom Class of the cell to RWBasicCell.
Set the Identifier (Reuse Identifier) to RWBasicCell.
Set the Row Height of the cell to 83.
Drag and drop a new UILabel onto the cell, and set its text to “Title”.
Set the title label’s Lines (the number of lines the label can have at most) to 0, meaning “unlimited”.
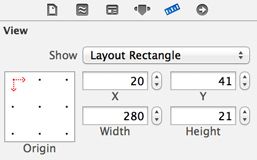
Set the title label’s size and position to the values of the screenshot below.
Connect the titleLabel outlet of RWBasicCell to the title label on the cell.
Next, drag and drop a second UILabel onto the cell, right below the title label, and set its text to “Subtitle”.
As you did with the title label, change the values of the size and position to match the values of the screenshot below.
Set the subtitle label’s Color to Light Gray Color; its Font to System 15.0; and its Lines to 0.
Connect the subtitleLabel outlet of RWBasicCell to the subtitle label on the cell.
Awesome, you’ve laid out and configured RWBasicCell. Now you just need to add auto layout constraints. Select the title label and pin the top, trailing and leading edges to 20 points from the superview.
This ensures that no matter how big or small the cell may be, the title label is always:
- 20 points from the top
- Spans the entire width of the cell, minus 20 points of padding on the left and right
Now select the subtitle label and this time, pin the leading, bottom, and trailing edges to 20 points from the superview.
Similar to the title label, these constraints work together to ensure the subtitle label is always at 20 points from the bottom and spans the entire width of the cell, minus a little padding.
Pro tip: the trick to getting auto layout working on a UITableViewCell is to ensure there are constraints that pin each subview to all the sides – that is, each subview should have leading, top, trailing and bottom constraints.
Further, there should be a clear line of constraints going from the top to the bottom of the contentView. This way, auto layout will correctly determine the height of the contentView, based on its subviews.
The tricky part is that Interface Builder often doesn’t warn you if you’re missing some of these constraints…
Auto layout will simply not return the correct heights when you try to run the project. For example, it may always return 0for the cell height, which is a strong clue that indicates your constraints are probably wrong.
If you run into issues in your own projects, try adjusting your constraints until the above criteria are met.
Select the subtitle label, hold down ⌃ control and drag to the title label. Choose Vertical Spacing to pin the top of the subtitle label to the bottom of the title label.
You probably have some warnings related to auto layout, but you’re about to fix those.
On the title and the subtitle labels, set the Horizontal and Vertical constraints for Content Hugging Priority and Content Compression Resistance Priority to 1000.
By setting these priorities to 1000, you’re forcing these constraints to be prioritized over all others. This tells auto layout that you want the labels to fit to show all of their text.
Lastly, select the title label and change its Intrinsic Size from Default (System Defined) to Placeholder. Do the same to the subtitle label’s Intrinsic Size.
This tells Interface Builder to assume the current size of the labels is also their intrinsic content size. By doing that, the constraints are once again unambiguous and the warnings will disappear.
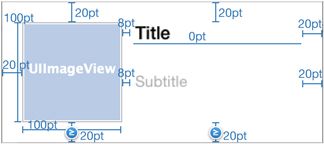
In the end, the auto layout constraints should look like this on RWBasicCell:
Review: Does this satisfy the previous auto layout criteria?
- Does each subview have constraints that pin all of their sides? Yes.
- Are there constraints going from the top to the bottom of the
contentView? Yes.
The titleLabel connects to the top by 20 points, it’s connected to the subtitleLabel by 0 points, and the subtitleLabel connects to the bottom by 20 points.
So auto layout can now determine the height of the cell!
Next, you need to create a segue from RWBasicCell to the scene titled Deviant Article:
Select RWBasicCell and control-drag to the Deviant Article scene. Select Push from the Selection Segue options.
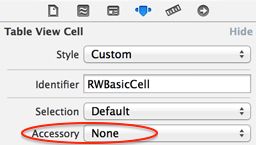
Interface Builder will also automatically change the cell Accessory property to Disclosure Indicator, which doesn’t look great with the design of the app. Change the Accessory back to None.
Now, whenever a user taps on an RWBasicCell, the app will segue to RWDetailViewController.
Awesome, RWBasicCell is setup! If you build and run the app now, you’ll see that… nothing has changed. What the what?!
Remember those #warning statements from before? Yep, those are your troublemakers. You need to implement the table view data source and delegate methods.
Implement UITableView Delegate and Data Source
Add the following to the top of RWFeedViewController.m, right below the #import statements:
#import "RWBasicCell.h" static NSString * const RWBasicCellIdentifier = @"RWBasicCell"; |
You’ll be using RWBasicCell in both the data source and delegate methods and will need to be able to identify it by the Reuse Identifier you set to RWBasicCellIdentifier in the Storyboard.
Next, start by implementing the data source methods.
Replace tableView:numberOfRowsInSection: with the following:
- (NSInteger)tableView:(UITableView *)tableView numberOfRowsInSection:(NSInteger)section { return [self.feedItems count]; } |
Then replace tableView:cellForRowAtIndexPath: with the following set of methods:
- (UITableViewCell *)tableView:(UITableView *)tableView cellForRowAtIndexPath:(NSIndexPath *)indexPath { return [self basicCellAtIndexPath:indexPath]; } - (RWBasicCell *)basicCellAtIndexPath:(NSIndexPath *)indexPath { RWBasicCell *cell = [self.tableView dequeueReusableCellWithIdentifier:RWBasicCellIdentifier forIndexPath:indexPath]; [self configureBasicCell:cell atIndexPath:indexPath]; return cell; } - (void)configureBasicCell:(RWBasicCell *)cell atIndexPath:(NSIndexPath *)indexPath { RSSItem *item = self.feedItems[indexPath.row]; [self setTitleForCell:cell item:item]; [self setSubtitleForCell:cell item:item]; } - (void)setTitleForCell:(RWBasicCell *)cell item:(RSSItem *)item { NSString *title = item.title ?: NSLocalizedString(@"[No Title]", nil); [cell.titleLabel setText:title]; } - (void)setSubtitleForCell:(RWBasicCell *)cell item:(RSSItem *)item { NSString *subtitle = item.mediaText ?: item.mediaDescription; // Some subtitles can be really long, so only display the // first 200 characters if (subtitle.length > 200) { subtitle = [NSString stringWithFormat:@"%@...", [subtitle substringToIndex:200]]; } [cell.subtitleLabel setText:subtitle]; } |
Here’s what’s happening above:
- In
tableView:cellForRowAtIndexPath:, you callbasicCellAtIndexPath:to get anRWBasicCell. As you’ll see later on, it’s easier to add additional types of custom cells if you create a helper method like this instead of returning a cell directing by the data source method. - In
basicCellAtIndexPath:, you dequeue anRWBasicCell, configure it withconfigureBasicCell:atIndexPath:, and finally, return the configured cell. - In
configureBasicCell:atIndexPath:, you get a reference to the item at theindexPath, which then gets and sets thetitleLabelandsubtitleLabeltexts on the cell.
Now replace tableView:heightForRowAtIndexPath: with the following set of methods:
- (CGFloat)tableView:(UITableView *)tableView heightForRowAtIndexPath:(NSIndexPath *)indexPath { return [self heightForBasicCellAtIndexPath:indexPath]; } - (CGFloat)heightForBasicCellAtIndexPath:(NSIndexPath *)indexPath { static RWBasicCell *sizingCell = nil; static dispatch_once_t onceToken; dispatch_once(&onceToken, ^{ sizingCell = [self.tableView dequeueReusableCellWithIdentifier:RWBasicCellIdentifier]; }); [self configureBasicCell:sizingCell atIndexPath:indexPath]; return [self calculateHeightForConfiguredSizingCell:sizingCell]; } - (CGFloat)calculateHeightForConfiguredSizingCell:(UITableViewCell *)sizingCell { [sizingCell setNeedsLayout]; [sizingCell layoutIfNeeded]; CGSize size = [sizingCell.contentView systemLayoutSizeFittingSize:UILayoutFittingCompressedSize]; return size.height; } |
You’re finally using auto layout to calculate the cell height for you! Here’s what’s going on:
- In
tableView:heightForRowAtIndexPath:, similar to the data source method, you simply return another method that does the actual calculation,heightForBasicCellAtIndexPath:. Once again, this makes it easier to add additional types of custom cells later on. - You might have noticed that
heightForBasicCellAtIndexPath:is pretty interesting.- This method instantiates a
sizingCellusing GCD to ensure it’s created only once - Calls
configureBasicCell:atIndexPath:to configure the cell - Returns another method:
calculateHeightForConfiguredSizingCell:. You probably already guessed it–this was also extracted to make it easier to add additional cells later on.
- This method instantiates a
- Lastly, in
calculateHeightForConfiguredSizingCell:, you:- First request the cell to lay out its content by calling
setNeedsLayoutandlayoutIfNeeded. - Then you ask auto layout to calculate the
systemLayoutSizeFittingSize:, passing in the parameterUILayoutFittingCompressedSize, and that means “use the smallest possible size” that fits the auto layout constraints.
- First request the cell to lay out its content by calling
Build and Run, and you should see a populated table view!
This looks great! Try rotating to landscape mode, however, and you might notice something peculiar:
“Why is there so much extra space around the subtitle label?” you might ask.
Well, there’s this preferredMaxLayoutWidth property on UILabel that affects its layout. Whenever the screen orientation changes, preferredMaxLayoutWidth does not update.
Fortunately, you can fix this by creating a subclass of UILabel. Add a new class to the project, name it RWLabel and make it a subclass of UILabel.
In RWLabel.m, replace everything within @implementation RWLabel with the following:
- (void)layoutSubviews { [super layoutSubviews]; if (self.numberOfLines == 0) { // If this is a multiline label, need to make sure // preferredMaxLayoutWidth always matches the frame width // (i.e. orientation change can mess this up) if (self.preferredMaxLayoutWidth != self.frame.size.width) { self.preferredMaxLayoutWidth = self.frame.size.width; [self setNeedsUpdateConstraints]; } } } - (CGSize)intrinsicContentSize { CGSize size = [super intrinsicContentSize]; if (self.numberOfLines == 0) { // There's a bug where intrinsic content size // may be 1 point too short size.height += 1; } return size; } |
As noted in the comments, RWLabel fixes two issues with UILabel:
- If the label has multiple lines, it makes sure that
preferredMaxLayoutWidthalways equals the frame width. - Sometimes, the
intrinsicContentSizecan be1point too short. It adds1point to theintrinsicContentSizeif the label has multiple lines.
Now you need to update RWBasicCell to use this custom subclass. In RWBasicCell.h, add the following right after the other#import statements:
#import "RWLabel.h" |
Then replace both of the @property lines with the following:
@property (nonatomic, weak) IBOutlet RWLabel *titleLabel; @property (nonatomic, weak) IBOutlet RWLabel *subtitleLabel; |
In Main.storyboard, navigate to the Feed View Controller scene, select the title label and change its class to RWLabel.
Do the same for the subtitle label.
In RWFeedViewController.m, add the following inside calculateHeightForConfiguredSizingCell: (make it the first line in the method):
sizingCell.bounds = CGRectMake(0.0f, 0.0f, CGRectGetWidth(self.tableView.bounds), 0.0f); |
This will make each RWLabel update its preferredMaxLayoutWidth property.
Build and Run; the labels should now be sized and positioned correctly in both portrait and landscape orientation.
Where are the Images?
The app is looking great, but doesn’t it feel like there’s something missing? Oh snap, where are the images?
Deviant Art is all about images, but the app doesn’t show any of them. You need to fix that or your client will think you’ve lost your mind!
A simple approach you might take is to add an image view to RWBasicCell. While this might work for some apps, Deviant Art has both deviations (posts with images) and blog posts (without images), so in this instance, it’s actually better to create a new custom cell.
Add a new class to the project. Name it RWImageCell and make it a subclass of RWBasicCell. The reason it’s a subclass of RWBasicCell is because it too will need a titleLabel and subtitleLabel.
Open RWImageCell.h and add the following right after @interface RWImageCell : RWBasicCell:
@property (nonatomic, weak) IBOutlet UIImageView *customImageView; |
This property’s name iscustomImageView rather than imageView, because there is already an imageView property on UITableViewCell.
Open Main.storyboard, select the basic cell you were working on before and copy it using ⌘C, or navigate to Edit > Copy.
Select the table view and press ⌘P or click Edit > Paste to create a new copy of the cell.
Select the new cell and change its Custom Class to RWImageCell. Likewise, change its Reuse Identifier to RWImageCell.
Select RWImageCell’s title label and change its x position to 128 and width to 172. Do the same to the subtitle label.
Interface Builder should give a warning about ambiguous auto layout constraints, because the constraints on those labels put them at a different position than what you just defined.
To correct this, first select RWImageCell’s title label to show its constraints, and then select its leading constraint and delete it. Delete the subtitle label’s leading constraint as well.
Now select RWImageCell’s title label and change its Intrinsic Size to Placeholder. Do the same to the subtitle label’s Intrinsic Size.
These tell Interface Builder to update the Placeholder to the current frame of the view. Check again, because the warnings should now be gone.
You need to add an image view to the cell next, but the height is currently a bit too small for it. So, select RWImageCell and change its Row Height to 141.
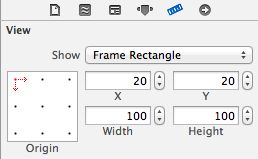
Now drag and drop an image view on RWImageCell. Set its size and position to the values shown in the screenshot below.
Select the image view and press pin the leading, top and bottom to 20. Pin the width and height to 100, and press Add 5 constraints.
Select the image view to show its constraints and then select its bottom constraint to edit it. In the attributes editor, change itsRelation to Greater Than or Equal and its Priority to 999.
Similarly, select the subtitleLabel to show its constraints, and then select its bottom constraint. In the attributes editor, change its Relation to Greater Than or Equal, yet leave its Priority set to 1000.
This basically says to auto layout, “There should be at least 20 points below both imageView and subtitleLabel, but if you must, you may break the bottom constraint on imageView to show a longer subtitle.”
Next, select RWImageCell’s title label, and press pin leading to 8, and press Add 1 constraint. Do the same for the subtitle label.
In the end, the auto layout constraints should look like this on RWImageCell.
You also need to select RWImageCell and actually connect the customImageView outlet to the image view.
Lastly, you need to create a segue from RWImageCell to the scene titled Deviant Media, so the app shows this screen when a user clicks on an RWImageCell.
Similar to how you setup the basic cell, select RWImageCell, control-drag to the scene titled Deviant Media, and then selectPush from the Selection Segue options.
Make sure you also change the Accessory to None.
Great, RWImageCell is setup! Now you just need to add the code to display it.
Show Me the Images!
Add the following to the top of RWFeedViewController.m, right below the #import statements:
#import "RWImageCell.h" static NSString * const RWImageCellIdentifier = @"RWImageCell"; |
You’ll add RWImageCell to both the data source and delegate methods. This will need to be able to identify it by the previously specified Reuse Identifier, which is set to RWImageCellIdentifier.
Still in RWFeedViewController.m, replace tableView:cellForRowAtIndexPath: with the following:
- (UITableViewCell *)tableView:(UITableView *)tableView cellForRowAtIndexPath:(NSIndexPath *)indexPath { if ([self hasImageAtIndexPath:indexPath]) { return [self galleryCellAtIndexPath:indexPath]; } else { return [self basicCellAtIndexPath:indexPath]; } } - (BOOL)hasImageAtIndexPath:(NSIndexPath *)indexPath { RSSItem *item = self.feedItems[indexPath.row]; RSSMediaThumbnail *mediaThumbnail = [item.mediaThumbnails firstObject]; return mediaThumbnail.url != nil; } - (RWImageCell *)galleryCellAtIndexPath:(NSIndexPath *)indexPath { RWImageCell *cell = [self.tableView dequeueReusableCellWithIdentifier:RWImageCellIdentifier forIndexPath:indexPath]; [self configureImageCell:cell atIndexPath:indexPath]; return cell; } - (void)configureImageCell:(RWImageCell *)cell atIndexPath:(NSIndexPath *)indexPath { RSSItem *item = self.feedItems[indexPath.row]; [self setTitleForCell:cell item:item]; [self setSubtitleForCell:cell item:item]; [self setImageForCell:(id)cell item:item]; } - (void)setImageForCell:(RWImageCell *)cell item:(RSSItem *)item { RSSMediaThumbnail *mediaThumbnail = [item.mediaThumbnails firstObject]; // mediaThumbnails are generally ordered by size, // so get the second mediaThumbnail, which is a // "medium" sized image if (item.mediaThumbnails.count >= 2) { mediaThumbnail = item.mediaThumbnails[1]; } else { mediaThumbnail = [item.mediaThumbnails firstObject]; } [cell.customImageView setImage:nil]; [cell.customImageView setImageWithURL:mediaThumbnail.url]; } |
Sweet! Because you kept your methods concise, you could reuse a lot of them.
Most of the above is similar to how you created and configured RWBasicCell earlier, but here’s a quick walkthrough of the new code:
-
hasImageAtIndexPathchecks if the item at theindexPathhas amediaThumbnailwith a non-nil URL–Deviant Art generates thumbnails automatically for all uploaded deviations.- If so, it has an image you’ll need to display using an
RWImageCell.
- If so, it has an image you’ll need to display using an
-
configureImageCell:atIndexPath:is similar to the configure method for a basic cell, but it also sets an image viasetImageForCell:item:. -
setImageForCell:item:attempts to get the second media thumbnail, which in general is a “medium” sized image and works wells for the given image view size.- The image is then set on
customImageViewby using a convenience method provided by AFNetworking,setImageWithURL:.
- The image is then set on
Next, you need to update the delegate method for calculating the cell height.
Replace tableView:heightForRowAtIndexPath: with the following:
- (CGFloat)tableView:(UITableView *)tableView heightForRowAtIndexPath:(NSIndexPath *)indexPath { if ([self hasImageAtIndexPath:indexPath]) { return [self heightForImageCellAtIndexPath:indexPath]; } else { return [self heightForBasicCellAtIndexPath:indexPath]; } } - (CGFloat)heightForImageCellAtIndexPath:(NSIndexPath *)indexPath { static RWImageCell *sizingCell = nil; static dispatch_once_t onceToken; dispatch_once(&onceToken, ^{ sizingCell = [self.tableView dequeueReusableCellWithIdentifier:RWImageCellIdentifier]; }); [self configureImageCell:sizingCell atIndexPath:indexPath]; return [self calculateHeightForConfiguredSizingCell:sizingCell]; } |
This is very similar to what you already did with RWBasicCell; you’re just reusing methods like a boss. ‘Nuff said!
Build and run, and some pretty sweet art will greet you! By default, the app retrieves items from the “popular” category on Deviant Art, but you can search by artist too.
Try searching for the artist who goes by CheshireCatArt (case insensitive). This is a friend of mine, Devin Kraft, who’s an excellent graphic artist (check out his website).
He’s very active on Deviant Art and posts a good mix of deviations and blog posts. So, bias aside, his account is a good test case to show the app displays both cells with and without images.
Sweet!
If you select a cell, the app will push a new RWDetailViewController onto the navigation controller stack. You may have noticed, however, that when you rotate to landscape orientation, the label’s height is incorrect.
Hmmmm….this seems familiar. Is it deja vu?
Kind of. This is the same issue RWBasicCell had, caused by UILabel‘s preferredMaxLayoutWidth property not being updated on device rotation.
To fix this issue, open Main.storyboard. In each of the scenes for RWDetailViewController, select the label and change itsClass to RWLabel.
Awesome, the app is looking pretty sharp, but you can still improve on it to truly stun and amaze your client.
Optimizing the Table View
While you can use auto layout to calculate cell height starting in iOS 6, it’s most beneficial in iOS 7 because of a new delegate method:
- (CGFloat)tableView:(UITableView *)tableView estimatedHeightForRowAtIndexPath:(NSIndexPath *)indexPath; |
If you don’t implement this method, the table view proactively calls tableView:heightForRowAtIndexPath: for every cell–even the cells that haven’t been displayed yet and may never be displayed.
If your table view has a lot of cells, this can be very expensive and result in poor initial loading, reloading or scrolling performance.
If you do implement this method, the table view will call it proactively.
Pro tip: You can greatly improve the performance of a table view that has many cells by implementing tableView:estimatedHeightForRowAtIndexPath:.
However, be warned that this delegate method comes with its own set of caveats.
If your cell estimates are inaccurate, then scrolling might be jumpy, the scroll indicator may be misleading, or the content offset may get messed up. For example, if the user rotates the device or taps the status bar to scroll to the top, the result could be a gap at the top/bottom of the table view.
If your table view has only a few cells, or if your cell heights are difficult to estimate in advance, you can opt to skip implementation of this method. However, you won’t have to worry about these issues.
If you notice poor loading, reloading, or scrolling, try implementing this method.
The key to success is finding a good balance between accurately estimating cell height and the performance cost of such calculation.
Ideally, you want to keep this method simple. Start with the simplest case: return a constant value. Add the following toRWFeedViewController.m:
- (CGFloat)tableView:(UITableView *)tableView estimatedHeightForRowAtIndexPath:(NSIndexPath *)indexPath { return 100.0f; } |
Build and run, and try scrolling the table view all the way to the bottom. You may notice the scrolling is jumpy, especially as you get towards the middle/end of the table view.
You might also notice that the scroll indicator isn’t very accurate. It seems to indicate there are fewer items are actually in the table view.
Now try rotating the simulator. You’ll likely see that the content offset is messed up e.g. white space at the top/bottom of the table view.
These are all symptoms of poor cell height estimation. Through better estimates, you greatly alleviate or even eliminate these issues.
Replace tableView:estimatedHeightForRowAtIndexPath: with the following:
- (CGFloat)tableView:(UITableView *)tableView estimatedHeightForRowAtIndexPath:(NSIndexPath *)indexPath { if ([self isLandscapeOrientation]) { if ([self hasImageAtIndexPath:indexPath]) { return 140.0f; } else { return 120.0f; } } else { if ([self hasImageAtIndexPath:indexPath]) { return 235.0f; } else { return 155.0f; } } } - (BOOL)isLandscapeOrientation { return UIInterfaceOrientationIsLandscape([UIApplication sharedApplication].statusBarOrientation); } |
You’re still using magic constants such as 140 and 235 to estimate height, but now you’re picking the best estimate based on the cell contents and the device orientation. You could get even fancier with your estimation but remember: the point of this method is to be fast. You want to return an estimate as quickly as possible.
Build and run. And try scrolling through the list and rotating the device. This new estimation method adds a tiny bit of overhead, but improves the performance. Scrolling is smooth, the scroll indicator is accurate and content offset issues are very infrequent.
It’s hard to eliminate the content offset issue altogether because it’s directly caused by the table view not knowing how large its content area should be. But even with this current implementation, it’s unlikely users would ever, or at least infrequently, experience this issue.
Where to Go From Here
You can download the completed project from here.
Table views are perhaps the most fundamental of structured data views in iOS. As apps become more complex, table views are being used to show all kinds of content in all kinds of custom layouts. Getting your table view cells properly formatted with different kinds and amounts of content is now much easier with auto layout, and the performance can be much better with proper row height estimation.
Auto layout is becoming more important as we get more device sizes and interface builder becomes more powerful. And there’s less code too! There should be plenty of ways to apply the concepts in this tutorial to your own apps to make them more responsive, faster, and better looking.
If you have any comments or questions, please respond below! I’d love to hear from you.
转载:http://www.raywenderlich.com/73602/dynamic-table-view-cell-height-auto-layout
