嵌入式学习(1)---ubuntu12.04(32位)下TQ2440开发板环境搭建
ubuntu12.04(32位)下TQ2440开发板环境搭建
Step 1.安装arm-linux-gcc交叉编译器
这里我使用的是天嵌tq2440光盘下的
EABI-4.3.3_EmbedSky_20100610.tar.bz2安装包。
1、在根目录下解压EABI-4.3.3_EmbedSky_20100610.tar.bz2
sudo tar -xvf EABI-4.3.3_EmbedSky_20100610.tar.bz2 -C /
2、打开/etc/environment文本
sudo vi /etc/environment
并修改PATH,添加蓝色字部分
PATH="/usr/local/sbin:/usr/local/bin:/usr/sbin:/usr/bin:/sbin:/bin:/usr/games:/opt/EmbedSky/4.3.3/bin"
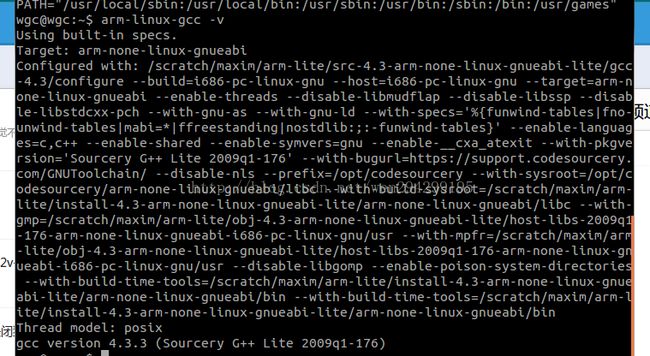
然后在终端输入
arm-linux-gcc -v,如果出现如下信息,说明安装成功!
Step2:安装minicom
1、sudo apt-get install minicom安装minicom
2、设置minicom参数
输入sudo minicom -s
选择 ”Serial port setup“,并修改参数如下:
由于我们使用USB转串口,这里使用ttyUSB0。
然后再选择"Save setup as dfl",以后每次打开minicom就不用重新配置参数,
接下来介入开发班的数据先,如果出现下面的信息,表示成功!
##### EmbedSky BIOS for SKY2440/TQ2440 #####
Press Space key to Download Mode !
##### Boot for Nor Flash Main Menu #####
[1] Download u-boot or STEPLDR.nb1 or other bootloader to Nand Flash
[2] Download Eboot to Nand Flash
[3] Download Linux Kernel to Nand Flash
[5] Download CRAMFS image to Nand Flash
[6] Download YAFFS image to Nand Flash
[7] Download Program (uCOS-II or TQ2440_Test) to SDRAM and Run it
[8] Boot the system
[9] Format the Nand Flash
[0] Set the boot parameters
[a] Download User Program (eg: uCOS-II or TQ2440_Test)
[b] Download LOGO Picture (.bin) to Nand Flash
[l] Set LCD Parameters
[o] Download u-boot to Nor Flash
[r] Reboot u-boot
[t] Test Linux Image (zImage)
[q] quit from menu
Enter your selection:
Step3:安装dnw2下载工具
1. 安装libusb-dev库
sudo apt-get install libusb-dev
2. 编译dnw2源码
/* dnw2 linux main file. This depends on libusb.
*
* Author: Fox <[email protected]>
* License: GPL
*
*/
#include <stdio.h>
#include <usb.h>
#include <errno.h>
#include <sys/stat.h>
#include <fcntl.h>
#include <unistd.h>
#define QQ2440_SECBULK_IDVENDOR 0x5345
#define QQ2440_SECBULK_IDPRODUCT 0x1234
struct usb_dev_handle * open_port()
{
struct usb_bus *busses, *bus;
usb_init();
usb_find_busses();
usb_find_devices();
busses = usb_get_busses();
for(bus=busses;bus;bus=bus->next)
{
struct usb_device *dev;
for(dev=bus->devices;dev;dev=dev->next)
{
if( QQ2440_SECBULK_IDVENDOR==dev->descriptor.idVendor
&& QQ2440_SECBULK_IDPRODUCT==dev->descriptor.idProduct)
{
printf("Target usb device found!\n");
struct usb_dev_handle *hdev = usb_open(dev);
if(!hdev)
{
perror("Cannot open device");
}
else
{
if(0!=usb_claim_interface(hdev, 0))
{
perror("Cannot claim interface");
usb_close(hdev);
hdev = NULL;
}
}
return hdev;
}
}
}
printf("Target usb device not found!\n");
return NULL;
}
void usage()
{
printf("Usage: dnw2 <file>\n\n");
}
unsigned char* prepare_write_buf(char *filename, unsigned int *len)
{
unsigned char *write_buf = NULL;
struct stat fs;
int fd = open(filename, O_RDONLY);
if(-1==fd)
{
perror("Cannot open file");
return NULL;
}
if(-1==fstat(fd, &fs))
{
perror("Cannot get file size");
goto error;
}
write_buf = (unsigned char*)malloc(fs.st_size+10);
if(NULL==write_buf)
{
perror("malloc failed");
goto error;
}
if(fs.st_size != read(fd, write_buf+8, fs.st_size))
{
perror("Reading file failed");
goto error;
}
printf("Filename : %s\n", filename);
printf("Filesize : %d bytes\n", fs.st_size);
*((u_int32_t*)write_buf) = 0x30000000; //download address
*((u_int32_t*)write_buf+1) = fs.st_size + 10; //download size;
*len = fs.st_size + 10;
return write_buf;
error:
if(fd!=-1) close(fd);
if(NULL!=write_buf) free(write_buf);
fs.st_size = 0;
return NULL;
}
int main(int argc, char *argv[])
{
if(2!=argc)
{
usage();
return 1;
}
struct usb_dev_handle *hdev = open_port();
if(!hdev)
{
return 1;
}
unsigned int len = 0;
unsigned char* write_buf = prepare_write_buf(argv[1], &len);
if(NULL==write_buf) return 1;
unsigned int remain = len;
unsigned int towrite;
printf("Writing data ...\n");
while(remain)
{
towrite = remain>512 ? 512 : remain;
if(towrite != usb_bulk_write(hdev, 0x03, write_buf+(len-remain), towrite, 3000))
{
perror("usb_bulk_write failed");
break;
}
remain-=towrite;
printf("\r%d%\t %d bytes ", (len-remain)*100/len, len-remain);
fflush(stdout);
}
if(0==remain) printf("Done!\n");
return 0;
}
*
* Author: Fox <[email protected]>
* License: GPL
*
*/
#include <stdio.h>
#include <usb.h>
#include <errno.h>
#include <sys/stat.h>
#include <fcntl.h>
#include <unistd.h>
#define QQ2440_SECBULK_IDVENDOR 0x5345
#define QQ2440_SECBULK_IDPRODUCT 0x1234
struct usb_dev_handle * open_port()
{
struct usb_bus *busses, *bus;
usb_init();
usb_find_busses();
usb_find_devices();
busses = usb_get_busses();
for(bus=busses;bus;bus=bus->next)
{
struct usb_device *dev;
for(dev=bus->devices;dev;dev=dev->next)
{
if( QQ2440_SECBULK_IDVENDOR==dev->descriptor.idVendor
&& QQ2440_SECBULK_IDPRODUCT==dev->descriptor.idProduct)
{
printf("Target usb device found!\n");
struct usb_dev_handle *hdev = usb_open(dev);
if(!hdev)
{
perror("Cannot open device");
}
else
{
if(0!=usb_claim_interface(hdev, 0))
{
perror("Cannot claim interface");
usb_close(hdev);
hdev = NULL;
}
}
return hdev;
}
}
}
printf("Target usb device not found!\n");
return NULL;
}
void usage()
{
printf("Usage: dnw2 <file>\n\n");
}
unsigned char* prepare_write_buf(char *filename, unsigned int *len)
{
unsigned char *write_buf = NULL;
struct stat fs;
int fd = open(filename, O_RDONLY);
if(-1==fd)
{
perror("Cannot open file");
return NULL;
}
if(-1==fstat(fd, &fs))
{
perror("Cannot get file size");
goto error;
}
write_buf = (unsigned char*)malloc(fs.st_size+10);
if(NULL==write_buf)
{
perror("malloc failed");
goto error;
}
if(fs.st_size != read(fd, write_buf+8, fs.st_size))
{
perror("Reading file failed");
goto error;
}
printf("Filename : %s\n", filename);
printf("Filesize : %d bytes\n", fs.st_size);
*((u_int32_t*)write_buf) = 0x30000000; //download address
*((u_int32_t*)write_buf+1) = fs.st_size + 10; //download size;
*len = fs.st_size + 10;
return write_buf;
error:
if(fd!=-1) close(fd);
if(NULL!=write_buf) free(write_buf);
fs.st_size = 0;
return NULL;
}
int main(int argc, char *argv[])
{
if(2!=argc)
{
usage();
return 1;
}
struct usb_dev_handle *hdev = open_port();
if(!hdev)
{
return 1;
}
unsigned int len = 0;
unsigned char* write_buf = prepare_write_buf(argv[1], &len);
if(NULL==write_buf) return 1;
unsigned int remain = len;
unsigned int towrite;
printf("Writing data ...\n");
while(remain)
{
towrite = remain>512 ? 512 : remain;
if(towrite != usb_bulk_write(hdev, 0x03, write_buf+(len-remain), towrite, 3000))
{
perror("usb_bulk_write failed");
break;
}
remain-=towrite;
printf("\r%d%\t %d bytes ", (len-remain)*100/len, len-remain);
fflush(stdout);
}
if(0==remain) printf("Done!\n");
return 0;
}
以上就是dnw2的源码,接下来我们进行编译。
gcc dnw2.c -o dnw2 -lusb
3、移动dnw2可执行文件到 /usr/sbin下
sudo dnw2 /usr/sbin
4、下载方式
sudo dnw2 file_name