手把手教你在springMVC中不用框架写表格
<个人原创,转载请注明出处>
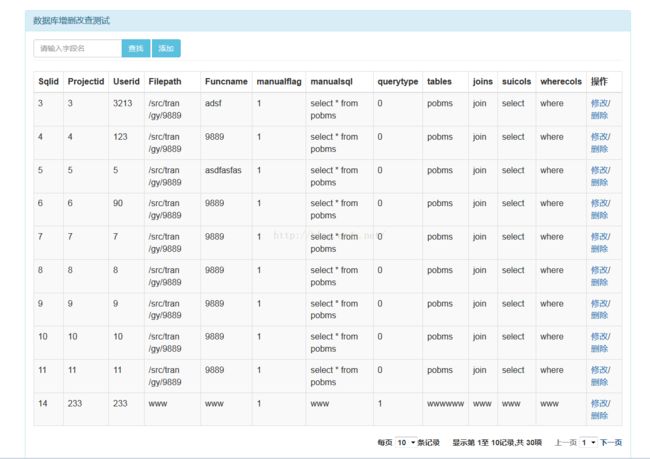
因为项目需要大量的表格,而leader又不允许使用已有的例如DataTables之类的表格框架,所以需要我自己手写一个表格控件
其实现的功能主要有
1.和后台controller交互,取数据,根据取得数据数量在页面显示数据
2.上一页,下一页
3.指定某一页
4.显示当前数据总数,显示的个数
5.修改数据
6.删除数据
7.项目主要使用的技术就是简单的springMVC+Ajax刷新
以上因为是我写的,所以可能在性能方面还有需要优化,基本功能暂时就想到这么多了,下面开始进入正题,最终实现的效果如下所示
第一步,因为我们使用了webservice,所以webservice提供了一系列接口,这里不一一介绍,后面使用到的时候再给大家说
上面正式打开webservice,其中数据库连接使用了jdbc方式,这个和前端也没什么大关系
第二步,主要写了几个文件,分别是table.js,table.jsp,其中js用来画表格和页面,jsp是用来显示
下面具体描述每项功能实现及其方法
a.查找功能
jsp页面代码如下(只摘取重要部分)
<div class="panel-body">
     <div class="form-inline" >
         <div class="input-group col-md-3" style="margin-top:0px positon:relative">
             <input type="text" class="form-control" name="selectName" id="selectName" placeholder="请输入字段名" / >
                   <span class="input-group-btn">
                        <button id="selectSqlButton" class="btn btn-info btn-search">查找</button>
                              <button class="btn btn-info btn-search" data-toggle="modal" data-target="#myModal" style="margin-left:3px">添加</button>
                   </span>
          </div>
      </div>
      <hr style="margin-top:5px"/>
      <!-- 表格,使用ajax返回刷新 -->
      <div class="table-responsive" >
           <table class="table table-striped table-bordered">
             <thead>
               <tr>
                  <th>Sqlid</th>
                  <th>Projectid</th>
                  <th>Userid</th>
                  <th>Filepath</th>
                  <th>Funcname</th>
                  <th>manualflag</th>
                  <th>manualsql</th>
                  <th>querytype</th>
                  <th>tables</th>
                  <th>joins</th>
                  <th>suicols</th>
                  <th>wherecols</th>
                  <th>操作</th>
               </tr>
           </thead>
         <tbody id="sqlTables">
         </tbody>
         </table>
        </div>

 <!-- 每页显示几条记录 -->
 <div id="bottomTool" style="float:right">
     <label>每页
         <select id="pageSize" onchange="research()" size="1">
          <option selected="selected">10</option>
          <option>15</option>
          <option>20</option>
          <option>30</option>
         </select>条记录
     </label>
     <label>显示第
       <label id="startItem"></label>至
       <label id="endItem"></label>记录,共
       <label id="allItem"></label>项
     </label>
     <label>
        <a id="previousPage" style="color:gray">上一页</a>
         <select id="PageNumDetail" onchange="selectPage()" size="1">
         </select>
        <a id="nextPage" style="color:gray">下一页</a>
     </label>
 </div>
 </div>
 </div>
 </div>
上面代码就是页面涉及到查找功能的部分代码,这里把字段固定了,每个操作都有对应的按钮和id,下面看看table.js文件是怎么实现查找功能的
var SqlForSelect;

/*设置表头不自动换行*/
$(document).ready(function() {
	$("th").css("white-space","nowrap");
});

/*更新数据字典表格*/
function refreshTable(sqlTables){
       //清空表格
      $("#sqlTables").html("");
       //根据传入的数据进行循环制表
      for(i in sqlTables){
           $("#sqlTables").append("<tr><td>"+sqlTables[i].sqlid+
                   "</td><td>"+sqlTables[i].projectid+
                   "</td><td>"+sqlTables[i].userid+
                   "</td><td>"+sqlTables[i].filepath+
                   "</td><td>"+sqlTables[i].funcname+
                   "</td><td>"+sqlTables[i].manualflag+
                   "</td><td>"+sqlTables[i].manualsql+
                   "</td><td>"+sqlTables[i].querytype+
                   "</td><td>"+sqlTables[i].tables+
                   "</td><td>"+sqlTables[i].joins+
                   "</td><td>"+sqlTables[i].suicols+
                   "</td><td>"+sqlTables[i].wherecols+
                   "</td><td>"+"<a href='javascript:void(0)' id='"+sqlTables[i].sqlid+"' onclick='editSql(this)' data-toggle='modal' data-target='#editMyModal'>修改</a>/<a href='javascript:void(0)' id='"+sqlTables[i].sqlid+"' onclick='deleteSql(this)'>删除</a>"+
                   "</td><tr>");
         }
};
上面代码先定义一个全局变量SqlForSelect,再设置了th的white-space属性,让其不要自动换行,关于这个,可以参考我写的 jsp中为表格添加水平滚动条这篇文章
接着refreshTable用来刷新页面表格,最后一列添加两个a标签用来响应修改和删除操作
下一步,我们需要写几个函数,分别用来更新页面显示的资源,例如开始和结束条目啊,总个数,控制上下页流程,代码如下
/*更新页面显示开始和结束数目*/
function refreshCount(countOfSqlName,currentPage,numOfPage){
	document.getElementById("allItem").innerHTML = countOfSqlName;
	var startItem=0;
	var endItem=0;
	var itemsPerPage = getItemsPerPage();
	if(currentPage<numOfPage){
		startItem=--currentPage*itemsPerPage;
		endItem=parseInt(startItem)+parseInt(itemsPerPage);
		startItem++;
	}else if(currentPage==numOfPage){
		startItem=--currentPage*itemsPerPage;
		endItem=countOfSqlName;
		startItem++;
	}
	document.getElementById("startItem").innerHTML = startItem;
	document.getElementById("endItem").innerHTML = endItem;
};
将ajax传过来的数据分别放入到页面标签内容中,关于显示当前页面显示的记录从多少条到多少条的算法就不做说明,下一步代码如下所示
/*更新当前页面以及控制上下页显示逻辑*/
function refreshCurrentPage(numOfPage,currentPage){
	$("#PageNumDetail").html("");
	var i=1;
	for(i=1;i<=numOfPage;i++){
           $("#PageNumDetail").append("<option>"+i+"</option>");
         }
    //设置当前页面值
    var select = document.getElementById("PageNumDetail");
    var currentPageForSql = currentPage;
    //options[]下标从0开始
    select.options[--currentPageForSql].selected = true;
	//判断页面如果为第一页,则将上一页设为不可选,如果不为第一页,则将按钮置为可选
    if(currentPage <= 1){
    	$("#previousPage").removeAttr("href");
    	$("#previousPage").css("color","grey");
    }else if(currentPage >1){
    	$("#previousPage").attr("href","javascript:previousPage()");
    	$("#previousPage").css("color","#23528C");
    }

    if (currentPage >= numOfPage){
    	$("#nextPage").removeAttr("href");
    	$("#nextPage").css("color","grey");
    }else{
    	$("#nextPage").attr("href","javascript:nextPage()");
    	$("#nextPage").css("color","#23528C");
    }
};
上述代码用来控制页面上下页码显示逻辑,在第一页,上一页不可选,最后一页,下一页不可选
/*获得页面的currentPage和 getItemsPerPag*/
function getCurrentPage(){
	return $('#PageNumDetail option:selected').val();
};
function getItemsPerPage(){
	return $('#pageSize option:selected').val();

};
上述代码用来对当前页的select控件进行控制,自动调节到当前页码
=======================================
上面的几个函数介绍完以后,我们看看ajax来请求查找命令是怎么实现的,代码如下
/*执行查找命令*/
$(function(){
	$('#selectSqlButton').click(function(){
		var selectSqlName = $('#selectName').val();
		$.ajax({
			type : "GET",
			url : "SelectSqlByName.do",
			data : {"selectName":selectSqlName,"currentPage":0,"itemsPerPag":10},
			dataType: "json",
			error: function(){
				alertLogin();
			},
			success : function(msg) {
				if(msg.errorInfo == 0){
				refreshTable(msg.sqls);
				refreshCurrentPage(msg.numOfPage,msg.currentPage);
				refreshCount(msg.countOfSqlName,msg.currentPage,msg.numOfPage);
				}else
				alert("查无数据");
			}
		});
	});
});
通过
$('#selectName').val()获得用户输入的查找命令,向controller发送SelectSqlByName请求,传入页面参数,在success里面进行几个页面的刷新
接下来,看看conrtoller里面是如何匹配到selectSqlByName这个方法的
 @RequestMapping(value = "/SelectSqlByName",method = RequestMethod.GET,produces
			 ={"application/json;charset=UTF-8"})
	    public @ResponseBody Map<String, Object> listSqls(Model model,HttpServletRequest request,HttpServletResponse res) {
		 	//每次都查询,避免数据字典改变
		 	Map<String, Object> map = new HashMap<String, Object>();
		 	int errorInfo = 0;
		 	Integer currentPage = Integer.parseInt(request.getParameter("currentPage"));
		 	Integer itemsPerPag = Integer.parseInt(request.getParameter("itemsPerPag"));
		 	String selectName = request.getParameter("selectName");


		 	long begin =System.currentTimeMillis();


                        //这里使用的是webservice接口函数
		 	factory = new ClientProxyFactoryBean();
		 	factory.setAddress("http://localhost:9000/Hello");
			factory.getServiceFactory().setDataBinding(new AegisDatabinding());
			client = factory.create(HelloWorld.class);
			List<Cptsql> list = client.pageSelectCptsql(selectName, currentPage, itemsPerPag);

			long end =System.currentTimeMillis();
			System.out.println("两个时间差为:"+(end-begin));

		 	//取页码数目
		 	int countOfDicName = client.pageSelectCptsqlCount(selectName);
		 	if (countOfDicName == 0){
		 		errorInfo = 1;
		 		currentPage=1;
		 		map.put("currentPage", currentPage);
		 		map.put("errorInfo",errorInfo);
		 		return map;
		 	}else{
			 	double tempDouble = itemsPerPag;
			 	double numOfPage = Math.ceil(countOfDicName/tempDouble);
			 	errorInfo = 0;
			 	currentPage=1;
			 	map.put("countOfSqlName", countOfDicName);
			 	map.put("sqls", list);
			 	map.put("numOfPage", numOfPage);
			 	map.put("currentPage", currentPage);
			 	map.put("errorInfo",errorInfo);
		        return map;
		 	}
	    }
调用了webservice函数,这个函数实现不多做说明,如果没有学过webservice可以自己写一个service和implement实现,做一个挡板进行数据的伪造
到这里,查找功能基本实现了
b.上下页
上下页码的实现很简单,用的也是ajax请求
/*获取下一页*/
function nextPage(){
	//参数获取
	var currentPage = getCurrentPage();
	var itemsPerPage = getItemsPerPage();
	var selectSqlName = $('#selectName').val();
	var getNextPage = 1;

		$.ajax({
			type : "GET",
			url : "SelectNextPageForSql.do",
			data : {"selectName":selectSqlName,"currentPage":currentPage,"itemsPerPag":itemsPerPage},
			dataType: "json",
			error: function(){alertLogin();},
			success : function(msg) {
				$('#sqlid').val(msg.sqls);
				refreshTable(msg.sqls);
					refreshCurrentPage(msg.numOfPage,msg.currentPage);
					refreshCount(msg.countOfSqlName,msg.currentPage,msg.numOfPage);
					refreshFooter();
			}
		});
};

/*获取上一页*/
function previousPage(){
	//参数获取
	var currentPage = getCurrentPage();
	var itemsPerPage = getItemsPerPage();
	var selectSqlName = $('#selectName').val();
	var getPreviousPage = 0;
		$.ajax({
			type : "GET",
			url : "SelectPreviousPageForSql.do",
			data : {"selectName":selectSqlName,"currentPage":currentPage,"itemsPerPag":itemsPerPage},
			dataType: "json",
			error: function(){alertLogin();},
			success : function(msg) {
				refreshTable(msg.sqls);
				refreshCurrentPage(msg.numOfPage,msg.currentPage);
				refreshCount(msg.countOfSqlName,msg.currentPage,msg.numOfPage);
				refreshFooter();
			}
		});
};
关于controller里面对上下页的匹配这里就不多做阐述了,主要就是针对传入的数据,将currentPage进行增减,再调用service函数,从而达到获取上下页的效果
C.指定某一页
同样的,直接从ajax请求谈起,代码如下
/*指定某一页操作*/
function selectPage(){
	//参数获取
	var currentPage = getCurrentPage();
	var itemsPerPage = getItemsPerPage();
	var selectSqlName = $('#selectName').val();
	var getPreviousPage = 0;
		$.ajax({
			type : "GET",
			url : "SelectPageForSql.do",
			data : {"selectName":selectSqlName,"currentPage":currentPage,"itemsPerPag":itemsPerPage},
			dataType: "json",
			error: function(){alertLogin();},
			success : function(msg) {
				refreshTable(msg.sqls);
				refreshCurrentPage(msg.numOfPage,msg.currentPage);
				refreshCount(msg.countOfSqlName,msg.currentPage,msg.numOfPage);
				refreshFooter();
			}
		});
}
这里使用的方法是selctPage(),通过之前页面定义的
<select id="PageNumDetail" onchange="selectPage()" size="1">当数值有change的时候就会触发这个方法,并将相应的参数发给controller,获得数据,最后调用统一的refresh函数
D.添加功能
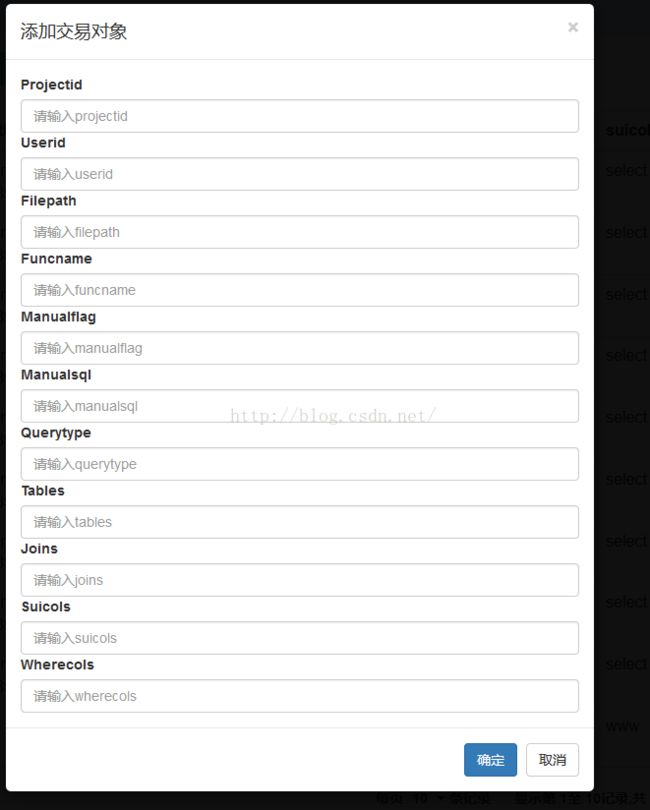
添加功能在这里主要涉及到bootstrap的modal框的使用,效果如下所示,点击页面添加按钮,弹出modal框
控制这个窗口的jsp代码是
<!-- 添加模态框(Modal) -->
	<div class="modal fade" id="myModal" tabindex="-1" role="dialog"
	   aria-labelledby="myModalLabel" aria-hidden="true">
	   <div class="modal-dialog">
	      <div class="modal-content">
	         <div class="modal-header">
	            <button type="button" class="close"
	               data-dismiss="modal" aria-hidden="true">
	                  ×
	            </button>
	            <h4 class="modal-title" id="myModalLabel">
	               添加交易对象
	            </h4>
	         </div>
		         <div class="modal-body">
		            <label>Projectid</label><input type="text" name="projectid" class="form-control" id="projectidForAdd" placeholder="请输入projectid" / >
		            <label>Userid</label><input type="text" name="userid" class="form-control" id="useridForAdd" placeholder="请输入userid" / >
		            <label>Filepath</label><input type="text" name="filepath" class="form-control" id="filepathForAdd" placeholder="请输入filepath" / >
		            <label>Funcname</label><input type="text" name="funcname" class="form-control" id="funcnameForAdd" placeholder="请输入funcname" / >
		            <label>Manualflag</label><input type="text" name="manualflag" class="form-control" id="manualflagForAdd" placeholder="请输入manualflag" / >
		            <label>Manualsql</label><input type="text" name="manualsql" class="form-control" id="manualsqlForAdd" placeholder="请输入manualsql" / >
		            <label>Querytype</label><input type="text" name="querytype" class="form-control" id="querytypeForAdd" placeholder="请输入querytype" / >
		            <label>Tables</label><input type="text" name="tables" class="form-control" id="tablesForAdd" placeholder="请输入tables" / >
		            <label>Joins</label><input type="text" name="joins" class="form-control" id="joinsForAdd" placeholder="请输入joins" / >
		            <label>Suicols</label><input type="text" name="suicols" class="form-control" id="suicolsForAdd" placeholder="请输入suicols" / >
		            <label>Wherecols</label><input type="text" name="wherecols" class="form-control" id="wherecolsForAdd" placeholder="请输入wherecols" / >
		         </div>
		         <div class="modal-footer">
		            <button id="addSql" class="btn btn-primary" data-dismiss="modal">
		               	确定
		            </button>
		            <button type="button" class="btn btn-default"
		               data-dismiss="modal">取消
		            </button>
		         </div>
	      </div><!-- /.modal-content -->
	</div><!-- /.modal -->
	</div>
通过
<button class="btn btn-info btn-search" data-toggle="modal" data-target="#myModal" style="margin-left:3px">添加</button>这个button的data-toggle和data-target属性,点击添加按钮,会打开模态框,在模态框内将布局写好,最后在modal-footer里,点击确定,触发js里对应的方法,js代码如下
/*这是Ajax添加选项*/
$(function() {
	$("#addSql").click(function() {
		var projectid=$("#projectidForAdd").val();
		var userid=$("#useridForAdd").val();
		var filepath=$("#filepathForAdd").val();
		var funcname=$("#funcnameForAdd").val();
		var manualflag=$("#manualflagForAdd").val();
		var manualsql=$("#manualsqlForAdd").val();
		var querytype=$("#querytypeForAdd").val();
		var tables=$("#tablesForAdd").val();
		var joins=$("#joinsForAdd").val();
		var suicols=$("#suicolsForAdd").val();
		var wherecols=$("#wherecolsForAdd").val();
		$.ajax( {
			type : "GET",
			url : "addSql.do",
			data : {"projectid":projectid,"userid":userid,"filepath":filepath,"funcname":funcname,"manualflag":manualflag,"manualsql":manualsql,"querytype":querytype,"tables":tables,"joins":joins,"suicols":suicols,"wherecols":wherecols},
			contentType : "application/json",
			dataType: "json",
			error: function(){alertLogin();},
			success : function(msg) {
				alert('恭喜你,添加成功!');
				refreshTable(msg.list);
				refreshCurrentPage(msg.numOfPage,msg.currentPage);
				refreshCount(msg.countOfSqlName,msg.currentPage,msg.numOfPage);
				refreshFooter();
			}
		});
	});
});
这段js代码首先获得用户在模态框里输入的值,在把这些参数传到controller( 后期可以考虑将这些数据组成map进行发送)
controller部分对于这个addSql的操作为
//添加
	 @RequestMapping(value = "/addSql",method = RequestMethod.GET,produces
			 ={"application/json;charset=UTF-8"})
	    public @ResponseBody Object addObject(HttpServletRequest request,HttpServletResponse res) throws UnsupportedEncodingException{
		 //将传进来的文字进行编码,不然会出现中文乱码错误
		 Map<String, Object> map = new HashMap<String, Object>();
		 int currentPage = 0;
		 int itemsPerPag = 10;
		 String projectid = new String(request.getParameter("projectid").getBytes("ISO-8859-1"),"utf-8") ;
		 String userid = new String(request.getParameter("userid").getBytes("ISO-8859-1"),"utf-8") ;
		 String filepath=new String(request.getParameter("filepath").getBytes("ISO-8859-1"),"utf-8") ;
		 String funcname=new String(request.getParameter("funcname").getBytes("ISO-8859-1"),"utf-8") ;
		 String manualflag=new String(request.getParameter("manualflag").getBytes("ISO-8859-1"),"utf-8") ;
		 String manualsql=new String(request.getParameter("manualsql").getBytes("ISO-8859-1"),"utf-8") ;
		 String querytype=new String(request.getParameter("querytype").getBytes("ISO-8859-1"),"utf-8") ;
		 String tables=new String(request.getParameter("tables").getBytes("ISO-8859-1"),"utf-8") ;
		 String joins=new String(request.getParameter("joins").getBytes("ISO-8859-1"),"utf-8") ;
		 String suicols=new String(request.getParameter("suicols").getBytes("ISO-8859-1"),"utf-8") ;
		 String wherecols=new String(request.getParameter("wherecols").getBytes("ISO-8859-1"),"utf-8") ;

		 factory = new ClientProxyFactoryBean();
	 	factory.setAddress("http://localhost:9000/Hello");
		factory.getServiceFactory().setDataBinding(new AegisDatabinding());
		client = factory.create(HelloWorld.class);
		 int maxId = client.maxSqlid();
		 com.spdb.domain.Cptsql addObj = new com.spdb.domain.Cptsql();
		 addObj.setSqlid(maxId+1);
		 addObj.setFilepath(filepath);
		 addObj.setFuncname(funcname);
		 addObj.setJoins(joins);
		 addObj.setManualflag(manualflag);
		 addObj.setManualsql(manualsql);
		 addObj.setProjectid(new Integer(projectid));
		 addObj.setQuerytype(querytype);
		 addObj.setSuicols(suicols);
		 addObj.setTables(tables);
		 addObj.setUserid(new Integer(userid));
		 addObj.setWherecols(wherecols);

	     //存储objTemp
	     client.insertCptsql(addObj);

	     //查找并返回
	     int countOfSqlName = client.pageSelectCptsqlCount(funcname);
	     List<com.spdb.domain.Cptsql> list = client.pageSelectCptsql(
	    		 funcname, currentPage, itemsPerPag);
	     currentPage=1;
	   //取页码数目,实时刷新,保证没有垃圾数据
		 double tempDouble = 10;
		 double numOfPage = Math.ceil(countOfSqlName/tempDouble);

	     map.put("countOfSqlName", countOfSqlName);
		 map.put("list", list);
		 map.put("numOfPage", numOfPage);
		 map.put("data", "data");
		 map.put("currentPage", currentPage);
		 return map;
	 }
注意这里要使用到
<span style="color:#FF0000;">produces={"application/json;charset=UTF-8"
</span><pre name="code" class="javascript">和(request.getParameter("projectid").getBytes("ISO-8859-1"),"utf-8"
对数据页面传入的字符串和传回给页面的字符串进行编码,避免产生乱码
主要的操作就和我在代码中备注的一样,其中同样调用的是webservice的方法
client.insertCptsql(addObj);进行添加,最后再通过添加的名字来获取所有同名的字符,相当于再做一次查找,返回给页面,从而对用户视觉有良好的过度效果
E.修改功能
修改功能和添加功能类似,都是使用的modal窗口进行的,其中在jsp代码方面,和 添加的唯一不同的地方在于
 <div class="modal-footer">
		            <button id="editObj" class="btn btn-primary" data-dismiss="modal">
		               	确定
		            </button>
		            <button type="button" class="btn btn-default"
		               data-dismiss="modal">取消
		            </button>
		            <button type="button" class="btn btn-default" id="test" onclick="refreshModalWhenEdit()">重置
		            </button>
 </div>
这里添加了重置功能,其具体实现的流程如下
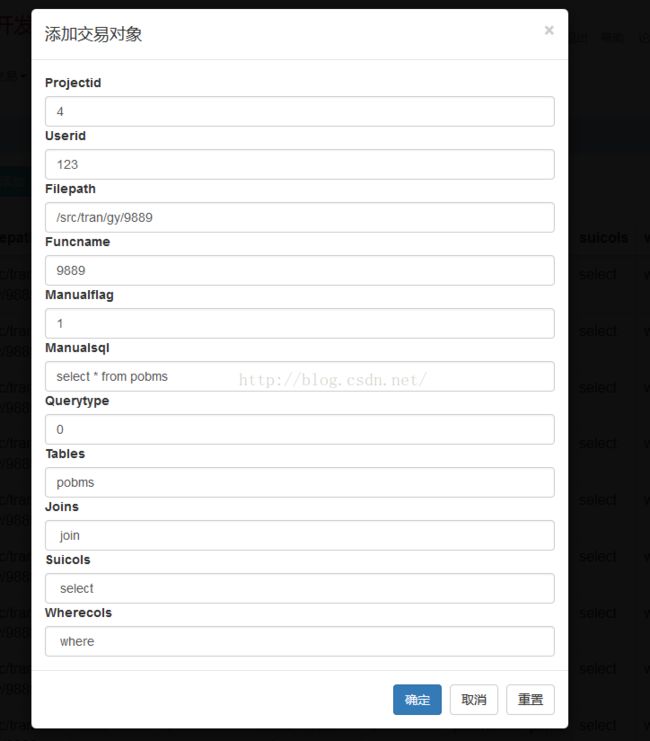
需要说明的是,这里当用户点击修改功能按钮的时候,会弹出当前的项目的值,如下图所示
点击后,出现原来的值,这个是怎么实现的呢?很简单,通过js代码控制,让我们看看js代码
"</td><td>"+"<a href='javascript:void(0)' id='"+sqlTables[i].sqlid+"' onclick='editSql(this)' data-toggle='modal' data-target='#editMyModal'>修改</a>/<a href='javascript:void(0)' id='"+sqlTables[i].sqlid+"' onclick='deleteSql(this)'>删除</a>"+
//修改操作
function editSql(obj)
{
	$.ajax( {
		type : "GET",
		url : "GetSqlByIdForUpdate.do",
		data : {"sqlid":obj.id},
		contentType : "application/json",
		dataType: "json",
//		error: function(){alertLogin();},
		success : function(msg) {
			SqlForSelect = msg.selectSql;
			refreshModalWhenEdit();
		}
	});

}
这两段代码,第一段是之前refreshtable()方法里面的一段,点击修改以后,触发editSql方法,将this传给editSql中的obj参数,然后调用ajax请求,将obj.id发给后台,后台再查询一次数据(为什么要每次都要查询,因为有可能在用户点击修改的时候,后台数据库发生变化,所以这时候需要再查询一次,后期可以通过广播方式进行通知,判断)
最后置全局变量SqlForSelect为获取的值,调用refreshModalWhenEdit方法,那么这个方法是如何定义的呢,很简单
/*控制修改页面显示原值*/
function refreshModalWhenEdit(){
			document.getElementById("projectidForEdit").value=SqlForSelect.projectid;
			document.getElementById("useridForEdit").value = SqlForSelect.userid;
		    document.getElementById("filepathForEdit").value = SqlForSelect.filepath;
		    document.getElementById("funcnameForEdit").value =SqlForSelect.funcname;
		    document.getElementById("manualflagForEdit").value = SqlForSelect.manualflag;
		    document.getElementById("manualsqlForEdit").value = SqlForSelect.manualsql;
		    document.getElementById("querytypeForEdit").value = SqlForSelect.querytype;
		    document.getElementById("tablesForEdit").value = SqlForSelect.tables;
		    document.getElementById("joinsForEdit").value = SqlForSelect.joins;
		    document.getElementById("suicolsForEdit").value =SqlForSelect.suicols;
		    document.getElementById("wherecolsForEdit").value = SqlForSelect.wherecols;
}
简单的说就是把modal框里的值一个个填充进去(
目前这里可能造成显示先后顺序的问题,如果网络卡的情况下,可能页面出现一段事件后里面才会填充,目前由于公司开发使用统一的内网,暂时未出现此问题)
最后用户点击确定的时候,调用
$(function() {
	$("#editObj").click(function() {
		var sqlId= SqlForSelect.sqlid;
		var projectid=$("#projectidForEdit").val();
		var userid=$("#useridForEdit").val();
		var filepath=$("#filepathForEdit").val();
		var funcname=$("#funcnameForEdit").val();
		var manualflag=$("#manualflagForEdit").val();
		var manualsql=$("#manualsqlForEdit").val();
		var querytype=$("#querytypeForEdit").val();
		var tables=$("#tablesForEdit").val();
		var joins=$("#joinsForEdit").val();
		var suicols=$("#suicolsForEdit").val();
		var wherecols=$("#wherecolsForEdit").val();
		$.ajax( {
			type : "GET",
			url : "editSql.do",
			data : {"sqlId":sqlId,"projectid":projectid,"userid":userid,"filepath":filepath,"funcname":funcname,"manualflag":manualflag,"manualsql":manualsql,"querytype":querytype,"tables":tables,"joins":joins,"suicols":suicols,"wherecols":wherecols},
			contentType : "application/json",
			dataType: "json",
//			error: function(){alertLogin();},
			success : function(msg) {
				alert('恭喜你,修改成功!');
				refreshTable(msg.list);
				refreshCurrentPage(msg.numOfPage,msg.currentPage);
				refreshCount(msg.countOfSqlName,msg.currentPage,msg.numOfPage);
				refreshFooter();
			}
		});
	});
});
发送请求即可,后台的controller就不多做说明了,和添加类似
关于重置方法的实现很简单,点击重置按钮,再调用
refreshModalWhenEdit()即可
F.删除功能
删除功能的实现更简单了,用户点击删除 按钮以后
//删除操作
function deleteSql(obj)
{
	var selectSqlName = $('#selectName').val();
	$.ajax( {
		type : "GET",
		url : "deleteSql.do",
		data : {"sqlid":obj.id,"selectSqlName":selectSqlName},
		contentType : "application/json",
		dataType: "json",
		success : function(msg) {
			alert("删除成功");
			refreshTable(msg.list);
			refreshCurrentPage(msg.numOfPage,msg.currentPage);
			refreshCount(msg.countOfSqlName,msg.currentPage,msg.numOfPage);
			refreshFooter();
		}
	});
}
把id发给后台,调用删除函数即可
这里之所以还要再获取一次selectSqlName是因为用户视觉统一性而言
就是点击删除以后,页面应该再刷新一次,显示刚刚搜索名字的结果(这时候,删除的那条已经不在了)
=====================================
到这里,基本上table的表的这些功能已经实现完了,我是个接触前端开发刚一两个月的新人,说的比较多和繁
总结一下就是js里面控制每个操作的方法,尤其是下面三个共用的方法要高度抽象化,这样为我们代码书写省去了很多麻烦
refreshTable(msg.list);
refreshCurrentPage(msg.numOfPage,msg.currentPage);
refreshCount(msg.countOfSqlName,msg.currentPage,msg.numOfPage);
大家有什么问题欢迎及时指正,谢谢!


