cardview和Palette,ActionBar颜色随图改变
CardView是一个控件,Palette是取色工具(工具类),本文会对他们进行比较细致的介绍,相信机制的各位看完一定轻而易举地实现ActionBar随图改变的特效。
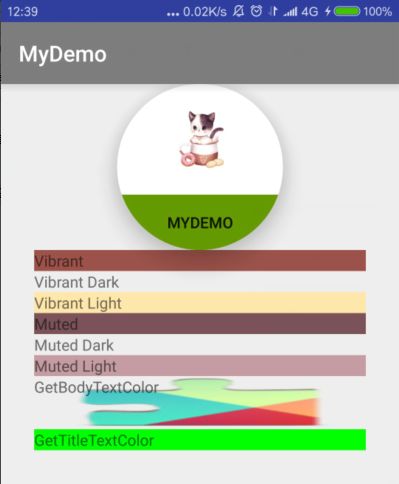
首先看一下效果图:
Gradle(Module:app)配置
dependencies {
    compile fileTree(dir: 'libs', include: ['*.jar'])
    compile 'com.android.support:appcompat-v7:24.0.0'
    compile 'com.android.support:cardview-v7:24.0.+'
    compile 'com.android.support:palette-v7:24.0.+'
}
Cardview
cardview可以理解成带圆角,内边距,阴影的FrameLayout,它本身也是继承自FrameLayout,使用的时候内部再嵌套一个自己喜欢的布局文件,就可以随意使用了,记得在Xml布局开头加这一段话:
xmlns:app="http://schemas.android.com/apk/res-auto"cardview的可选属性:
- app:cardBackgroundColor这是设置背景颜色
- app:cardCornerRadius这是设置圆角大小
- app:cardElevation这是设置z轴的阴影
- app:cardMaxElevation这是设置z轴的最大高度值
- app:cardUseCompatPadding是否使用CompatPadding
- app:cardPreventCornerOverlap是否使用
- app:contentPadding 设置内容的padding
- app:contentPaddingLeft 设置内容的左padding
- app:contentPaddingTop 设置内容的上padding
- app:contentPaddingRight 设置内容的右padding
- app:contentPaddingBottom 设置内容的底padding
card_view:cardUseCompatPadding 设置内边距,V21+的版本和之前的版本仍旧具有一样的计算方式
card_view:cardPreventConrerOverlap 在V20和之前的版本中添加内边距,这个属性为了防止内容和边角的重叠
Palette
相当于一个图片的颜料吸管,使用的时候传入一个Bitmap 对象,至于取什么颜色就让代码处理了,也有可能会取不到颜色,使用的时候注意判断即可。
创建Palette实例
1. 第一种方式:
    public void initPalette2(int imgId, final View view){
        Bitmap bitmap = BitmapFactory.decodeResource( getResources(), imgId);
        Palette.from( bitmap ).generate( new Palette.PaletteAsyncListener() {
            @Override
            public void onGenerated( Palette palette ) {
                //在这里调用Palette对象
                //view.setBackgroundColor(.......);
            }
        });
    }
2. 第二种方式:
    private Palette mPalette;
    public void initPalette(int imgId) {
        //对象实例化
        Bitmap bm = BitmapFactory.decodeResource(getResources(), imgId);
        mPalette = Palette.from(bm).generate();
    }
3. 最实用的方式
获取Drawable对象,
如果是ImageView就这样:img.getDrawable();
如果是Button就这样:btn.getBackground(),
然后把获取的Drawable传入下面这个方法,关于Drawable转Bitmap文章后面还会介绍:
    private Palette mPalette;
    public void initPalette(Drawable drawable) {
        //对象实例化
        mPalette = Palette.from(((BitmapDrawable) drawable).getBitmap()).generate();
    }
Palette这个类中提取颜色的方式:
需要注意的是getVibrantSwatch()返回一个swatch对象,也可能会返回一个null值,所以检查一下是必须的,一共6种方式:
- Vibrant (有活力)Palette.getVibrantSwatch()
- Vibrant dark(有活力 暗色)Palette.getDarkVibrantSwatch()
- Vibrant light(有活力 亮色)Palette.getLightVibrantSwatch()
- Muted (柔和)Palette.getMutedSwatch()
- Muted dark(柔和 暗色)Palette.getDarkMutedSwatch()
- Muted light(柔和 亮色)Palette.getLightMutedSwatch()
更加实用的方法:
上面的6种方法都有一个与之对应的GetColor的方法,参数是颜色的默认值(int类型),取不到颜色的时候就用默认值
Palette.getDarkMutedColor(Color.GREEN)
swatch对象有以下方法:
- getPopulation(): 像素总数 the amount of pixels which this swatch
represents. - getRgb(): the RGB value of this color.
- getHsl(): 色相(H)、饱和度(S)、明度(L),the HSL value of this color.
- getBodyTextColor(): the RGB value of a text color which can be
displayed on top of this color. - getTitleTextColor(): the RGB value of a text color which can be
displayed on top of this color.
TextView 有个背景图片,要想让字体颜色能够和背景图片匹配,则使用getBodyTextColor()比较合适,getTitleTextColor()其实应该和getBodyTextColor()差不多。
获取全部swatch
你还可以使用如下方法一次性获得所有的swatch:
List<Palette.Swatch> swatches = palette.getSwatches();
在上面的代码中,你可能注意到了可以设置palette的size。size越大,花费的时间越长,而越小,可以选择的色彩也越小。最佳的选择是根据image的用途:头像之类的,size最好在24-32之间;风景大图之类的 size差不多在8-16;默认是16.
- maximunColorCount(int
numOfSwatches)允许你改变从bitmap中生成的Swatch的数量,默认的数量为16.
生成越多的Swatch对象需要耗费越多的时间去生成Palette对象. - resizeBitmapSize(int maxDimension)重新调整bitmap的大小,因此它最大的尺寸只能是此方法定义的最大值.
bitmap越大,生成Palette对象的时间就越长. 同样的,更小的bitmap将会处理得更快些,但是这样的话你可能将会失去颜色的精度.
Drawable换Bitmap
简单的强转了一下,将Drawable转换为Bitmap
   public Bitmap drawableToBitamp(Drawable drawable) {
        BitmapDrawable bd = (BitmapDrawable) drawable;
        return bd.getBitmap();
    }
繁琐的drawable转Bitamp方法,使用Canvas重新绘制了一个Bitmap,速度较慢
public Bitmap drawable2Bitamp(Drawable drawable) {
        int w = drawable.getIntrinsicWidth();
        int h = drawable.getIntrinsicHeight();
        Bitmap.Config config =
                drawable.getOpacity() != PixelFormat.OPAQUE ? Bitmap.Config.ARGB_8888
                        : Bitmap.Config.RGB_565;
        Bitmap bitmap = Bitmap.createBitmap(w, h, config);
        //注意,下面三行代码要用到,否在在View或者surfaceview里的canvas.drawBitmap会看不到图
        Canvas canvas = new Canvas(bitmap);
        drawable.setBounds(0, 0, w, h);
        drawable.draw(canvas);
        return bitmap;
    }
源码:
Java文件:
public class TestCardView extends AppCompatActivity {
    private Palette mPalette;

    @Override
    protected void onCreate(Bundle savedInstanceState) {
        super.onCreate(savedInstanceState);
        setContentView(R.layout.activity_card_view);
        this.init();
    }


    public void init() {
        ImageView img= (ImageView) findViewById(R.id.car_view_img);
        initPalette(img.getDrawable());
        TextView tv1 = (TextView) findViewById(R.id.car_view_txt_1);
        TextView tv2 = (TextView) findViewById(R.id.car_view_txt_2);
        TextView tv3 = (TextView) findViewById(R.id.car_view_txt_3);
        TextView tv4 = (TextView) findViewById(R.id.car_view_txt_4);
        TextView tv5 = (TextView) findViewById(R.id.car_view_txt_5);
        TextView tv6 = (TextView) findViewById(R.id.car_view_txt_6);
        TextView tv7 = (TextView) findViewById(R.id.car_view_txt_7);
        TextView tv8 = (TextView) findViewById(R.id.car_view_txt_8);

        //设置Actionbar的颜色
        getSupportActionBar().setBackgroundDrawable(
                new ColorDrawable(mPalette.getLightVibrantSwatch().getTitleTextColor()));

        //使用Swatch对象取色
        if (mPalette.getVibrantSwatch() != null)
            tv1.setBackgroundColor(mPalette.getVibrantSwatch().getRgb());
        if (mPalette.getDarkVibrantSwatch() != null)
            tv2.setBackgroundColor(mPalette.getDarkVibrantSwatch().getRgb());
        if (mPalette.getLightVibrantSwatch() != null)
            tv3.setBackgroundColor(mPalette.getLightVibrantSwatch().getRgb());
        if (mPalette.getMutedSwatch() != null)
            tv4.setBackgroundColor(mPalette.getMutedSwatch().getRgb());
        if (mPalette.getDarkMutedSwatch() != null)
            tv5.setBackgroundColor(mPalette.getDarkMutedSwatch().getRgb());
        if (mPalette.getLightMutedSwatch() != null)
            tv6.setBackgroundColor(mPalette.getLightMutedSwatch().getRgb());

        //使用指定默认值的取色方法
        tv8.setBackgroundColor(mPalette.getDarkMutedColor(Color.GREEN));

        //通过背景更换字体颜色,原先指定为红色,运行之后为灰色
        initPalette(tv7.getBackground());
        if (mPalette.getVibrantSwatch() != null)
            tv7.setTextColor(mPalette.getVibrantSwatch().getBodyTextColor());
    }


    public void initPalette(Drawable drawable) {
        //对象实例化
        mPalette = Palette.from(((BitmapDrawable) drawable).getBitmap()).generate();
    }
}
XML布局
<?xml version="1.0" encoding="utf-8"?>
<LinearLayout xmlns:android="http://schemas.android.com/apk/res/android" xmlns:card="http://schemas.android.com/apk/res-auto" xmlns:tools="http://schemas.android.com/tools" android:layout_width="match_parent" android:layout_height="match_parent" android:animateLayoutChanges="true" android:gravity="center_horizontal" android:orientation="vertical" tools:context=".souce.TestCardView">

    <android.support.v7.widget.CardView  android:layout_width="150dp" android:layout_height="150dp" card:cardBackgroundColor="#FFF" card:cardCornerRadius="75dp" card:cardElevation="25dp">

        <LinearLayout  android:layout_width="wrap_content" android:layout_height="wrap_content" android:gravity="center_horizontal" android:layout_gravity="center_horizontal" android:orientation="vertical">


            <ImageView  android:id="@+id/car_view_img" android:layout_width="100dp" android:layout_height="100dp" android:scaleType="fitXY" android:src="@drawable/card_view_img" />

            <Button  android:layout_width="150dp" android:layout_height="50dp" android:background="#669900" android:text="@string/app_name" />
        </LinearLayout>
    </android.support.v7.widget.CardView>


    <TextView  android:id="@+id/car_view_txt_1" android:layout_width="300dp" android:layout_height="wrap_content" android:text="Vibrant" />

    <TextView  android:id="@+id/car_view_txt_2" android:layout_width="300dp" android:layout_height="wrap_content" android:text="Vibrant Dark" />

    <TextView  android:id="@+id/car_view_txt_3" android:layout_width="300dp" android:layout_height="wrap_content" android:text="Vibrant Light" />

    <TextView  android:id="@+id/car_view_txt_4" android:layout_width="300dp" android:layout_height="wrap_content" android:text="Muted" />

    <TextView  android:id="@+id/car_view_txt_5" android:layout_width="300dp" android:layout_height="wrap_content" android:text="Muted Dark" />

    <TextView  android:id="@+id/car_view_txt_6" android:layout_width="300dp" android:layout_height="wrap_content" android:text="Muted Light" />


    <TextView  android:id="@+id/car_view_txt_7" android:layout_width="300dp" android:textColor="#F00" android:background="@drawable/common_ic_googleplayservices" android:layout_height="wrap_content" android:text="GetBodyTextColor" />


    <TextView  android:id="@+id/car_view_txt_8" android:layout_width="300dp" android:layout_height="wrap_content" android:text="GetTitleTextColor" />
</LinearLayout>