Unity Shader-后处理:景深
一.简介
景深一直是我最喜欢的效果之一,最早接触CE3的时候,发现CE引擎默认就支持景深的效果,当时感觉这个效果特别酷炫,如今投身于Unity的怀抱中,准备用Unity实现以下传说中的景深效果。
所谓景深,是摄影的一个专业术语:在聚焦完成后,在焦点前后的范围内都能形成清晰的像,这一前一后的距离范围,便叫做景深,也是被摄物体能清晰成像的空间深度。在景深范围内景物影像的清晰度并不完全一致,其中焦点上的清晰度是最高的,其余的影像清晰度随着它与焦点的距离成正比例下降。先附上一张正常的照片和使用景深控制的照片:

通过左右两张照片的对比,我们很容易发现,通过景深处理的照片,我们可以很容易地抓住照片的重点部分。这也就是景深最大的用处,能够突出主题,并且可以使画面更有层次感。
在摄影技术中的景深,是通过调整相机的焦距,光圈来控制景深的,这里就不多说了。而我们的游戏中要想出现这种效果,就需要下一番功夫了。首先拆分一下图像的效果,图像中主要分为两部分,后面的模糊背景和前面清晰的“主题”部分。后面的背景模糊我们可以通过前面的两篇文章Unity Shader-后处理:高斯模糊,Unity Shader后处理-均值模糊来实现,而前景部分就是一张清晰的场景图,最后通过一定的权值将两者混合,离摄像机(准确地说是焦距)越远的部分,模糊图片的权重越高,离摄像机越近的部分,清晰图片的权重越高。那么问题来了,我们怎么知道哪个部分离摄像机更近呢?
二.Camera Depth Texture
上面说到,我们要怎么得到摄像机渲染的这个场景的图片中哪个部分离我们更远,哪个部分离我们更近?答案就是Camera Depth Texture这个东东。从字面上理解这个就是相机深度纹理。在Unity中,相机可以产生深度,深度+法线或者运动方向纹理,这是一个简化版本的G-Buffer纹理,我们可以用这个纹理进行一些后处理操作。这张纹理图记录了屏幕空间所有物体距离相机的距离。深度纹理中每个像素所记录的深度值是从0 到1 非线性分布的。精度通常是 24 位或16 位,这主要取决于所使用的深度缓冲区。当读取深度纹理时,我们可以得到一个0-1范围内的高精度值。如果你需要获取到达相机的距离或者其他线性关系的值,那么你需要手动计算它。
关于这张图是怎么样产生的,在Unity5之前是通过一个叫做Shader ReplaceMent的操作完成的。这个操作简单来说就是临时把场景中所有的shader换成我们想要的shader,然后渲染到张图上,我们通过Shader ReplaceMent操作,将场景中的对象shader换成按照深度写入一张纹理图。我们可以在5.X版本之前Unity自带的Shader中找到这个生成深度图的shader:Camera-DepthTexture.shader,这里我摘出一小段Tags中RenderType为Opaque的subshader:
SubShader
{
	Tags { "RenderType"="Opaque" }
	Pass
	{
		CGPROGRAM
		#pragma vertex vert
		#pragma fragment frag
		#include "UnityCG.cginc"
		struct v2f
		{
			float4 pos : POSITION;
			#ifdef UNITY_MIGHT_NOT_HAVE_DEPTH_TEXTURE
			float2 depth : TEXCOORD0;
			#endif
		};

		v2f vert( appdata_base v )
		{
			v2f o;
			o.pos = mul(UNITY_MATRIX_MVP, v.vertex);
			UNITY_TRANSFER_DEPTH(o.depth);
			return o;
		}

		fixed4 frag(v2f i) : COLOR {
			UNITY_OUTPUT_DEPTH(i.depth);
		}

		ENDCG
	}
}
我们看到,当物体的渲染Tag为Opaque也就是不透明的时候,会写入深度纹理。而这个文件中其他的几个subshader也分别对针对不同类型的type,比如RenderType为TransparentCutout的subshader,就增加了一句下面的判断,去掉了所有应该透明的地方:
clip( texcol.a*_Color.a - _Cutoff );而且这个shader中没有出现RnderType为Transparent类型的,因为透明的物体不会写入我们的深度贴图,也就是说我们开启了alpha blend类型的对象是不会写入深度的。
上面的代码中有几个宏定义,我们可以从UnityCG.cginc文件中找到这几个宏定义的实现:
// Depth render texture helpers
#if defined(UNITY_MIGHT_NOT_HAVE_DEPTH_TEXTURE)
	#define UNITY_TRANSFER_DEPTH(oo) oo = o.pos.zw
	#define UNITY_OUTPUT_DEPTH(i) return i.x/i.y
#else
	#define UNITY_TRANSFER_DEPTH(oo)
	#define UNITY_OUTPUT_DEPTH(i) return 0
#endif
结合上面shader的使用,我们看出:UNITY_TRANSFER_DEPTH宏将传入vertex shader中的position的最后两位返回,也就是z坐标和w坐标,在unity里面也就是从屏幕向里看的那个方向就是z轴的方向。而UNITY_OUTPUT_DEPTH通过将z/w将真正的深度返回。UNITY_MIGHT_NOT_HAVE_DEPTH_TEXTURE是如果没有深度图的意思,也就是说,仅当没有获得深度图的时候,才会通过这个计算来计算深度,否则就无操作或者返回0。那么,这种情况下,深度信息从哪里来呢?我们看一下Unity的文档就知道了:
- UNITY_TRANSFER_DEPTH(o): computes eye space depth of the vertex and outputs it in o (which must be a float2). Use it in a vertex program when rendering into a depth texture. On platforms with native depth textures this macro does nothing at all, because Z buffer value is rendered implicitly.
- UNITY_OUTPUT_DEPTH(i): returns eye space depth from i (which must be a float2). Use it in a fragment program when rendering into a depth texture. On platforms with native depth textures this macro always returns zero, because Z buffer value is rendered implicitly.
也就是说,如果硬件支持硬件深度的话,也就是直接从z buffer取深度,那么这个宏就没有必要了,因为这样的话,z buffer的深度是隐式渲染的。
关于深度纹理,深度法线纹理,运动方向纹理 Unity官方文档有很好的介绍,我们就不多说了,下面我们看一下怎么在Unity中开启深度的渲染。通过Camera.DepthTextureMode这个变量我们就可以控制是否开启深度的渲染,默认这个值是None,我们可以将其设为None,Depth,DepthNormals三种类型。只要开启了Depth模式,我们就可以在shader中通过_CameraDepthTexture来获得屏幕深度的纹理了。 Unity官方文档中也有详细介绍。下面我们通过一个后处理来实现一个最简单的输出屏幕深度的效果:
C#脚本
using UnityEngine;
using System.Collections;

[ExecuteInEditMode]
public class DepthTextureTest : PostEffectBase
{
    void OnEnable()
    {
        GetComponent<Camera>().depthTextureMode |= DepthTextureMode.Depth;
    }

    void OnDisable()
    {
        GetComponent<Camera>().depthTextureMode &= ~DepthTextureMode.Depth;
    }

    void OnRenderImage(RenderTexture source, RenderTexture destination)
    {
        if (_Material)
        {
            Graphics.Blit(source, destination, _Material);
        }
    }
}
shader部分:
Shader "Custom/DepthTest" {

	CGINCLUDE
	#include "UnityCG.cginc"

	//仍然要声明一下_CameraDepthTexture这个变量,虽然Unity这个变量是unity内部赋值
	sampler2D _CameraDepthTexture;
	sampler2D _MainTex;
	float4	  _MainTex_TexelSize;

	struct v2f
	{
		float4 pos : SV_POSITION;
		float2 uv  : TEXCOORD0;
	};

	v2f vert(appdata_img v)
	{
		v2f o;
		o.pos = mul(UNITY_MATRIX_MVP, v.vertex);
		o.uv.xy = v.texcoord.xy;

		return o;
	}

	fixed4 frag(v2f i) : SV_Target
	{
		//直接根据UV坐标取该点的深度值
		float depth = SAMPLE_DEPTH_TEXTURE(_CameraDepthTexture, 1 - i.uv);
		//将深度值变为线性01空间
		depth = Linear01Depth(depth);
		return float4(depth, depth, depth, 1);
	}

	ENDCG

	SubShader
	{
		Pass
		{

			ZTest Off
			Cull Off
			ZWrite Off
			Fog{ Mode Off }

			CGPROGRAM
			#pragma vertex vert
			#pragma fragment frag
			ENDCG
		}

	}
}
找一个场景,将该脚本挂在摄像机并赋予材质。(注:PostEffectBase类为后处理基类,在 之前的文章中有详细实现,此处不予贴出),找到一个场景,我们测试一下:
原始场景效果:
开启输出深度后处理效果:
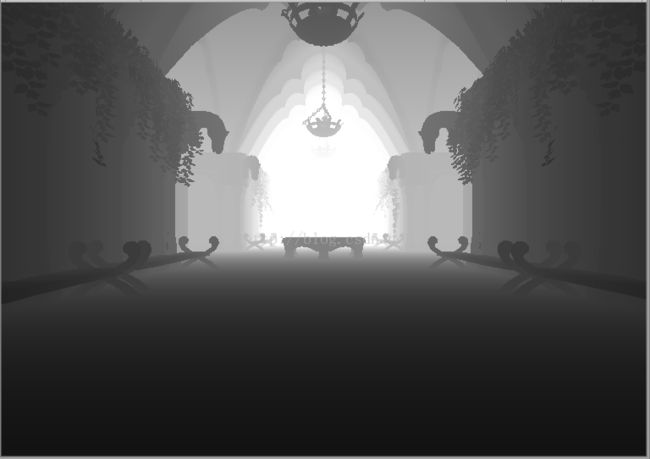
恩,场景图变成了一张黑白图像,越远的地方越亮,越近的地方越暗,也就是我们shader中所写的,直接按照深度值来输出了一幅图片。不过注意,这张图中,我把摄像机的远裁剪面调整到了50这一比较小的距离,这样,图中的远近信息显示得更加明显,而如果摄像机的远裁剪面距离很大,那么这张图的输出就会整体偏黑,因为离我们较近的物体距离占远裁剪面的距离太小了,几乎为0,所以就是黑的,如下图所示,当远裁剪面改为1000时深度图,仅有窗户的位置能看到白色:

关于CameraDepthTexture,在Unity4中CameraDepthTexture仍然是通过上面我们说的shader替换技术实现的,所以,一旦我们开启深度渲染,会导致DrawCall翻倍!而在Unity5中,这个CameraDepthTexture与Shadow Caster使用的是一套DepthTexture,通过带有Shadow Caster的对象才会被渲染到深度缓存中。关于Unity5和Unity4中深度缓存的渲染, 这篇文章介绍得很详细,可以进行参考。
三.景深效果实现
终于到了这篇文章的主题了,我们通过shader实现一个景深的效果。思路上面已经说过了,通过两张图片,一张清晰的,一张经过高斯模糊的,然后根据图片中每个像素的深度值在两张图片之间差值,就可以达到景深的效果了。下面附上景深效果代码:
shader部分:
Shader "Custom/DepthOfField" {

	Properties{
		_MainTex("Base (RGB)", 2D) = "white" {}
		_BlurTex("Blur", 2D) = "white"{}
	}

	CGINCLUDE
	#include "UnityCG.cginc"

	struct v2f_blur
	{
		float4 pos : SV_POSITION;
		float2 uv  : TEXCOORD0;
		float4 uv01 : TEXCOORD1;
		float4 uv23 : TEXCOORD2;
		float4 uv45 : TEXCOORD3;
	};

	struct v2f_dof
	{
		float4 pos : SV_POSITION;
		float2 uv  : TEXCOORD0;
		float2 uv1 : TEXCOORD1;
	};

	sampler2D _MainTex;
	float4 _MainTex_TexelSize;
	sampler2D _BlurTex;
	sampler2D_float _CameraDepthTexture;
	float4 _offsets;
	float _focalDistance;
	float _nearBlurScale;
	float _farBlurScale;

	//高斯模糊 vert shader(上一篇文章有详细注释)
	v2f_blur vert_blur(appdata_img v)
	{
		v2f_blur o;
		_offsets *= _MainTex_TexelSize.xyxy;
		o.pos = mul(UNITY_MATRIX_MVP, v.vertex);
		o.uv = v.texcoord.xy;

		o.uv01 = v.texcoord.xyxy + _offsets.xyxy * float4(1, 1, -1, -1);
		o.uv23 = v.texcoord.xyxy + _offsets.xyxy * float4(1, 1, -1, -1) * 2.0;
		o.uv45 = v.texcoord.xyxy + _offsets.xyxy * float4(1, 1, -1, -1) * 3.0;

		return o;
	}

	//高斯模糊 pixel shader(上一篇文章有详细注释)
	fixed4 frag_blur(v2f_blur i) : SV_Target
	{
		fixed4 color = fixed4(0,0,0,0);
		color += 0.40 * tex2D(_MainTex, i.uv);
		color += 0.15 * tex2D(_MainTex, i.uv01.xy);
		color += 0.15 * tex2D(_MainTex, i.uv01.zw);
		color += 0.10 * tex2D(_MainTex, i.uv23.xy);
		color += 0.10 * tex2D(_MainTex, i.uv23.zw);
		color += 0.05 * tex2D(_MainTex, i.uv45.xy);
		color += 0.05 * tex2D(_MainTex, i.uv45.zw);
		return color;
	}

	//景深效果 vertex shader
	v2f_dof vert_dof(appdata_img v)
	{
		v2f_dof o;
		//mvp矩阵变换
		o.pos = mul(UNITY_MATRIX_MVP, v.vertex);
		//uv坐标传递
		o.uv.xy = v.texcoord.xy;
		o.uv1.xy = o.uv.xy;
		//dx中纹理从左上角为初始坐标,需要反向
		#if UNITY_UV_STARTS_AT_TOP
		if (_MainTex_TexelSize.y < 0)
			o.uv.y = 1 - o.uv.y;
		#endif
		return o;
	}

	fixed4 frag_dof(v2f_dof i) : SV_Target
	{
		//取原始清晰图片进行uv采样
		fixed4 ori = tex2D(_MainTex, i.uv1);
		//取模糊普片进行uv采样
		fixed4 blur = tex2D(_BlurTex, i.uv);
		//取当位置对应的深度值
		float depth = SAMPLE_DEPTH_TEXTURE(_CameraDepthTexture, i.uv);
		//将深度值转化到01线性空间
		depth = Linear01Depth(depth);

		//如果depth小于焦点的物体,那么使用原始清晰图像,否则使用模糊的图像与清晰图像的差值,通过差值避免模糊和清晰之间明显的边界,结果为远景模糊效果
		fixed4 final = (depth <= _focalDistance) ? ori : lerp(ori, blur, clamp((depth - _focalDistance) * _farBlurScale, 0, 1));
		//上面的结果,再进行一次计算,如果depth大于焦点的物体,使用上面的结果和模糊图像差值,得到近景模糊效果
		final = (depth > _focalDistance) ? final : lerp(ori, blur, clamp((_focalDistance - depth) * _nearBlurScale, 0, 1));
		//焦点位置是清晰的图像,两边分别用当前像素深度距离焦点的距离进行差值,这样就达到原理焦点位置模糊的效果

		//上面的?在编译时会被编译成if语句,GPU并不擅长分支计算,而且如果有分支,两个分支都要跑。这里给了一个更优化一些的计算方式,不过语法比较晦涩
		//float focalTest = clamp(sign(depth - _focalDistance),0,1);
		//fixed4 final = (1 - focalTest) * ori + focalTest * lerp(ori, blur, clamp((depth - _focalDistance) * _farBlurScale, 0, 1));
		//final = (focalTest)* final + (1 - focalTest) * lerp(ori, blur, clamp((_focalDistance - depth) * _nearBlurScale, 0, 1));
		return final;
	}

	ENDCG

	SubShader
	{
		//pass 0: 高斯模糊
		Pass
		{
			ZTest Off
			Cull Off
			ZWrite Off
			Fog{ Mode Off }

			CGPROGRAM
			#pragma vertex vert_blur
			#pragma fragment frag_blur
			ENDCG
		}

		//pass 1: 景深效果
		Pass
		{

			ZTest Off
			Cull Off
			ZWrite Off
			Fog{ Mode Off }
			ColorMask RGBA

			CGPROGRAM
			#pragma vertex vert_dof
			#pragma fragment frag_dof
			ENDCG
		}

	}
}
C#部分:
using UnityEngine;
using System.Collections;

[ExecuteInEditMode]
public class DepthOfFiled : PostEffectBase {

    [Range(0.0f, 100.0f)]
    public float focalDistance = 10.0f;
    [Range(0.0f, 100.0f)]
    public float nearBlurScale = 0.0f;
    [Range(0.0f, 1000.0f)]
    public float farBlurScale = 50.0f;
    //分辨率
    public int downSample = 1;
    //采样率
    public int samplerScale = 1;

    private Camera _mainCam = null;
    public Camera MainCam
    {
        get
        {
            if (_mainCam == null)
                _mainCam = GetComponent<Camera>();
            return _mainCam;
        }
    }

    void OnEnable()
    {
        //maincam的depthTextureMode是通过位运算开启与关闭的
        MainCam.depthTextureMode |= DepthTextureMode.Depth;
    }

    void OnDisable()
    {
        MainCam.depthTextureMode &= ~DepthTextureMode.Depth;
    }

    void OnRenderImage(RenderTexture source, RenderTexture destination)
    {
        if (_Material)
        {
            //首先将我们设置的焦点限制在远近裁剪面之间
            Mathf.Clamp(focalDistance, MainCam.nearClipPlane, MainCam.farClipPlane);

            //申请两块RT,并且分辨率按照downSameple降低
            RenderTexture temp1 = RenderTexture.GetTemporary(source.width >> downSample, source.height >> downSample, 0, source.format);
            RenderTexture temp2 = RenderTexture.GetTemporary(source.width >> downSample, source.height >> downSample, 0, source.format);

            //直接将场景图拷贝到低分辨率的RT上达到降分辨率的效果
            Graphics.Blit(source, temp1);

            //高斯模糊,两次模糊,横向纵向,使用pass0进行高斯模糊
            _Material.SetVector("_offsets", new Vector4(0, samplerScale, 0, 0));
            Graphics.Blit(temp1, temp2, _Material, 0);
            _Material.SetVector("_offsets", new Vector4(samplerScale, 0, 0, 0));
            Graphics.Blit(temp2, temp1, _Material, 0);

            //景深操作,景深需要两的模糊效果图我们通过_BlurTex变量传入shader
            _Material.SetTexture("_BlurTex", temp1);
            //设置shader的参数,主要是焦点和远近模糊的权重,权重可以控制插值时使用模糊图片的权重
            _Material.SetFloat("_focalDistance", FocalDistance01(focalDistance));
            _Material.SetFloat("_nearBlurScale", nearBlurScale);
            _Material.SetFloat("_farBlurScale", farBlurScale);

            //使用pass1进行景深效果计算,清晰场景图直接从source输入到shader的_MainTex中
            Graphics.Blit(source, destination, _Material, 1);

            //释放申请的RT
            RenderTexture.ReleaseTemporary(temp1);
            RenderTexture.ReleaseTemporary(temp2);
        }
    }

    //计算设置的焦点被转换到01空间中的距离,以便shader中通过这个01空间的焦点距离与depth比较
    private float FocalDistance01(float distance)
    {
        return MainCam.WorldToViewportPoint((distance - MainCam.nearClipPlane) * MainCam.transform.forward + MainCam.transform.position).z / (MainCam.farClipPlane - MainCam.nearClipPlane);
    }


}
大部分的景深效果是前景清晰,远景模糊,这也是景深的标准用法,不过有时候也有需要近景模糊,远景清晰的效果,或者前后都模糊,中间焦点位置清晰,在实现上我们通过像素点深度到达焦点的距离作为参数,在清晰和模糊图像之间插值,先计算远景的,结果与模糊图片再进行插值,得到最终的效果。
四.效果展示
在MainCamera上挂上DepthOfField脚本,将DepthOfFileld.shader赋给shader槽,即可看见景深的效果。
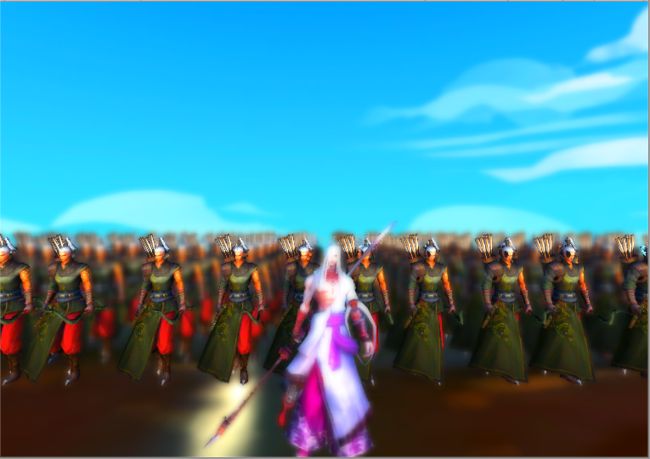
首先我们看一下清晰的场景图:

开启远景模糊的景深效果:
远近同时模糊的效果,只有焦点距离的对象清晰: