基于MHA的MySQL高可用架构的搭建
MySQL高可用架构之MHA
简介:
MHA(Master High Availability)目前在MySQL高可用方面是一个相对成熟的解决方案,它由日本DeNA公司youshimaton(现就职于 Facebook公司)开发,是一套优秀的作为MySQL高可用性环境下故障切换和主从提升的高可用软件。在MySQL故障切换过程中,MHA能做到在 0~30秒之内自动完成数据库的故障切换操作,并且在进行故障切换的过程中,MHA能在最大程度上保证数据的一致性,以达到真正意义上的高可用。
该软件由两部分组成:MHA Manager(管理节点)和MHA Node(数据节点)。MHA Manager可以单独部署在一台独立的机器上管理多个master-slave集群,也可以部署在一台slave节点上。MHA Node运行在每台MySQL服务器上,MHA Manager会定时探测集群中的master节点,当master出现故障时,它可以自动将最新数据的slave提升为新的master,然后将所有其 他的slave重新指向新的master。整个故障转移过程对应用程序完全透明。
在MHA自动故障切换过程中,MHA试图从宕机的主服务器上保存二进制日志,最大程度的保证数据的不丢失,但这并不总是可行的。例如,如果主服务器 硬件故障或无法通过ssh访问,MHA没法保存二进制日志,只进行故障转移而丢失了最新的数据。使用MySQL 5.5的半同步复制,可以大大降低数据丢失的风险。MHA可以与半同步复制结合起来。如果只有一个slave已经收到了最新的二进制日志,MHA可以将最 新的二进制日志应用于其他所有的slave服务器上,因此可以保证所有节点的数据一致性。
目前MHA主要支持一主多从的架构,要搭建MHA,要求一个复制集群中必须最少有三台数据库服务器,一主二从,即一台充当master,一台充当备用master,另外一台充当从库,因为至少需要三台服务器,出于机器成本的考虑,淘宝也在该基础上进行了改造,目前淘宝TMHA已经支持一主一从。另外对于想快速搭建的可以参考:MHA快速搭建
我们自己使用其实也可以使用1主1从,但是master主机宕机后无法切换,以及无法补全binlog。master的mysqld进程crash后,还是可以切换成功,以及补全binlog的。
实验环境:
一主两从:将Mha也安装到Master端 以节省节点(资源)
Master/Mha: server3     172.25.254.3
Slave:      server4         172.25.254.4
Slave:      server5     172.25.254.5
安装包:
 mha4mysql-manager-0.56-0.el6.noarch.rpm
 mha4mysql-node-0.56-0.el6.noarch.rpm
 perl-Config-Tiny-2.12-7.1.el6.noarch.rpm
 perl-Email-Date-Format-1.002-5.el6.noarch.rpm
 perl-Log-Dispatch-2.27-1.el6.noarch.rpm
 perl-Mail-Sender-0.8.16-3.el6.noarch.rpm
 perl-Mail-Sendmail-0.79-12.el6.noarch.rpm
 perl-MIME-Lite-3.027-2.el6.noarch.rpm
 perl-MIME-Types-1.28-2.el6.noarch.rpm
 perl-Parallel-ForkManager-0.7.9-1.el6.noarch.rpm
1.搭建实验环境
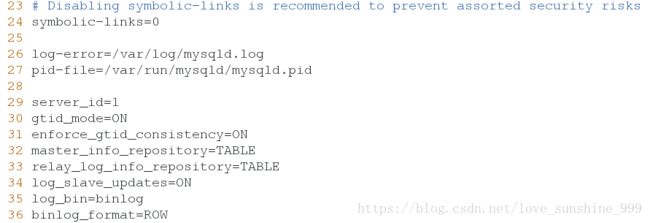
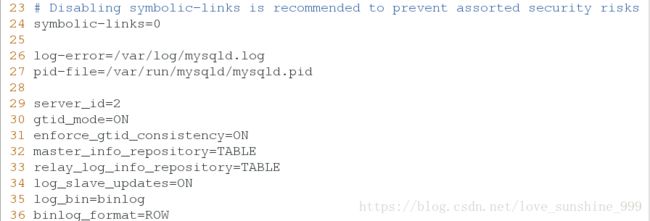
在server3中:
[root@server3 ~]# /etc/init.d/mysqld stop
Stopping mysqld:                                           [  OK  ]
[root@server3 ~]# chkconfig --list mysqld
mysqld          0:off   1:off   2:off   3:on    4:on    5:on    6:off
[root@server3 ~]# chkconfig mysqld off
[root@server3 ~]# ls
anaconda-ks.cfg
install.log
install.log.syslog
mysql-community-client-5.7.17-1.el6.x86_64.rpm
mysql-community-common-5.7.17-1.el6.x86_64.rpm
mysql-community-libs-5.7.17-1.el6.x86_64.rpm
mysql-community-libs-compat-5.7.17-1.el6.x86_64.rpm
mysql-community-server-5.7.17-1.el6.x86_64.rpm
[root@server3 ~]# rm -rf *
[root@server3 ~]# ls
##数据目录初始化
[root@server3 ~]# cd /var/lib/mysql
[root@server3 mysql]# ls
auto.cnf            private_key.pem
binlog.000001       public_key.pem
binlog.000002       server3-relay-bin-group_replication_applier.000002
binlog.index        server3-relay-bin-group_replication_applier.000003
ca-key.pem          server3-relay-bin-group_replication_applier.000004
ca.pem              server3-relay-bin-group_replication_applier.index
client-cert.pem     server3-relay-bin-group_replication_recovery.000001
client-key.pem      server3-relay-bin-group_replication_recovery.000002
ib_buffer_pool      server3-relay-bin-group_replication_recovery.index
ibdata1             server-cert.pem
ib_logfile0         server-key.pem
ib_logfile1         sys
mysql               test
performance_schema
[root@server3 mysql]# rm -fr *
[root@server3 mysql]# ls
[root@server3 mysql]# vim /etc/my.cnf
[root@server3 mysql]# /etc/init.d/mysqld start
Initializing MySQL database:
[ OK ]
Starting mysqld: [ OK ]
##过滤密码
[root@server3 mysql]# grep password /var/log/mysqld.log
[root@server3 mysql]# mysql -p
Enter password:
Welcome to the MySQL monitor. Commands end with ; or \g.
Your MySQL connection id is 4
Server version: 5.7.17-log
Copyright (c) 2000, 2016, Oracle and/or its affiliates. All rights reserved.
Oracle is a registered trademark of Oracle Corporation and/or its
affiliates. Other names may be trademarks of their respective
owners.
Type 'help;' or '\h' for help. Type '\c' to clear the current input statement.
##设置密码
mysql> ALTER USER root@localhost identified by 'HYM*hyf5532';
Query OK, 0 rows affected (0.04 sec)
##查看pos号和file名
mysql> show master status;
+---------------+----------+--------------+------------------+----------------------------------------+
| File | Position | Binlog_Do_DB | Binlog_Ignore_DB | Executed_Gtid_Set |
+---------------+----------+--------------+------------------+----------------------------------------+
| binlog.000002 | 398 | | | 5a6dfa50-9d08-11e8-9cb2-525400042e83:1 |
+---------------+----------+--------------+------------------+----------------------------------------+
1 row in set (0.00 sec)
##创建用户并授权
mysql> grant replication slave on *.* to server3@'172.25.52.%' identified by 'HYM*hyf5532';
Query OK, 0 rows affected, 1 warning (0.04 sec)在server4中:
root@server4 ~]# /etc/init.d/mysqld stop
Stopping mysqld:                                           [  OK  ]
##数据目录初始化
[root@server4 ~]# cd /var/lib/mysql
[root@server4 mysql]# ls
auto.cnf            public_key.pem
binlog.000001       server4-relay-bin-group_replication_applier.000001
binlog.000002       server4-relay-bin-group_replication_applier.000002
binlog.index        server4-relay-bin-group_replication_applier.000003
ca-key.pem          server4-relay-bin-group_replication_applier.000004
ca.pem              server4-relay-bin-group_replication_applier.index
client-cert.pem     server4-relay-bin-group_replication_recovery.000001
client-key.pem      server4-relay-bin-group_replication_recovery.000002
ib_buffer_pool      server4-relay-bin-group_replication_recovery.000003
ibdata1             server4-relay-bin-group_replication_recovery.index
ib_logfile0         server-cert.pem
ib_logfile1         server-key.pem
mysql               sys
performance_schema  test
private_key.pem
[root@server4 mysql]# rm -rf *
[root@server4 mysql]# ls
[root@server4 mysql]# vim /etc/my.cnf
[root@server4 mysql]# /etc/init.d/mysqld start
Initializing MySQL database:
[ OK ]
Starting mysqld: [ OK ]
##过滤密码
[root@server4 mysql]# grep password /var/log/mysqld.log
[root@server4 mysql]# mysql -p
Enter password:
Welcome to the MySQL monitor. Commands end with ; or \g.
Your MySQL connection id is 4
Server version: 5.7.17-log
Copyright (c) 2000, 2016, Oracle and/or its affiliates. All rights reserved.
Oracle is a registered trademark of Oracle Corporation and/or its
affiliates. Other names may be trademarks of their respective
owners.
Type 'help;' or '\h' for help. Type '\c' to clear the current input statement.
##设定密码
mysql> ALTER USER root@localhost identified by 'HYM*hyf5532';
Query OK, 0 rows affected (0.05 sec)
##
mysql> change master to master_host='172.25.52.3',master_user='server3',master_password='HYM*hyf5532',MASTER_AUTO_POSITION=1;
Query OK, 0 rows affected, 2 warnings (0.39 sec)
mysql> start slave;
Query OK, 0 rows affected (0.05 sec)
##可查看到 Slave_IO_Running: Yes Slave_SQL_Running: Yes 即可
mysql> show slave status\G
*************************** 1. row ***************************
Slave_IO_State: Waiting for master to send event
Master_Host: 172.25.52.3
Master_User: server3
Master_Port: 3306
Connect_Retry: 60
Master_Log_File: binlog.000002
Read_Master_Log_Pos: 694
Relay_Log_File: server4-relay-bin.000002
Relay_Log_Pos: 901
Relay_Master_Log_File: binlog.000002
Slave_IO_Running: Yes
Slave_SQL_Running: Yes
Replicate_Do_DB:
Replicate_Ignore_DB:
Replicate_Do_Table:
Replicate_Ignore_Table:
Replicate_Wild_Do_Table:
Replicate_Wild_Ignore_Table:
Last_Errno: 0
Last_Error:
Skip_Counter: 0
Exec_Master_Log_Pos: 694
Relay_Log_Space: 1110
Until_Condition: None
Until_Log_File:
Until_Log_Pos: 0
Master_SSL_Allowed: No
Master_SSL_CA_File:
Master_SSL_CA_Path:
Master_SSL_Cert:
Master_SSL_Cipher:
Master_SSL_Key:
Seconds_Behind_Master: 0
Master_SSL_Verify_Server_Cert: No
Last_IO_Errno: 0
Last_IO_Error:
Last_SQL_Errno: 0
Last_SQL_Error:
Replicate_Ignore_Server_Ids:
Master_Server_Id: 1
Master_UUID: 5a6dfa50-9d08-11e8-9cb2-525400042e83
Master_Info_File: mysql.slave_master_info
SQL_Delay: 0
SQL_Remaining_Delay: NULL
Slave_SQL_Running_State: Slave has read all relay log; waiting for more updates
Master_Retry_Count: 86400
Master_Bind:
Last_IO_Error_Timestamp:
Last_SQL_Error_Timestamp:
Master_SSL_Crl:
Master_SSL_Crlpath:
Retrieved_Gtid_Set: 5a6dfa50-9d08-11e8-9cb2-525400042e83:1-2
Executed_Gtid_Set: 5a6dfa50-9d08-11e8-9cb2-525400042e83:1-2,
d2c5b462-9d08-11e8-8514-525400322e05:1
Auto_Position: 1
Replicate_Rewrite_DB:
Channel_Name:
Master_TLS_Version:
1 row in set (0.00 sec)测试(主从数据库是否数据同步):
在server3中插入数据:
mysql> show databases; +--------------------+
| Database | +--------------------+
| information_schema | | mysql | | performance_schema |
| sys | +--------------------+
4 rows in set (0.04 sec)
##创建test数据库
mysql> create database test;
Query OK, 1 row affected (0.09 sec)

在sercer4中检测:
mysql> show databases; +--------------------+
| Database | +--------------------+
| information_schema | | mysql | | performance_schema |
| sys                |
| test | +--------------------+
5 rows in set (0.00 sec)
在server5中检测:
mysql> show databases; +--------------------+
| Database | +--------------------+
| information_schema | | mysql | | performance_schema |
| sys                |
| test | +--------------------+
5 rows in set (0.00 sec)
2.安装软件包
[root@server3 ~]# ls
mha4mysql-manager-0.56-0.el6.noarch.rpm
mha4mysql-node-0.56-0.el6.noarch.rpm
perl-Config-Tiny-2.12-7.1.el6.noarch.rpm
perl-Email-Date-Format-1.002-5.el6.noarch.rpm
perl-Log-Dispatch-2.27-1.el6.noarch.rpm
perl-Mail-Sender-0.8.16-3.el6.noarch.rpm
perl-Mail-Sendmail-0.79-12.el6.noarch.rpm
perl-MIME-Lite-3.027-2.el6.noarch.rpm
perl-MIME-Types-1.28-2.el6.noarch.rpm
perl-Parallel-ForkManager-0.7.9-1.el6.noarch.rpm
[root@server3 ~]# yum install * -y
[root@server3 ~]# scp mha4mysql-node-0.56-0.el6.noarch.rpm server4:
The authenticity of host 'server4 (172.25.52.4)' can't be established.
RSA key fingerprint is fc:68:3f:d9:a8:07:dd:06:20:09:b5:02:fb:33:a9:99.
Are you sure you want to continue connecting (yes/no)? yes
Warning: Permanently added 'server4' (RSA) to the list of known hosts.
root@server4's password:
mha4mysql-node-0.56-0.el6.noarch.rpm          100%   35KB  35.5KB/s   00:00
[root@server4 ~]# ls
mha4mysql-node-0.56-0.el6.noarch.rpm
[root@server4 ~]# yum install mha4mysql-node-0.56-0.el6.noarch.rpm -y
[root@server4 ~]# scp mha4mysql-node-0.56-0.el6.noarch.rpm server5:
root@server5's password:
mha4mysql-node-0.56-0.el6.noarch.rpm          100%   35KB  35.5KB/s   00:00
[root@server5 ~]# ls
mha4mysql-node-0.56-0.el6.noarch.rpm
[root@server5 ~]# yum install mha4mysql-node-0.56-0.el6.noarch.rpm -y
3.编写配置文件
[root@server3 ~]# mkdir -p /etc/masterha
[root@server3 ~]# cd /etc/masterha/
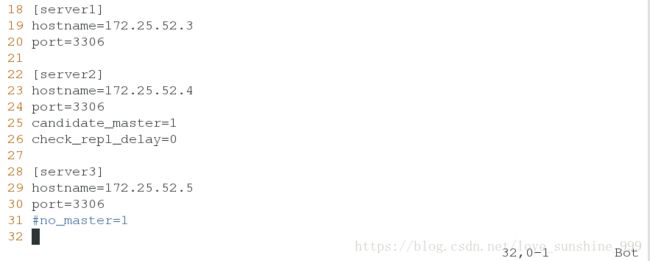
[root@server3 masterha]# vim app1.cnf
########################
写入:
[server default]
manager_workdir=/etc/masterha/      ##设置manager的工作目录
manager_log=/etc/masterha/app1.log  ##设置manager的日志
master_binlog_dir=/var/lib/mysql    ##设置master 保存binlog的位置,以便MHA可以找到master的日志
#master_ip_failover_script=/usr/local/bin ##设置自动failover时候的切换脚本 /master_ip_failover
#master_ip_online_change_script=/usr/local ##设置手动切换时候的切换脚本
user=root
password=HYM*hyf5532   ##设置root用户的登陆mysql的密码
ping_interval=1        ##设置监控主库,发送ping包的时间间隔,默认是3秒,尝试三次没有回应的时候自动进行railover
remote_workdir=/tmp    ##设置远端mysql在发生切换时binlog的保存位置
repl_user=server3
repl_password=HYM*hyf5532   ##设置复制用户的密码
#report_script=/usr/local/send_report ##设置发生切换后发送的报警的脚本
#secondary_check_script=/usr/local/bin/masterha_secondary_check -s server03 -s server02
#shutdown_script="" ##设置故障发生后关闭故障主机脚本(该脚本的主要作用是关闭主机放在发生脑裂,这里没有使用)
ssh_user=root         ##设置ssh的登录用户名

[server1]
hostname=172.25.52.3
port=3306

[server2]
hostname=172.25.52.4
port=3306
candidate_master=1  ##设置为候选master,如果设置该参数以后,发生主从切换以后将会将此从库提升为主库,即使这个主库不是集群中事件最新的slave
check_repl_delay=0  ##默认情况下如果一个slave落后master 100M的relay logs的话,MHA将不会选择该slave作为一个新的master,因为对于这个slave的恢复需要花费很长时间,通过设置check_repl_delay=0,MHA触发切换在选择一个新的master的时候将会忽略复制延时,这个参数对于设置了candidate_master=1的主机非常有用,因为这个候选主在切换的过程中一定是新的master

[server3]
hostname=172.25.52.5
port=3306
#no_master=1
##查看ssh登陆是否成功
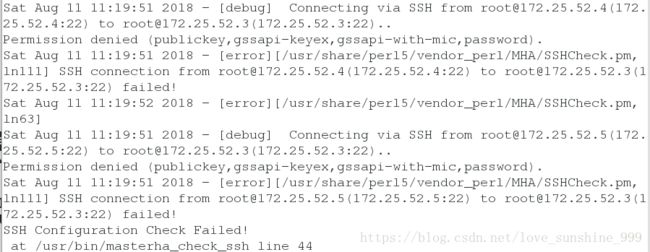
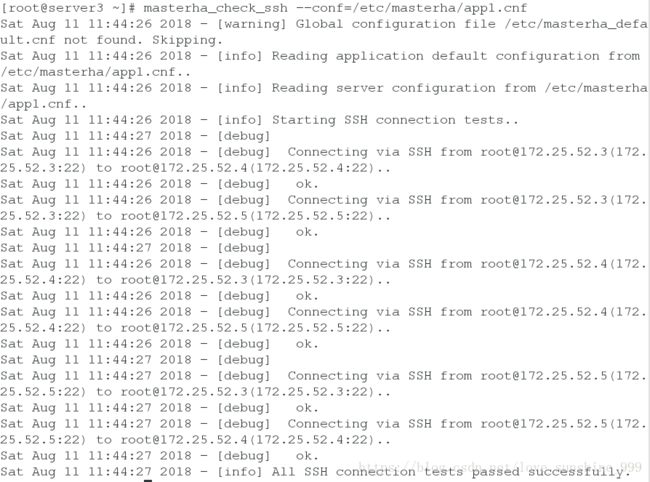
[root@server3 masterha]# masterha_check_ssh --conf=/etc/mha/app.conf##设置免密登陆
[root@server3 masterha]# cd
##生成公钥与私钥对(密钥)
[root@server3 ~]# ssh-keygen
Generating public/private rsa key pair.
Enter file in which to save the key (/root/.ssh/id_rsa):
Enter passphrase (empty for no passphrase):
Enter same passphrase again:
Your identification has been saved in /root/.ssh/id_rsa.
Your public key has been saved in /root/.ssh/id_rsa.pub.
The key fingerprint is:
2a:d9:f5:3c:a7:f5:48:13:75:44:d8:1a:6c:b7:44:30 root@server3
The key's randomart image is:
+--[ RSA 2048]----+
| Eo=o|
| *oo|
| .o+o|
| ..o |
| S . |
| o o o . |
| o o + = |
| . * + |
| . . . |
+-----------------+
##将公钥复制到远程机器中
[root@server3 ~]# ssh-copy-id 172.25.52.3
Now try logging into the machine, with "ssh '172.25.52.3'", and check in:
.ssh/authorized_keys
to make sure we haven't added extra keys that you weren't expecting.
[root@server3 ~]# scp -r .ssh/ 172.25.52.4:
root@172.25.52.4's password:
authorized_keys 100% 788 0.8KB/s 00:00
known_hosts 100% 1965 1.9KB/s 00:00
id_rsa.pub 100% 394 0.4KB/s 00:00
id_rsa 100% 1675 1.6KB/s 00:00
[root@server3 ~]# scp -r .ssh/ 172.25.52.5:
root@172.25.52.5's password:
authorized_keys 100% 788 0.8KB/s 00:00
known_hosts 100% 1965 1.9KB/s 00:00
id_rsa.pub 100% 394 0.4KB/s 00:00
id_rsa 100% 1675 1.6KB/s 00:00检测免密登陆:
在server3中:
[root@server3 ~]# ssh 172.25.52.3
Last login: Sat Aug 11 08:53:17 2018 from 172.25.52.250
[root@server3 ~]# logout
Connection to 172.25.52.3 closed.
[root@server3 ~]# ssh 172.25.52.4
Last login: Sat Aug 11 08:53:27 2018 from 172.25.52.250
[root@server4 ~]# logout
Connection to 172.25.52.4 closed.
[root@server3 ~]# ssh 172.25.52.5
Last login: Sat Aug 11 10:41:52 2018 from 172.25.52.250
[root@server5 ~]# logout
Connection to 172.25.52.5 closed.
在server4中:
[root@server4 ~]# ssh 172.25.52.3
Last login: Sat Aug 11 11:29:21 2018 from server3
[root@server3 ~]# logout
Connection to 172.25.52.3 closed.
[root@server4 ~]# ssh 172.25.52.4
Last login: Sat Aug 11 11:28:40 2018 from server3
[root@server4 ~]# logout
Connection to 172.25.52.4 closed.
[root@server4 ~]# ssh 172.25.52.5
Last login: Sat Aug 11 11:28:48 2018 from server3
[root@server5 ~]# logout
Connection to 172.25.52.5 closed.
在server5中:
[root@server5 ~]# ssh 172.25.52.3
Last login: Sat Aug 11 11:29:53 2018 from server4
[root@server3 ~]# logout
Connection to 172.25.52.3 closed.
[root@server5 ~]# ssh 172.25.52.4
Last login: Sat Aug 11 11:29:57 2018 from server4
[root@server4 ~]# logout
Connection to 172.25.52.4 closed.
[root@server5 ~]# ssh 172.25.52.5
Last login: Sat Aug 11 11:30:00 2018 from server4
[root@server5 ~]# logout
Connection to 172.25.52.5 closed.
##再次查看ssh登陆是否成功
$ 均为ok即可
[root@server3 ~]# masterha_check_ssh --conf=/etc/masterha/app1.cnf ##给root用户授权
[root@server3 ~]# mysql -p
Enter password:
Welcome to the MySQL monitor. Commands end with ; or \g.
Your MySQL connection id is 7
Server version: 5.7.17-log MySQL Community Server (GPL)
Copyright (c) 2000, 2016, Oracle and/or its affiliates. All rights reserved.
Oracle is a registered trademark of Oracle Corporation and/or its
affiliates. Other names may be trademarks of their respective
owners.
Type 'help;' or '\h' for help. Type '\c' to clear the current input statement.
##授权
mysql> grant all on *.* to root@'%' identified by 'HYM*hyf5532';
Query OK, 0 rows affected, 1 warning (0.08 sec)
mysql> quit
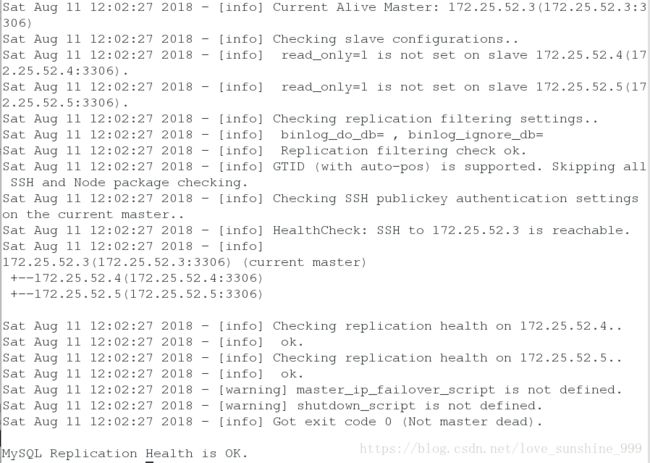
Bye##检查整个复制环境状况(健康检查)
$ 均为ok即可
[root@server3 ~]# masterha_check_repl --conf=/etc/masterha/app1.cnf 手动同步
##switch 将master从server3手动同步到server4上
[root@server3 masterha]# masterha_master_switch --conf=/etc/masterha/app1.cnf --master_state=alive --new_master_host=172.25.52.4 --new_master_port=3306 --orig_master_is_new_slave
测试:
在servser3中
mysql> show slave status\G;
*************************** 1. row ***************************
 Slave_IO_State: Waiting for master to send event
 Master_Host: 172.25.52.4
 Master_User: server3
 Master_Port: 3306
 Connect_Retry: 60
 Master_Log_File: binlog.000002
 Read_Master_Log_Pos: 154
 Relay_Log_File: server3-relay-bin.000002
 Relay_Log_Pos: 361
 Relay_Master_Log_File: binlog.000002
 Slave_IO_Running: Yes
 Slave_SQL_Running: Yes
在server5中:
mysql> mysql> show slave status\G;
*************************** 1. row ***************************
 Slave_IO_State: Waiting for master to send event
 Master_Host: 172.25.52.4
 Master_User: server3
 Master_Port: 3306
 Connect_Retry: 60
 Master_Log_File: binlog.000002
 Read_Master_Log_Pos: 154
 Relay_Log_File: server5-relay-bin.000003
 Relay_Log_Pos: 361
 Relay_Master_Log_File: binlog.000002
 Slave_IO_Running: Yes
 Slave_SQL_Running: Yes
自动同步
##打入后台
[root@server3 ~]# nohup masterha_manager --conf=/etc/masterha/app1.cnf --ignore_last_failover &
[2] 2985
[root@server3 ~]# nohup: ignoring input and appending output to `nohup.out'

[root@server3 ~]# ls
nohup.out
[root@server3 ~]# cat nohup.out
Sat Aug 11 12:09:35 2018 - [warning] Global configuration file /etc/masterha_default.cnf not found. Skipping.
Sat Aug 11 12:09:35 2018 - [info] Reading application default configuration from /etc/masterha/app1.cnf..
Sat Aug 11 12:09:35 2018 - [info] Reading server configuration from /etc/masterha/app1.cnf..
[root@server3 ~]# cd /etc/masterha/
[root@server3 masterha]# ls
app1.cnf  app1.log  app1.master_status.health
[root@server3 masterha]# ps ax
##杀死mysql进程
[root@server3 masterha]# kill -9 2398
[root@server3 masterha]# kill -9 2691测试:
在server5中:
[root@server5 ~]# mysql -p
Enter password:
Welcome to the MySQL monitor.  Commands end with ; or \g.
Your MySQL connection id is 17
Server version: 5.7.17-log MySQL Community Server (GPL)

Copyright (c) 2000, 2016, Oracle and/or its affiliates. All rights reserved.

Oracle is a registered trademark of Oracle Corporation and/or its
affiliates. Other names may be trademarks of their respective
owners.

Type 'help;' or '\h' for help. Type '\c' to clear the current input statement.
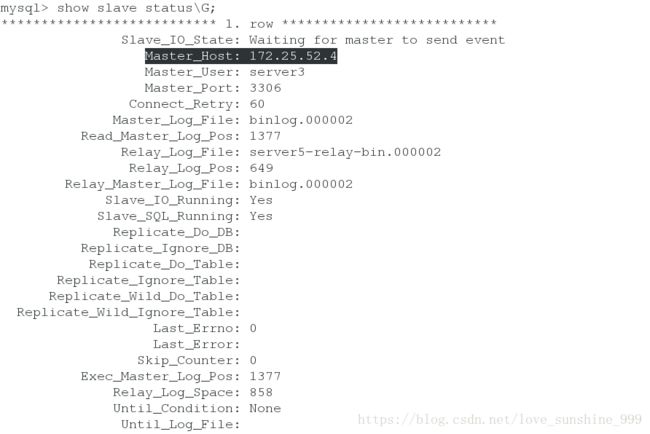
##查看到master自动切换到server4上
mysql> show slave status\G;
在srver4中
##插入数据
[root@server4 ~]# mysql -p
Enter password:
Welcome to the MySQL monitor. Commands end with ; or \g.
Your MySQL connection id is 18
Server version: 5.7.17-log MySQL Community Server (GPL)
Copyright (c) 2000, 2016, Oracle and/or its affiliates. All rights reserved.
Oracle is a registered trademark of Oracle Corporation and/or its
affiliates. Other names may be trademarks of their respective
owners.
Type 'help;' or '\h' for help. Type '\c' to clear the current input statement.
mysql> show databases; +--------------------+
| Database | +--------------------+
| information_schema | | mysql | | performance_schema |
| sys |
| test | +--------------------+
5 rows in set (0.00 sec)
mysql> create database westos;
Query OK, 1 row affected (0.06 sec)
mysql> use westos
Database changed
mysql> show tables;
Empty set (0.00 sec)
mysql> create table userlist (
-> username varchar(20) not null,
-> password varchar(15) not null);
Query OK, 0 rows affected (0.37 sec)
mysql> desc userlist; +----------+-------------+------+-----+---------+-------+
| Field | Type | Null | Key | Default | Extra | +----------+-------------+------+-----+---------+-------+
| username | varchar(20) | NO | | NULL | |
| password | varchar(15) | NO | | NULL | | +----------+-------------+------+-----+---------+-------+
2 rows in set (0.00 sec)
mysql> insert into userlist values ('user1','111');
Query OK, 1 row affected (0.08 sec)
在server5中:
##可以查看到插入的数据
mysql> show databases; +--------------------+
| Database | +--------------------+
| information_schema | | mysql | | performance_schema |
| sys |
| test |
| westos | +--------------------+
6 rows in set (0.00 sec)
mysql> use westos
Reading table information for completion of table and column names
You can turn off this feature to get a quicker startup with -A
Database changed
mysql> select * from userlist; +----------+----------+
| username | password | +----------+----------+
| user1 | 111 | +----------+----------+
1 row in set (0.00 sec)排错:
##如果 show slave status\G
出现 Slave_IO_Running: No
则执行:
 mysql> stop slave;
Query OK, 0 rows affected (0.34 sec)

mysql> reset master;
Query OK, 0 rows affected (0.32 sec)

mysql> reset slave;
Query OK, 0 rows affected (0.34 sec)

mysql> start slave;
Query OK, 0 rows affected (0.36 sec)

再重新查看就ok了

##如果切换后出现了多个master
则执行 set global read_only=1;