SpringBoot-SpringData-多数据源
实际项目中可能需要操作多个数据源,今天写一个SpringData多数据源的Demo
此Demo以SpringBoot集成代码 Maven构建SpringBoot项目 为基础,一步一步实现
1,pom.xml加入SpringData-Jpa依赖,我们使用mysql数据库
<dependency>
   <groupId>mysqlgroupId>
   <artifactId>mysql-connector-javaartifactId>
   <version>5.1.21version>
dependency>


<dependency>
   <groupId>org.springframework.bootgroupId>
   <artifactId>spring-boot-starter-data-jpaartifactId>
dependency>
2,application.properties添加多数据源配置
spring.datasource.primary.url=jdbc:mysql://localhost:3306/manysource1
spring.datasource.primary.username=root
spring.datasource.primary.password=123
spring.datasource.primary.driver-class-name=com.mysql.jdbc.Driver

spring.datasource.secondary.url=jdbc:mysql://localhost:3306/manysource2
spring.datasource.secondary.username=root
spring.datasource.secondary.password=123
spring.datasource.secondary.driver-class-name=com.mysql.jdbc.Driver

# validate 加载hibernate时,验证创建数据库表结构 (表结构不对就报错了,不会创建和修改表) --> 导数据用这个
# create 每次加载hibernate,重新创建数据库表结构,这就是导致数据库表数据丢失的原因。
# create-drop 加载hibernate时创建,退出是删除表结构
# update 加载hibernate自动更新数据库结构 (已存在的数据库表字段多时不删除,少时添加)
#spring.jpa.properties.hibernate.hbm2ddl.auto=create-drop
spring.jpa.properties.hibernate.hbm2ddl.auto=update
#spring.jpa.properties.hibernate.hbm2ddl.auto=validate
#spring.jpa.database-platform=org.hibernate.dialect.MySQLDialect
我们在本地创建了两个数据库,manysource1和manysource2
3,SpringData创建数据库表和Dao
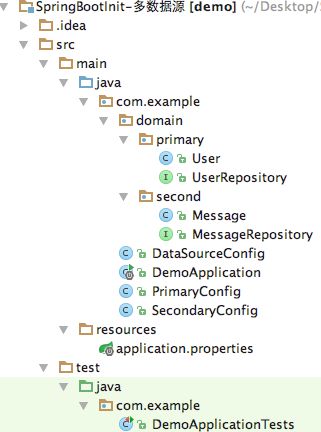
下图为完整的项目目录结构,domain下primary和second包下分别为2个数据源的domain
我们在第一个数据源,穿件User数据库
@Entity
public class User {

    @Id
    @GeneratedValue
    private Long id;

    @Column(nullable = false)
    private String name;

    @Column(nullable = false)
    private Integer age;

// @Column(nullable = false)
// private Integer sex;

    public User(){}

// public User(String name, Integer age, Integer sex) {
// this.name = name;
// this.age = age;
// this.sex = sex;
// }

    public User(String name, Integer age) {
        this.name = name;
        this.age = age;
    }

    public Long getId() {
        return id;
    }

    public void setId(Long id) {
        this.id = id;
    }

    public String getName() {
        return name;
    }

    public void setName(String name) {
        this.name = name;
    }

    public Integer getAge() {
        return age;
    }

    public void setAge(Integer age) {
        this.age = age;
    }

// public Integer getSex() {
// return sex;
// }
//
// public void setSex(Integer sex) {
// this.sex = sex;
// }
}
第二个数据库创建Message表
@Entity
public class Message {

    @Id
    @GeneratedValue
    private Long id;

    @Column(nullable = false)
    private String name;

    @Column(nullable = false)
    private String content;

    public Message(){}

    public Message(String name, String content) {
        this.name = name;
        this.content = content;
    }

    public Long getId() {
        return id;
    }

    public void setId(Long id) {
        this.id = id;
    }

    public String getName() {
        return name;
    }

    public void setName(String name) {
        this.name = name;
    }

    public String getContent() {
        return content;
    }

    public void setContent(String content) {
        this.content = content;
    }

}
顺便创建对应的Dao
public interface UserRepository extends JpaRepository<User, Long> {

}

public interface MessageRepository extends JpaRepository<Message, Long> {

}
4,配置多数据源
使用application.properties配置参数,初始化2个数据源dataSource
DataSourceConfig.java
@Configuration
public class DataSourceConfig {

    //数据源1-引用配置:spring.datasource.primary
    @Bean(name = "primaryDataSource")
    @Qualifier("primaryDataSource")
    @ConfigurationProperties(prefix="spring.datasource.primary")
    public DataSource primaryDataSource() {
        return DataSourceBuilder.create().build();
    }

    //数据源2-引用配置:spring.datasource.secondary
    @Bean(name = "secondaryDataSource")
    @Qualifier("secondaryDataSource")
    @Primary
    @ConfigurationProperties(prefix="spring.datasource.secondary")
    public DataSource secondaryDataSource() {
        return DataSourceBuilder.create().build();
    }

}
以上代码根据两个数据源的配置,生成了对应的数据源DataSource实例 primaryDataSource 和 secondaryDataSource
5,使用DataSource注入JPA,指明每个数据源SpringData要扫描的domain,Dao的包名
PrimaryConfig.java
/** * 注入JPA: * entityManagerFactory : entityManagerFactoryPrimary * transactionManager : transactionManagerPrimary * basePackages : com.example.domain.primary */
@Configuration
@EnableTransactionManagement
@EnableJpaRepositories(
        entityManagerFactoryRef="entityManagerFactoryPrimary",
        transactionManagerRef="transactionManagerPrimary",
        basePackages= {"com.example.domain.primary"}) //设置Repository所在位置
public class PrimaryConfig {

    //创建数据源 primaryDataSource - 引用数据源1配置:primaryDataSource
    @Autowired
    @Qualifier("primaryDataSource")
    private DataSource primaryDataSource;

    @Primary
    @Bean(name = "entityManagerPrimary")
    public EntityManager entityManager(EntityManagerFactoryBuilder builder) {
        return entityManagerFactoryPrimary(builder).getObject().createEntityManager();
    }

    /** * 创建数据源1的entityManagerFactoryPrimary * 1,使用primaryDataSource配置 * 2,数据实体包名packages:com.example.domain.primary */
    @Primary
    @Bean(name = "entityManagerFactoryPrimary")
    public LocalContainerEntityManagerFactoryBean entityManagerFactoryPrimary (EntityManagerFactoryBuilder builder) {
        return builder
                .dataSource(primaryDataSource)
                .properties(getVendorProperties(primaryDataSource))
                .packages("com.example.domain.primary") //设置实体类所在位置
                .persistenceUnit("primaryPersistenceUnit")
                .build();
    }

    @Autowired
    private JpaProperties jpaProperties;

    private Map getVendorProperties(DataSource dataSource) {
        return jpaProperties.getHibernateProperties(dataSource);
    }

    @Primary
    @Bean(name = "transactionManagerPrimary")
    public PlatformTransactionManager transactionManagerPrimary(EntityManagerFactoryBuilder builder) {
        return new JpaTransactionManager(entityManagerFactoryPrimary(builder).getObject());
    }

}
SecondaryConfig.java
/** * 注入JPA: * entityManagerFactory : entityManagerFactorySecondary * transactionManager : transactionManagerSecondary * basePackages : com.example.domain.second */
@Configuration
@EnableTransactionManagement
@EnableJpaRepositories(
        entityManagerFactoryRef="entityManagerFactorySecondary",
        transactionManagerRef="transactionManagerSecondary",
        basePackages= {"com.example.domain.second"}) //设置Repository所在位置
public class SecondaryConfig {

    /** * 自动注入 DataSourceConfig 类中的数据源配置文件secondaryDataSource * 实例化DataSource(secondaryDataSource) */
    @Autowired
    @Qualifier("secondaryDataSource")
    private DataSource secondaryDataSource;

    /** * 创建 EntityManager : * 根据EntityManagerFactoryBuilder 创建 EntityManager * @param builder EntityManagerFactoryBuilder * @return */
    @Bean(name = "entityManagerSecondary")
    public EntityManager entityManager(EntityManagerFactoryBuilder builder) {
        return entityManagerFactorySecondary(builder).getObject().createEntityManager();
    }

    /** * 根据当前数据源配置,创建entityManagerFactory * @param builder * @return */
    @Bean(name = "entityManagerFactorySecondary")
    public LocalContainerEntityManagerFactoryBean entityManagerFactorySecondary (EntityManagerFactoryBuilder builder) {
        return builder
                .dataSource(secondaryDataSource)
                .properties(getVendorProperties(secondaryDataSource))
                .packages("com.example.domain.second") //设置实体类所在位置
                .persistenceUnit("secondaryPersistenceUnit")
                .build();
    }

    @Autowired
    private JpaProperties jpaProperties;

    private Map getVendorProperties(DataSource dataSource) {
        return jpaProperties.getHibernateProperties(dataSource);
    }

    /** * 根据entityManagerFactory(entityManagerFactorySecondary)生成transactionManager(transactionManagerSecondary) * @param builder PlatformTransactionManager * @return */
    @Bean(name = "transactionManagerSecondary")
    PlatformTransactionManager transactionManagerSecondary(EntityManagerFactoryBuilder builder) {
        return new JpaTransactionManager(entityManagerFactorySecondary(builder).getObject());
    }

}
6,测试多数据源实现,查看数据库
@RunWith(SpringJUnit4ClassRunner.class)
@SpringApplicationConfiguration(classes = DemoApplication.class)
public class DemoApplicationTests {

   @Autowired
   private UserRepository userRepository;
   @Autowired
   private MessageRepository messageRepository;

   @Test
   public void test() throws Exception {

// userRepository.save(new User("aaa", 10, 1));//测试添加SEX字段后
      userRepository.save(new User("bbb", 20));
      userRepository.save(new User("ccc", 30));
      userRepository.save(new User("ddd", 40));
      userRepository.save(new User("eee", 50));

// Assert.assertEquals(5, userRepository.findAll().size());

      messageRepository.save(new Message("o1", "aaaaaaaaaa"));
      messageRepository.save(new Message("o2", "bbbbbbbbbb"));
      messageRepository.save(new Message("o3", "cccccccccc"));

// Assert.assertEquals(3, messageRepository.findAll().size());

   }
}
执行测试后查看数据库
数据操作成功!SpringData多数据源实现
7,代码下载
CSDN下载
GitHub下载


