【小程序】小程序上传照片,拖拽,放大缩小
最近在做的一个关于照片上传打印成相册的小程序,功能主要在用户处理图片,放大缩小,拖拽,不同模板不同表现直至最后打印,过程中碰到很多坑。
接下来我主要叙述的路线如下:
- 用户操作 --------------上传图片
- 用户操作 --------------选中图片
- 初始化 -----------------模板 / 用户选择模板 (例如相框,背景模板)
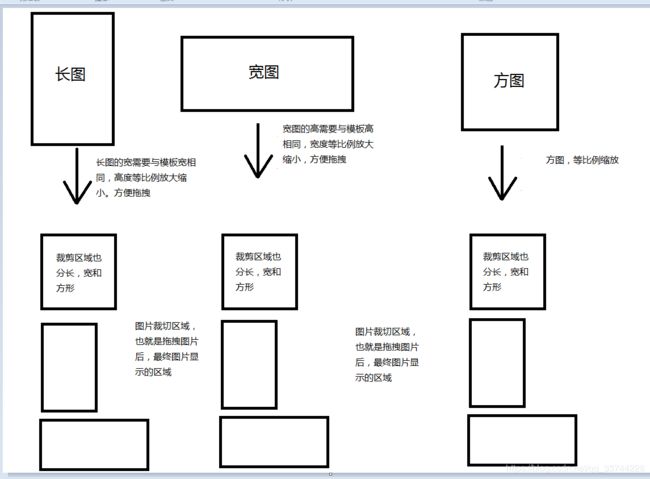
- 图片处理 --------------初始化图片位置数据,初始化长图,宽图,方图
- 拖拽图片,放大缩小图片
- 保存图片数据,后台生成图片结束
大概逻辑就是这样了,包含了几个功能:图片上传,图片拖拽、图片放大缩小,接下来就是上代码,我会加上注释:
①:上传图片
/*
 * count :  限制图片上传最大数量
 * length : 当前用户已经上传图片的数量
*/
var photoList = this.data.photoList
 wx.chooseImage({
      count: count - length,
      sizeType: ['original'],
      sourceType: ['album', 'camera'],
      success(res) {
        imgArr = res.tempFiles
        that.setData({
          imgArrLength: imgArr.length,
        })
        var tempFiles = []
        res.tempFiles.forEach(function (ele, index) {
        var data2 = {
              path: '',						// 存放上传成功回调返回的图片地址
              thumbnail: ''				    // 存放上传成功回调返回的缩略图片地址
            }
            const uploadTask = wx.uploadFile({
              url: 'https://xxxx.cn/api/Home/UploadImage',     // 后台接收图片接口地址
              filePath: ele.path,						      //调用wx.chooseImage选择之后的临时图片地址
              name: 'fileData',
              formData: {
                skv: app.storage.getStorSync('SKV')     // 用户令牌(表示这个用户,接口需要,不用管)
              },
              success(res) {
                var imgUrl = JSON.parse(res.data)
                data2.path = imgUrl.file
                data2.thumbnail = imgUrl.Thumbnail
                photoList.push(data2)
                if (photoList.ImagesList.length > count) {
                  photoList.splice(count)
                }
                app.storage.setStorSync('imgList', photoList)
                that.setData({
                  photoList: photoList,
                  imgLength: photoList.ImagesList.length,
                })
              },
            })
        })
      },
      fail(err){
        console.log(err)
      }
    })
需要上传进度的朋友加上
uploadTask.onProgressUpdate((res) => {
  console.log('上传进度', res.progress)
  console.log('已经上传的数据长度', res.totalBytesSent)
  console.log('预期需要上传的数据总长度', res.totalBytesExpectedToSend)
})
注意:
- 小程序崩溃、闪屏:因为这个小程序功能主要是处理图片,
图片太多太大就会导致小程序崩溃,闪屏,所以我们尽量使用缩略图来处理,将原图传给后台,最后传数据给后台处理原图,我们前端就不要去处理原图了,代价太大。 - wx.uploadFile: 该API成功回调返回值是
String字符串类型,所以要记得JSON.parse(res.data) - 上传进度:个人感觉上传进度与实际上传进度不符
②、③:用户选择图片,初始化模板,选择模板就不上代码了
④:初始化图片位置数据 , 初始化长图,宽图,方图
stv: {
      offsetX: 0,	// x轴
      offsetY: 0,	// y轴
      zoom: false,  // 是否缩放状态
      scale: 1,     // 图片缩放倍数
    },
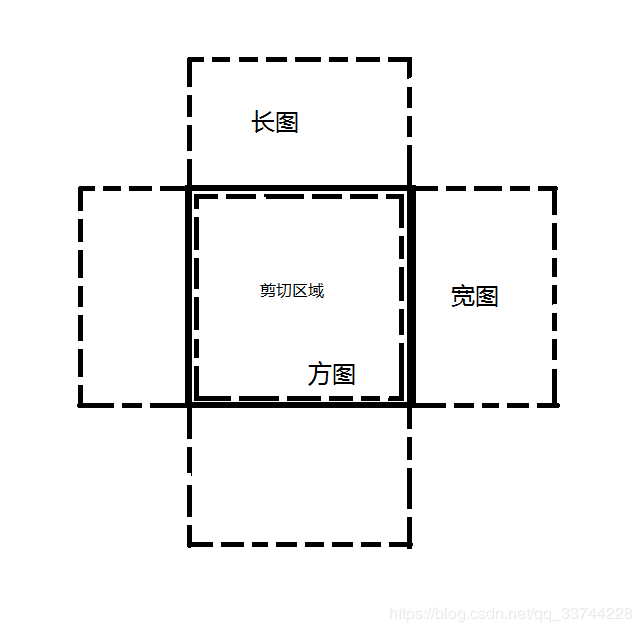
最终各类图片显示如下
接下来就是获取图片宽高,模板宽高了
/*
* getRect()	  获取节点信息,宽高,定位信息等
* imageLoad() 获取当前图片的实际宽高
*/
// 获取节点信息
  getRect(callback) {
    var _this = this;
    var r1, r2
    wx.createSelectorQuery().select('.showImg').boundingClientRect(function (rect) {
      r1 = rect
      _this.setData({
        rect1: rect
      })
    }).exec()
    wx.createSelectorQuery().select('.imgContainer').boundingClientRect(function (rect) {
      r2 = rect
      _this.setData({
        rect2: rect
      })
    }).exec()
    setTimeout(function (){
      typeof callback == "function" && callback(r1,r2)
    })
  },
imageLoad(e) {
    let originalWidth = e.detail.width;
    let originalHeight = e.detail.height;
    this.setData({
      originalWidth,
      originalHeight
    })
  },
改变图片大小
/*
*	tempWeight  模板宽度
*	tempHeight  模板高度
*	oWidth	  	原图宽度
*	oHeight		原图高度
*	zoomWeight  适应后显示的图片高宽度
*	zoomHeight  适应后显示的图片高度
*/
 zoomImg(tempWeight, tempHeight,oWidth, oHeight){
    var oWidth, oHeight
      tempHeight = tempHeight / 5
      tempWeight = tempWeight / 5					// 因为原模板图片太大 所以这里等比例缩小5倍
    var zoomHeight = tempHeight
    var zoomWeight = (zoomHeight * oWidth) / oHeight
    if (zoomWeight < tempWeight) {
      zoomWeight = tempWeight
      zoomHeight = (zoomWeight * oHeight) / oWidth
    }
    // console.log(zoomWeight, zoomHeight)
    this.setData({
      zoomWeight: parseFloat(zoomWeight.toFixed(2)),
      zoomHeight: parseFloat(zoomHeight.toFixed(2)),
    })
  },
效果如下:长图
横图
⑤:拖拽图片,放大缩小图片
/*
* stv: {
*     offsetX: 0,	// x轴
*     offsetY: 0,	// y轴
*     zoom: false,  // 是否缩放状态
8     scale: 1,     // 图片缩放倍数
*   },
*  r1,r2分别是前面getRect()获取模板和图片的节点信息
*/
 // 触摸开始事件处理函数
  touchstartCallback: function (e) {
    this.getRect()
    let { clientX, clientY } = e.touches[0]; // 结构获取 距离可视区域距离
    this.startX = clientX;
    this.startY = clientY;
    this.touchStartEvent = e.touches
  },
  //触摸移动中
  touchmoveCallback: function (e) {
    var stv = this.data.stv
    var r1 = this.data.rect1
    var r2 = this.data.rect2
    if (e.touches.length === 1) {
      //单指移动
      if (this.data.stv.zoom) {
        //缩放状态,不处理单指
        return;
      }
      let { clientX, clientY } = e.touches[0];
      let offsetX = clientX - this.startX;
      let offsetY = clientY - this.startY;
      this.startX = clientX;
      this.startY = clientY;
      let { stv } = this.data;
      stv.offsetX += offsetX;
      stv.offsetY += offsetY;
      if (stv.offsetY >= 0) {											// 限制图片顶部移出边界
          stv.offsetY = 0
      }
      if (stv.offsetX >= 0) {											// 限制图片左侧移出边界
        stv.offsetX = 0
      }
      if (Math.abs(stv.offsetY) >= (r1.height - r2.height)) {			// 限制图片底部移出边界
        stv.offsetY = -(r1.height - r2.height)
      }
      if (Math.abs(stv.offsetX) >= (r1.width - r2.width)) {				// 限制图片右侧移出边界
        stv.offsetX = -(r1.width - r2.width)
      }
      stv.offsetLeftX = stv.offsetX
      stv.offsetLeftY = stv.offsetY
      this.setData({
        stv: stv,
      });
    }
  },
  //触摸结束
  touchendCallback: function (e) {
    var that = this
    if (e.touches.length === 0) {
      if (this.data.changeBol) {
        this.change()
      } else {
        this.data.changeBol = true
      }
      this.setData({
        'stv.zoom': false, //重置缩放状态
        changeBol: this.data.changeBol
      })
    }
    setTimeout(function () {
      that.getRect()						// 获取节点

    }, 200)
  },
小程序view的图片一块如下
<view class='imgContainer' bindtap='change' catchtouchstart="touchstartCallback"  catchtouchmove="touchmoveCallback" catchtouchend="touchendCallback" style="border-radius:{{template.Type==4?'50%':'0'}}">
   <image src='{{imgInfo.path}}' style="width:{{zoomWeight*2}}rpx;height:{{zoomHeight*2}}rpx;transform:translate({{stv.offsetX}}px, {{stv.offsetY}}px) scale({{stv.scale}});transform-origin: 0px 0px;" mode="{{imgState==1?'widthFix':''}}" class='showImg' data-url='{{imgInfo.path}}' bindload="imageLoad" >image>
view>
放大缩小: 利用了slider来控制图片放大缩小
理由:因为双指来放大缩小会有大量计算,所以体验不友好,就运用slider来间接控制
slider3change(e){
    var stv = this.data.stv
    this.getRect((r1,r2)=>{
      stv.offsetX = 0
      stv.offsetY = 0
      stv.scale = e.detail.value
      this.setData({
        stv: stv,
        slideNum: e.detail.value,
      })
    })
  },
⑥:保存图片数据,后台生成图片结束
这些数据传给后台之后,他们就根据数据进行合成啦,就可以拿到最终的合成图了。这里为什么不用canvas呢,因为图片质量的原因,所以不适合前端来合成图片,交由后台来对原图合成。
合成图如下:
ze_16,color_FFFFFF,t_70)


