ssm框架之Spring和Mybatis整合(适合新手)
最近刚学习完ssm框架,找了个项目熟悉下整合的步骤,大概是spring和mybatis先整合,之后是mybatis和springmvc的整合,这里先讲spring和mybatis的整合,已备今后的学习。
一、搭建开发环境
首先在IDEA中创建maven项目(以ecplise为例)

创建中的Group id等看情况填写即可,图中为本人的配置。

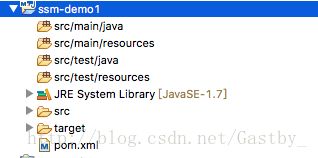
创建好的工程目录如下

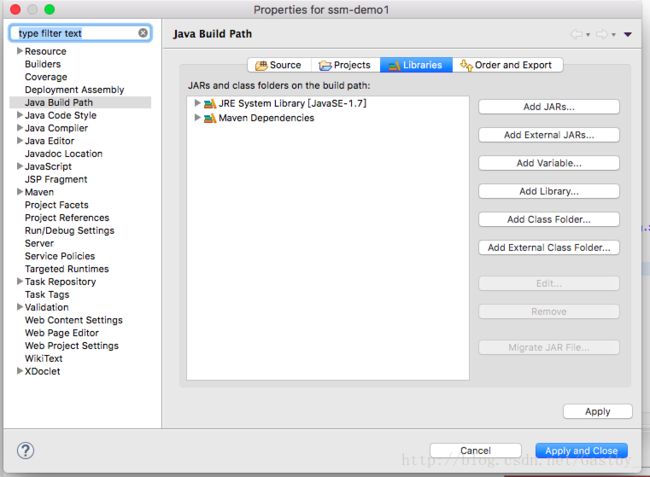
如果遇到创建好的工程中没有src/main/java以及test目录等,需要右击该项目,选择Build Path中的Configure Build Path,在JRE Library选相框中Remove掉JRE再重新添加即可,如下图


接着就是pom.xml文件了
<project xmlns="http://maven.apache.org/POM/4.0.0" xmlns:xsi="http://www.w3.org/2001/XMLSchema-instance"
    xsi:schemaLocation="http://maven.apache.org/POM/4.0.0 http://maven.apache.org/maven-v4_0_0.xsd">
    <modelVersion>4.0.0modelVersion>
    <groupId>me.gaclgroupId>
    <artifactId>spring4-mybatis3artifactId>
    <packaging>warpackaging>
    <version>1.0-SNAPSHOTversion>
    <name>spring4-mybatis3name>
    <url>http://maven.apache.orgurl>
    <dependencies>

        <dependency>
            <groupId>org.springframeworkgroupId>
            <artifactId>spring-coreartifactId>
            <version>4.1.4.RELEASEversion>
        dependency>

        <dependency>
            <groupId>org.springframeworkgroupId>
            <artifactId>spring-contextartifactId>
            <version>4.1.4.RELEASEversion>
        dependency>

        <dependency>
            <groupId>org.springframeworkgroupId>
            <artifactId>spring-txartifactId>
            <version>4.1.4.RELEASEversion>
        dependency>

        <dependency>
            <groupId>org.springframeworkgroupId>
            <artifactId>spring-jdbcartifactId>
            <version>4.1.4.RELEASEversion>
        dependency>

        <dependency>
            <groupId>org.springframeworkgroupId>
            <artifactId>spring-testartifactId>
            <version>4.1.4.RELEASEversion>
        dependency>

        <dependency>
            <groupId>org.springframeworkgroupId>
            <artifactId>spring-webartifactId>
            <version>4.1.4.RELEASEversion>
        dependency>

        <dependency>
            <groupId>org.aspectjgroupId>
            <artifactId>aspectjweaverartifactId>
            <version>1.8.5version>
        dependency>

        <dependency>
            <groupId>org.mybatisgroupId>
            <artifactId>mybatisartifactId>
            <version>3.2.8version>
        dependency>

        <dependency>
            <groupId>org.mybatisgroupId>
            <artifactId>mybatis-springartifactId>
            <version>1.2.2version>
        dependency>

        <dependency>
            <groupId>javax.servletgroupId>
            <artifactId>javax.servlet-apiartifactId>
            <version>3.0.1version>
        dependency>
        <dependency>
            <groupId>javax.servlet.jspgroupId>
            <artifactId>javax.servlet.jsp-apiartifactId>
            <version>2.3.2-b01version>
        dependency>

        <dependency>
            <groupId>javax.servletgroupId>
            <artifactId>jstlartifactId>
            <version>1.2version>
        dependency>

        <dependency>
            <groupId>mysqlgroupId>
            <artifactId>mysql-connector-javaartifactId>
            <version>5.1.34version>
        dependency>

        <dependency>
            <groupId>com.alibabagroupId>
            <artifactId>druidartifactId>
            <version>1.0.12version>
        dependency>

        <dependency>
            <groupId>junitgroupId>
            <artifactId>junitartifactId>
            <version>4.12version>
            <scope>testscope>
        dependency>
    dependencies>
    <build>
        <finalName>spring4-mybatis3finalName>
    build>
project>
二、创建数据库和表(针对MySQL)
sql创建语句如下
Create DATABASE ssm;
USE ssm;

DROP TABLE IF EXISTS t_user;
CREATE TABLE t_user (
  user_id char(32) NOT NULL,
  user_name varchar(30) DEFAULT NULL,
  user_birthday date DEFAULT NULL,
  user_salary double DEFAULT NULL,
  PRIMARY KEY (user_id)
) ENGINE=InnoDB DEFAULT CHARSET=utf8;
创建好的数据库和表如下:

三、使用generator工具生成代码
这里我们使用generator工具生成数据库对应的pojo,如果不会使用generator,可以看我的前一篇文章。具体的generatorConfig.xml配置如下
<generatorConfiguration>

  <context id="DB2Tables" targetRuntime="MyBatis3">
    <jdbcConnection driverClass="com.mysql.jdbc.Driver"
        connectionURL="jdbc:mysql://127.0.0.1:3306/ssm"
        userId="root"
        password="">
    jdbcConnection>
    <javaTypeResolver >
      <property name="forceBigDecimals" value="false" />
    javaTypeResolver>
    <javaModelGenerator targetPackage="com.ssm.domain" targetProject="./src">
      <property name="enableSubPackages" value="false" />
      <property name="trimStrings" value="true" />
    javaModelGenerator>

    <sqlMapGenerator targetPackage="com.ssm.mapping"  targetProject="./src">
      <property name="enableSubPackages" value="false" />
    sqlMapGenerator>

    <javaClientGenerator type="XMLMAPPER" targetPackage="com.ssm.dao"  targetProject="./src">
      <property name="enableSubPackages" value="false" />
    javaClientGenerator>

    <table tableName="t_user">table>
  context>
generatorConfiguration>
生成后的实体类
package com.ssm.domain;

import java.util.Date;

public class User {
    private String userId;

    private String userName;

    private Date userBirthday;

    private Double userSalary;

    public String getUserId() {
        return userId;
    }

    public void setUserId(String userId) {
        this.userId = userId == null ? null : userId.trim();
    }

    public String getUserName() {
        return userName;
    }

    public void setUserName(String userName) {
        this.userName = userName == null ? null : userName.trim();
    }

    public Date getUserBirthday() {
        return userBirthday;
    }

    public void setUserBirthday(Date userBirthday) {
        this.userBirthday = userBirthday;
    }

    public Double getUserSalary() {
        return userSalary;
    }

    public void setUserSalary(Double userSalary) {
        this.userSalary = userSalary;
    }
}
生成后的dao类
package com.ssm.dao;

import com.ssm.domain.User;

public interface UserMapper {
    int deleteByPrimaryKey(String userId);

    int insert(User record);

    int insertSelective(User record);

    User selectByPrimaryKey(String userId);

    int updateByPrimaryKeySelective(User record);

    int updateByPrimaryKey(User record);
}
生成后的mapper文件
<mapper namespace="com.ssm.dao.UserMapper" >
  <resultMap id="BaseResultMap" type="com.ssm.domain.User" >
    <id column="user_id" property="userId" jdbcType="CHAR" />
    <result column="user_name" property="userName" jdbcType="VARCHAR" />
    <result column="user_birthday" property="userBirthday" jdbcType="DATE" />
    <result column="user_salary" property="userSalary" jdbcType="DOUBLE" />
  resultMap>
  <sql id="Base_Column_List" >
    user_id, user_name, user_birthday, user_salary
  sql>
  <select id="selectByPrimaryKey" resultMap="BaseResultMap" parameterType="java.lang.String" >
    select
    <include refid="Base_Column_List" />
    from t_user
    where user_id = #{userId,jdbcType=CHAR}
  select>
  <delete id="deleteByPrimaryKey" parameterType="java.lang.String" >
    delete from t_user
    where user_id = #{userId,jdbcType=CHAR}
  delete>
  <insert id="insert" parameterType="com.ssm.domain.User" >
    insert into t_user (user_id, user_name, user_birthday,
      user_salary)
    values (#{userId,jdbcType=CHAR}, #{userName,jdbcType=VARCHAR}, #{userBirthday,jdbcType=DATE},
      #{userSalary,jdbcType=DOUBLE})
  insert>
  <insert id="insertSelective" parameterType="com.ssm.domain.User" >
    insert into t_user
    <trim prefix="(" suffix=")" suffixOverrides="," >
      <if test="userId != null" >
        user_id,
      if>
      <if test="userName != null" >
        user_name,
      if>
      <if test="userBirthday != null" >
        user_birthday,
      if>
      <if test="userSalary != null" >
        user_salary,
      if>
    trim>
    <trim prefix="values (" suffix=")" suffixOverrides="," >
      <if test="userId != null" >
        #{userId,jdbcType=CHAR},
      if>
      <if test="userName != null" >
        #{userName,jdbcType=VARCHAR},
      if>
      <if test="userBirthday != null" >
        #{userBirthday,jdbcType=DATE},
      if>
      <if test="userSalary != null" >
        #{userSalary,jdbcType=DOUBLE},
      if>
    trim>
  insert>
  <update id="updateByPrimaryKeySelective" parameterType="com.ssm.domain.User" >
    update t_user
    <set >
      <if test="userName != null" >
        user_name = #{userName,jdbcType=VARCHAR},
      if>
      <if test="userBirthday != null" >
        user_birthday = #{userBirthday,jdbcType=DATE},
      if>
      <if test="userSalary != null" >
        user_salary = #{userSalary,jdbcType=DOUBLE},
      if>
    set>
    where user_id = #{userId,jdbcType=CHAR}
  update>
  <update id="updateByPrimaryKey" parameterType="com.ssm.domain.User" >
    update t_user
    set user_name = #{userName,jdbcType=VARCHAR},
      user_birthday = #{userBirthday,jdbcType=DATE},
      user_salary = #{userSalary,jdbcType=DOUBLE}
    where user_id = #{userId,jdbcType=CHAR}
  update>
mapper>
四、spring和mybaits的具体配置
注意下面的配置文件都是放在resources目录中
首先是db.properties的配置
driverClassName=com.mysql.jdbc.Driver
validationQuery=SELECT 1
jdbc_url=jdbc:mysql://localhost:3306/ssm?useUnicode=true&characterEncoding=UTF-8&zeroDateTimeBehavior=convertToNull
jdbc_username=root
jdbc_password=
接下是spring.xml,我是放在resources/spring/spring.xml中的
<beans xmlns="http://www.springframework.org/schema/beans"
    xmlns:xsi="http://www.w3.org/2001/XMLSchema-instance" xmlns:context="http://www.springframework.org/schema/context"
    xsi:schemaLocation="
http://www.springframework.org/schema/beans
http://www.springframework.org/schema/beans/spring-beans-3.0.xsd
http://www.springframework.org/schema/context
http://www.springframework.org/schema/context/spring-context-3.0.xsd">

    <context:property-placeholder location="classpath:db.properties">context:property-placeholder>

    <context:component-scan base-package="com.ssm.service">context:component-scan>
beans>
然后是spring-dao.xml的配置
<beans xmlns="http://www.springframework.org/schema/beans" xmlns:xsi="http://www.w3.org/2001/XMLSchema-instance" xmlns:tx="http://www.springframework.org/schema/tx" xmlns:aop="http://www.springframework.org/schema/aop" xsi:schemaLocation="
http://www.springframework.org/schema/beans
http://www.springframework.org/schema/beans/spring-beans-3.0.xsd
http://www.springframework.org/schema/tx
http://www.springframework.org/schema/tx/spring-tx-3.0.xsd
http://www.springframework.org/schema/aop
http://www.springframework.org/schema/aop/spring-aop-3.0.xsd">

    <bean id="dataSource" class="com.alibaba.druid.pool.DruidDataSource">
        <property name="url" value="${jdbc_url}">property>
        <property name="username" value="${jdbc_username}">property>
        <property name="password" value="${jdbc_password}">property>

        <property name="initialSize" value="0" />

        <property name="maxActive" value="20" />

        <property name="maxIdle" value="20" />

        <property name="minIdle" value="0" />

        <property name="maxWait" value="60000" />

        <property name="validationQuery" value="${validationQuery}" />
        <property name="testOnBorrow" value="false" />
        <property name="testOnReturn" value="false" />
        <property name="testWhileIdle" value="true" />

        <property name="timeBetweenEvictionRunsMillis" value="60000" />

        <property name="minEvictableIdleTimeMillis" value="25200000" />

        <property name="removeAbandoned" value="true" />

        <property name="removeAbandonedTimeout" value="1800" />

        <property name="logAbandoned" value="true" />


        <property name="filters" value="mergeStat" />
    bean>

    <bean id="sqlSessionFactory" class="org.mybatis.spring.SqlSessionFactoryBean">

        <property name="dataSource" ref="dataSource">property>

        <property name="mapperLocations" value="classpath:com/ssm/mapping/*.xml">property>
    bean>

    <bean class="org.mybatis.spring.mapper.MapperScannerConfigurer">

        <property name="basePackage" value="com.ssm.dao">property>
        <property name="sqlSessionFactoryBeanName" value="sqlSessionFactory">property>
    bean>

    <bean id="transactionManager" class="org.springframework.jdbc.datasource.DataSourceTransactionManager">
        <property name="dataSource" ref="dataSource" />
    bean>

    <tx:advice id="transactionAdvice" transaction-manager="transactionManager">
        <tx:attributes>
            <tx:method name="add*" propagation="REQUIRED" />
            <tx:method name="append*" propagation="REQUIRED" />
            <tx:method name="insert*" propagation="REQUIRED" />
            <tx:method name="save*" propagation="REQUIRED" />
            <tx:method name="update*" propagation="REQUIRED" />
            <tx:method name="modify*" propagation="REQUIRED" />
            <tx:method name="edit*" propagation="REQUIRED" />
            <tx:method name="delete*" propagation="REQUIRED" />
            <tx:method name="remove*" propagation="REQUIRED" />
            <tx:method name="repair" propagation="REQUIRED" />
            <tx:method name="delAndRepair" propagation="REQUIRED" />

            <tx:method name="get*" propagation="SUPPORTS" />
            <tx:method name="find*" propagation="SUPPORTS" />
            <tx:method name="load*" propagation="SUPPORTS" />
            <tx:method name="search*" propagation="SUPPORTS" />
            <tx:method name="datagrid*" propagation="SUPPORTS" />

            <tx:method name="*" propagation="SUPPORTS" />
        tx:attributes>
    tx:advice>
    <aop:config>
        <aop:pointcut id="transactionPointcut" expression="execution(* me.gacl.service..*Impl.*(..))" />
        <aop:advisor pointcut-ref="transactionPointcut" advice-ref="transactionAdvice" />
    aop:config>
beans>
五、进行单元测试
经过以上的四个步骤,srping和mybatis基本整合完成,接下来进行单元测试
首先创建com.ssm.service包,并在下面创建UserServiceI接口,代码如下
package com.ssm.service;

import com.ssm.domain.User;

public interface UserServiceI
{
    void addUser(User user);
    User findUserById(String user_id);
}
接着创建一个com.smm.service.impl包,在包内创建一个针对UserServiceI接口的实现类:UserServiceImpl,代码如下
package com.ssm.service.impl;

import org.springframework.beans.factory.annotation.Autowired;
import org.springframework.stereotype.Service;

import com.ssm.dao.UserMapper;
import com.ssm.domain.User;
import com.ssm.service.UserServiceI;
@Service("userService")
public class UserServiceImpl implements UserServiceI
{
    @Autowired
    private UserMapper userMapper;
    @Override
    public void addUser(User user)
    {
        userMapper.insert(user);
    }
    @Override
    public User findUserById(String user_id)
    {
        return userMapper.selectByPrimaryKey(user_id);
    }

}
最后在src/test/java目录下创建com.ssm.test测试包,并在里面创建MybatisTest测试类,代码如下
package com.ssm.test;

import java.util.Date;

import org.junit.Before;
import org.junit.Test;
import org.springframework.context.ApplicationContext;
import org.springframework.context.support.ClassPathXmlApplicationContext;

import com.ssm.domain.User;
import com.ssm.service.UserServiceI;

public class MybatisTest
{
    private UserServiceI userService;
    @Before
    public void setUp()
    {
        ApplicationContext bean =new  ClassPathXmlApplicationContext(new String[] {"classpath:spring/spring.xml","classpath:spring/spring-dao.xml"});
        userService = (UserServiceI) bean.getBean("userService");
    }
    @Test
    public void testAddUser()
    {
        User user = new User();
        user.setUserId("3");
        user.setUserBirthday(new Date());
        user.setUserName("gatsby");
        user.setUserSalary(10000.0);
        userService.addUser(user);
    }
}
运行该测试类,成功运行

如果遇到项目出错,首先检查之前的配置是否正确,然后右击pom.xml文件,DEBUG AS-MAVEN INSTALL,出现下图结果后再次尝试运行
到这里整合完毕,遇到任何问题欢迎留言讨论
