走进Spring Cloud之七 简单Zuul(路由网关)(Greenwich版本)
走进Spring Cloud之七 简单Zuul(路由网关)(Greenwich版本)
- API Gateway
- Spring Cloud Zuul
- service-zuul
- pom.xml
- application.yml
- ServiceZuulApplication.java
- 启动测试
- 负载均衡
- application-test.yml
- ProducerController.java
- 启动测试
API Gateway
在 Spring Cloud 的在微服务架构中,前端的应用往往是不可以直接调用我们提供的微服务,而是通过一个API Gateway根据请求的url,路由到相应的服务。当添加API Gateway后,在第三方调用端和服务提供方之间就创建了一面墙,这面墙直接与调用方通信进行权限控制,后将请求均衡分发给后台服务端。
API Gateway是一个更为智能的应用服务器,它的定义类似于面向对象设计模式中的Facade模式,它的存在就像是整个微服务架构系统的门面一样,所有的外部客户端访问都需要经过它来进行调度和过滤。它除了要实现请求路由、 负载均衡、 校验过滤等功能之外,还需要更多能力,比如与服务治理框架的结合、请求转发时的熔断机制、服务的聚合等一系列高级功能。
Spring Cloud官方推出的第二代网关框架Spring Cloud Gateway,用于取代Spring Cloud Zuul网关。
Spring Cloud Zuul
在SpringCloud中了提供了基于Netflix Zuul实现的API网关组件Spring Cloud Zuul。
SpringCloud Zuul可以通过与SpringCloud Eureka进行整合,将自身注册为Eureka服务治理下的应用,同时从Eureka中获得了所有其他微服务的实例信息。这样的设计非常巧妙地将服务治理体系中维护的实例信息利用起来,使得将维护服务实例的工作交给了服务治理框架自动完成,不再需要人工介入。
SpringCloud Zuul提供了一套过滤器机制,它可以 很好地支持这样的任务。开发者可以通过使用Zuul来创建各种校验过滤器,然后指定哪些规则的请求需要执行校验逻辑,只有通过校验的才会被路由到具体的微服务接口,不然就返回错误提示。通过这样的改造,各个业务层的微服务应用就不再需要非业务性质的校验逻辑了,这使得我们的微服务应用可以更专注千业务逻辑的开发,同时微服务的自动化测试也变得更容易实现。
我们可以利用SpringCloud Zuul完成路由转发和过滤器的功能/api/user转发到到user服务,/api/shop转发到到shop服务。
service-zuul
新建moudle ->service-zuul
pom.xml
修改pom.xml添加spring-cloud-starter-netflix-zuul依赖
<project xmlns="http://maven.apache.org/POM/4.0.0"
         xmlns:xsi="http://www.w3.org/2001/XMLSchema-instance"
         xsi:schemaLocation="http://maven.apache.org/POM/4.0.0 http://maven.apache.org/xsd/maven-4.0.0.xsd">
    <parent>
        <artifactId>scexampleartifactId>
        <groupId>com.pubutechgroupId>
        <version>0.0.1-SNAPSHOTversion>
    parent>
    <modelVersion>4.0.0modelVersion>

    <artifactId>service-zuulartifactId>
    <packaging>jarpackaging>

    <dependencies>
        <dependency>
            <groupId>org.springframework.cloudgroupId>
            <artifactId>spring-cloud-starter-netflix-eureka-clientartifactId>
        dependency>
        <dependency>
            <groupId>org.springframework.cloudgroupId>
            <artifactId>spring-cloud-starter-netflix-zuulartifactId>
        dependency>
    dependencies>

    <dependencyManagement>
        <dependencies>
            <dependency>
                <groupId>org.springframework.cloudgroupId>
                <artifactId>spring-cloud-dependenciesartifactId>
                <version>${spring-cloud.version}version>
                <type>pomtype>
                <scope>importscope>
            dependency>
        dependencies>
    dependencyManagement>

    <build>
        <plugins>
            <plugin>
                <groupId>org.springframework.bootgroupId>
                <artifactId>spring-boot-maven-pluginartifactId>
            plugin>
        plugins>
    build>


project>
application.yml
在resources目录下新建application.yml并且添加配置信息
eureka:
  client:
    service-url:
      #设置与Eureka Server交互的地址,查询服务和注册服务都需要依赖这个地址。默认是http://localhost:8761/eureka ;多个地址可使用 , 分隔。
      defaultZone: http://localhost:8761/eureka/,http://localhost:8762/eureka/,http://localhost:8763/eureka/

server:
  port: 8070

spring:
  application:
    name: service-zuul

zuul:
  routes:
    #/api-a/ 开头匹配到service-producer
    api-a:
      path: /api-a/**
      serviceId: service-producer
    #/api-b/ 开头匹配到service-producer
    api-b:
      path: /api-b/**
      serviceId: service-producer
    #匹配/github/直接重定向到https://github.com/
    github:
      path: /github/**
      url: https://github.com/
ServiceZuulApplication.java
构建SpringBoot启动应用ServiceZuulApplication
@EnableEurekaClient
@EnableDiscoveryClient
//支持网关路由
@EnableZuulProxy
@SpringBootApplication(exclude = {DataSourceAutoConfiguration.class})
public class ServiceZuulApplication {

    public static void main(String[] args) {
        SpringApplication.run(ServiceZuulApplication.class, args);
    }

}
启动测试
启动我们的producer和zuul
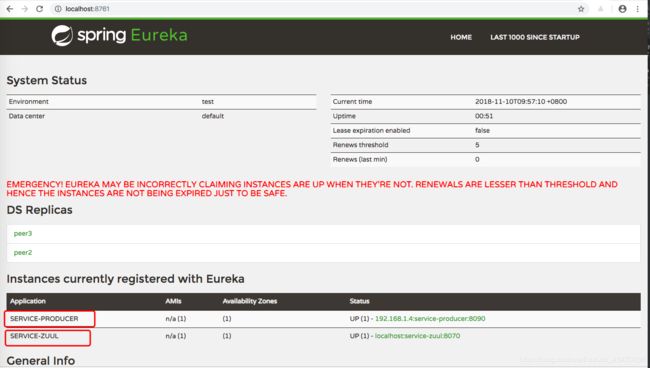
再次访问 localhost:8761

此时我们的服务注册成功.
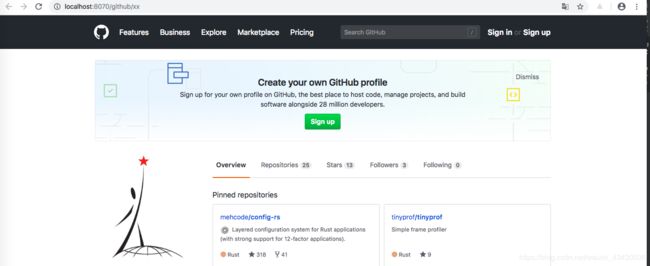
此时,我们访问http://localhost:8070/github/xx

github成功访问。
此时,我们继续访问http://localhost:8070/api-a/hello?name=jason
由此可见,zuul可以为我们成功分发我们的服务。
负载均衡
前面我们已经成功测试了zuul的路由功能,接下来演示一下,zuul的负载均衡功能。
为了演示负载均衡,我们需要启动多个producer,这里我们对service-producer子moudle稍作改动
application-test.yml
service-producer子moudle的resources目录新建application-test.yml,为了服务运行在同一台机器,我们可以修改运行端口
server:
  port: 8091

spring:
  application:
    name: service-producer

eureka:
  client:
    service-url:
      #设置与Eureka Server交互的地址,查询服务和注册服务都需要依赖这个地址。默认是http://localhost:8761/eureka ;多个地址可使用 , 分隔。
      defaultZone: http://localhost:8761/eureka/,http://localhost:8762/eureka/,http://localhost:8763/eureka/
ProducerController.java
修改ProducerController服务,体现出我们的服务是来自于那里。
@RestController
public class ProducerController {


    @Value("${server.port}")
    String port;

    @RequestMapping("/hello")
    public String hello(@RequestParam String name) {
        return "hello "+name+",from "+ port+ " this is new world";
    }

}
启动测试
这里还是一样,顺序启动我们的注册中心,zuul.
然后分别
java -jar service-producer-0.0.1-SNAPSHOT.jar
java -jar service-producer-0.0.1-SNAPSHOT.jar  --spring.profiles.active=test
我们已经有多个服务者了。
此时访问http://localhost:8070/api-a/hello?name=jason

再次访问http://localhost:8070/api-a/hello?name=jason

看见在多服务提供者的时候我们最终的服务者会负载均衡。
GitHub源代码


