感知机算法python实现
我们以统计学习方法的三要素为大纲,来对感知机进行介绍。其三要素分别为:模型、策略、算法,其详细介绍可见:https://blog.csdn.net/DXMARK/article/details/89390881
ps: 此专题为AI领域经典算法书籍及论文解析与代码复现,AI算法讲解。欢迎关注知乎专栏《致敬图灵》
https://www.zhihu.com/people/li-zhi-hao-32-6/columns
微信公众号:‘致敬图灵’。
1.算法思想
首先我们要确定模型的假设空间,感知机模型的假设空间为一个sign(WX+b),WX+b中,W为待求的参数的向量,X为特征向量,b为偏差。确定模型后,我们要对感知机的参数进行确定,确定参数后,我们就完成了感知机的设计。
确定参数的第一步是设计策略,即风险函数,感知机方法中,并没有采用整体的数据准确率作为算法的策略,因为他首先假设了数据是线性可分的,本文的策略是判断每一个数据的预测是否是准确的,若准确则进行下一个样本点的更新,若不准确,则通过算法进行参数的更新,直到能够准确地进行分类。
接下来进行算法的设计,本文采用的是梯度下降法,关于梯度下降法的介绍可以见我之前的文章:https://blog.csdn.net/DXMARK/article/details/89049281
因此算法如下:
1.2算法实践
本文采用图像数据0-10(借用wds2006sdo大佬处理后的数据),若图像非零则为标签设置为1,若图像为0则标签设置为0。

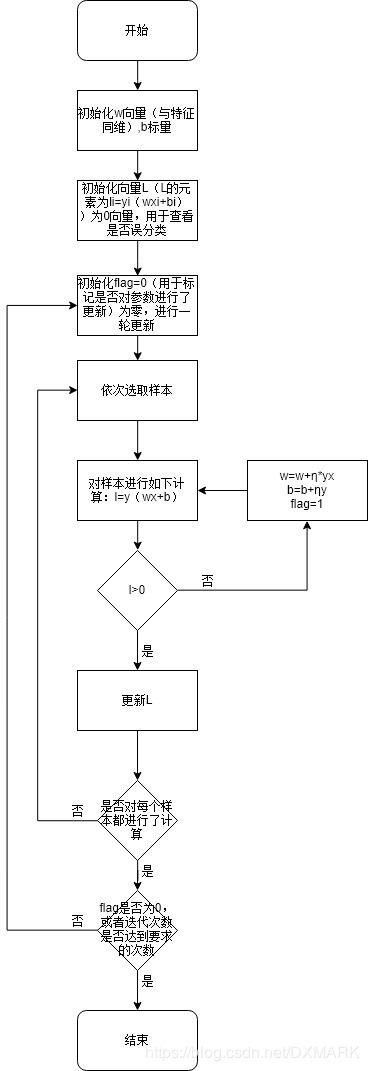
根据上述算法的描述,可以得出以下的算法流程图:
下面贴出算法的python代码实现:
import pandas as pd
import numpy as np
import time

from sklearn.cross_validation import train_test_split
from sklearn.metrics import accuracy_score


iteration_num=100
b=0
IMAGE_SIZE=40

def lalel_y(y): #求输出y
    if(y==0):
        return -1
    else:
        return 1

def perceptron(X,Y,W,b,a,iteration_num):
    right=0
    for i in range(iteration_num):#迭代多轮,每一轮迭代都会对样本中的所有数据进行拟合。
        print('iteration_num{}'.format(i))
        flag=0
        for j in range(m): #对样本中的每一个数据进行处理
            print('样本{}'.format(j))
            L[j]=lalel_y(Y[j])*(np.dot(X[j].reshape(1, n),W)+b)
            while(L[j]<=0):
                flag = 1
                W=W+a*(X[j].reshape(n, 1))*lalel_y(Y[j])  #梯度下降
                b = b + a * Y[j]  # 梯度下降
                L[j] = lalel_y(Y[j]) * (np.dot(X[j].reshape(1, n),W)+b)
                print('loss:{}'.format(L[j]))

        if(flag==0):
            break
    for j in range(m):
        L[j] = lalel_y(Y[j]) * (np.dot(X[j].reshape(1, n),W) + b)
        if(L[j]>0):
            right=right+1
    return W,b

def predict(X,W,b):
    y_predict=[]
    for i in range(len(X)):
        y = np.dot(X[i].reshape(1, n), W) + b
        if(y<0):
            y=0
        else:
            y=1
        y_predict.append(y)
    return y_predict

time_1 = time.time()

raw_data = pd.read_csv('./train_binary.csv', header=0)
data = raw_data.values

imgs = data[0::, 1::]
labels = data[::, 0]

# 选取 2/3 数据作为训练集, 1/3 数据作为测试集
train_features, test_features, train_labels, test_labels = train_test_split(
    imgs, labels, test_size=0.33, random_state=23323)

m=len(train_labels) #样本数m
n= len(imgs[1])#特征数n

a=0.5#学习率
X = np.zeros((m,n))
Y = np.zeros((m,1))
L=np.zeros((m,1))
W=np.zeros((n,1))

time_2 = time.time()
print('read data cost ', time_2 - time_1, ' second', '\n')
print('Start training')

W,b = perceptron(train_features, train_labels,W,b,a,iteration_num)

time_3 = time.time()
print('training cost ', time_3 - time_2, ' second', '\n')

print('Start predicting')
test_predict = predict(test_features,W,b)
time_4 = time.time()
print('predicting cost ', time_4 - time_3, ' second', '\n')

score = accuracy_score(test_labels, test_predict)
print("The accruacy socre is ", score)
最后结果还不错 ,准确率为0.98左右。

