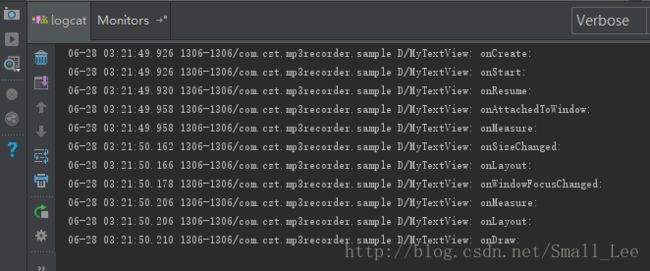
View的生命周期和Activity生命周期的执行顺序
前言
了解了View的生命周期和Activity的生命周期能够让我们更好的理解View的工作原理。
代码
我们先写一个自定义View,然后打印出它的生命周期方法
public class MyTextView extends TextView {
    private static final String TAG = "MyTextView";
    public MyTextView(Context context) {
        super(context);
    }

    public MyTextView(Context context, @Nullable AttributeSet attrs) {
        super(context, attrs);
    }

    @Override
    protected void onMeasure(int widthMeasureSpec, int heightMeasureSpec) {
        Log.d(TAG, "onMeasure: ");
        super.onMeasure(widthMeasureSpec, heightMeasureSpec);
    }

    @Override
    protected void onDraw(Canvas canvas) {
        Log.d(TAG, "onDraw: ");
        super.onDraw(canvas);
    }

    @Override
    protected void onLayout(boolean changed, int left, int top, int right, int bottom) {
        Log.d(TAG, "onLayout: ");
        super.onLayout(changed, left, top, right, bottom);
    }

    @Override
    protected void onAttachedToWindow() {
        super.onAttachedToWindow();
        Log.d(TAG, "onAttachedToWindow: ");
    }

    @Override
    protected void onSizeChanged(int w, int h, int oldw, int oldh) {
        super.onSizeChanged(w, h, oldw, oldh);
        Log.d(TAG, "onSizeChanged: ");
    }
}
然后在Activity的布局中引用这个View,然后我们在Activity中打印出生命周期方法
public class MainActivity extends Activity {
    private static final String TAG = "MyTextView";
    @Override
    public void onCreate(Bundle savedInstanceState) {
        super.onCreate(savedInstanceState);
        setContentView(R.layout.main);
        Log.d(TAG, "onCreate: ");
    }

    @Override
    protected void onStart() {
        Log.d(TAG, "onStart: ");
        super.onStart();
    }

    @Override
    protected void onResume() {
        Log.d(TAG, "onResume: ");
        super.onResume();
    }

    @Override
    public void onWindowFocusChanged(boolean hasFocus) {
        Log.d(TAG, "onWindowFocusChanged: ");
        super.onWindowFocusChanged(hasFocus);
    }
}
最终结果如下
下面在记录一下触摸事件产生的过程。
触摸事件被系统处理后,会传到ViewRootImpl中进行进一步处理,
final class WindowInputEventReceiver extends InputEventReceiver {
        public WindowInputEventReceiver(InputChannel inputChannel, Looper looper) {
            super(inputChannel, looper);
        }
        //接受事件
        @Override
        public void onInputEvent(InputEvent event) {
            enqueueInputEvent(event, this, 0, true);
        }

        @Override
        public void onBatchedInputEventPending() {
            if (mUnbufferedInputDispatch) {
                super.onBatchedInputEventPending();
            } else {
                scheduleConsumeBatchedInput();
            }
        }

        @Override
        public void dispose() {
            unscheduleConsumeBatchedInput();
            super.dispose();
        }
    }
void enqueueInputEvent(InputEvent event,
InputEventReceiver receiver, int flags, boolean processImmediately) {
QueuedInputEvent q = obtainQueuedInputEvent(event, receiver, flags);
// Always enqueue the input event in order, regardless of its time stamp.
// We do this because the application or the IME may inject key events
// in response to touch events and we want to ensure that the injected keys
// are processed in the order they were received and we cannot trust that2 // the time stamp of injected events are monotonic.
QueuedInputEvent last = mPendingInputEventTail;
if (last == null) {
mPendingInputEventHead = q;
mPendingInputEventTail = q;
} else {
last.mNext = q;
mPendingInputEventTail = q;
}
mPendingInputEventCount += 1;
Trace.traceCounter(Trace.TRACE_TAG_INPUT, mPendingInputEventQueueLengthCounterName,
mPendingInputEventCount);
if (processImmediately) {
doProcessInputEvents();
} else {
scheduleProcessInputEvents();
}
} void doProcessInputEvents() {
// Deliver all pending input events in the queue.
while (mPendingInputEventHead != null) {
QueuedInputEvent q = mPendingInputEventHead;
mPendingInputEventHead = q.mNext;
if (mPendingInputEventHead == null) {
mPendingInputEventTail = null;
}
q.mNext = null;
mPendingInputEventCount -= 1;
Trace.traceCounter(Trace.TRACE_TAG_INPUT, mPendingInputEventQueueLengthCounterName,
mPendingInputEventCount);
deliverInputEvent(q);
}
// We are done processing all input events that we can process right now
// so we can clear the pending flag immediately.
if (mProcessInputEventsScheduled) {
mProcessInputEventsScheduled = false;
mHandler.removeMessages(MSG_PROCESS_INPUT_EVENTS);
}
} private void deliverInputEvent(QueuedInputEvent q) {
5687 Trace.asyncTraceBegin(Trace.TRACE_TAG_VIEW, "deliverInputEvent",
q.mEvent.getSequenceNumber());
if (mInputEventConsistencyVerifier != null) {
mInputEventConsistencyVerifier.onInputEvent(q.mEvent, 0);
}
InputStage stage;
if (q.shouldSendToSynthesizer()) {
stage = mSyntheticInputStage;
} else {
stage = q.shouldSkipIme() ? mFirstPostImeInputStage : mFirstInputStage;
}
if (stage != null) {
stage.deliver(q);
} else {
finishInputEvent(q);
}
}接下来我们看看InputStage
在ViewRootImpl的setView方法中,进行了InputStage的初始化
  mSyntheticInputStage = new SyntheticInputStage();
                InputStage viewPostImeStage = new ViewPostImeInputStage(mSyntheticInputStage);
                InputStage nativePostImeStage = new NativePostImeInputStage(viewPostImeStage,
                        "aq:native-post-ime:" + counterSuffix);
                InputStage earlyPostImeStage = new EarlyPostImeInputStage(nativePostImeStage);
                InputStage imeStage = new ImeInputStage(earlyPostImeStage,
                        "aq:ime:" + counterSuffix);
                InputStage viewPreImeStage = new ViewPreImeInputStage(imeStage);
                InputStage nativePreImeStage = new NativePreImeInputStage(viewPreImeStage,
                        "aq:native-pre-ime:" + counterSuffix);
final class ViewPostImeInputStage extends InputStage {
public ViewPostImeInputStage(InputStage next) {
super(next);
}
@Override
protected int onProcess(QueuedInputEvent q) {
if (q.mEvent instanceof KeyEvent) {
return processKeyEvent(q);
} else {
// If delivering a new non-key event, make sure the window is
// now allowed to start updating.
handleDispatchDoneAnimating();
final int source = q.mEvent.getSource();
if ((source & InputDevice.SOURCE_CLASS_POINTER) != 0) {
return processPointerEvent(q);
} else if ((source & InputDevice.SOURCE_CLASS_TRACKBALL) != 0) {
return processTrackballEvent(q);
} else {
return processGenericMotionEvent(q);
}
}
}我们看看processPointerEvent这个方法。
 private int processPointerEvent(QueuedInputEvent q) {
            final MotionEvent event = (MotionEvent)q.mEvent;

            mAttachInfo.mUnbufferedDispatchRequested = false;
            boolean handled = mView.dispatchPointerEvent(event);
            if (mAttachInfo.mUnbufferedDispatchRequested && !mUnbufferedInputDispatch) {
                mUnbufferedInputDispatch = true;
                if (mConsumeBatchedInputScheduled) {
                    scheduleConsumeBatchedInputImmediately();
                }
            }
            return handled ? FINISH_HANDLED : FORWARD;
        }
这里调用了mView.dispatchPointerEvent这个方法。
mView是DecorView,我们并没有在DecorView里发现这个方法,于是我们在View中去找。
  public final boolean dispatchPointerEvent(MotionEvent event) {
        if (event.isTouchEvent()) {
            return dispatchTouchEvent(event);
        } else {
            return dispatchGenericMotionEvent(event);
        }
    }
接下来调用了DecorView的dispatchTouchEvent方法,
 @Override
        public boolean dispatchTouchEvent(MotionEvent ev) {
            final Callback cb = getCallback();
            return cb != null && !isDestroyed() && mFeatureId < 0 ? cb.dispatchTouchEvent(ev)
                    : super.dispatchTouchEvent(ev);
        }
这里我们看cb.dispathTouchEvent这个方法,cb是Window.Callback对象,而Activity实现了这个接口,所以调用了Activity中的
 public boolean dispatchTouchEvent(MotionEvent ev) {
        if (ev.getAction() == MotionEvent.ACTION_DOWN) {
            onUserInteraction();
        }
        if (getWindow().superDispatchTouchEvent(ev)) {
            return true;
        }
        return onTouchEvent(ev);
    }
又把事件传到了Window中,我们知道这个Window是PhoneWindow,
 @Override
public boolean superDispatchTouchEvent(MotionEvent event) {
        return mDecor.superDispatchTouchEvent(event);
    }
又到了DecorView的superDispatchTouchEvent方法,
public boolean superDispatchTouchEvent(MotionEvent event) {
            return super.dispatchTouchEvent(event);
        }
到这里就调用了ViewGroup的dispatchTouchEvent开始分发事件。
