TensorFLow基础:使用TensorBoard进行可视化学习
##使用TensorBoard进行可视化学习
TensorFlow涉及到的运算,往往是在训练庞大的神经网络过程中出现的复杂且难以理解的运算,为了方便对程序进行理解、调试和优化,tensorflow提供了一个叫做tensorboard的可视化工具来对模型以及训练过程进行可视化描述。你可以使用它来展示模型结构,绘制出关键参数的变化过程图,观察训练过程并根据图形适当调整模型参数。
以下是一个使用tensorboard进行可视化的一个实例,该例构建了一个两层深度网络模型,并在训练的过程中对一些参数及准确度做了记录,并可以在tensorboard中以图表方式展现,图片见代码部分后面。
from __future__ import absolute_import
from __future__ import division
from __future__ import print_function

import argparse
import os
import sys

import tensorflow as tf

from tensorflow.examples.tutorials.mnist import input_data

FLAGS = None


def train():
  #输入数据
  mnist = input_data.read_data_sets(FLAGS.data_dir, fake_data=FLAGS.fake_data)
  #创建一个tensorflow交互式会话
  sess = tf.InteractiveSession()
  #建立一个多层模型 事实上该示例只有2层

  #插入placeholder
  #placeholder(type,…) 用于保存数据 第一个参数用于指定数据类型 第二个参数指定数据结构 其余可选
  with tf.name_scope('input'):
    x = tf.placeholder(tf.float32, [None, 784], name='x-input')
    y_ = tf.placeholder(tf.int64, [None], name='y-input')

  with tf.name_scope('input_reshape'):
    image_shaped_input = tf.reshape(x, [-1, 28, 28, 1])
    tf.summary.image('input', image_shaped_input, 10)

  #下面的变量不能初始化为零 否则整个网络将会阻塞
  def weight_variable(shape):
    """Create a weight variable with appropriate initialization."""
    initial = tf.truncated_normal(shape, stddev=0.1)
    return tf.Variable(initial)

  def bias_variable(shape):
    """Create a bias variable with appropriate initialization."""
    initial = tf.constant(0.1, shape=shape)
    return tf.Variable(initial)

  def variable_summaries(var):
    """Attach a lot of summaries to a Tensor (for tensorboard visualization)."""
    with tf.name_scope('summaries'):
      mean = tf.reduce_mean(var)
      tf.summary.scalar('mean', mean)
      with tf.name_scope('stddev'):
        stddev = tf.sqrt(tf.reduce_mean(tf.square(var - mean)))
      tf.summary.scalar('stddev', stddev)
      tf.summary.scalar('max', tf.reduce_max(var))
      tf.summary.scalar('min', tf.reduce_min(var))
      tf.summary.histogram('histogram', var)

  def nn_layer(input_tensor, input_dim, output_dim, layer_name, act=tf.nn.relu):
    '''Make a simple neural net layer.
    It does a matrix multiply, bias add, then use RelU to nonlinearize.
    It also sets up name scoping to make resultant graph easy to read.
    It adds a number of summary ops.
    '''
    #添加一个namescope确保图中的层的逻辑分组正常进行
    with tf.name_scope(layer_name):
      #下面的变量会保存当前层的权值状态
      with tf.name_scope('weights'):
        weights = weight_variable([input_dim, output_dim])
        variable_summaries(weights)
      with tf.name_scope('biases'):
        biases = bias_variable([output_dim])
        variable_summaries(biases)
      with tf.name_scope('Wx_plus_b'):
        preactivate = tf.matmul(input_tensor, weights) + biases
        tf.summary.histogram('pre_activations', preactivate)
      activations = act(preactivate, name='activation')
      tf.summary.histogram('activations', activations)
      return activations
  hidden1 = nn_layer(x, 784, 500, 'layer1')

  with tf.name_scope('dropout'):
    keep_prob = tf.placeholder(tf.float32)
    tf.summary.scalar('dropout_keep_probability', keep_prob)
    dropped = tf.nn.dropout(hidden1, keep_prob)

  y = nn_layer(dropped, 500, 10, 'layer2', act=tf.identity)

  with tf.name_scope('cross_entropy'):
    #原始交叉熵,计算方法如下
    #tf.reduce_mean(-tf.reduce_sum(y_ * tf.log(tf.softmax(y)), reduction_indices=[1])
    #它在数值上是不稳定的
    #因此我们在这里用了tf.losses.sparse_softmax_cross_entropy
    #它在上层nn_layer的logit原始输出上取了整个bacth的平均值
    with tf.name_scope('total'):
      cross_entropy = tf.losses.sparse_softmax_cross_entropy(
          labels=y_, logits=y)
  tf.summary.scalar('cross_entropy', cross_entropy)

  with tf.name_scope('train'):
    train_step = tf.train.AdamOptimizer(FLAGS.learning_rate).minimize(
        cross_entropy)

  with tf.name_scope('accuracy'):
    with tf.name_scope('correct_prediction'):
      correct_prediction = tf.equal(tf.argmax(y, 1), y_)
    with tf.name_scope('accuracy'):
      accuracy = tf.reduce_mean(tf.cast(correct_prediction, tf.float32))
  tf.summary.scalar('accuracy', accuracy)

  #合并所有summary并写入日志路径:/tmp/mnist_log(本例使用的路径)
  merged = tf.summary.merge_all()
  train_writer = tf.summary.FileWriter(FLAGS.log_dir + '/train', sess.graph)
  test_writer = tf.summary.FileWriter(FLAGS.log_dir + '/test')
  tf.global_variables_initializer().run()

  #训练模型同时写出summary
  #本例每隔10个步长 计算模型在测试集上的准确度 并写出当前测试的summaries
  #在所有其他的步长 在训练集上运行train_step并添加训练的summaries

  def feed_dict(train):
    """Make a TensorFlow feed_dict: maps data onto Tensor placeholders."""
    if train or FLAGS.fake_data:
      xs, ys = mnist.train.next_batch(100, fake_data=FLAGS.fake_data)
      k = FLAGS.dropout
    else:
      xs, ys = mnist.test.images, mnist.test.labels
      k = 1.0
    return {x: xs, y_: ys, keep_prob: k}

  for i in range(FLAGS.max_steps):
    if i % 10 == 0:  #当前step记录summary以及模型在测试集上的准确度
      summary, acc = sess.run([merged, accuracy], feed_dict=feed_dict(False))
      test_writer.add_summary(summary, i)
      print('Accuracy at step %s: %s' % (i, acc))
    else:  #当前step记录summary并训练
      if i % 100 == 99:  #记录当前执行状态
        run_options = tf.RunOptions(trace_level=tf.RunOptions.FULL_TRACE)
        run_metadata = tf.RunMetadata()
        summary, _ = sess.run([merged, train_step],
                              feed_dict=feed_dict(True),
                              options=run_options,
                              run_metadata=run_metadata)
        train_writer.add_run_metadata(run_metadata, 'step%03d' % i)
        train_writer.add_summary(summary, i)
        print('Adding run metadata for', i)
      else:  #记录一个summary
        summary, _ = sess.run([merged, train_step], feed_dict=feed_dict(True))
        train_writer.add_summary(summary, i)
  train_writer.close()
  test_writer.close()


def main(_):
  if tf.gfile.Exists(FLAGS.log_dir):
    tf.gfile.DeleteRecursively(FLAGS.log_dir)
  tf.gfile.MakeDirs(FLAGS.log_dir)
  train()

if __name__ == '__main__':
  '''
  max_step 最大迭代次数
  learning_rate 学习率
  dropout dropout时随机保留的神经元的比例
  help里的英文即是参数注释
  '''
  parser = argparse.ArgumentParser()
  parser.add_argument('--fake_data', nargs='?', const=True, type=bool,
                      default=False,
                      help='If true, uses fake data for unit testing.')
  parser.add_argument('--max_steps', type=int, default=1000,
                      help='Number of steps to run trainer.')
  parser.add_argument('--learning_rate', type=float, default=0.001,
                      help='Initial learning rate')
  parser.add_argument('--dropout', type=float, default=0.9,
                      help='Keep probability for training dropout.')
  parser.add_argument(
      '--data_dir',
      type=str,
      default=os.path.join(os.getenv('TEST_TMPDIR', '/tmp'),
                           'mnist'),
      help='Directory for storing input data')
  parser.add_argument(
      '--log_dir',
      type=str,
      default=os.path.join(os.getenv('TEST_TMPDIR', '/tmp'),
                           'mnist_log'),
      help='Summaries log directory')
  FLAGS, unparsed = parser.parse_known_args()
tf.app.run(main=main, argv=[sys.argv[0]] + unparsed)
过程中的输出如下:
Extracting /tmp/mnist/train-images-idx3-ubyte.gz
Extracting /tmp/mnist/train-labels-idx1-ubyte.gz
Extracting /tmp/mnist/t10k-images-idx3-ubyte.gz
Extracting /tmp/mnist/t10k-labels-idx1-ubyte.gz

Accuracy at step 0: 0.1363
Accuracy at step 10: 0.7112
Accuracy at step 20: 0.8307
Accuracy at step 30: 0.8597
Accuracy at step 40: 0.8779
Accuracy at step 50: 0.8875
Accuracy at step 60: 0.8972
Accuracy at step 70: 0.904
Accuracy at step 80: 0.9092
Accuracy at step 90: 0.9147
Adding run metadata for 99
Accuracy at step 100: 0.9176
Accuracy at step 110: 0.9208
Accuracy at step 120: 0.9163
Accuracy at step 130: 0.9269
Accuracy at step 140: 0.9289
Accuracy at step 150: 0.927
Accuracy at step 160: 0.9307
Accuracy at step 170: 0.9307
Accuracy at step 180: 0.9311
Accuracy at step 190: 0.9329
Adding run metadata for 199
Accuracy at step 200: 0.9363
Accuracy at step 210: 0.9327
Accuracy at step 220: 0.9379
Accuracy at step 230: 0.9366
Accuracy at step 240: 0.9362
Accuracy at step 250: 0.9384
Accuracy at step 260: 0.9388
Accuracy at step 270: 0.9405
Accuracy at step 280: 0.9394
Accuracy at step 290: 0.9423
Adding run metadata for 299
Accuracy at step 300: 0.9396
Accuracy at step 310: 0.9475
Accuracy at step 320: 0.9471
Accuracy at step 330: 0.9458
Accuracy at step 340: 0.9489
Accuracy at step 350: 0.949
Accuracy at step 360: 0.9517
Accuracy at step 370: 0.9486
Accuracy at step 380: 0.9512
Accuracy at step 390: 0.9525
Adding run metadata for 399
Accuracy at step 400: 0.9503
Accuracy at step 410: 0.9524
Accuracy at step 420: 0.9475
Accuracy at step 430: 0.9558
Accuracy at step 440: 0.951
Accuracy at step 450: 0.9559
Accuracy at step 460: 0.953
Accuracy at step 470: 0.9529
Accuracy at step 480: 0.9563
Accuracy at step 490: 0.9558
Adding run metadata for 499
Accuracy at step 500: 0.9579
Accuracy at step 510: 0.9575
Accuracy at step 520: 0.9577
Accuracy at step 530: 0.9558
Accuracy at step 540: 0.9562
Accuracy at step 550: 0.9594
Accuracy at step 560: 0.9583
Accuracy at step 570: 0.9555
Accuracy at step 580: 0.9603
Accuracy at step 590: 0.9592
Adding run metadata for 599
Accuracy at step 600: 0.9595
Accuracy at step 610: 0.9597
Accuracy at step 620: 0.9609
Accuracy at step 630: 0.9605
Accuracy at step 640: 0.9607
Accuracy at step 650: 0.9597
Accuracy at step 660: 0.9621
Accuracy at step 670: 0.9622
Accuracy at step 680: 0.9629
Accuracy at step 690: 0.9621
Adding run metadata for 699
Accuracy at step 700: 0.9634
Accuracy at step 710: 0.9626
Accuracy at step 720: 0.9637
Accuracy at step 730: 0.9635
Accuracy at step 740: 0.964
Accuracy at step 750: 0.9622
Accuracy at step 760: 0.966
Accuracy at step 770: 0.9641
Accuracy at step 780: 0.9648
Accuracy at step 790: 0.9636
Adding run metadata for 799
Accuracy at step 800: 0.9627
Accuracy at step 810: 0.9622
Accuracy at step 820: 0.9664
Accuracy at step 830: 0.9662
Accuracy at step 840: 0.9658
Accuracy at step 850: 0.967
Accuracy at step 860: 0.9662
Accuracy at step 870: 0.9649
Accuracy at step 880: 0.9683
Accuracy at step 890: 0.9652
Adding run metadata for 899
Accuracy at step 900: 0.9679
Accuracy at step 910: 0.9689
Accuracy at step 920: 0.9683
Accuracy at step 930: 0.9695
Accuracy at step 940: 0.967
Accuracy at step 950: 0.9689
Accuracy at step 960: 0.968
Accuracy at step 970: 0.9702
Accuracy at step 980: 0.9688
Accuracy at step 990: 0.9705
Adding run metadata for 999

An exception has occurred, use %tb to see the full traceback.

SystemExit

/home/steve/.conda/envs/tensorflow/lib/python3.6/site-packages/IPython/core/interactiveshell.py:2918: UserWarning: To exit: use 'exit', 'quit', or Ctrl-D.
warn("To exit: use 'exit', 'quit', or Ctrl-D.", stacklevel=1)
###TensorBoard真容
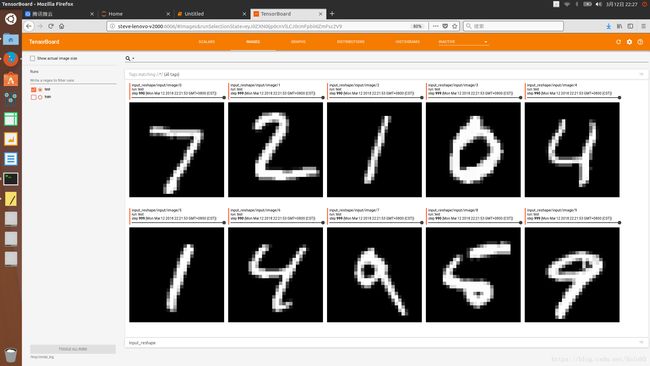
建议放大图片观看。
####简要说明
相对熵(relative entropy)即KL散度(Kullback–Leibler divergence)[9],用于衡量两个概率分布之间的差异。
对于2个概率分布p(x)、q(x), 其相对熵的计算公式为:
KL(p || q) = -∫p(x)lnq(x)dx - (-∫p(x)lnp(x)dx)
上述代码中计算的交叉熵(cross entropy)即为公式的前半部分:
-∫p(x)lnq(x)dx
在机器学习中,p(x)代表数据真实的概率分布,q(x)是经由模型计算产生的概率分布。我们训练的目的就是使p(x)和q(x)尽可能地接近。也就是使相对熵为0。真实的概率分布P(x)是一个固定值,也就是说相对熵公式的后半部分是固定值。那么只要交叉熵取得最小值,相对熵也同时取得最小值。对交叉熵求最小值,也等价于求最大似然估计。
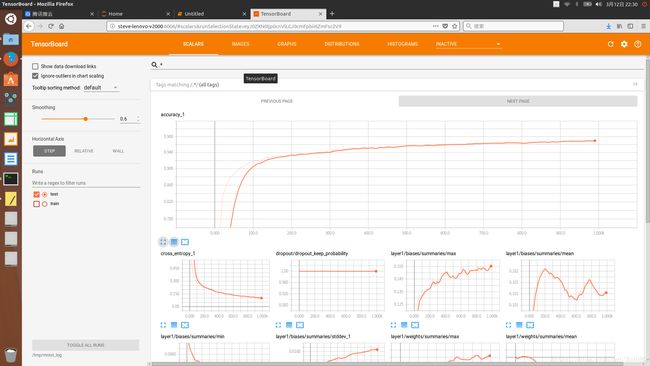
在第一张图片(Scalars 选项卡)中,你可以看到训练过程中,随着准确度的增大,交叉熵在减小。
机器学习对模型的训练目标在数值上也体现为使交叉熵取得最小值,当然准确度是一个更为直观的值。
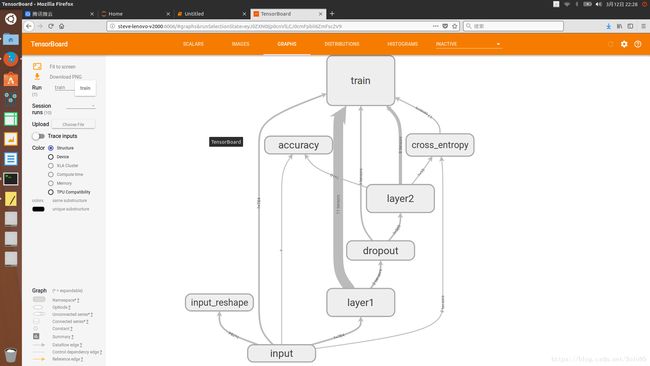
第四张图(Graph选项卡)中,你可以窥见整个模型的大致结构以及数据的流向。
第五张图(Distribution 选项卡)中, 你可以看到激活函数(relu函数)激活神经网络中某一部分神经元的情况。
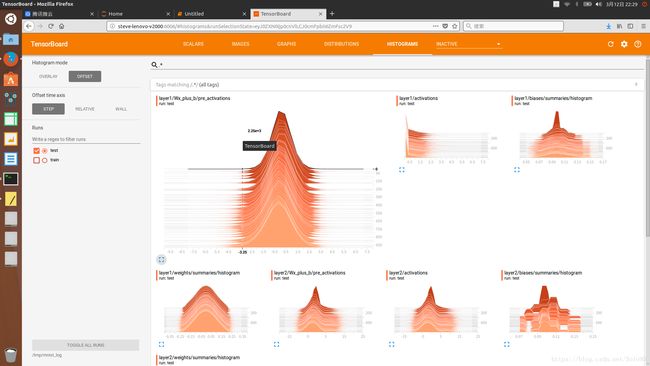
第六张图(Histogram 选项卡)中,你可以看到各数据的直方图。
第三个实例与前面的例子作对比,你可以发现tensorflow的强大之处。即使你是对高等数学完全一窍不通,你也可以使用tensorflow的高级API快速搭建一个模型解决你面临问题;而如果你是精通高等数学的科研人员,你也可以使用tensorflow的底层API按照自己的需求搭建一个非常个性化的模型。同时tensorboard所提供的便捷的可视化功能又可以使你深入了解模型,并对关键参数进行微调以提高模型的准确度。


