SpringBoot中使用Swagger生成RESTful规范API文档
Swagger是为了描述一套标准的而且是和语言无关的REST API的规范。对于外部调用者来说,只需通过Swagger文档即可清楚Server端提供的服务,而不需去阅读源码或接口文档说明。
官方网站为:http://swagger.io
中文网站:http://www.sosoapi.com
背景
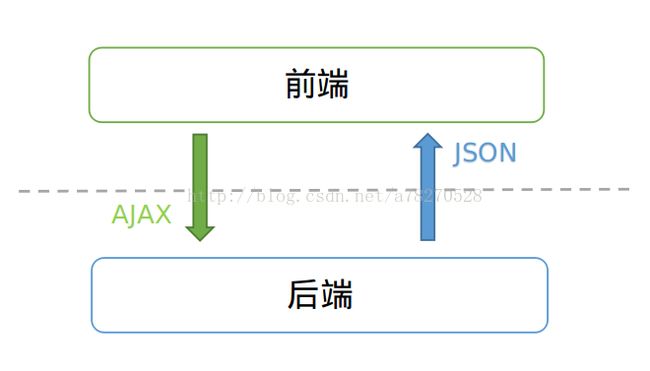
前后端分离
1、前后端仅仅通过异步接口(AJAX/JSON)来编程
2、前后端都各自有自己的开发流程,构建工具,测试集合
3、关注点分离,前后端变得相对独立并松耦合
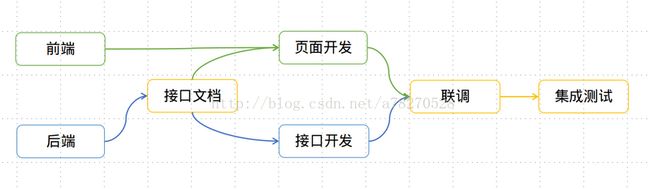
1、后台编写和维护接口文档,在 API 变化时更新接口文档
2、后台根据接口文档进行接口开发
3、前端根据接口文档进行开发
4、开发完成后联调和提交测试
1、Swagger Editor: Swagger提供的一个编辑器,用来通过Swagger提供的特定的YAML语法来编写API文档
2、Swagger Codegen: 代码生成器
3、Swagger UI: YAML语法定义我们的RESTful API,然后它会自动生成一篇排版优美的API文档,并且提供实时预览。
面临问题
1、没有统一的文档编写规范,导致文档越来越乱,无法维护和阅读。
2、开发中的接口增删改等变动,需要较大的沟通成本。
3、对于一个新需求,前端开发的接口调用和自测依赖后台开发完毕。
4、将接口的风险后置,耽误项目时间。
1、接口文档服务器 -- 解决接口文档编辑和维护的问题。
2、mock 数据 -- 解决前端开发依赖真实后台接口的问题。
1、修改pom.xml,添加maven依赖
2、添加Swagger配置类,Swagger会默认把所有Controller中的RequestMapping方法都生成API出来,实际上我们一般只需要标准接口的(像返回页面的那种Controller方法我们并不需要),所有你可以按下面的方法来设定要生成API的方法的要求。
如下我针对RestController注解的类和ResponseBody注解的方法才生成Swaager的API,并且排除了特定的类,代码如下:
3、对外接口类配置
1. @Api
用在类上,说明该类的作用
@Api(value = "UserController", description = "用户相关api")
2. @ApiOperation
用在方法上,说明方法的作用
@ApiOperation(value = "查找用户", notes = "查找用户", httpMethod = "GET", produces = MediaType.APPLICATION_JSON_UTF8_VALUE)
3 @ApiImplicitParams
用在方法上包含一组参数说明
4. @ApiImplicitParam
用在@ApiImplicitParams注解中,指定一个请求参数的各个方面
paramType:参数放在哪个地方
header–>请求参数的获取:@RequestHeader
query–>请求参数的获取:@RequestParam
path(用于restful接口)–>请求参数的获取:@PathVariable
body(不常用)
form(不常用)
name:参数名
dataType:参数类型
required:参数是否必须传
value:参数的意思
defaultValue:参数的默认值
@ApiImplicitParams({
@ApiImplicitParam(name = "id", value = "唯一id", required = true, dataType = "Long", paramType = "path"),
})
5. @ApiResponses
用于表示一组响应
6. @ApiResponse
用在@ApiResponses中,一般用于表达一个错误的响应信息
code:数字,例如400
message:信息,例如”请求参数没填好”
response:抛出异常的类
@ApiResponses(value = {
@ApiResponse(code = 400, message = "No Name Provided")
})
7. @ApiModel
描述一个Model的信息(这种一般用在post创建的时候,使用@RequestBody这样的场景,请求参数无法使用@ApiImplicitParam注解进行描述的时候)
@ApiModel(value = "用户实体类")
8. @ApiModelProperty
描述一个model的属性
@ApiModelProperty(value = "登录用户")
Swagger接口请求有几个:
http://localhost:8080/swagger-resources/configuration/ui
http://localhost:8080/swagger-resources
http://localhost:8080/api-docs
http://localhost:8080/swagger-resources/configuration/security
官方网站为:http://swagger.io
中文网站:http://www.sosoapi.com
背景
前后端分离
1、前后端仅仅通过异步接口(AJAX/JSON)来编程
2、前后端都各自有自己的开发流程,构建工具,测试集合
3、关注点分离,前后端变得相对独立并松耦合
1、后台编写和维护接口文档,在 API 变化时更新接口文档
2、后台根据接口文档进行接口开发
3、前端根据接口文档进行开发
4、开发完成后联调和提交测试
1、Swagger Editor: Swagger提供的一个编辑器,用来通过Swagger提供的特定的YAML语法来编写API文档
2、Swagger Codegen: 代码生成器
3、Swagger UI: YAML语法定义我们的RESTful API,然后它会自动生成一篇排版优美的API文档,并且提供实时预览。
面临问题
1、没有统一的文档编写规范,导致文档越来越乱,无法维护和阅读。
2、开发中的接口增删改等变动,需要较大的沟通成本。
3、对于一个新需求,前端开发的接口调用和自测依赖后台开发完毕。
4、将接口的风险后置,耽误项目时间。

1、接口文档服务器 -- 解决接口文档编辑和维护的问题。
2、mock 数据 -- 解决前端开发依赖真实后台接口的问题。

1、修改pom.xml,添加maven依赖
            io.springfox
            springfox-swagger2
            2.6.1


            io.springfox
            springfox-swagger-ui
            2.6.1
2、添加Swagger配置类,Swagger会默认把所有Controller中的RequestMapping方法都生成API出来,实际上我们一般只需要标准接口的(像返回页面的那种Controller方法我们并不需要),所有你可以按下面的方法来设定要生成API的方法的要求。
如下我针对RestController注解的类和ResponseBody注解的方法才生成Swaager的API,并且排除了特定的类,代码如下:
import org.springframework.context.annotation.Bean;
import org.springframework.context.annotation.Configuration;
import springfox.documentation.builders.ApiInfoBuilder;
import springfox.documentation.builders.PathSelectors;
import springfox.documentation.builders.RequestHandlerSelectors;
import springfox.documentation.service.ApiInfo;
import springfox.documentation.spi.DocumentationType;
import springfox.documentation.spring.web.plugins.Docket;
import springfox.documentation.swagger2.annotations.EnableSwagger2;
import springfox.documentation.service.Tag;
@Configuration
@EnableSwagger2
public class Swagger2Config {
@Bean
public Docket createRestApi() {
return new Docket(DocumentationType.SWAGGER_2)
.apiInfo(apiInfo())
.select()
.apis(RequestHandlerSelectors.basePackage("com.bocom.gzxf.jcsj.controller"))
.paths(PathSelectors.any())
.build();
}
private ApiInfo apiInfo() {
return new ApiInfoBuilder()
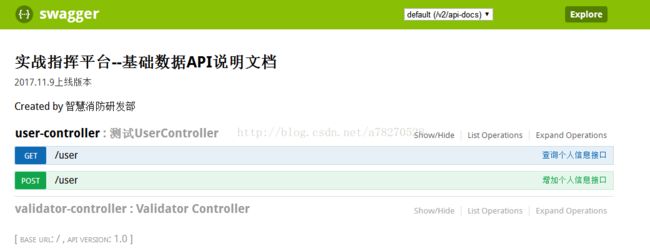
.title("实战指挥平台--基础数据API说明文档")
.description("2017.11.9上线版本")
//.termsOfServiceUrl("http://mindao.com.cn")
.contact("智慧消防研发部")
.version("1.0")
.build();
}
}3、对外接口类配置
/**
* Controller
*
* @since 2017年9月8日上午9:39:32
* @author shanming.yang
*
*/
@RestController
@RequestMapping("/user")
@Validated
@Api(value = "USER", description = "测试UserController")
public class UserController {
private static Logger logger = LogManager.getLogger(UserController.class.getName());
@Resource
private DemoService demoService;
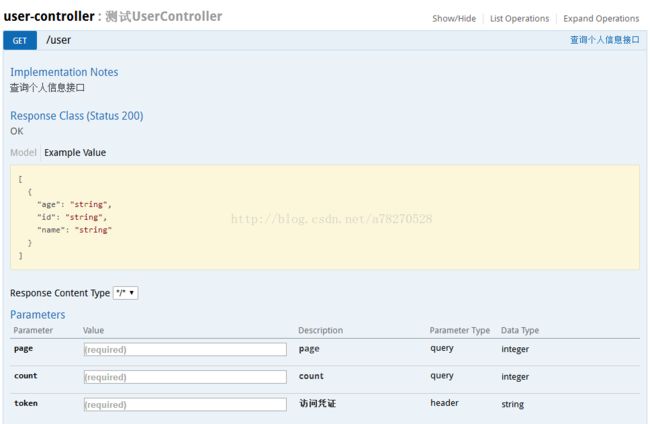
@RequestMapping(value="",method={RequestMethod.GET })
@ApiOperation(value = "查询个人信息接口",notes = "查询个人信息接口")
@ApiImplicitParams({
@ApiImplicitParam(paramType = "header", dataType="string", name = "token", value = "访问凭证", required = true),
})
public List query(@RequestParam("page") int page,
@RequestParam("count") int count) {
return demoService.query(page, count);
}
@RequestMapping(value="",method={RequestMethod.POST })
@ApiOperation(value = "增加个人信息接口",notes = "增加个人信息接口")
public void insert(@RequestAttribute("name") String name) {
Demo model = new Demo();
String uuid = UUID.randomUUID().toString().replaceAll("-", "");
model.setId(uuid);
model.setAge("25");
model.setName(name);
demoService.insert(model);
}
} 经过这3步配置后,我们启动服务后,访问:http://localhost:8080/swagger-ui.html 就完成了集成。
4、相关注解解读
1. @Api
用在类上,说明该类的作用
@Api(value = "UserController", description = "用户相关api")
2. @ApiOperation
用在方法上,说明方法的作用
@ApiOperation(value = "查找用户", notes = "查找用户", httpMethod = "GET", produces = MediaType.APPLICATION_JSON_UTF8_VALUE)
3 @ApiImplicitParams
用在方法上包含一组参数说明
4. @ApiImplicitParam
用在@ApiImplicitParams注解中,指定一个请求参数的各个方面
paramType:参数放在哪个地方
header–>请求参数的获取:@RequestHeader
query–>请求参数的获取:@RequestParam
path(用于restful接口)–>请求参数的获取:@PathVariable
body(不常用)
form(不常用)
name:参数名
dataType:参数类型
required:参数是否必须传
value:参数的意思
defaultValue:参数的默认值
@ApiImplicitParams({
@ApiImplicitParam(name = "id", value = "唯一id", required = true, dataType = "Long", paramType = "path"),
})
5. @ApiResponses
用于表示一组响应
6. @ApiResponse
用在@ApiResponses中,一般用于表达一个错误的响应信息
code:数字,例如400
message:信息,例如”请求参数没填好”
response:抛出异常的类
@ApiResponses(value = {
@ApiResponse(code = 400, message = "No Name Provided")
})
7. @ApiModel
描述一个Model的信息(这种一般用在post创建的时候,使用@RequestBody这样的场景,请求参数无法使用@ApiImplicitParam注解进行描述的时候)
@ApiModel(value = "用户实体类")
8. @ApiModelProperty
描述一个model的属性
@ApiModelProperty(value = "登录用户")
Swagger接口请求有几个:
http://localhost:8080/swagger-resources/configuration/ui
http://localhost:8080/swagger-resources
http://localhost:8080/api-docs
http://localhost:8080/swagger-resources/configuration/security
附:使用Swagger生成JAVA Mock Server(Springboot)代码
http://blog.csdn.net/a78270528/article/details/78530702