SpringMVC项目集成Activiti 5.22 Modeler
下面我们说一下怎吗整合activiti的web modeler,当你完成web整合的时候,建议你看下这个人写的博客,总结出来,学习东西还是要懂原理,多看看源码,好多值得借鉴和学习的地方!
当你读完下面后,给你推荐这个人的博客,更好的深入连接源码:点击打开链接
1.web modeler
天下文章一大抄
Activiti版本是5.20,Modeler模块跟5.16 之前变化很大,相关的API已经大变样。
假设已经有SpringMVC的项目,只需要把以下文件复制到自己的项目中,包名可以改,但是在自动搜索类的时候请指定包路径。
配置文件如下:
上面是spring的一个重要配置点,红色字体的你可以根据你的实际路径指定。例如
上面是我自己代码:只供参考 。 看一看源码中的代码,在看我下面说的
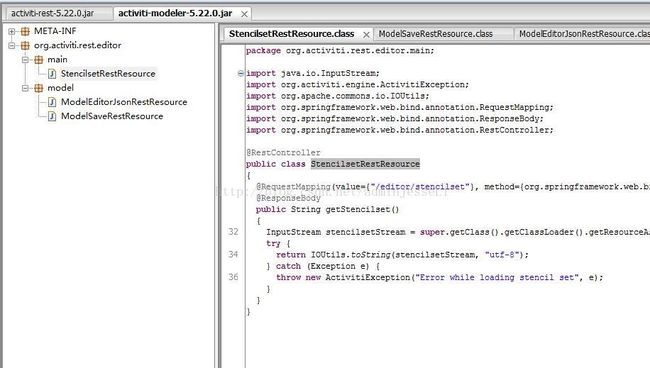
StencilsetRestResource这个类复制到自己的项目中去。Modeler相关的Rest入口
以下三个文件,我放到项目中的: edu.xxx.web.rest 这个位置。红字是你自己的路径spring配置中能知道别且注解进去就行,随你放
Modeler相关的页面文件
app-cfg.js文件也需要修改下,指定contextRoot为 /项目/service
以上截图中使用到的Activiti源码项目中的文件,可以到这里下载:
https://codeload.github.com/Activiti/Activiti/zip/master
还要检查Rest的入口路径是否与自己的项目路径一致。默认是这样:
@RequestMapping(value="/model/{modelId}/json", method = RequestMethod.GET, produces = "application/json")
我改成这样:
@RequestMapping(value="/service/model/{modelId}/json", method = RequestMethod.GET, produces = "application/json")
/项目路径/process-editor/modeler.html?modelId=xxx就可以访问到在线的模型编辑器了。请格外留意红色部分的路径,如果是在现有项目里升级Modeler,请修改相应的入口路径。
其实你按照上面的说去做,应该已经实现,不怎吗会写文档,下面补充一下,
现在运行项目,直接访问地址:http://localhost:端口号/项目名/modeler.html 会发现只有一个布局,各种功能及组件都没有显示出来,F12查看发现访问在线流程编辑器主页的时候会发现其访问了http://localhost:端口号/activiti-explorer/service/model//json 这个地址,实际上我现在还没有写后台。这说明了两个问题:一是前台页面应该是写死了url的。二是activiti应该有与之对应的jar包完成Activiti Modeler与个人项目的整合。
先查找前台页面会发现在editor-app文件夹下的app-cfg.js中全局访问路径/activiti-explorer/service 将activiti-explorer改成自己的项目名service路径会在web.xml中配置,可以更改。这个http://localhost:端口号/activiti-explorer/service/model//json 实际的调用地方在app.js中的一个方法中:
|
1
2
3
4
5
6
7
8
9
10
11
12
13
14
15
|
/* Helper method to fetch model from server (always needed) */
function
fetchModel(modelId) {
var
modelUrl = KISBPM.URL.getModel(modelId);
$http({method:
'GET'
, url: modelUrl}).
success(
function
(data, status, headers, config) {
$rootScope.editor =
new
ORYX.Editor(data);
$rootScope.modelData = angular.fromJson(data);
$rootScope.editorFactory.resolve();
}).
error(
function
(data, status, headers, config) {
console.log(
'Error loading model with id '
+ modelId +
' '
+ data);
});
}
|
断点截图:
第二个问题实际上Activiti Modeler的后台服务官方是给出了的,都放在了activiti-modeler.jar包中,其采用的是spring-mvc的形式。所以在pom.xml中添加相关依赖:
|
1
2
3
4
5
|
5.21
.
0
|
查看activiti-modeler源码,发现里面十分简单,一共只有三个类,对应着三个URL,分别是:
/editor/stencilset 用来加载并返回stencilset.json文件的内容
/model/{modelId}/json 这个就是访问的那个url了,通过部署的modelId模型编辑源
/model/{modelId}/save 这个是用来保存编辑的模型
知道这些之后,我们再在resources文件夹下创建一个spring-mvc-modeler.xml用于提供对Activiti Modeler后台URL的支持。
|
1
2
3
4
5
6
7
8
9
10
11
12
13
14
15
16
17
18
19
20
21
22
|
xmlns:xsi=
"http://www.w3.org/2001/XMLSchema-instance"
xmlns:context=
"http://www.springframework.org/schema/context"
xmlns:mvc=
"http://www.springframework.org/schema/mvc"
xsi:schemaLocation="http:
//www.springframework.org/schema/beans
http:
//www.springframework.org/schema/beans/spring-beans.xsd
http:
//www.springframework.org/schema/context
http:
//www.springframework.org/schema/context/spring-context.xsd
http:
//www.springframework.org/schema/mvc
http:
//www.springframework.org/schema/mvc/spring-mvc.xsd">
|
在web.xml中配置路径分发:请求分配器
|
1
2
3
4
5
6
7
8
9
10
11
12
13
14
|
1
|
注意: 这句话是放屁的一句话,我也是复制的网上的资源,你要理解web.xml中配置拦截的意思, 是
/service/* 看你怎吗拦截,我是.do拦截,那么你就要修改editor-app/configuration/url-config.js中的请求,全改成.do的
var KISBPM = KISBPM || {};

KISBPM.URL = {

    getModel: function(modelId) {
        return ACTIVITI.CONFIG.contextRoot + '/model/' + modelId + '/json.do';
    },

    getStencilSet: function() {
        return ACTIVITI.CONFIG.contextRoot + '/editor/stencilset.do?version=' + Date.now();
    },

    putModel: function(modelId) {
        return ACTIVITI.CONFIG.contextRoot + '/model/' + modelId + '/save.do';
    }
};
配置完成后,启动项目不会报错,但是访问依旧是404not found,/项目名/service/model//json 查看后台,方法没有被执行,这个可能是少了中间的参数,url没有匹配。先看前台url配置。url是配置在了configuration文件夹下的url-config中。继续查找源码,看是哪里调用了这个方法,在app.js中发现:
|
1
2
3
4
5
6
7
8
9
10
11
12
|
/**
* Initialize the Oryx Editor when the content has been loaded
*/
$rootScope.$on(
'$includeContentLoaded'
,
function
(event) {
if
(!$rootScope.editorInitialized) {
ORYX._loadPlugins();
var
modelId = EDITOR.UTIL.getParameterByName(
'modelId'
);
fetchModel(modelId);
...
}
|
EDITOR.UTIL.getParameterByName('modelId'),查找源码在editor-utils.js中找到这块代码:
|
1
2
3
4
5
6
|
getParameterByName:
function
(name) {
name = name.replace(/[\[]/,
"\\["
).replace(/[\]]/,
"\\]"
);
var
regex =
new
RegExp(
"[\\?&]"
+ name +
"=([^&#]*)"
),
results = regex.exec(location.search);
return
results ==
null
?
""
: decodeURIComponent(results[1].replace(/\+/g,
" "
));
},
|
这样就很明显了,在访问这个界面的时候要带上查询参数,必须访问地址http://localhost:端口号/项目名/modeler.html?modelId=xx。这样查询的url就是/model/xx/json了。但是这样之后还是报错404,这回要看后台是否哪里配置有问题了。
查看后台日志,发现里面的方法是被执行了,这证明URL是匹配上了。日志提示了下面一段话:org.springframework.web.servlet.DispatcherServlet.noHandlerFound(1120) | No mapping found for HTTP request with URI [/activiti-spring/service/model/1/model/1/json] in DispatcherServlet with name 'ModelerServlet'。这就相当于url前面多了model/1/这段。查看源码,断点调试:
|
1
2
3
4
5
6
7
8
9
10
11
12
13
14
15
16
17
18
19
20
21
22
23
24
25
26
27
|
@RequestMapping
(value=
"/model/{modelId}/json"
, method = RequestMethod.GET, produces =
"application/json"
)
public
ObjectNode getEditorJson(
@PathVariable
String modelId) {
ObjectNode modelNode =
null
;
Model model = repositoryService.getModel(modelId);
if
(model !=
null
) {
try
{
if
(StringUtils.isNotEmpty(model.getMetaInfo())) {
modelNode = (ObjectNode) objectMapper.readTree(model.getMetaInfo());
}
else
{
modelNode = objectMapper.createObjectNode();
modelNode.put(MODEL_NAME, model.getName());
}
modelNode.put(MODEL_ID, model.getId());
ObjectNode editorJsonNode = (ObjectNode) objectMapper.readTree(
new
String(repositoryService.getModelEditorSource(model.getId()),
"utf-8"
));
modelNode.put(
"model"
, editorJsonNode);
}
catch
(Exception e) {
LOGGER.error(
"Error creating model JSON"
, e);
throw
new
ActivitiException(
"Error creating model JSON"
, e);
}
}
return
modelNode;
}
}
|
这里看不出什么问题,后来仔细检查,modeler.xml中只配了扫描包,忘记配置
成功后,你可能还需要这个http://download.csdn.net/detail/adminjesseli/9755970
我也是整合网上资源,自己搭建的不想写,因为我没有独立的dome,若要是给你的项目源码看,可能会更不好懂,希望能帮到你!