springBoot整合mybatis实例应用(附orm自动生成器与GitHub源码简洁完整版下载)
说到springBoot框架,我们常常想到的就是它的优点,像快速构建项目;内嵌了servlet容器;降低了对环境的要求;提供运行时的应用监控;代码少了、配置文件少了、减少了开发时间和提高了工作效率 这些客套话的优点我们可以忽略不计,我们实际需要与最常用的优点是springBoot可以快速整合第三方框架(如Spring JDBC,Spring ORM,Spring Data,Spring Security等,本文我们要聊的就是springBoot整合Spring ORM的应用。
无论是新框架还是旧框架都有它的优点和缺点存在,它的最大的缺点我认为是因为整合的东西比较多,开发过程中假如出现错误不好定位不好处理,夹道迎接优点诚恳包容缺点,让我们开始吧。
本文数据库表
1 college 学院表
2 teacher 教师表(外键关联学院)
3 student 学生表(外键关联学院表与教师表)
使用mybatis自动生成工具生成数据库orm信息
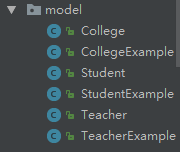
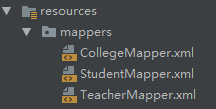
mybatis orm自动生成工具是由mybatis-generator-core-&&.jar 构建的一套生成工具,生成的数据类别有数据库表model、数据库表modelExample、数据库表Mapper.java接口映射文件、数据库表Mapper.xml 脚本映射文件,其中modelExample聚合了数据库常用的关键字与符号操作,比如=、>、not in、between 等等,目录如下:
这三个包或目录建的位置没有严格的要求,但与配置息息相关,所以最好命名和建的位置清晰可见。目录或包建好生成就简单了,直接执行生成工具main函数即可:
/**
 * mybatis orm自动生成工具
 */
public class Generator {
    public static void main(String[] args) throws Exception {
        //MBG 执行过程中的警告信息
        List warnings = new ArrayList();
        //当生成的代码重复时,覆盖原代码
        boolean overwrite = true;
        //读取我们的 MBG 配置文件
        InputStream is = Generator.class.getResourceAsStream("/GeneratorConfig.xml");
        ConfigurationParser cp = new ConfigurationParser(warnings);
        Configuration config = cp.parseConfiguration(is);
        is.close();

        DefaultShellCallback callback = new DefaultShellCallback(overwrite);
        //创建 MBG
        MyBatisGenerator myBatisGenerator = new MyBatisGenerator(config, callback, warnings);
        //执行生成代码
        myBatisGenerator.generate(null);
        //输出警告信息
        for (String warning : warnings) {
            System.out.println(warning);
        }
    }
}
InputStream is = Generator.class.getResourceAsStream("/GeneratorConfig.xml");
如上的代码最关键的是在这一小段,读取配置文件,该配置文件就决定了数据库的连接信息和生成文件的存放目录
如下是该配置文件的代码段:
该配置文件最主要的内容是model存在路径、脚本映射文件存放目录和接口存放路径的配置。其中有一小段是注释生成器,可以给model对应的字段添加上建表时的注释, java代码段如下:
/**
 * 自定义注释生成器
 */
public class CommentGenerator extends DefaultCommentGenerator {
    private boolean addRemarkComments = false;

    /**
     * 设置用户配置的参数
     */
    @Override
    public void addConfigurationProperties(Properties properties) {
        super.addConfigurationProperties(properties);
        this.addRemarkComments = StringUtility.isTrue(properties.getProperty("addRemarkComments"));
    }

    /**
     * 给字段添加注释
     */
    @Override
    public void addFieldComment(Field field, IntrospectedTable introspectedTable,
                                IntrospectedColumn introspectedColumn) {
        String remarks = introspectedColumn.getRemarks();
        //根据参数和备注信息判断是否添加备注信息
        if(addRemarkComments&&StringUtility.stringHasValue(remarks)){
            //文档注释开始
            field.addJavaDocLine("/**");
            //获取数据库字段的备注信息
            String[] remarkLines = remarks.split(System.getProperty("line.separator"));
            for(String remarkLine:remarkLines){
                field.addJavaDocLine(" * "+remarkLine);
            }
            addJavadocTag(field, false);
            field.addJavaDocLine(" */");
        }
    }
}
写到这边工作就差不多完成一半了,接下来主要就是做springBoot的一些配置,首先扫描mapper接口所在包路径,这可以在springBoot启动类 用@MapperScan注解进行配置,如下所示
@SpringBootApplication
@ComponentScan("com.allen.springBoot.*") //组件包扫描路径
@MapperScan("com.allen.springBoot.mybatis.dao.mapper")//扫描mybatis mapper接口所在包
public class MyApplication  {

	public static void main(String[] args) {
		SpringApplication.run(MyApplication.class, args);
	}

}
接下来就是数据库连接池和工厂的创建了,首先创建数据库连接池,这边使用HikariCP进行连接池创建,如下连接池的类
@Configuration
@EnableTransactionManagement
public class DataBaseConfiguration implements EnvironmentAware {

	private RelaxedPropertyResolver propertyResolver;

	private static Logger log = LoggerFactory
			.getLogger(DataBaseConfiguration.class);

	private Environment env;

	@Override
	public void setEnvironment(Environment env) {
		this.env = env;
		this.propertyResolver = new RelaxedPropertyResolver(env, "jdbc.");
	}
	/**
	 * 数据库的参数配置
	 * @return
	 */
	@Bean(destroyMethod = "shutdown")
	public DataSource dataSource() {
		log.debug("Configruing DataSource");
		if (propertyResolver.getProperty("url") == null
				&& propertyResolver.getProperty("databaseName") == null) {
			log.error("Your database conncetion pool configuration is incorrct ! The application "
					+ "cannot start . Please check your jdbc");
			Arrays.toString(env.getActiveProfiles());
			throw new ApplicationContextException(
					"DataBase connection pool is not configured correctly");
		}
		HikariConfig config = new HikariConfig();
		config.setDataSourceClassName(propertyResolver
				.getProperty("dataSourceClassName"));
		if (propertyResolver.getProperty("url") == null
				|| "".equals(propertyResolver.getProperty("url"))) {
			config.addDataSourceProperty("databaseName",
					propertyResolver.getProperty("databaseName"));
			config.addDataSourceProperty("serverName",
					propertyResolver.getProperty("serverName"));
		} else {
			config.addDataSourceProperty("url",
					propertyResolver.getProperty("url"));
		}
		config.setUsername(propertyResolver.getProperty("username"));
		config.setPassword(propertyResolver.getProperty("password"));
		if ("com.mysql.jdbc.jdbc2.optional.MysqlDataSource"
				.equals(propertyResolver.getProperty("dataSourceName"))) {
			config.addDataSourceProperty("cachePrepStmts",
					propertyResolver.getProperty("cachePrepStmts"));
			config.addDataSourceProperty("prepStmtCacheSize",
					propertyResolver.getProperty("prepStmtsCacheSize"));
			config.addDataSourceProperty("prepStmtCacheSqlLimit",
					propertyResolver.getProperty("prepStmtCacheSqlLimit"));
			config.addDataSourceProperty("userServerPrepStmts",
					propertyResolver.getProperty("userServerPrepStmts"));
		}
		return new HikariDataSource(config);
	}

}
数据库连接池有了就需要数据库连接的工厂SqlSessionFactory才能创建更多的连接数据库的操作 ,如下是连接工厂的类
@Configuration
@ConditionalOnClass({ EnableTransactionManagement.class})
@AutoConfigureAfter({ DataBaseConfiguration.class })
public class MybatisConfiguration implements EnvironmentAware {

	private static Log logger = LogFactory.getLog(MybatisConfiguration.class);

	private RelaxedPropertyResolver propertyResolver;

	@Inject
	private DataSource dataSource;

	@Override
	public void setEnvironment(Environment environment) {
		this.propertyResolver = new RelaxedPropertyResolver(environment,
				"mybatis.");
	}

	/**
     * mybatis的参数配置
	 * @return
     */
	@Bean
	@ConditionalOnMissingBean
	public SqlSessionFactory sqlSessionFactory() {
		try {
			SqlSessionFactoryBean sessionFactory = new SqlSessionFactoryBean();
			sessionFactory.setDataSource(dataSource);
			sessionFactory.setTypeAliasesPackage(propertyResolver
					.getProperty("typeAliasesPackage"));//mybatis mapper接口所在包路径
			sessionFactory
					.setMapperLocations(new PathMatchingResourcePatternResolver()
							.getResources(propertyResolver
									.getProperty("mapperLocations")));//mybatis mapper接口映射的xml配置文件所在路径
			sessionFactory
					.setConfigLocation(new DefaultResourceLoader()
							.getResource(propertyResolver
									.getProperty("configLocation")));//数据库其他参数配置

			return sessionFactory.getObject();
		} catch (Exception e) {
			logger.warn("Could not confiure mybatis session factory");
			return null;
		}
	}

	@Bean
	@ConditionalOnMissingBean
	public DataSourceTransactionManager transactionManager() {
		return new DataSourceTransactionManager(dataSource);
	}
}
如上数据库连接池和连接工厂读取的配置参数都是从application.yml配置文件读取,如下是配置文件的内容
#端口号
server:
  port: 8080


# DATASOURCE
jdbc:
      dataSourceClassName:  com.mysql.jdbc.jdbc2.optional.MysqlDataSource
      url:  jdbc:mysql://127.0.0.1:3306/test0629?useUnicode=true&characterEncoding=utf-8&allowMultiQueries=true
      databaseName:  test0629
      serverName:  127.0.0.1
      username: root
      password: zjm@cat
      cachePrepStmts: true
      prepStmtsSize: 250mybatis-config.xml
      prepStmtsCacheSqlLimit: 2048
      userServerPrepStmts: true

# MyBatis
mybatis:
           typeAliasesPackage: com.allen.springBoot.mybatis.dao.mapper
           mapperLocations: classpath:/mappers/*.xml
           configLocation: classpath:/mybatis-config.xml
该配置的都配置完成,接下就是进入实战应用阶段 ,mybatis自动生成工具创建了很完善的条件查询和增删改查的操作,操作起来非常方便,直接在控制层注入mybatis自动生成工具生成的mapper接口即可,如下是基本的crud实例:
@Resource
	public StudentMapper studentMapper;

	/**
	 * 查询所有学生信息
	 *  http://localhost:8080/getAllStudents
	 */
	@GetMapping("/getAllStudents")
	@ResponseBody
	public List getAllStudents(){
		StudentExample studentExample = new StudentExample();
		StudentExample.Criteria studentExampleCriteria = studentExample.createCriteria();
		List students= studentMapper.selectByExample(studentExample);
		return students;
	}

	/**
	 * 添加新的学生
	 *  http://localhost:8080/addNewStudent
	 */
	@GetMapping("/addNewStudent")
	@ResponseBody
	public String addNewStudent(){
		SimpleDateFormat simpleDateFormat=new SimpleDateFormat("ss");
		String randomNum=simpleDateFormat.format(new Date());

		StudentExample studentExample = new StudentExample();
		StudentExample.Criteria studentExampleCriteria = studentExample.createCriteria();
		Student student=new Student("10009"+randomNum,"李四9"+randomNum,7,1);
		try {
			studentMapper.insert(student);
			return "添加成功  ";
		}catch (Exception e){
			e.printStackTrace();
			return "添加异常:"+e.getMessage();
		}
	}

	/**
	 * 更新学生信息
	 *  http://localhost:8080/updateStudentInfo
	 */
	@GetMapping("/updateStudentInfo")
	@ResponseBody
	public String updateStudentInfo(){
		SimpleDateFormat simpleDateFormat=new SimpleDateFormat("ss");
		String randomNum=simpleDateFormat.format(new Date());
		Student student=new Student(14,"1000988","李四999"+randomNum,7,1);
		try {
			studentMapper.updateByPrimaryKeySelective(student);//更新方法1,按主键更新

			StudentExample studentExample = new StudentExample();
			StudentExample.Criteria studentExampleCriteria = studentExample.createCriteria();
			studentExampleCriteria.andStudentNoEqualTo("1000999");
			student=new Student("1000999","李四998"+randomNum,7,1);
			studentMapper.updateByExampleSelective(student,studentExample);//更新方法2,按条件更新
			return "更新成功";
		}catch (Exception e){
			e.printStackTrace();
			return "更新异常:"+e.getMessage();
		}
	}
	/**
	 * 通过学号删除学生
	 *  http://localhost:8080/deleteStudentByNo/1000999
	 */
	@GetMapping("/deleteStudentByNo/{studentNo}")
	@ResponseBody
	public String deleteStudentByNo(@PathVariable(value = "studentNo") String studentNo){
		StudentExample studentExample = new StudentExample();
		StudentExample.Criteria studentExampleCriteria = studentExample.createCriteria();
		studentExampleCriteria.andStudentNoEqualTo(studentNo);
		try {
			studentMapper.deleteByExample(studentExample);
			return "删除成功";
		}catch (Exception e){
			e.printStackTrace();
			return "删除异常:"+e.getMessage();
		}
	}
细心的朋友会发现,这些操作只是针对单表的操作,但我们日常开发过程中,多表关联查询是必不可少的,这时候该怎么办呢?,不用担心,自动生成工具虽然帮我们自动生成了很全面的数据库表映射脚本和操作接口,但不代表不可以修改它,我们仍然可以回归到原始的mybatis配置方法,添加我们所需要的更复杂sql关联查询操作,如下所示在studentMapper.xml添加我们所需要的关联查询操作:
StudentMapper接口操作方法一样,添加对应的脚本id映射接口(需要注意传入参数的个数)
 List getStudentNameByTeacherName(String studentName);

 List getTeacherNameByCityNameAndCollectName(String city, String collegeName);

 List getStudentNoByTeacherNameAndCollectName(String teacherName, String collegeName);
控制层使用调用方式一样,如下
/**
	 *通过教师的名字获取学生的名字
	 * http://localhost:8080/getStudentNameByTeacherName/张三1
	 * @return
	 */
	@GetMapping( "/getStudentNameByTeacherName/{teacherName}")
	@ResponseBody
	public List getTeacherNameByStudentName(@PathVariable(value = "teacherName") String teacherName) {

		List listStudent=studentMapper.getStudentNameByTeacherName(teacherName);
		return listStudent;
	}


	/**
	 * 查询祖籍为龙岩市计算机学院的老师姓名
	 *  http://localhost:8080/getTeacherNameByCityNameAndCollectName/龙岩市/计算机学院
	 */
	@GetMapping("/getTeacherNameByCityNameAndCollectName/{city}/{collegeName}")
	@ResponseBody
	public List  getTeacherNameByCityNameAndCollectName(@PathVariable(value = "city") String city,@PathVariable(value = "collegeName") String collegeName){
		List teacherNames=studentMapper.getTeacherNameByCityNameAndCollectName(city,collegeName);
		return teacherNames;
	}

	/**
	 * 查询计算机学院下张三1老师带的学生学号
	 *  http://localhost:8080/getStudentNoByTeacherNameAndCollectName/张三1/计算机学院
	 */
	@GetMapping("/getStudentNoByTeacherNameAndCollectName/{teacherName}/{collegeName}")
	@ResponseBody
	public List  getStudentNoByTeacherNameAndCollectName(@PathVariable(value = "teacherName") String teacherName,@PathVariable(value = "collegeName") String collegeName){
		List studentNos=studentMapper.getStudentNoByTeacherNameAndCollectName(teacherName,collegeName);
		return studentNos;
	}
写到这边工作算是完成了,执行springBoot的main函数可以开始工作了。
一路下来真不容易,无数字的调试,无数次的百度和参考,感谢优秀的网络资源,如上表述肯定还有不全面不清晰甚至错误的地方,欢迎看到的同仁们提出来,相互学习共同成长与进步,谢谢。
本文 GitHub源码地址 https://github.com/higherzjm/springBoot_mybatis.git,附Mysql脚本


