前端面试需掌握的知识点
目录
1、原型链的理解
2、闭包
3、手写实现call、apply和bind
4、new的原理
5、深拷贝和浅拷贝
6、js继承
7、前端性能优化
一、原型链的理解
在谈原型链之前,我们需要掌握一些知识,如下所示:
1、js对象分为普通对象和函数对象(object和Function是js自带的函数对象),问题来了,如何区分普通对象和函数对象呢?
记住一句话:凡是通过new Function创建的对象都是函数对象,其他都是普通对象(注:像开头提到的Function、object也都是通过new Function()创建的)
2、每个函数对象都有一个prototype属性,这个属性指向函数的原型对象(注:只有函数对象才有prototype属性),而每个对象都有__proto__属性。在默认情况下,原型对象都会自动获得一个constructor(构造函数)属性,这个属性指向prototype属性所在的那个函数。如下面所示:
如上面所示,Person.prototype(原型对象)默认有一个constructor属性,指向prototype所在的那个函数,然后原型对象还包括了原型对象的属性和方法。
3、原型对象其实就是普通对象(但Function.prototype除外,它是函数对象,但它很特殊,它没有prototype属性)
4、所有函数对象的__proto__都指向Function.prototype,它是一个空函数,如我们常见的函数对象
Number.__proto__ === Function.prototype //true
Array.__proto__ === Function.prototype //true
Object.__proto__ === Function.prototype //true
5、正如我们上面提到的原型对象都默认有一个constructor属性,指向prototype所在的那个函数,而函数对象都是通过new Function得到的,所以可以得出函数对象的构造函数为Function,如下面所示:
Array.constructor === Function
String.constructor === Function
Function.constructor === Function 等等
看到最后一个例子,因为Function可以看成是一个函数,也可以是一个对象,所有函数和对象最终都是有Function构造函数得来的,所以constructor属性的终点就是Function这个函数。
那么对于普通对象来说,它们的构造函数就是当时那个创建的所拥有的构造函数,比如说下面这个例子
function Person(){}; let person1 = new Person(); 此时person1的构造函数就是Person。
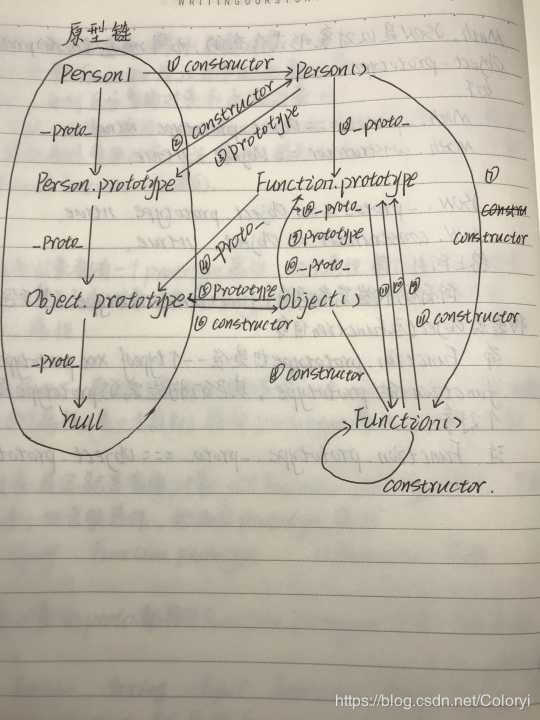
好了,到这里,我们在总结一下,proytotype属性的作用就是让该函数所实例化的对象都可以找到公用的属性和方法;constructor属性的含义就是指向该对象的构造函数,所有函数(此时看成了对象)最终的都构造函数都指向Function;__proto__属性的作用就是当访问一个对象的属性时,那么就会去它的__proto__属性所指向的那个对象找,直到找到null,这里也形成了一个原型链。那么,接下里我们就可以挑战更难的了,按下面这张图:
哈哈哈,不知道你们是否能彻底看懂呢?在这里我会挑几个序号来讲
a、先看到左边圈着的那个图,那就是原型链,因为person1时Person构建的,所以person1.__proto__指向Person.prototype,因为Person是函数对象,所以Person.prototype.__proto__指向Object.prototype,而 Object.prototype指向null(原型链的终点)
b、
1、根据原型对象默认有一个constructor属性,指向prototype所在的那个函数,所以有2、6、11号线;
2、因为person1是有Person构建的,所以它的构造函数时Person,所以有1号线;
3、因为Person、Object等的函数对象都是由Function构建的,所以有7、8号线;
4、因为Function.prototype也是一个对象,所以它的__proto__指向Object.prototype,所以有4号线;
5、因为Person、Object也都是函数对象,所以它们的__proto__也指向Function.prototype,所以有12、13号线。
说到这里,不知道你完全掌握了吗?接下来尝试做一些题目吧(建议先不要看答案)
 function  Person(){};

let  person1 = new Person();


person1.__proto__ === ?
person1.__proto__.__proto__  === ?
person1.__proto__.__proto__.__proto__  ===  ?


Person.__proto__  ===  ?
Person.prototype.__proto__  ===  ?


Array.__proto__  ===  ?

Array.prototype.__proto__  ===  ?

Object.prototype.__proto__  ===  ?
Function.prototype.__proto__  ===  ?


答案:
       Person.prototype
       Object.prototype
       null
       Function.prototype
       Object.prototype
       Function.prototype
       Object.prototype
       null
       Object.prototype
二、闭包
闭包:有权访问另一函数作用域中的变量的函数
使用场景:循环给元素绑定事件
三、手写实现call、apply和bind
1、call
          //模拟call
			Function.prototype.mycall = function(context){

				 var context = context || window; //如果传进来的是null,就赋予window对象


				  context.fn = this;

				  let  arg = [...arguments].slice(1);  //将函数里面的参数取出来,这里的...是es6的知识,作用是将参数用逗号分隔形成参数序列(注:这里使用slice是获取第二个参数以后的值

				  let  result = context.fn(...arg);   //调用context.fn,隐式绑定this
				  delete context.fn;
				  return  result;
			}


验证:

let demo = {
				name:'tom',
				say:function(){
                    console.log(this.sex);  //nv
					console.log(11);  // 11
				}
			}


			let  demo1 = {
				sex:'nv'
			}


			demo.say.mycall(demo1,null);


let demo = {
				name:'tom',
				say:function(a,b){
                    console.log(this.sex);  //nv
					console.log(a,b);       // 前端
				}
			}


			let  demo1 = {
				sex:'nv'
			}


			demo.say.mycall(demo1,'前','端');
2、apply
//模拟apply

			Function.prototype.myapply = function(context,arg){

			  var context = context || window; //如果传进来的是null,就赋予window对象

				context.fn = this;

				let result;

				if(arg == null || arg == undefined ){  //之所以要判断是因为apply的参数是以数组的形式传入的,所以要使用...转化为参数序列,当没有传值的时候就不需要转化
					 result = context.fn(arg);
				}else{
					result = context.fn(...arg);
				}

				delete  context.fn;
				return result;
			}

验证:

let demo = {
				name:'tom',
				say:function(a,b){
                    console.log(this.sex);  //nv
					console.log(a,b);       // 11
				}
			}


			let  demo1 = {
				sex:'nv'
			}


			demo.say.myapply(demo1,['前','端']);


let demo = {
				name:'tom',
				say:function(a,b){
                    console.log(this.sex);  //nv
					console.log(a,b); // 前端
				}
			}


			let  demo1 = {
				sex:'nv'
			}


			demo.say.myapply(demo1,['前','端']);
3、bind
//模拟bind

			Function.prototype.mybind = function(context){
				if(typeof this !='function'){
					throw new TypeError('not a function')
				}

				let arg1 = [...arguments].slice(1);

				function Fn1(){}
					Fn1.prototype = this.prototype;

				let prethis = this;

				let fn2 = function(){
					let arg2 = [...arg1,...arguments];
					context = this instanceof Fn1 ? this : context || this;
					return  prethis.apply(context,arg2);
				}

				fn2.prototype = new Fn1();
				return fn2;
			}


  验证:
            let demo = {
				   name:'tom',
				   say:function(){
					  console.log(this.name);
				}
			}


			let  fn = demo.say;

			let  newfn = fn.mybind(demo);
			   newfn();  //tom
四、new的原理
//new的原理

			function create(fn){
				let  obj = {};
				     obj.__proto__ = fn.prototype;

				let  obj1 = fn.call(obj);

				if(typeof obj1 =='object'  ||  typeof obj1 == 'function' ){
					return obj1;
				}

				return obj;
			}


验证:
  function Person(){
		   	this.name='zhangsan';
		   }

		   let  ob = create(Person);
		   console.log(ob.name);  //zhangsan
五、深拷贝和浅拷贝
什么是深拷贝?
答:深拷贝复制变量值,对于非基本类型的变量,则递归至基本类型变量后,再复制。深拷贝后的对象与原来的对象是完全隔离的,互不影响,对一个对象的修改并不会影响另一个对象。
什么是浅拷贝?
答:浅拷贝是指只复制第一层对象,但是当对象的属性是引用类型时,实质复制的是其引用,当引用指向的值改变时也会跟着变化。
浅拷贝的实现方法:
1、Object.assign
代码如下:
let obj = {
a:1,
b:{
c:2
}
}
let newobj = Object.assign({},obj);
newobj.a = 2;
newobj.b.c = 3;
console.log(obj)
console.log(newobj);
2、使用扩展运算符...
代码如下:
let obj = {
a:1,
b:{
c:2
}
}
let newobj = {...obj};
newobj.a = 2;
newobj.b.c = 3;
console.log(obj)
console.log(newobj);
两者的答案如下:
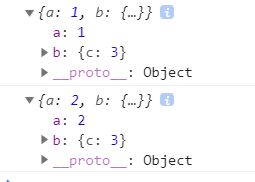
从这里可以看到,浅拷贝是指只复制第一层对象,但是当对象的属性是引用类型时,实质复制的是其引用,当引用指向的值改变时也会跟着变化,所以当a改变的时候,obj的a没有跟着改变,但是c却跟着改变
另外如果是数组的话,还有数组的concat和slice方法
a、concat方法
arr2 = arr1.concat();
arr2.push(6);
console.log(arr1); //[1,2,3,4,5]
console.log(arr2); //[1,2,3,4,5,6]
b、slice方法
arr2 = arr1.slice();
arr2.push(6);
console.log(arr1); //[1,2,3,4,5]
console.log(arr2); //[1,2,3,4,5,6];
在这里也说一下浅拷贝和赋值的区别:
-
当我们把一个对象赋值给一个新的变量时,赋的其实是该对象的在栈中的地址,而不是堆中的数据。也就是两个对象指向的是同一个存储空间,无论哪个对象发生改变,其实都是改变的存储空间的内容,因此,两个对象是联动的。
-
浅拷贝是按位拷贝对象,它会创建一个新对象,这个对象有着原始对象属性值的一份精确拷贝。如果属性是基本类型,拷贝的就是基本类型的值;如果属性是内存地址(引用类型),拷贝的就是内存地址 ,因此如果其中一个对象改变了这个地址,就会影响到另一个对象。即默认拷贝构造函数只是对对象进行浅拷贝复制(逐个成员依次拷贝),即只复制对象空间而不复制资源。
深拷贝的方法:
1、JSON.parse(JSON.stringify(str))
let arr = [
{num:1},
{num:2},
{num:3},
{num:4},
{num:5}
];
let arr2 = JSON.parse(JSON.stringify(arr));
arr2.push({num:6});
console.log(arr); // [{num:1},{num:2},{num:3}, {num:4},{num:5}]
console.log(arr2); // // [{num:1},{num:2},{num:3}, {num:4},{num:5},{num:6}]
2、手写深拷贝的方法
function copy(obj){
var result,newobj = judge(obj) ;
if(newobj == 'Object'){
result = {};
}else if(newobj == 'Array'){
result = [];
}else{
return obj;
}
for(key in obj){
var value = obj[key];
if(judge(value) == "Object"){
result[key] = arguments.callee(value);//递归调用
}else if(judge(value)=="Array"){
result[key] = arguments.callee(value);
}else{
result[key] = obj[key];
}
}
return result;
}
function judge(o){
if(o == null){
return 'null';
}else if(o == undefined){
return 'undefined'
}else{
return Object.prototype.toString.call(o).slice(8,-1);
}
}
六、JS继承
1、原型链继承
//js继承
function Person(grade){
this.grade = grade;
this.identity = '学生';
}
Person.prototype.study = function (){
console.log('我正在努力学习当中!');
}
//原型链继承
function Student(){
this.name = '小红';
this.sex ='女';
}
Student.prototype = new Person();
Student.prototype.number = '18356';
let student1 = new Student();
console.log(student1)
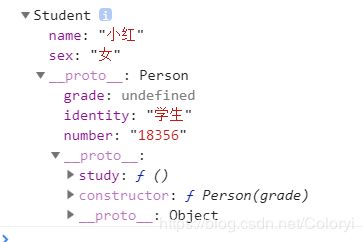
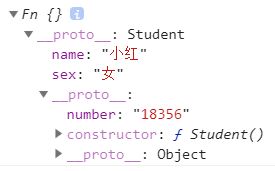
结果:
优点: 父类新增原型方法/原型属性,子类都能访问到、简单、易于实现;
缺点: 创建子类型实例时无法向父类型的构造函数传参,如上图的grade属性的值为undefined、给子类增加原型方法和属性要在替换原型之后、子类原型上的constuctor被替换掉。
2、借用构造函数
function Student(){
this.name = '小红';
this.sex ='女';
Person.call(this,100)
}
Student.prototype.number = '18356';
let student1 = new Student();
console.log(student1)
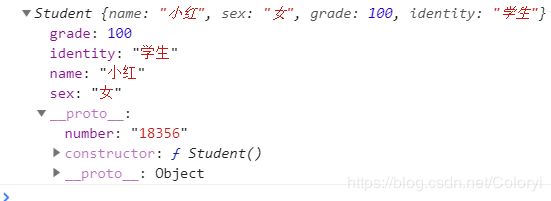
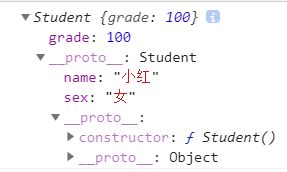
结果:
优点:创建子类型实例时可以向父类型的构造函数传参、不会破坏子类的原型同时子类对原型进行修改,也不会影响到父类的原型。
缺点:无法访问父类的原型方法和属性,只能继承父类实例的方法和属性。
3、组合继承
function Student(){
this.name = '小红';
this.sex ='女';
Person.call(this,100);
}
Student.prototype = Person.prototype;
Student.prototype.number = '18356';
let student1 = new Student();
console.log(student1)
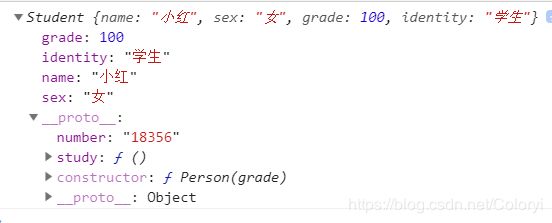
结果:
优点:可以继承实例属性/方法,也可以继承原型属性/方法、可传参、不存在引用属性共享问题。
缺点:调用了两次父类构造函数,生成了两份实例(子类实例将子类原型上的那份屏蔽了)。
4、原型式继承
function object(o){
function Fn(){};
Fn.prototype = o;
return new Fn();
}
function Student(){
this.name = '小红';
this.sex ='女';
}
Student.prototype.number = '18356';
let student1 = object(new Student());
console.log(student1)
结果:
5、寄生式继承
function newobj(obj){
let copy = Object.create(obj);
copy.grade = 100;
return copy;
}
function Student(){
this.name = '小红';
this.sex ='女';
}
let student1 = newobj(new Student());
console.log(student1)
结果:
6、寄生组合继承
(function(){
let Demo = function (){};
Demo.prototype = Person.prototype;
Student.prototype = new Demo();
}());
function Student(){
this.name = '小红';
this.sex ='女';
Person.call(this,100);
}
Student.prototype.number = '18356';
let student1 = new Student();
console.log(student1)
结果:
七、前端性能优化
说到前端性能优化,那么我们应该先要了解一下整个过程是怎么样的,然后才能知道在什么地方可以进行性能优化,这里也经常遇到一个很经典的面试题:从输入URL到页面展示的过程是怎样的,在这里就大概说一下流程(详细的流程在我的博客有总结https://blog.csdn.net/Coloryi/article/details/89258499)。
第一部分是加载一个资源的过程:
1、 浏览器根据DNS服务器得到域名的IP地址
2、 向这个IP的机器发送http请求
3、 服务器收到、处理并返回http请求
4、 浏览器的到返回的内容
第二部分是浏览器渲染页面的过程
5、 根据HTML结构生成DOM Tree
6、 根据css生成CSSOM
7、 将DOM和CSSOM整合形成Render Tree
8、 根据Render Tree开始渲染和展示
9、 遇到

