deeplearning Note : Practical aspects of Deep Learning
作者: Dylan_frank(滔滔)
这是 吴恩达 coursera Deep Learning Specialization 的第二门课程《Improving Deep Neural Networks: Hyperparameter tuning, Regularization and Optimization》 的第一周笔记,主要讲在实现神经网络过程中所遇到的问题,和处理方法,具体来说是3点
- 初始化
- regularization(正则化)
- grad checking(梯度检验)
Initialization(初始化)
数据集初始化
初始化分两个方面,一是对于数据集,这个在机器学习中也会遇到,一般就是做一个标准化变换
这个和机器学习中一样,主要是为了让数据集更均与,使cost fanction的contour图更正,不会变得像一个狭长的椭圆.
参数初始化
下面重点说一下这个参数的初始化。
我们先来看一下作业中的实验结果,作业做了3组实验
- 用0初始化
- 随机初始化为很大的值
- he_initialization (随机初始化为一个与维度相关的数)
(由于代码和相关数据在coursera服务器上我无法在这里完全重现实验,只能展示一些实验结果)
(可以看到他引入的模块中包含它自身写好的东西以及数据集,所以我没法复现完整代码)
这是我们需要实验的模型
def model(X, Y, learning_rate = 0.01, num_iterations = 15000, print_cost = True, initialization = "he"):
    """
    Implements a three-layer neural network: LINEAR->RELU->LINEAR->RELU->LINEAR->SIGMOID.

    Arguments:
    X -- input data, of shape (2, number of examples)
    Y -- true "label" vector (containing 0 for red dots; 1 for blue dots), of shape (1, number of examples)
    learning_rate -- learning rate for gradient descent
    num_iterations -- number of iterations to run gradient descent
    print_cost -- if True, print the cost every 1000 iterations
    initialization -- flag to choose which initialization to use ("zeros","random" or "he")

    Returns:
    parameters -- parameters learnt by the model
    """

    grads = {}
    costs = [] # to keep track of the loss
    m = X.shape[1] # number of examples
    layers_dims = [X.shape[0], 10, 5, 1]

    # Initialize parameters dictionary.
    if initialization == "zeros":
        parameters = initialize_parameters_zeros(layers_dims)
    elif initialization == "random":
        parameters = initialize_parameters_random(layers_dims)
    elif initialization == "he":
        parameters = initialize_parameters_he(layers_dims)

    # Loop (gradient descent)

    for i in range(0, num_iterations):

        # Forward propagation: LINEAR -> RELU -> LINEAR -> RELU -> LINEAR -> SIGMOID.
        a3, cache = forward_propagation(X, parameters)

        # Loss
        cost = compute_loss(a3, Y)

        # Backward propagation.
        grads = backward_propagation(X, Y, cache)

        # Update parameters.
        parameters = update_parameters(parameters, grads, learning_rate)

        # Print the loss every 1000 iterations
        if print_cost and i % 1000 == 0:
            print("Cost after iteration {}: {}".format(i, cost))
            costs.append(cost)

    # plot the loss
    plt.plot(costs)
    plt.ylabel('cost')
    plt.xlabel('iterations (per hundreds)')
    plt.title("Learning rate =" + str(learning_rate))
    plt.show()

    return parameters
是一个3层的神经网络
初始化为0
这是初始化为0的运行结果,cost function没有变化,因为参数没有打破对称性(break symmetry) 只是简单的将数据分为了0.
初始化为随机值
def initialize_parameters_random(layers_dims):
    """
    Arguments:
    layer_dims -- python array (list) containing the size of each layer.

    Returns:
    parameters -- python dictionary containing your parameters "W1", "b1", ..., "WL", "bL":
                    W1 -- weight matrix of shape (layers_dims[1], layers_dims[0])
                    b1 -- bias vector of shape (layers_dims[1], 1)
                    ...
                    WL -- weight matrix of shape (layers_dims[L], layers_dims[L-1])
                    bL -- bias vector of shape (layers_dims[L], 1)
    """

    np.random.seed(3)               # This seed makes sure your "random" numbers will be the as ours
    parameters = {}
    L = len(layers_dims)            # integer representing the number of layers

    for l in range(1, L):
        ### START CODE HERE ### (≈ 2 lines of code)
        parameters['W' + str(l)] = np.random.randn(layers_dims[l],layers_dims[l-1])*10
        parameters['b' + str(l)] = np.zeros((layers_dims[l],1))
        ### END CODE HERE ###

    return parameters
这里将参数设置为了正态分布点的10倍
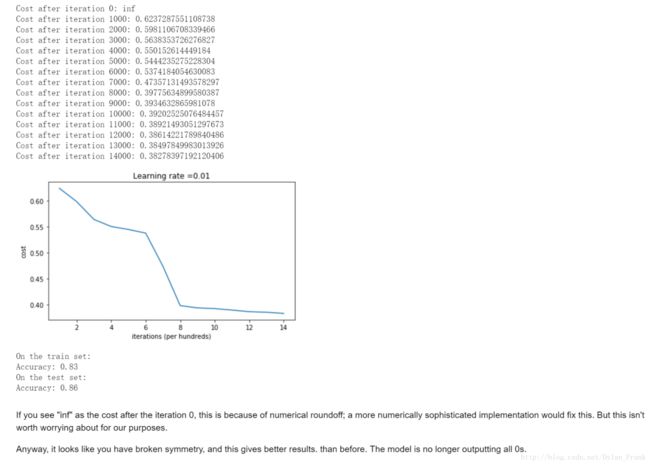
他分类出来的数据边界是这样的
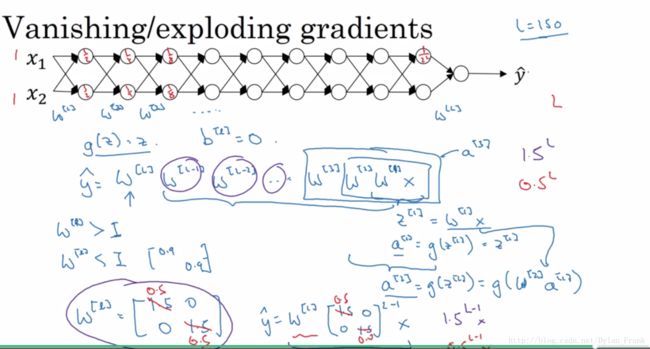
可以看到0此迭代cost function出现了inf,这是因为参数传播速度大致是指数级的会造成 vanishing/Exploding grad,
andrew 在课程中举了个很极端的例子
he initialization
之所以称为he initialization 是因为他在这边论文中被提到:He et al., 2015.
def initialize_parameters_he(layers_dims):
    """
    Arguments:
    layer_dims -- python array (list) containing the size of each layer.

    Returns:
    parameters -- python dictionary containing your parameters "W1", "b1", ..., "WL", "bL":
                    W1 -- weight matrix of shape (layers_dims[1], layers_dims[0])
                    b1 -- bias vector of shape (layers_dims[1], 1)
                    ...
                    WL -- weight matrix of shape (layers_dims[L], layers_dims[L-1])
                    bL -- bias vector of shape (layers_dims[L], 1)
    """

    np.random.seed(3)
    parameters = {}
    L = len(layers_dims) - 1 # integer representing the number of layers

    for l in range(1, L + 1):
        ### START CODE HERE ### (≈ 2 lines of code)
        parameters['W' + str(l)] = np.random.randn(layers_dims[l],layers_dims[l-1])*np.sqrt(2/layers_dims[l-1])
        parameters['b' + str(l)] = np.zeros((layers_dims[l],1))
        ### END CODE HERE ###

    return parameters
其实就是将每一层参数方差设置为 2layer_dims[l−1]−−−−−−−−−−√
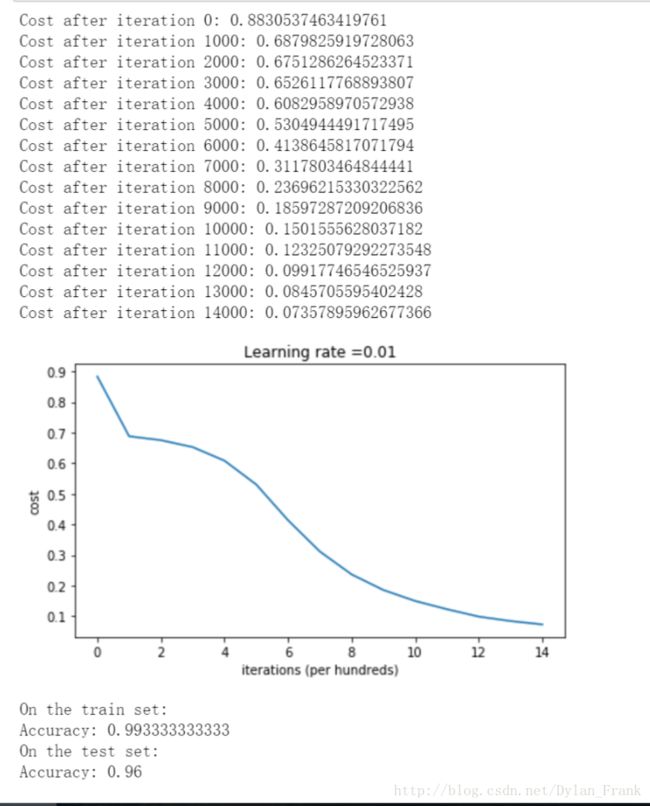
可以看到这样做的分类效果非常好
测试集上的准确率提高到了 96%而且cost下降很明显
至于它为什么好我就不知道了.
总结
What you should remember from this notebook:
- Different initializations lead to different results
- Random initialization is used to break symmetry and make sure different hidden units can learn different things
- Don’t intialize to values that are too large
- He initialization works well for networks with ReLU activations.
正则化
接下来我们来谈一谈正则化问题
L2范数正则化
这种正则化,我们在机器学习中已经接触到了,就是对参数加一个惩罚项避免过拟合。即
W:指代所有层,这样写是为了方便
总结:
What you should remember – the implications of L2-regularization on:
- The cost computation:
- A regularization term is added to the cost
- The backpropagation function:
- There are extra terms in the gradients with respect to weight matrices
- Weights end up smaller (“weight decay”):
- Weights are pushed to smaller values.
dropout
这是一项黑科技啊,以前没有接触过.
简单的说就是让一些神经元以一定的概率不发生作用,我们为每一层的参数生成一个随机矩阵 D ,均匀分布,然后以一个固定的概率某一些神经元不发生作用,比如keep_prob = 0.8,伪代码如下
D = np.random.rand(para.shape)
D = D < keep_prob
这样 D 就成了一个0,1矩阵,让参数乘D 就让某些参数不起作用,最总让某些神经元不起作用,伪代码如下
para *=D
para /=keep_prob
第一行代码很好理解,第二行代码是为了让下一层保持均值不变,因为从前一层传过来的时候有些神经元不起作用了,导致最终的和式均值变低,所以将起作用的神经元”加强”,就好比你让 1−keep_prob 的神经元不起作用,导致均值降低 1−keep_prob 所以将其提高 1−keep_prob 回来
实现代码
# GRADED FUNCTION: forward_propagation_with_dropout

def forward_propagation_with_dropout(X, parameters, keep_prob = 0.5):
    """
    Implements the forward propagation: LINEAR -> RELU + DROPOUT -> LINEAR -> RELU + DROPOUT -> LINEAR -> SIGMOID.

    Arguments:
    X -- input dataset, of shape (2, number of examples)
    parameters -- python dictionary containing your parameters "W1", "b1", "W2", "b2", "W3", "b3":
                    W1 -- weight matrix of shape (20, 2)
                    b1 -- bias vector of shape (20, 1)
                    W2 -- weight matrix of shape (3, 20)
                    b2 -- bias vector of shape (3, 1)
                    W3 -- weight matrix of shape (1, 3)
                    b3 -- bias vector of shape (1, 1)
    keep_prob - probability of keeping a neuron active during drop-out, scalar

    Returns:
    A3 -- last activation value, output of the forward propagation, of shape (1,1)
    cache -- tuple, information stored for computing the backward propagation
    """

    np.random.seed(1)

    # retrieve parameters
    W1 = parameters["W1"]
    b1 = parameters["b1"]
    W2 = parameters["W2"]
    b2 = parameters["b2"]
    W3 = parameters["W3"]
    b3 = parameters["b3"]

    # LINEAR -> RELU -> LINEAR -> RELU -> LINEAR -> SIGMOID
    Z1 = np.dot(W1, X) + b1
    A1 = relu(Z1)
    ### START CODE HERE ### (approx. 4 lines)         # Steps 1-4 below correspond to the Steps 1-4 described above.
    D1 = np.random.rand(A1.shape[0],A1.shape[1])                     # Step 1: initialize matrix D1 = np.random.rand(..., ...)
    D1 = D1<=keep_prob                                # Step 2: convert entries of D1 to 0 or 1 (using keep_prob as the threshold)
    A1 *=D1                                           # Step 3: shut down some neurons of A1
    A1 /=keep_prob                                    # Step 4: scale the value of neurons that haven't been shut down
    ### END CODE HERE ###
    Z2 = np.dot(W2, A1) + b2
    A2 = relu(Z2)
    ### START CODE HERE ### (approx. 4 lines)
    D2 = np.random.rand(A2.shape[0],A2.shape[1])                      # Step 1: initialize matrix D2 = np.random.rand(..., ...)
    D2 = D2 < keep_prob                                # Step 2: convert entries of D2 to 0 or 1 (using keep_prob as the threshold)
    A2 *=D2                                            # Step 3: shut down some neurons of A2
    A2 /=keep_prob                                     # Step 4: scale the value of neurons that haven't been shut down
    ### END CODE HERE ###
    Z3 = np.dot(W3, A2) + b3
    A3 = sigmoid(Z3)

    cache = (Z1, D1, A1, W1, b1, Z2, D2, A2, W2, b2, Z3, A3, W3, b3)

    return A3, cache
反向传播代码
# GRADED FUNCTION: backward_propagation_with_dropout

def backward_propagation_with_dropout(X, Y, cache, keep_prob):
    """
    Implements the backward propagation of our baseline model to which we added dropout.

    Arguments:
    X -- input dataset, of shape (2, number of examples)
    Y -- "true" labels vector, of shape (output size, number of examples)
    cache -- cache output from forward_propagation_with_dropout()
    keep_prob - probability of keeping a neuron active during drop-out, scalar

    Returns:
    gradients -- A dictionary with the gradients with respect to each parameter, activation and pre-activation variables
    """

    m = X.shape[1]
    (Z1, D1, A1, W1, b1, Z2, D2, A2, W2, b2, Z3, A3, W3, b3) = cache

    dZ3 = A3 - Y
    dW3 = 1./m * np.dot(dZ3, A2.T)
    db3 = 1./m * np.sum(dZ3, axis=1, keepdims = True)
    dA2 = np.dot(W3.T, dZ3)
    ### START CODE HERE ### (≈ 2 lines of code)
    dA2 *= D2            # Step 1: Apply mask D2 to shut down the same neurons as during the forward propagation
    dA2 /= keep_prob              # Step 2: Scale the value of neurons that haven't been shut down
    ### END CODE HERE ###
    dZ2 = np.multiply(dA2, np.int64(A2 > 0))
    dW2 = 1./m * np.dot(dZ2, A1.T)
    db2 = 1./m * np.sum(dZ2, axis=1, keepdims = True)

    dA1 = np.dot(W2.T, dZ2)
    ### START CODE HERE ### (≈ 2 lines of code)
    dA1 *= D1              # Step 1: Apply mask D1 to shut down the same neurons as during the forward propagation
    dA1 /= keep_prob              # Step 2: Scale the value of neurons that haven't been shut down
    ### END CODE HERE ###
    dZ1 = np.multiply(dA1, np.int64(A1 > 0))
    dW1 = 1./m * np.dot(dZ1, X.T)
    db1 = 1./m * np.sum(dZ1, axis=1, keepdims = True)

    gradients = {"dZ3": dZ3, "dW3": dW3, "db3": db3,"dA2": dA2,
                 "dZ2": dZ2, "dW2": dW2, "db2": db2, "dA1": dA1,
                 "dZ1": dZ1, "dW1": dW1, "db1": db1}

    return gradients
需要注意的是在反向传播的时候也需要用原来的随机矩阵保证起作用的参数变化
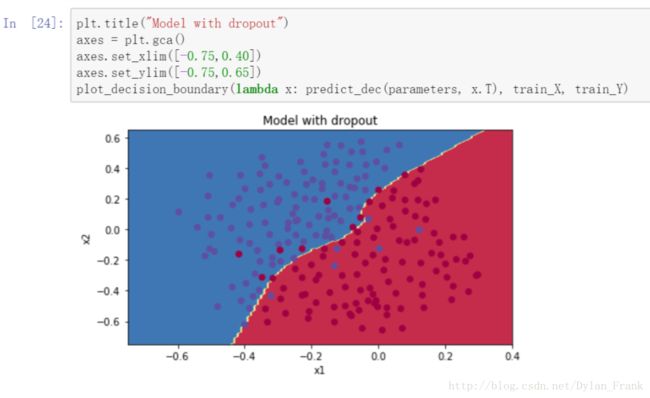
这里看一下实现效果.
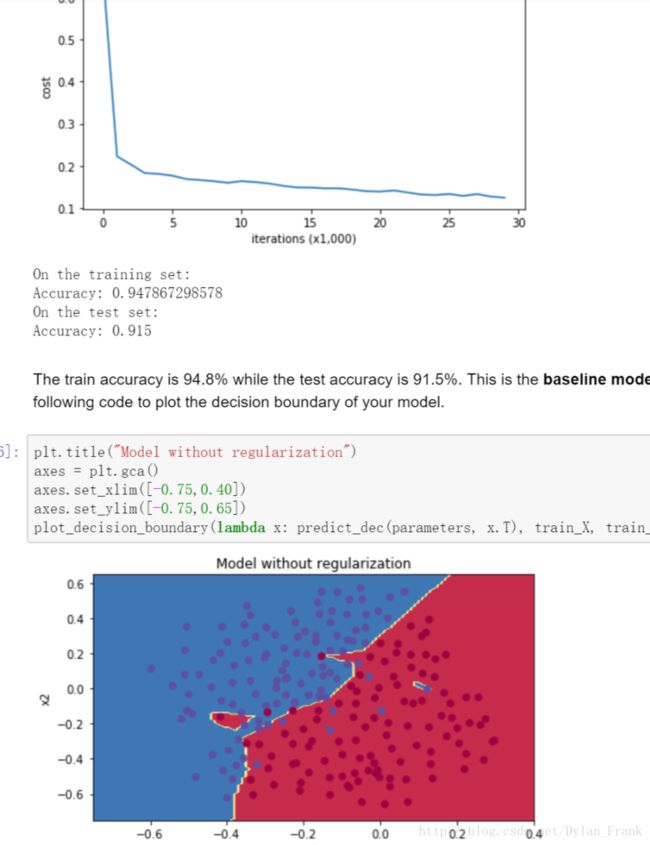
可以看到边界很平滑,而没有用任何正则化的图是这样的
过拟合并且正确率稍低
总结
Note:
- A common mistake when using dropout is to use it both in training and testing. You should use dropout (randomly eliminate nodes) only in training.
What you should remember about dropout:
- Dropout is a regularization technique.
- You only use dropout during training. Don’t use dropout (randomly eliminate nodes) during test time.
- Apply dropout both during forward and backward propagation.
- During training time, divide each dropout layer by keep_prob to keep the same expected value for the activations. For example, if keep_prob is 0.5, then we will on average shut down half the nodes, so the output will be scaled by 0.5 since only the remaining half are contributing to the solution. Dividing by 0.5 is equivalent to multiplying by 2. Hence, the output now has the same expected value. You can check that this works even when keep_prob is other values than 0.5.
grad check
这个讲的是如何debug 你的梯度计算是否有问题,就是用数值方法计算梯度,然后将其与back propagation 计算出来的作比较,如果差值在合理范围内就认为其是正确的.
所谓数值计算方法,就是
将 θ 取的足够小就行了,一般取 10−7
然后与反向传播的梯度做比较,设反向传播计算的梯度为 grad , 数值计算的梯度为 dW ,则用如下公式
如果 diff 的数量级与 θ 相当则认为正确,本例中 小于 10−7 认为正确。
下面是代码
# GRADED FUNCTION: gradient_check_n

def gradient_check_n(parameters, gradients, X, Y, epsilon = 1e-7):
    """
    Checks if backward_propagation_n computes correctly the gradient of the cost output by forward_propagation_n

    Arguments:
    parameters -- python dictionary containing your parameters "W1", "b1", "W2", "b2", "W3", "b3":
    grad -- output of backward_propagation_n, contains gradients of the cost with respect to the parameters.
    x -- input datapoint, of shape (input size, 1)
    y -- true "label"
    epsilon -- tiny shift to the input to compute approximated gradient with formula(1)

    Returns:
    difference -- difference (2) between the approximated gradient and the backward propagation gradient
    """

    # Set-up variables
    parameters_values, _ = dictionary_to_vector(parameters)
    grad = gradients_to_vector(gradients)
    num_parameters = parameters_values.shape[0]
    J_plus = np.zeros((num_parameters, 1))
    J_minus = np.zeros((num_parameters, 1))
    gradapprox = np.zeros((num_parameters, 1))

    # Compute gradapprox
    for i in range(num_parameters):

        # Compute J_plus[i]. Inputs: "parameters_values, epsilon". Output = "J_plus[i]".
        # "_" is used because the function you have to outputs two parameters but we only care about the first one
        ### START CODE HERE ### (approx. 3 lines)
        thetaplus =  np.copy(parameters_values)                                     # Step 1
        thetaplus[i][0] +=epsilon                                                      # Step 2
        J_plus[i], _ = forward_propagation_n(X,Y,vector_to_dictionary(thetaplus))        # Step 3
        ### END CODE HERE ###

        # Compute J_minus[i]. Inputs: "parameters_values, epsilon". Output = "J_minus[i]".
        ### START CODE HERE ### (approx. 3 lines)
        thetaminus = np.copy(parameters_values)                                              # Step 1
        thetaminus[i][0] -= epsilon                                                          # Step 2
        J_minus[i], _ = forward_propagation_n(X,Y,vector_to_dictionary(thetaminus))            # Step 3
        ### END CODE HERE ###

        # Compute gradapprox[i]
        ### START CODE HERE ### (approx. 1 line)
        gradapprox[i] = (J_plus[i]-J_minus[i]) / (2*epsilon)
        ### END CODE HERE ###

    # Compare gradapprox to backward propagation gradients by computing difference.
    ### START CODE HERE ### (approx. 1 line)
    norm1 ,norm2= np.linalg.norm(grad),np.linalg.norm(gradapprox)
    numerator =np.abs(norm1 - norm2)                                            # Step 1'
    denominator = norm1 + norm2                                  # Step 2'
    difference =  numerator / denominator                                       # Step 3'
    ### END CODE HERE ###

    if difference > 1e-7:
        print ("\033[93m" + "There is a mistake in the backward propagation! difference = " + str(difference) + "\033[0m")
    else:
        print ("\033[92m" + "Your backward propagation works perfectly fine! difference = " + str(difference) + "\033[0m")

    return difference
需要注意的是数值计算梯度往往只用在debug中因为计算复杂度太大了….
版权声明
本文作者Dylan_frank(滔滔) 谢绝任何爬虫转载,如有转载请注明出处,联系作者http://blog.csdn.net/dylan_frank/article/details/77284747


