PX4通过I2C方式添加自定义传感器(3)
添加自定义传感器并实现数据的发送和订阅
1、前期准备
1.1 建立文件夹和相关文件配置
我是在src/drivers/distance_sensor文件夹下操作的,当然其他文件夹下都类似。首先建立了两个文件夹angle_source和angle_detection,前面一个主要是基类的定义,里面有一些函数的申明,后面一个主要是存放主要的程序和实现消息的发布。angle_source这个文件夹我先不说,因为这个文件夹比较简单我是直接把src/drivers/airspeed文件夹下的内容拷贝到我的文件夹下的,然后对它进行一些名字上的修改。我们还是来看angle_detection文件夹吧。 可以看到我们建了两个文件,一个.cpp文件一个Cmakelists文件。.cpp文件就是存放代码的,cmakelists文件就是跟编译有关,有了这个文件我们才能让自己写的代码能够参与编译。
1.2 Cmakelists文件编写
我们先看一下代码
px4_add_module(
        MODULE angle_detection
        MAIN angle_sensor
    COMPILE_FLAGS
        -Wno-sign-compare
    SRCS
                angle_sensor.cpp
    DEPENDS
        platforms__common
    )
# vim: set noet ft=cmake fenc=utf-8 ff=unix :
关于这个文件的编写,随便找一个Cmakelists文件模仿一下就好了。需要说一下,MAIN就是主函数的名字,SRCS对应的是你.cpp文件的名字,比如我的就是angle_sensor.cpp。
1.3 编译文件nuttx_px4fmu-v2_default.cmake的修改
这个文件就是整个固件的编译文件了,我们只需要在其中加一句就行,这样就和我们刚刚写的Cmakelists文件对接上了,我们的程序就可以参与整体的编译了。
红线所划之处就是我添加的模块。这样我们前期的准备工作就结束了。下面就是具体的编程了。
2、基类的编写
2.1 基类.cpp文件编写
这个其实就是我前面所说的angle_source文件夹下内容的编写,我也说了就是直接把src/drivers/airspeed文件夹下的内容拷贝到我的文件夹下的,然后对它进行一些名字上的修改。
这里我直接就把我的这块程序复制过来了,就不做过多介绍了。
#include 可以看到我就是把类的名字进行了修改。这个类有什么作用呢?我们不妨再简单看一下这段程序,其实也就是几个函数的定义而已,比如我们看到有初始化函数Angle::init(),还有启动函数start(),还有一个名字是ioctl(),这个函数就是对文件的操作,比如到时候设置采集的频率等等。
2.2 基类Cmakelists文件修改
这个修改也比较简单了,就是几个名字的修改,不做过多介绍,代码如下:
px4_add_module(
        MODULE drivers__angle_source
    COMPILE_FLAGS
    SRCS
                angle.cpp
    DEPENDS
        platforms__common
    )
2.3 基类.h文件编写
这个文件就是头文件了,对类和基本函数的申明咯,到时候其他文件只要包含了这个头文件,相应的函数和类就可以使用了,而不必重复声明。代码如下:
#pragma once

#include
#include
#include
#include
#include
#include
#include
#include
#include
#include
#include
#include

/* Default I2C bus */
static constexpr uint8_t PX4_I2C_BUS_DEFAULT = PX4_I2C_BUS_EXPANSION;

class __EXPORT Angle : public device::I2C
{
public:
        Angle(int bus, int address, unsigned conversion_interval, const char *path);
        virtual ~Angle();

    virtual int init();

    virtual int ioctl(device::file_t *filp, int cmd, unsigned long arg);

private:
    /* this class has pointer data members and should not be copied */
        Angle(const Angle &);
        Angle &operator=(const Angle &);

protected:
    virtual int probe();

    /**
    * Perform a poll cycle; collect from the previous measurement
    * and start a new one.
    */
    virtual void    cycle() = 0;
    virtual int measure() = 0;
    virtual int collect() = 0;

    /**
     * Update the subsystem status
     */
    void update_status();

    work_s          _work;
    bool            _sensor_ok;
    bool            _last_published_sensor_ok;
    uint32_t        _measure_ticks;
    bool            _collect_phase;
    float           _diff_pres_offset;

        orb_advert_t        _angle_pub;
    int         _angle_orb_class_instance;

    orb_advert_t        _subsys_pub;

    int         _class_instance;

    unsigned        _conversion_interval;

    perf_counter_t      _sample_perf;
    perf_counter_t      _comms_errors;

    /**
    * Initialise the automatic measurement state machine and start it.
    *
    * @note This function is called at open and error time.  It might make sense
    *       to make it more aggressive about resetting the bus in case of errors.
    */
    void    start();

    /**
    * Stop the automatic measurement state machine.
    */
    void    stop();

    /**
    * Static trampoline from the workq context; because we don't have a
    * generic workq wrapper yet.
    *
    * @param arg        Instance pointer for the driver that is polling.
    */
    static void cycle_trampoline(void *arg);

    /**
    * add a new report to the reports queue
    *
    * @param report     differential_pressure_s report
    */
        void    new_report(const angle_sensor_s &volt_data);
};
3、继承类的编写
从这里开始就进入到我们真正需要好好编写的地方了,需要根据自己的需要进行适当的修改。
-首先我们来看一些基本的常量的定义:
/* I2C bus address */
#define I2C_ADDRESS 0x48    /* 7-bit I2C ADDRESS */
#define SET_CMD 0x40|3 /*Choose the channel */
#define Anglesensor_BUS PX4_I2C_BUS_EXPANSION

#define angle_PATH  "/dev/angle_detection"
第一个定义的是I2C的地址,还是那句话这里的地址是7位的,这里需要根据具体的器件地址进行修改,地址如果不对了,什么数据都读不出来了。第二个定义的是一个控制命令,因为我的器件在读之前需要先进行通道的选择等一系列操作,所以需要先写入一个控制命令,如果你的器件在读之前也需要进行写控制命令也可以在这里进行定义。第三个定义的是I2C的总线有PX4_I2C_BUS_EXPANSION和PX4_I2C_BUS_ONBOARD可以选择,因为我的器件属于板外扩展的,所以就选择这个。第四个是路径的定义,定义了路径之后,一切都可以以文件的形式进行操作了,但是关于文件操作具体如何实现,这个我也不太清楚。
- 接着就是类的声明了
class Anglesensor:public Angle
{
public:

                Anglesensor( int bus , int address,const char *path);
                virtual int collect();

protected:

        virtual int measure();
//        virtual int collect();
        virtual void cycle();


};


Anglesensor::Anglesensor( int bus , int address=I2C_ADDRESS,const char *path=angle_PATH):
Angle(bus,address,10000,path)
{
    _device_id.devid_s.devtype=DRV_DIFF_PRESS_DEVTYPE_MS5525;
}
看到这里的类就是对我们刚刚建立的基类的公有继承了,比较简单。
- 然后就是相关函数的定义
int
Anglesensor::measure()
{
        int ret=-EIO;

        /*
         * Send the command to begin a measurement.
         */
        uint8_t cmd=SET_CMD;
        ret = transfer(&cmd,1,nullptr, 0);
        if (OK != ret) {
        perf_count(_comms_errors);
        }

        return ret;
}

int
Anglesensor::collect()
{
        int ret = -EIO;

        uint8_t val;
        angle_sensor_s volt_data;  /*define a struct to collect data*/

    /*read the data*/

        perf_begin(_sample_perf);
        ret = transfer(nullptr, 0, &val,1);
        if (ret < 0) {
        perf_count(_comms_errors);
        return ret;
        }
        PX4_INFO("volt data1:%d",val);   //add by klb 5/4
        volt_data.error_count=perf_event_count(_comms_errors);
        volt_data.volt=val;
        volt_data.volt_b=val/50;           //transfer to volt,b:the integer before point
        volt_data.volt_a=(val%50)/10;      //a:the integer after point
        volt_data.device_id=0;
        PX4_INFO("volt data2:%d",volt_data.volt);   //add by klb 5/4
   /*to publish a topic */


    if (_angle_pub != nullptr && !(_pub_blocked)) {

        orb_publish(ORB_ID(angle_sensor), _angle_pub, &volt_data);
    }
        ret = OK;
                perf_end(_sample_perf);


        return ret;
}

void
Anglesensor::cycle()
{
    int ret;

    if(_collect_phase){
        ret=collect();

        if(OK!=ret){
            perf_count(_comms_errors);
            start();
            _sensor_ok=false;
            return;
        }
        _collect_phase=false;

        if(_measure_ticks>USEC2TICK(10000)){
            work_queue(HPWORK,
                       &_work,
                       (worker_t)&Angle::cycle_trampoline,
                       this,
                       _measure_ticks-USEC2TICK(10000));

            return;
        }
    }


    ret=measure();
    if(OK!=ret){
        DEVICE_DEBUG("measure error");
    }
        _sensor_ok=(ret==OK);
        _collect_phase=true;

        /*schedule a fresh cycle call when the measurement is done*/
        work_queue(HPWORK,
                   &_work,
                   (worker_t)&Angle::cycle_trampoline,
                   this,
                   USEC2TICK(10000));

}
这里定义了measure()函数就是在读之前先发送控制命令的,collect()函数就是进行数据的读取,及一些简单的对数据结果的处理。处理完了之后我们看到有对数据的发布:
   /*to publish a topic */


    if (_angle_pub != nullptr && !(_pub_blocked)) {

        orb_publish(ORB_ID(angle_sensor), _angle_pub, &volt_data);
    }
这里的angle_sensor是我自己定义的一个topic,关于topic的定义也比较简单相关的文章也很多,你可以之间搜uORB添加自定义主题,就会有相关的文章。定义了主题之后,通过公告、发布、订阅,这样其他的app也可以使用你这个传感器的数据了,我们后面还会有这方面的操作。
关于cycle()这个函数看起来比较复杂,其实就可以理解为是一种循环进行读取。
- 最后就是一些提供给nsh调试的函数
上一篇文章也提到了,我们看一下代码:
/**
 * Local function in support of the shell command
 */

namespace anglesensor {
    Anglesensor *cal;
    int start(int i2c_bus);
    int stop();
    int test();
    int reset();

/**
 * @brief start
 * @param i2c_bus
 * start the driver
 */
int
start(int i2c_bus)
{
    int fd;
    if(cal!=nullptr){
        PX4_ERR("already started");
        return PX4_ERROR;
    }

    /*creat the driver*/
    cal=new Anglesensor(i2c_bus);

    if (cal==nullptr){
        goto fail;
    }


    if(OK!=cal->init()){
        PX4_ERR("i2c not started!");
        goto fail;
    }
    /*set the poll rate to default,starts automatic data collection*/
    fd=open(angle_PATH,O_RDONLY);
    if (fd<0){
        PX4_ERR("failed to open");
        goto fail;
    }

    if(px4_ioctl(fd,SENSORIOCSPOLLRATE,SENSOR_POLLRATE_DEFAULT)<0){
        PX4_ERR("failed to set default");
       goto fail;
    }

    return PX4_OK;
fail:
    if(cal!=nullptr){
        delete cal;
        cal=nullptr;
    }
    PX4_WARN("driver not started on bus %d",i2c_bus);
    return PX4_ERROR;
}

/**
 * @brief stop
 * @stop the driver
 */
int
stop()
{
    if(cal!=nullptr){
        delete cal;
        cal=nullptr;
    }else {
        PX4_ERR("driver not running");
        return PX4_ERROR;
    }
    return PX4_OK;

}

/**
 * @brief test
 * perform some basic funcational tests one driver;
 * make sure we can collect data from the sensor in polled
 * and automatic modes
 */
int
test()
{
//    struct angle_sensor_s volt_da;
    ssize_t sz;
    int ret;

    int fd=px4_open(angle_PATH,O_RDONLY);

    if(fd<0){
        PX4_ERR("%s open failed try'angle_sensor start'if the driver is not running",angle_PATH);
        return PX4_ERROR;
    }
    /*do a simple demmand read*/

    struct angle_sensor_s volt_da;
    int angle_sub_fd=orb_subscribe(ORB_ID(angle_sensor));
    orb_copy(ORB_ID(angle_sensor),angle_sub_fd,&volt_da);


    PX4_INFO("volt data3:%d",volt_da.volt);
    sz=px4_read(fd,&volt_da,sizeof(volt_da));

    if(sz!=sizeof(volt_da)){
        PX4_ERR("immediate read failed");
        return PX4_ERROR;
    }
    PX4_INFO("single read");
    PX4_INFO("transfer volt data: %d.%d V",volt_da.volt_b,volt_da.volt_a);

    /*start the sensor polling at 2HZ*/
    if(OK!=px4_ioctl(fd,SENSORIOCSPOLLRATE,2)){
        PX4_ERR("failed to set 2 HZ poll rate");
        return PX4_ERROR;
    }
    /*read the sensor 5x and report each value*/
    for(unsigned i=0;i<5;i++){
        px4_pollfd_struct_t fds;

        /*wait for data to be ready*/
        fds.fd=fd;
        fds.events=POLLIN;
        ret=px4_poll(&fds,1,2000);

        if(ret!=1){
            PX4_ERR("time out waiting for the sensor data");
            return PX4_ERROR;

        }
        /*now to get it*/
        sz=px4_read(fd,&volt_da,sizeof(volt_da));

        if(sz!=sizeof(volt_da)){
            PX4_ERR("periodic read failed");
        }

        PX4_INFO("periodic read %u",i);
        PX4_INFO("volt data: %d.%d",volt_da.volt_b,volt_da.volt_a);
    }
    /*reset the sensor polling to default rate*/
    if(OK!=px4_ioctl(fd,SENSORIOCGPOLLRATE,SENSOR_POLLRATE_DEFAULT)){
        PX4_ERR("failed to set default rate");
        return PX4_ERROR;
    }
    return PX4_OK;
}
/**
 * @brief reset
 * @reset the driver
 */
int reset()
{
    int fd=px4_open(angle_PATH,O_RDONLY);

    if(fd<0){
        PX4_ERR("failed");
        return PX4_ERROR;
    }

    if(px4_ioctl(fd,SENSORIOCSPOLLRATE,0)<0){
        PX4_ERR("driver reset failed");
        return PX4_ERROR;
    }

    if(px4_ioctl(fd,SENSORIOCSPOLLRATE,SENSOR_POLLRATE_DEFAULT)<0){
        PX4_ERR("driver poll restart failed");
        return PX4_ERROR;
    }
    return PX4_ERROR;
}
}
start()函数就是进行一些初始化的设置,另外如果我们需要nsh调试看我们能否得到传感器的数据时,必须首先要进行start()。关于test()函数,其实就是两个功能:
(1). 进行单个数据的读取;
(2). 设置读取频率为2HZ,连续读取五次。
但是在这里我也遇到了问题,
  sz=px4_read(fd,&volt_da,sizeof(volt_da));

    if(sz!=sizeof(volt_da)){
        PX4_ERR("immediate read failed");
        return PX4_ERROR;
    }
     }
就是在这里进行读的时候总是出现错误,显示“immediate read failed”,我琢磨了很久也不知道是什么原因,我觉得可能是路径方面出了问题,但是找相关的资料也找不到。但是还好,虽然这里读不出来,但是主题是成功地发布了,而且可以成功地进行订阅。所以我在这加了一句消息订阅进行检测:
 struct angle_sensor_s volt_da;
    int angle_sub_fd=orb_subscribe(ORB_ID(angle_sensor));
    orb_copy(ORB_ID(angle_sensor),angle_sub_fd,&volt_da);


    PX4_INFO("volt data3:%d",volt_da.volt);
既然成功了,我就没管它了。于是下面我们就进行在其他app里进行订阅,看看能否成功。
4、 在px4_simple_app中进行订阅
px4_simple_app在src/examples路径下,这是已经为我们提供好了的一个app例程,我们只需要简单进行修改就好了。还是直接看我修改后的文件吧:
/**
* @file px4_simple_app.c
* Minimal application example for PX4 autopilot
*
* @author Example User
*/
#include 这里说一下两个地方:
(1). orb_set_interval(sensor_sub_fd, 200); 这个是对接收频率的设置,设置间隔为200ms也就是5HZ
(2).然后我在这里是设置了读取20次
另外需要注意的一点是,px4_simple_app也是需要加入到编译中去的,所以也需要在px4fmu-v2_default当中加入的,具体的方法和上面的一样。
4、加入自启动
为什么要加入自启动呢?这跟我们上面说的一个地方有关,上面我提到,如果我们要获取传感器的数据,我们首先需要先输入angle_sensor start这个命令,也就是启动命令。那么这是在调试中我们可以这么办,那么在实际板子上谁给你输入这个启动命令呢?没有人,那你就只能自启动了。
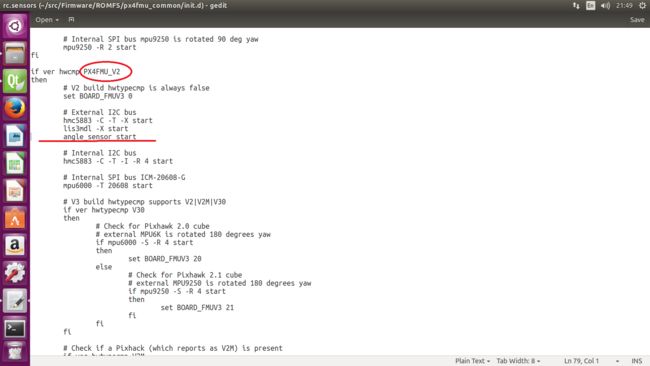
我们来看看自启动在哪操作,其实也是很简单。我们找到src/Firmware/ROMFS/px4fmu_common/init.d下的rc.sensor这个文件,这里就是对传感器的自启动了。

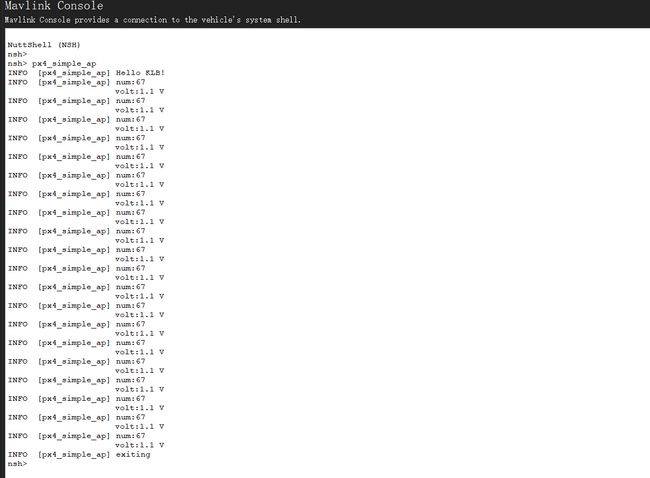
这里一定要找对,是在PX4FMU_V2下进行添加,红色线标注的部分就是添加的内容,这样他就可以自启动啦。我们直接输入px4_simple_ap就可以直接看到数据啦!
