SpringCloud架构搭建以及集群&架构搭建之SpringCloud
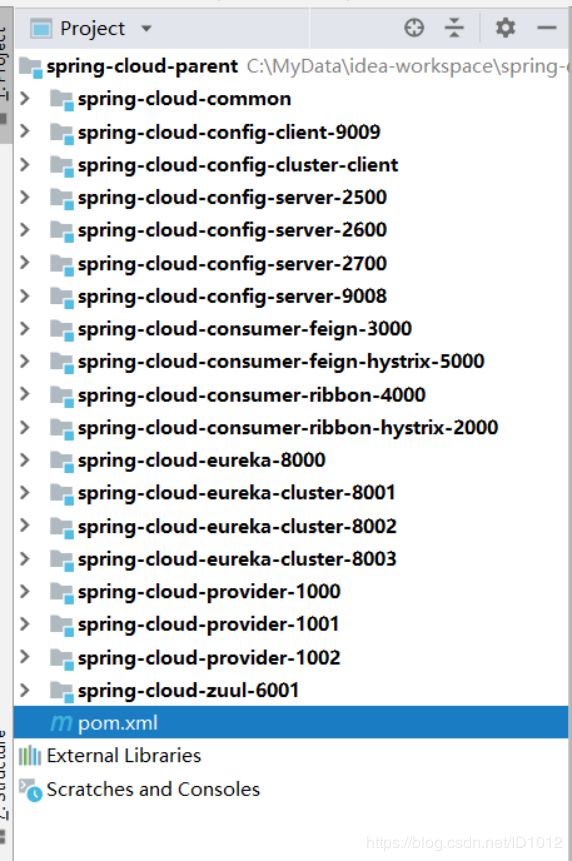
1.创建maven聚合项目 spring-cloud-parent
pom.xml配置
		org.springframework.boot
		spring-boot-starter-parent
		2.0.5.RELEASE


		UTF-8
		UTF-8
		1.8
		Finchley.RELEASE
		1.16.10


			org.springframework.boot
			spring-boot-starter-test
			test


				org.projectlombok
				lombok
				${lombok.version}
				provided


				org.springframework.cloud
				spring-cloud-dependencies
				${spring-cloud.version}
				pom
				import


				org.springframework.boot
				spring-boot-maven-plugin
2.创建common模块 依赖父工程
3.创建eureka-8000 注册中心
pom.xml配置
		org.springframework.cloud
		spring-cloud-starter-netflix-eureka-server
application.xml配置
  server:
      port: 8000
    eureka:
      instance:
        hostname: localhost #eureka服务器的实例名字
      client:
        register-with-eureka: false #注册中心不注册自己,默认自己也会注册自己
        fetch-registry: false #是否获取数据,false表明自己就是注册中心
        service-url:
          defaultZone: http://${eureka.instance.hostname}:${server.port}/eureka/
    spring:
      application:
        name: eureka-8000 #应用名
启动类配置
@EnableEurekaServer
@SpringBootApplication
public class Start {
    public static void main(String[] args) {
        SpringApplication.run(Start.class, args);
    }
}
效果测试

成功 还没有实例注册到eureka
4.创建生产者 将服务注册到eureka
pom.xml配置文件
        org.springframework.boot
        spring-boot-starter-web


        org.springframework.boot
        spring-boot-devtools


        org.springframework.cloud
        spring-cloud-starter-netflix-eureka-client
application.yml配置文件
server:
  port: 1000
spring:
  application:
    name: provider-1000
eureka:
  client:
    service-url:
      defaultZone: http://localhost:8000/eureka/
启动类配置
@SpringBootApplication
@EnableEurekaClient
public class Start {
    public static void main(String[] args) {
        SpringApplication.run(Start.class, args);
    }
}
测试效果

成功启动
5.服务消费者 ribbon 与 feign
ribbon
继续添加多个生产者 provider -1001 provider-1002,给这些生产者 修改端口号 添加Ctrl
@RestController
public class Ctrl {
    @RequestMapping("/hello")
    public Map hello() {
        Map map = new HashMap();
        map.put("name", "provider-1002");
        return map;
    }
}
创建消费者 ribbon
pom.xml配置文件
        org.springframework.cloud
        spring-cloud-starter-netflix-eureka-client


        org.springframework.boot
        spring-boot-starter-web


        org.springframework.cloud
        spring-cloud-starter-netflix-ribbon
application.yml配置文件
server:
  port: 2000
eureka:
  client:
    service-url:
      defaultZone: http://localhost:8000/eureka/
spring:
  application:
    name: consumer-ribbon-2000
配置文件类
@Configuration
public class MyConfig {
    @Bean
    @LoadBalanced
    /**添加负载均衡,默认会轮询调用提供者*/
    public RestTemplate restTemplate() {
        return new RestTemplate();
    }
}
控制层
@RestController
public class Ctrl {
    @Resource
    RestTemplate restTemplate;

    @RequestMapping("/hello")
    public Map hello() {
        return restTemplate.getForObject("http://PROVIDER/hello", Map.class);
    }
}
测试效果


每次都会轮流执行
切换负载均衡策略
在myConfig 添加后 刷新即可
/**修改负载均衡策略*/
@Bean
public  IRule LoadBalanced(){
    return new RandomRule();
}
创建消费者 Feign
编写接口 我将接口写到common工程
pom.xml配置文件
org.springframework.cloud
spring-cloud-starter-netflix-eureka-client
org.springframework.boot
spring-boot-starter-web
org.springframework.cloud
spring-cloud-starter-feign
1.4.2.RELEASE
接口
@FeignClient(value = "PROVIDER")/**通过value绑定微服务的名字*/
public interface IService {
    @GetMapping("/hello")/**调用provider的@RequestMapping里的名字*/
    public Map hello();
}
consumer-feign
pom.xml配置文件
        com.xiaowei.springcloud
        spring-cloud-common
        1.0-SNAPSHOT


        org.springframework.cloud
        spring-cloud-starter-netflix-eureka-client


        org.springframework.boot
        spring-boot-starter-web


        org.springframework.cloud
        spring-cloud-starter-feign
        1.4.2.RELEASE
@SpringBootApplication
@EnableEurekaClient
@EnableFeignClients
public class Start {
    public static void main(String[] args) {
        SpringApplication.run(Start.class, args);
    }
}
控制层
@RestController
public class Ctrl {
    @Resource
    IService iService;

    @RequestMapping("/hello")
    public Map hello() {
        return iService.hello();
    }
}
application.yml配置文件
server:
  port: 3000
eureka:
  client:
    service-url:
      defaultZone: http://localhost:8000/eureka/
spring:
  application:
    name: consumer-feign-3000
测试


6.熔断器
ribbon中使用熔断器
pom.xml配置文件
        org.springframework.cloud
        spring-cloud-starter-netflix-hystrix


        org.springframework.cloud
        spring-cloud-starter-netflix-eureka-client


        org.springframework.boot
        spring-boot-starter-web


        org.springframework.cloud
        spring-cloud-starter-netflix-ribbon
application.yml配置文件
server:
  port: 2000
eureka:
  client:
    service-url:
      defaultZone: http://localhost:8000/eureka/
spring:
  application:
    name: consumer-ribbon-hyxtrix-2000
启动类
@SpringBootApplication
@EnableEurekaClient
@EnableHystrix
public class Start {
    public static void main(String[] args) {
        SpringApplication.run(Start.class, args);
    }
}
配置文件类
@Configuration
public class MyConfig {
    @Bean
    @LoadBalanced
    /**添加负载均衡,默认会轮询调用提供者*/
    public RestTemplate restTemplate() {
        return new RestTemplate();
    }

    /**修改负载均衡策略*/
 /*   @Bean
    public  IRule LoadBalanced(){
        return new RandomRule();
    }*/
}
控制层
@RestController
public class Ctrl {
    @Resource
    RestTemplate restTemplate;

    @RequestMapping("/hello")
    @HystrixCommand(fallbackMethod = "errorMethod")
    public Map hello() {
        /**PROVIDER是应用提供者注册的名字*/
        return restTemplate.getForObject("http://PROVIDER/hello", Map.class);
    }

    public Map errorMethod() {
        Map map = new HashMap<>();
        map.put("error", "出错啦");
        return map;
    }

}
测试类
只启动注册中心和写了熔断器的消费者

Feign中使用熔断器
feign中已经引入了hystrix 所以不需要依赖了
application.yml配置文件
server:
  port: 5000
eureka:
  client:
    service-url:
      defaultZone: http://localhost:8000/eureka/
spring:
  application:
    name: consumer-feign-hyxtrix-5000
feign:
  hystrix:
    enabled: true # 开启hystrix熔断器
common工程中写一个接口
/**用来处理异常问题*/
@FeignClient(value = "PROVIDER",fallback = HystrixService.class)
public interface IServiceHystrix {
    @GetMapping("/hello")
    public Map hello();
}
再写一个接口实现类
    @Component
    public class HystrixService implements IServiceHystrix {

        @Override
        public Map hello() {
            Map map = new HashMap();
            map.put("feign", "出错啦");
            return map;
        }

}
启动类
@RestController
public class Ctrl {
    @Resource
    IServiceHystrix iService;

    @RequestMapping("/hello")
    public Map hello() {
        return iService.hello();
    }
}
测试
只开启注册中心和带熔断器的消费者feign


7 zuul路由网关配置
pom.xml配置文件
    org.springframework.cloud
    spring-cloud-starter-netflix-eureka-client


    org.springframework.boot
    spring-boot-starter-actuator


    org.springframework.cloud
    spring-cloud-starter-netflix-zuul
application.yml配置文件
server:
  port: 6001
eureka:
  client:
    service-url:
      defaultZone: http://localhost:8000/eureka/
spring:
  application:
    name: zuul
启动类
@EnableZuulProxy
@SpringBootApplication
public class Start {
    public static void main(String[] args) {
        SpringApplication.run(Start.class, args);
    }
}
application.yml
server:
  port: 6001
eureka:
  client:
    service-url:
      defaultZone: http://localhost:8000/eureka/
spring:
  application:
    name: zuul
zuul:
  routes:
    my-route: # 标识 代表一组 路由名称 随便起一个就好了 没有任何意义,如果没有配置 和service-id是一样的
      service-id: provider # 微服务的名字 要被路由的微服务
      path: /zuuls/** # /zuul/hello ---> /provider/下面的hello请求 使用的路由路径
测试

但是有bug 如果 看下图 还是可以访问

继续修改
application.yml配置文件
server:
  port: 6001
eureka:
  client:
    service-url:
      defaultZone: http://localhost:8000/eureka/
spring:
  application:
    name: zuul
zuul:
  routes:
    my-route: # 标识 代表一组 路由名称 随便起一个就好了 没有任何意义,如果没有配置 和service-id是一样的
      service-id: provider # 微服务的名字 要被路由的微服务
      path: /zuuls/** # /zuul/hello ---> /provider/下面的hello请求 使用的路由路径
  ignored-services: "*" # 屏蔽指定的服务 屏蔽全部 但是不屏蔽设置好的
  prefix: /xiaowei # 前缀 随便加一点
测试
进入之前的
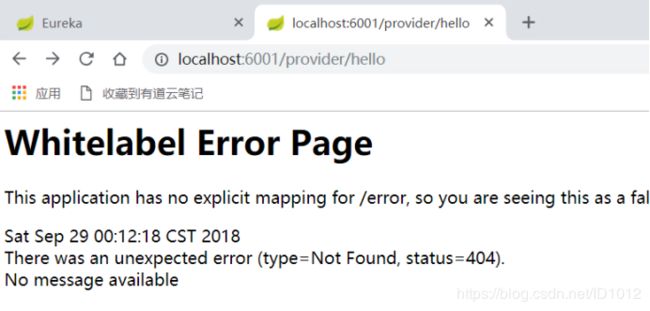
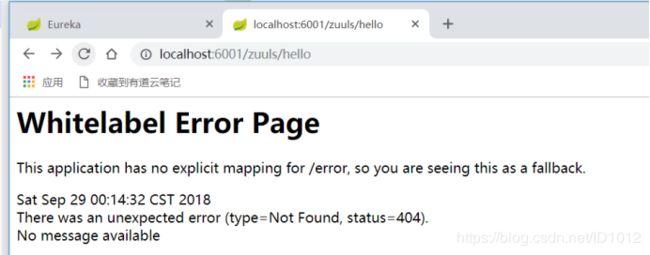

成功!
8 过滤器
在zuul工程编写一个类
/**
 * 〈过滤器〉

 * @author xiaowei
 * @create 2018/9/29
 * @since 1.0.0
 */
public class TokenFilter extends ZuulFilter {
    /**过滤器类型,实例里边类型类似与通知*/
    @Override
    public String filterType() {
        return FilterConstants.PRE_TYPE;
    }
    /**当前过滤器的级别,在同一种类型才有意义,数字越大,优先级越低*/
    @Override
    public int filterOrder() {
        return 0;
    }
    /**是否要被过滤 true代表需要进行过滤*/
    @Override
    public boolean shouldFilter() {
        return true;
    }
    /**过滤器要执行的方法*/
    @Override
    public Object run() throws ZuulException {
        RequestContext context= RequestContext.getCurrentContext();
        HttpServletRequest request = context.getRequest();
        /**获取请求的参数*/
        String token = request.getParameter("token");
        if(token==null){
            /**过滤该请求,不对其进行路由*/
            context.setSendZuulResponse(false);
            /**返回错误码*/
            context.setResponseStatusCode(250);
            /**返回错误内容*/
            context.setResponseBody("{\"result\":\"你没有传递token\"}");
            context.set("isSuccess",false);
        }else{
            /**对该请求进行路由*/
            context.setSendZuulResponse(true);
            context.setResponseStatusCode(200);
            /**设值,让下一个Filter看到上一个Filter的状态*/
            context.set("isSuccess",true);
        }
        return null;
    }
}
把这个类配置到Spring容器中
/**
 * 〈网关启动类〉

 *
 * @author xiaowei
 * @create 2018/9/28
 * @since 1.0.0
 */
@SpringBootApplication
@EnableZuulProxy
@Configuration
public class Start {
    public static void main(String[] args) {
        SpringApplication.run(Start.class, args);
    }

    @Bean
    public TokenFilter tokenFilter() {
        return new TokenFilter();
    }
}
启动 测试
成功被拦截

成功进入

9 config分布式配置中心
创建一个Git仓库
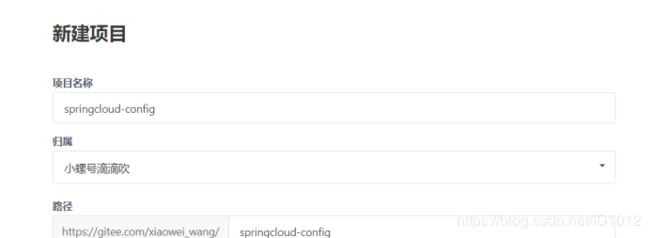
接下来下载到本地进行修改
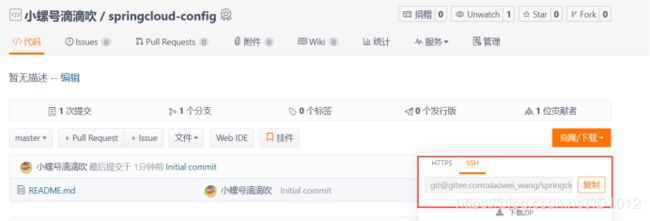
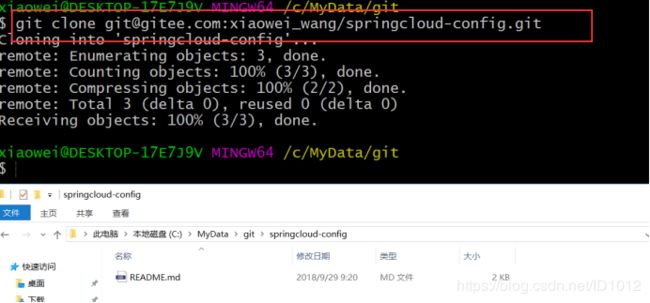
编写 application.yml配置文件
spring:
  profiles:
    active:
    - dev
---
spring:
  profiles: dev
  application:
    name: config-client-9001
server:
     port: 9001
user:
  name: xiaowei
  age: 99
---
spring:
     profiles: test
     application:
       name: config-client-9002
server:
  port: 9002
user:
  name: xiaobai
  age: 19
上传到码云
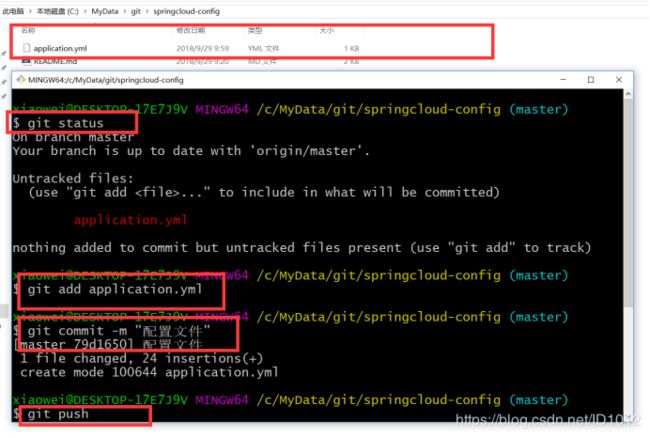
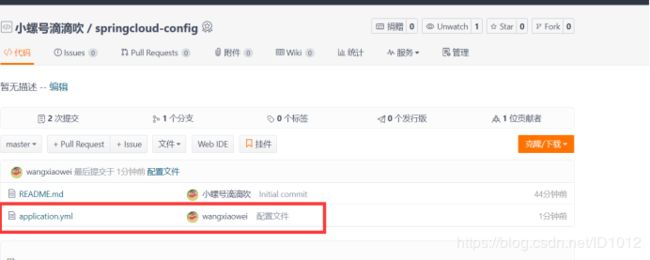
创建spring-cloud-config-server-9008模块
pom.xml配置文件
        org.springframework.boot
        spring-boot-starter-web


        org.springframework.cloud
        spring-cloud-config-server
application.xml配置文件
server:
  port: 9008
spring:
  application:
    name: config-server
  cloud:
    config:
      server:
        git:
          uri: [email protected]:xiaowei_wang/springcloud-config.git #存放配置文件git仓库的地址
启动类
/**
 * 〈启动类〉

 *
 * @author xiaowei
 * @create 2018/9/28
 * @since 1.0.0
 */
@EnableConfigServer
@SpringBootApplication
public class Start {
    public static void main(String[] args) {
        SpringApplication.run(Start.class, args);
    }
}
测试 只需要启动config-server即可
注意 : ssh可能连接不上
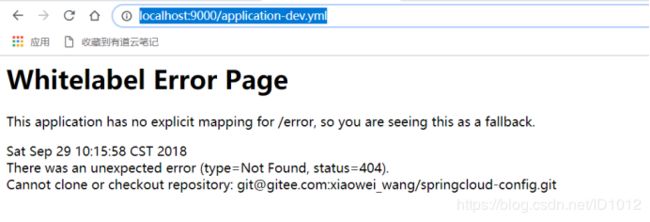
修改application.yml配置文件
server:
  port: 9008
spring:
  application:
    name: config-server-9008
  cloud:
    config:
      server:
        git:
          uri: https://gitee.com/xiaowei_wang/springcloud-config.git           #存放配置文件git仓库的地址
          username: *******
          password: *******
测试会自动的根据环境获取到不同的配置

10 config-client
任何一个需要获取配置信息的微服务都可以是一个client
创建spring-cloud-config-client-9009
pom.xml配置文件
        org.springframework.boot
        spring-boot-starter-web


        org.springframework.cloud
        spring-cloud-starter-config
bootstrap.yml
这个配置文件的优先级高于applicaiton.yml,当然,我们也可以在项目中继续保持,
application.yml配置文件
spring:
        cloud:
          config:
            name: application # 配置文件的名字,去掉后缀,如果不指明,会加载application文件
            uri: http://localhost:9008  # config-server的地址
            label: master # git的分支
            profile: dev # 选择环境
启动类
@SpringBootApplication
public class Start {
    public static void main(String[] args) {
        SpringApplication.run(Start.class, args);
    }
}
测试
启动config-server-9008

启动config-client

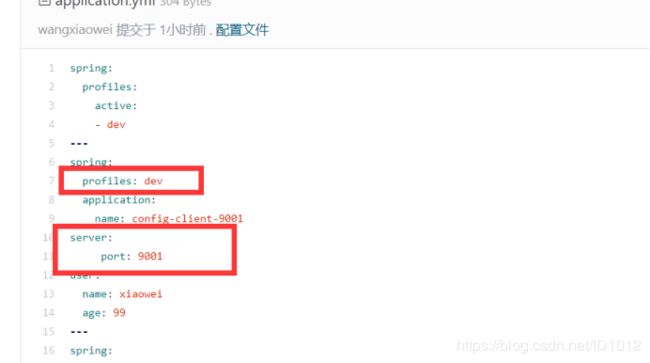
结果应该为 9001

成功
11. Config-Server集群搭建
config-server-2500 config-server-2600 config-server-2700
以下文件通用
pom.xml配置文件
        org.springframework.boot
        spring-boot-starter-web


        org.springframework.cloud
        spring-cloud-config-server


        org.springframework.cloud
        spring-cloud-starter-netflix-eureka-client
启动类
/**
 * 〈启动类〉

 *
 * @author xiaowei
 * @create 2018/9/28
 * @since 1.0.0
 */
@EnableEurekaClient
@EnableConfigServer
@SpringBootApplication
public class Start {
    public static void main(String[] args) {
        SpringApplication.run(Start.class, args);
    }
}
配置文件
server:
  port: 2500
spring:
  application:
    name: config-server    #集群的话必须一致啊
  cloud:
    config:
      server:
        git:
          uri: https://gitee.com/xiaowei_wang/springcloud-config.git           #存放配置文件git仓库的地址
          username: [email protected]
          password: wxx1997xxxx
eureka:
  client:
    service-url:
      defaultZone: http://localhost:8000/eureka/
测试
一切正常启动
        org.springframework.boot
        spring-boot-starter-web


        org.springframework.cloud
        spring-cloud-starter-config


        org.springframework.cloud
        spring-cloud-starter-netflix-eureka-client


bootstrap.xml
spring:
  cloud:
    config:
      name: application # 配置文件的名字
      discovery:
        service-id: CONFIG-SERVER
        enabled: true
      label: master
      profile: dev
eureka:
  client:
    service-url:
      defaultZone: http://localhost:8000/eureka/
控制层
@RestController
public class TestCtrl {
    @Value("${user.name}")
    private String name;

    @Value("${user.age}")
    private String age;

    @RequestMapping("/info")
    public String showInfo(String name,String age){
        System.out.println(name+age);
        return "aaa";
    }
}
启动类
/**
 * 〈启动类〉

 *
 * @author xiaowei
 * @create 2018/9/28
 * @since 1.0.0
 */
@EnableEurekaClient
@SpringBootApplication
public class Start {
    public static void main(String[] args) {
        SpringApplication.run(Start.class, args);
    }
}
        org.springframework.cloud
        spring-cloud-starter-netflix-eureka-server
application.yml
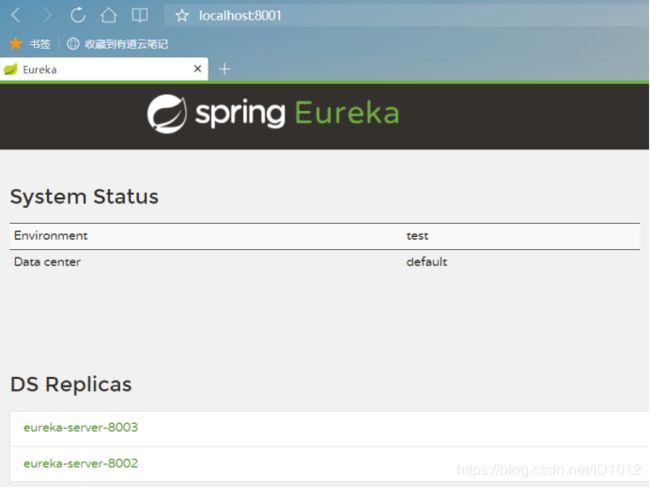
server:
  port: 8003
eureka:
  instance:
    hostname: eureka-server-8003  #服务器的主机名
  client:
    register-with-eureka: false #不向注册中心注册自己
    fetch-registry: false  # 是否获取数据,false表示自己就是注册中心
    service-url:
      defaultZone: http://eureka-server-8001:8001,http://eureka-server-8002:8002 #配置其它eureka服务器的地址
spring:
  application:
    name: eureka-cluster
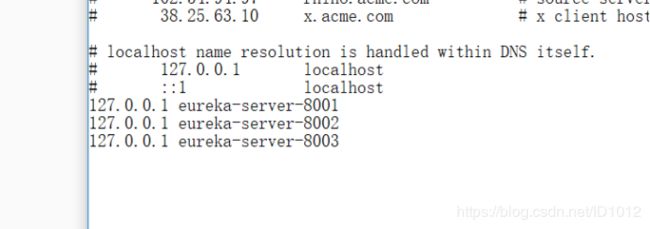
配置hosts C:\Windows\System32\drivers\etc
@EnableEurekaServer
@SpringBootApplication
public class Start {
    public static void main(String[] args) {
        SpringApplication.run(Start.class, args);
    }
}


