EventBus3.0源码解析
我的EventBus学习之路
我可以用它来干什么
EventBus是greenrobot在Android平台发布的一款以订阅——发布模式为核心的开源库。平时开发的时候,当遇到Activity与Activity、Activity与Fragment之间的通信,往往采用Intent,又或者线程之间使用Handler进行通信,这样代码难免会复杂许多,而使用EventBus能极大简化两个组件之间的通信问题,而且效率极高。
原理
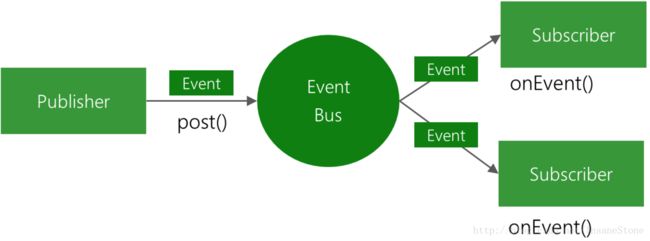
不要一看到图就觉得很烦躁,听我来说道说道你就觉得这种感觉是不存在的。
Publisher将事件(可以理解为一个对象)通过EventBus发出,那发出去以后会怎么样呢?从图中你可以看到,EventBus将事件分别发送给了两个Subscriber,而这两个Subscriber就收到了Publisher发出去的两个事件。这就好比你又三个Activity A、B、C,首先你打开了A,然后又打开B,最后打开C页面,在C页面你post()了一个事件给A和B,告诉他们我这边的工作已经做完了,你们可以开始你们的工作了。
举个栗子:在Activity1中打开Activity2,而Activity2中通过点击按钮来使Activity1中的TextView显示内容得到更改,而显示的内容由Activity2指定。这便构成了一个典型的Activity与Activity之间通信的场景,如果用我们之前的做法可以采用BroadcastReceiver来实现两者的通信,但现在我们使用EventBus,只需要几行代码就能实现了。在使用中我会详细说来。
使用
在App的build.gradle的dependencies节点下添加如下依赖 点我获取官网最新版本号:
compile 'org.greenrobot:eventbus:3.0.0'普通事件与粘性事件的区别
比如有A、B两个Activity,A注册EventBus的监听,从A跳转到B,从B发出事件,A来接收。这属于普通事件。
再比如有A、B两个Activity,A需要传递事件给B,但是B还没有注册EventBus的监听,如果想要B能够收到A发出的事件,则需要使用粘性事件。
普通事件
- 发出普通事件
EventBus.getDefault().post(new User("张三"));- 接收普通事件
   @Override
    protected void onCreate(@Nullable Bundle savedInstanceState) {
        super.onCreate(savedInstanceState);
        setContentView(R.layout.activity_a);
        /*注册事件*/
        EventBus.getDefault().register(this);
    }

    @Override
    protected void onDestroy() {
        super.onDestroy();
        /*注销事件*/
        EventBus.getDefault().unregister(this);
    }

    @Subscribe(threadMode = ThreadMode.MAIN)
    public void getUser(User user){
        Log.d(this.getClass().getName(),"收到了B页面传过来的参数:\n"+user.toString());
    }
粘性事件
- 发送粘性事件
        /*发出粘性事件*/
EventBus.getDefault().postSticky(new User("李四"));- 接收粘性事件
 @Subscribe(priority = 0,sticky = true,threadMode = ThreadMode.MAIN)
    public void getUser(User user){
        Log.d(this.getClass().getName(),"收到了A页面传过来的粘性事件,参数:\n"+user.toString());
    }
源码分析
获取对象
无论是订阅者的注册,还是事件的发布首先必须要获得EventBus对象。那么下面就来看一下如何获取EventBus对象。可以通过EventBus.getDefault()获得EventBus对象。然后就来看一下这个getDefault方法。
 /** Convenience singleton for apps using a process-wide EventBus instance. */
    public static EventBus getDefault() {
        if (defaultInstance == null) {
            synchronized (EventBus.class) {
                if (defaultInstance == null) {
                    defaultInstance = new EventBus();
                }
            }
        }
        return defaultInstance;
    }
通过单例模式获取EventBus对象。下面就来看一下EventBus的构造方法。
 public EventBus() {
        this(DEFAULT_BUILDER);
} EventBus(EventBusBuilder builder) {
//以事件类型作为Key,Subscription的List集合作为Value的Map集合
subscriptionsByEventType = new HashMap<>();
//订阅者作为Key,订阅事件作为Value的Map集合
typesBySubscriber = new HashMap<>();
stickyEvents = new ConcurrentHashMap<>();
//Handler对象,用于切换到主线程中执行订阅方法
mainThreadPoster = new HandlerPoster(this, Looper.getMainLooper(), 10);
//Runable对象
backgroundPoster = new BackgroundPoster(this);
//Runable对象
asyncPoster = new AsyncPoster(this);
indexCount = builder.subscriberInfoIndexes != null ? builder.subscriberInfoIndexes.size() : 0;
subscriberMethodFinder = new SubscriberMethodFinder(builder.subscriberInfoIndexes,
builder.strictMethodVerification, builder.ignoreGeneratedIndex);
logSubscriberExceptions = builder.logSubscriberExceptions;
logNoSubscriberMessages = builder.logNoSubscriberMessages;
sendSubscriberExceptionEvent = builder.sendSubscriberExceptionEvent;
sendNoSubscriberEvent = builder.sendNoSubscriberEvent;
throwSubscriberException = builder.throwSubscriberException;
eventInheritance = builder.eventInheritance;
executorService = builder.executorService;
}我们可以通过构造一个EventBusBuilder,来对EventBus进行配置。并且在这里注意到对于EventBus可以采用单实例模式获取,但是EventBus的构造方法为公共的。很显然也就是说明了在应用中可以存在多个EventBus,对于存在多个的EventBus情况下,它们之间相互独立,会发布和订阅各自的事件进行接收执行。
订阅者的注册
public void register(Object subscriber) {
    Class subscriberClass = subscriber.getClass();
    List<SubscriberMethod> subscriberMethods = subscriberMethodFinder.findSubscriberMethods(subscriberClass);
    synchronized (this) {
        for (SubscriberMethod subscriberMethod : subscriberMethods) {
            subscribe(subscriber, subscriberMethod);
        }
    }
}
我们传入的this对象。在这个方法中主要完成了两件事情。首先通过findSubscriberMethods方法来查找订阅者中所有的订阅方法。然后遍历订阅者的订阅方法来完成订阅者的订阅操作。下面来详细的分析这两步的实现过程。
未完待续。。。
