scrollTo 和 scrollBy 方法使用说明
一、滚动的是什么?
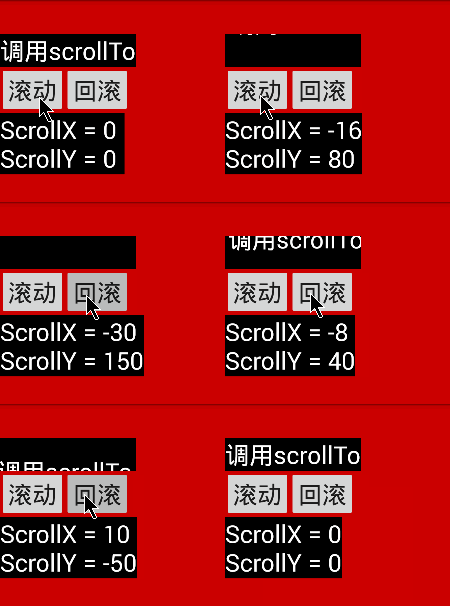
scrollgoback.setOnClickListener(new OnClickListener() {

	@Override
	public void onClick(View v) {
		text.scrollBy(2, -10);
//		text.scrollTo(20, -50);
		textInfo.setText("ScrollX = "+text.getScrollX()+"\n"+"ScrollY = "+text.getScrollY());
	}
   });

scroll.setOnClickListener(new OnClickListener() {

	@Override
	public void onClick(View v) {
	text.scrollBy(-2, 10);
//	text.scrollTo(-20, 50);
	textInfo.setText("ScrollX = "+text.getScrollX()+"\n"+"ScrollY = "+text.getScrollY());
	}
   });
首先明白一点调用View的scrollTo()和scrollBy()是用于滑动View中的内容,而不是把某个View的位置进行改变。如果想改变莫个View在屏幕中的位置,可以使用如下的方法。
调用public void offsetLeftAndRight(int offset)用于左右移动方法或public void offsetTopAndBottom(int offset)用于上下移动。
如:button.offsetLeftAndRignt(300)表示将button控件向左移动300个像素。
二、View的scrollTo( )和scrollBy( )
在View类中,scrollTo的代码如下:
    /**
     * Set the scrolled position of your view. This will cause a call to
     * {@link #onScrollChanged(int, int, int, int)} and the view will be
     * invalidated.
     * @param x the x position to scroll to
     * @param y the y position to scroll to
     */
    public void scrollTo(int x, int y) {
        if (mScrollX != x || mScrollY != y) {
            int oldX = mScrollX;
            int oldY = mScrollY;
            mScrollX = x;
            mScrollY = y;
            invalidateParentCaches();
            onScrollChanged(mScrollX, mScrollY, oldX, oldY);
            if (!awakenScrollBars()) {
                postInvalidateOnAnimation();
            }
        }
    }
该方法用于设置滚动视图的位置,然后会调用onScrollChanged(int, int, int, int)方法,最后视图会被刷新。那它是如何让视图滚动的呢?首先注意到在这个方法中有两个变量:mScrollX、mScrollY。这两个变量是在View类中定义的。
/**
     * The offset, in pixels, by which the content of this view is scrolled
     * horizontally.
     * {@hide}
     */
    protected int mScrollX;   //该视图内容相当于视图起始坐标的偏移量   , X轴 方向
    /**
     * The offset, in pixels, by which the content of this view is scrolled
     * vertically.
     * {@hide}
     */
    protected int mScrollY;   //该视图内容相当于视图起始坐标的偏移量   , Y轴方向

    /**
     * Return the scrolled left position of this view. This is the left edge of
     * the displayed part of your view. You do not need to draw any pixels
     * farther left, since those are outside of the frame of your view on
     * screen.
     *
     * @return The left edge of the displayed part of your view, in pixels.
     */
    public final int getScrollX() {
        return mScrollX;
    }

    /**
     * Return the scrolled top position of this view. This is the top edge of
     * the displayed part of your view. You do not need to draw any pixels above
     * it, since those are outside of the frame of your view on screen.
     *
     * @return The top edge of the displayed part of your view, in pixels.
     */
    public final int getScrollY() {
        return mScrollY;
    }
这两个变量分别是视图在水平和垂直方向的偏移量, mScrollX: 该视图内容相当于视图起始坐标的偏移量, X轴方向 mScrollY:该视图内容相当于视图起始坐标的偏移量, Y轴方向 分别通过
View里的scrollBy()方法
    /**
     * Move the scrolled position of your view. This will cause a call to
     * {@link #onScrollChanged(int, int, int, int)} and the view will be
     * invalidated.
     * @param x the amount of pixels to scroll by horizontally
     * @param y the amount of pixels to scroll by vertically
     */
    public void scrollBy(int x, int y) {
        scrollTo(mScrollX + x, mScrollY + y);
    }
直接调用了scrollTo方法,但是从这个方法的实现机制可以看出,它是一个累加减的过程,不断的将当前视图内容继续偏移(x , y)个单位。
比如第一次 scrollBy(10,10),第二次 scrollBy(10,10),那么最后的结果就相当于scrollTo(20,20)。
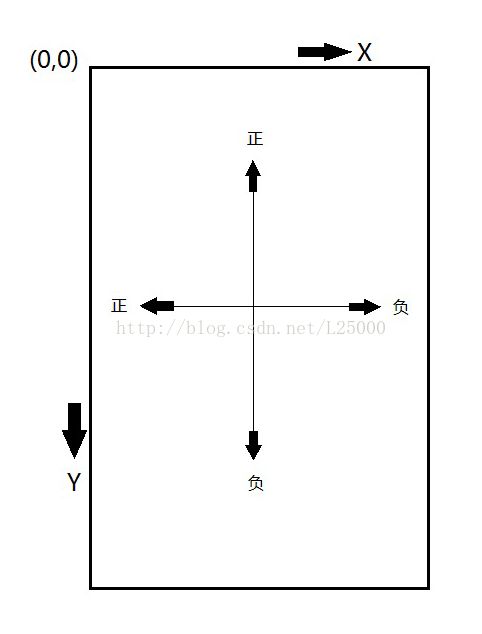
理解这两个方法的实现机制之后,还有一个重要的问题,就是关于移动的方向。比如一个位于原点的视图,如果调用了scrollTo(0,20)方法,
如果你认为是垂直向下移动20像素就错了,其实是向上移动了20个像素。
在上图中,我已经给出了一个十字坐标,正负代表坐标的正负以及相应的方向。为什么会是这样的情况呢?按坐标系的认知来说,不应该
是这个结果的,所以必须研究一下究竟为何。
线索当然还是要分析源码,在scrollTo(x, y)中,x和y分别被赋值给了mScrollX和mScrollY,最后调用了postInvalidateOnAnimation()方法。
之后这个方法会通知View进行重绘。
 /**
     * Manually render this view (and all of its children) to the given Canvas.
     * The view must have already done a full layout before this function is
     * called.  When implementing a view, implement
     * {@link #onDraw(android.graphics.Canvas)} instead of overriding this method.
     * If you do need to override this method, call the superclass version.
     *
     * @param canvas The Canvas to which the View is rendered.
     */
    public void draw(Canvas canvas) {
        final int privateFlags = mPrivateFlags;
        final boolean dirtyOpaque = (privateFlags & PFLAG_DIRTY_MASK) == PFLAG_DIRTY_OPAQUE &&
                (mAttachInfo == null || !mAttachInfo.mIgnoreDirtyState);
        mPrivateFlags = (privateFlags & ~PFLAG_DIRTY_MASK) | PFLAG_DRAWN;

        /*
         * Draw traversal performs several drawing steps which must be executed
         * in the appropriate order:
         *
         *      1. Draw the background
         *      2. If necessary, save the canvas' layers to prepare for fading
         *      3. Draw view's content
         *      4. Draw children
         *      5. If necessary, draw the fading edges and restore layers
         *      6. Draw decorations (scrollbars for instance)
         */

        // Step 1, draw the background, if needed
        int saveCount;
        ..........................
        canvas.restoreToCount(saveCount);

        // Step 6, draw decorations (scrollbars)
        onDrawScrollBars(canvas);

        if (mOverlay != null && !mOverlay.isEmpty()) {
            mOverlay.getOverlayView().dispatchDraw(canvas);
        }
}然后看一下onDrawScrollBars(canvas)方法:
    /**
     * Request the drawing of the horizontal and the vertical scrollbar. The
     * scrollbars are painted only if they have been awakened first.
     *
     * @param canvas the canvas on which to draw the scrollbars
     *
     * @see #awakenScrollBars(int)
     */
    protected final void onDrawScrollBars(Canvas canvas) {
        // scrollbars are drawn only when the animation is running
        final ScrollabilityCache cache = mScrollCache;
        if (cache != null) {
             int state = cache.state;
             if (state == ScrollabilityCache.OFF) {
                return;
            }

            boolean invalidate = false;
             if (state == ScrollabilityCache.FADING) {
                // We're fading -- get our fade interpolation
                if (cache.interpolatorValues == null) {
                    cache.interpolatorValues = new float[1];
                }

                float[] values = cache.interpolatorValues;

                // Stops the animation if we're done
                if (cache.scrollBarInterpolator.timeToValues(values) ==
                        Interpolator.Result.FREEZE_END) {
                    cache.state = ScrollabilityCache.OFF;
                } else {
                    cache.scrollBar.setAlpha(Math.round(values[0]));
                }

                // This will make the scroll bars inval themselves after
                // drawing. We only want this when we're fading so that
                // we prevent excessive redraws
                invalidate = true;
            } else {
                // We're just on -- but we may have been fading before so
                // reset alpha
                cache.scrollBar.setAlpha(255);
            }


            final int viewFlags = mViewFlags;

            final boolean drawHorizontalScrollBar =
                (viewFlags & SCROLLBARS_HORIZONTAL) == SCROLLBARS_HORIZONTAL;
            final boolean drawVerticalScrollBar =
                (viewFlags & SCROLLBARS_VERTICAL) == SCROLLBARS_VERTICAL
                && !isVerticalScrollBarHidden();

            if (drawVerticalScrollBar || drawHorizontalScrollBar) {
                final int width = mRight - mLeft;
                final int height = mBottom - mTop;

                final ScrollBarDrawable scrollBar = cache.scrollBar;

                final int scrollX = mScrollX;
                final int scrollY = mScrollY;
                final int inside = (viewFlags & SCROLLBARS_OUTSIDE_MASK) == 0 ? ~0 : 0;

                int left;
                int top;
                int right;
                int bottom;

                if (drawHorizontalScrollBar) {
                    int size = scrollBar.getSize(false);
                    if (size <= 0) {
                        size = cache.scrollBarSize;
                    }

                    scrollBar.setParameters(computeHorizontalScrollRange(),
                                            computeHorizontalScrollOffset(),
                                            computeHorizontalScrollExtent(), false);
                    final int verticalScrollBarGap = drawVerticalScrollBar ?
                            getVerticalScrollbarWidth() : 0;
                    top = scrollY + height - size - (mUserPaddingBottom & inside);
                    left = scrollX + (mPaddingLeft & inside);
                    right = scrollX + width - (mUserPaddingRight & inside) - verticalScrollBarGap;
                    bottom = top + size;
                    onDrawHorizontalScrollBar(canvas, scrollBar, left, top, right, bottom);
                    if (invalidate) {
                        invalidate(left, top, right, bottom);
                    }
                }

                if (drawVerticalScrollBar) {
                    int size = scrollBar.getSize(true);
                    if (size <= 0) {
                        size = cache.scrollBarSize;
                    }

                    scrollBar.setParameters(computeVerticalScrollRange(),
                                            computeVerticalScrollOffset(),
                                            computeVerticalScrollExtent(), true);
                    int verticalScrollbarPosition = mVerticalScrollbarPosition;
                    if (verticalScrollbarPosition == SCROLLBAR_POSITION_DEFAULT) {
                        verticalScrollbarPosition = isLayoutRtl() ?
                                SCROLLBAR_POSITION_LEFT : SCROLLBAR_POSITION_RIGHT;
                    }
                    switch (verticalScrollbarPosition) {
                        default:
                        case SCROLLBAR_POSITION_RIGHT:
                            left = scrollX + width - size - (mUserPaddingRight & inside);
                            break;
                        case SCROLLBAR_POSITION_LEFT:
                            left = scrollX + (mUserPaddingLeft & inside);
                            break;
                    }
                    top = scrollY + (mPaddingTop & inside);
                    right = left + size;
                    bottom = scrollY + height - (mUserPaddingBottom & inside);
                    onDrawVerticalScrollBar(canvas, scrollBar, left, top, right, bottom);
                    if (invalidate) {
                        invalidate(left, top, right, bottom);
                    }
                }
            }
        }
    }
这个方法分别绘制水平和垂直方向的ScrollBar,最后都会调用invalidate(left, top, right, bottom)方法。
    /**
     * Mark the area defined by the rect (l,t,r,b) as needing to be drawn. The
     * coordinates of the dirty rect are relative to the view. If the view is
     * visible, {@link #onDraw(android.graphics.Canvas)} will be called at some
     * point in the future.
     *
     * This must be called from a UI thread. To call from a non-UI thread, call
     * {@link #postInvalidate()}.
     *
     * @param l the left position of the dirty region
     * @param t the top position of the dirty region
     * @param r the right position of the dirty region
     * @param b the bottom position of the dirty region
     */
    public void invalidate(int l, int t, int r, int b) {
        final int scrollX = mScrollX;
        final int scrollY = mScrollY;
        invalidateInternal(l - scrollX, t - scrollY, r - scrollX, b - scrollY, true, false);
    }
    void invalidateInternal(int l, int t, int r, int b, boolean invalidateCache,
            boolean fullInvalidate) {
        if (mGhostView != null) {
            mGhostView.invalidate(invalidateCache);
            return;
        }

        if (skipInvalidate()) {
            return;
        }

        if ((mPrivateFlags & (PFLAG_DRAWN | PFLAG_HAS_BOUNDS)) == (PFLAG_DRAWN | PFLAG_HAS_BOUNDS)
                || (invalidateCache && (mPrivateFlags & PFLAG_DRAWING_CACHE_VALID) == PFLAG_DRAWING_CACHE_VALID)
                || (mPrivateFlags & PFLAG_INVALIDATED) != PFLAG_INVALIDATED
                || (fullInvalidate && isOpaque() != mLastIsOpaque)) {
            if (fullInvalidate) {
                mLastIsOpaque = isOpaque();
                mPrivateFlags &= ~PFLAG_DRAWN;
            }

            mPrivateFlags |= PFLAG_DIRTY;

            if (invalidateCache) {
                mPrivateFlags |= PFLAG_INVALIDATED;
                mPrivateFlags &= ~PFLAG_DRAWING_CACHE_VALID;
            }

            // Propagate the damage rectangle to the parent view.
            final AttachInfo ai = mAttachInfo;
            final ViewParent p = mParent;
            if (p != null && ai != null && l < r && t < b) {
                final Rect damage = ai.mTmpInvalRect;
                damage.set(l, t, r, b);
                p.invalidateChild(this, damage);
            }

            // Damage the entire projection receiver, if necessary.
            if (mBackground != null && mBackground.isProjected()) {
                final View receiver = getProjectionReceiver();
                if (receiver != null) {
                    receiver.damageInParent();
                }
            }

            // Damage the entire IsolatedZVolume receiving this view's shadow.
            if (isHardwareAccelerated() && getZ() != 0) {
                damageShadowReceiver();
            }
        }
    }
在这个方法的最后,可以看到damage .set(l - scrollX, t - scrollY, r - scrollX, b - scrollY),真相终于大白,相信也都清楚为什么会是反方向的了。也会明白当向右移动视图时候,为什么getScrollX()返回值会是负的了。
现在可以明白为什么一开始的图的现象了。
三、Scroller类
Android里Scroller类是为了实现View平滑滚动的一个Helper类。通常在自定义的View时使用,在View中定义一个私有成员mScroller = new Scroller(context)。设置mScroller滚动的位置时,并不会导致View的滚动,通常是用mScroller记录/计算View滚动的位置,再重写View的computeScroll(),完成实际的滚动。
Scroller要与View的computeScroll()配合使用。
mScroller.getCurrX() //获取mScroller当前水平滚动的位置
mScroller.getCurrY() //获取mScroller当前竖直滚动的位置
mScroller.getFinalX() //获取mScroller最终停止的水平位置
mScroller.getFinalY() //获取mScroller最终停止的竖直位置
mScroller.setFinalX(int newX) //设置mScroller最终停留的水平位置,没有动画效果,直接跳到目标位置
mScroller.setFinalY(int newY) //设置mScroller最终停留的竖直位置,没有动画效果,直接跳到目标位置

//滚动,startX, startY为开始滚动的位置,dx,dy为滚动的偏移量, duration为完成滚动的时间
mScroller.startScroll(int startX, int startY, int dx, int dy) //使用默认完成时间250ms
mScroller.startScroll(int startX, int startY, int dx, int dy, int duration)

mScroller.computeScrollOffset() //返回值为boolean,true说明滚动尚未完成,false说明滚动已经完成。这是一个很重要的方法,通常放在View.computeScroll()中,用来判断是否滚动是否结束。
首先从源码开始分析:
View.java
  /**
 * Called by a parent to request that a child update its values for mScrollX
 * and mScrollY if necessary. This will typically be done if the child is
 * animating a scroll using a {@link android.widget.Scroller Scroller}
 * object.
 */
  public void computeScroll()
 {
  }
ViewGroup.java
@Override
protected void dispatchDraw(Canvas canvas) {

            .......
            .......

            for (int i = 0; i < count; i++) {
            final View child = children[i];
            if ((child.mViewFlags & VISIBILITY_MASK) == VISIBLE || child.getAnimation() != null)

            {
                more |= drawChild(canvas, child, drawingTime);
            }

            .......

            .......

....... 再看看drawChild函数:
 protected boolean drawChild(Canvas canvas, View child, long drawingTime) {

            ................

            ................

           child.computeScroll();

            ................

            ................

}
在父容器重画自己的孩子时,它会调用孩子的computScroll方法.
1.绘制View的时候会触发computeScroll()方法,接着重写computeScroll(),在computeScroll()里面先调用Scroller的computeScrollOffset()方法来判断滚动是否结束,如果滚动没有结束就调用scrollTo()方法来进行滚动。
@Override
public void computeScroll() {
      if (scroller.computeScrollOffset()) {
           scrollTo(scroller.getCurrX(), 0);
        }
}
@Override
public void computeScroll() {
      if (scroller.computeScrollOffset()) {
          scrollTo(scroller.getCurrX(), 0);
          invalidate();
      }
}
四、练习(滑屏)
参考:http://blog.csdn.net/bigconvience/article/details/26697645
http://www.it165.net/pro/html/201404/12506.html
http://blog.csdn.net/vipzjyno1/article/details/24577023
http://blog.csdn.net/lmj623565791/article/details/39670935
http://www.it165.net/pro/html/201406/16033.html

