自定义View-打造属于你的炫酷按钮
自定义View-打造属于你的炫酷按钮
前言
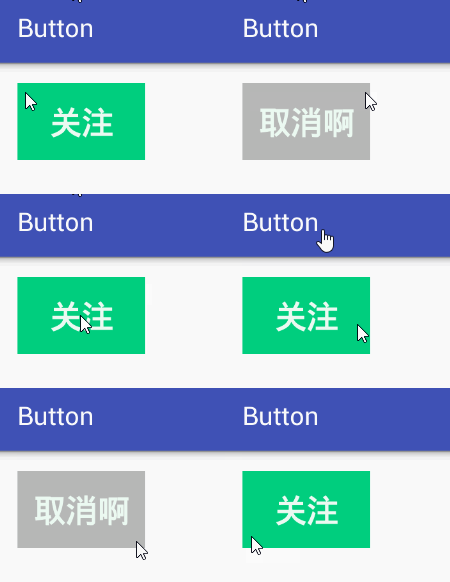
Google I/O 2014 发布 Material Design ,最近也用了一下,给我的感觉就是简单而不失华丽,在Material Design我想用的最多的就是波纹效果(Ripple),今天我就带着大家一起来动手搞定这个效果!
效果图
TODO
先讲一下思路:首先我们要获取点击的位置,然后以点击的位置为圆心,在View中画圆(也可以画其他图形),然后画文字。
代码如下:
public class SpecialEffectsButton extends View {

    private Context context;
    private Paint textPaint;
    private boolean isfollow = false;
    private Paint bgPaint;
    private int radius = -1;
    private int height;
    private int width;
    private int time = 1;
    private float centerX;
    private float centerY;

    public SpecialEffectsButton(Context context) {
        super(context);
        init(context);
    }


    public SpecialEffectsButton(Context context, AttributeSet attrs) {
        super(context, attrs);
        init(context);
    }

    public SpecialEffectsButton(Context context, AttributeSet attrs,   int defStyleAttr) {
        super(context, attrs, defStyleAttr);
        init(context);
    }
上面说了第一步要获取我们的点击的位置(坐标XY),我们需要定义一个常量来存储XY的位置,当然也可以使用Point和PointF来记录,都是可以的,我个人偏好是使用常量,然后就是画圆,圆心我们声明了接下来再声明个半径,然后呢就是点击的状态(isfollow,是否关注,进入要做就模仿的像一点),最后就是声明View的宽高。
  private void init(Context context) {

        this.context = context;

        textPaint = new Paint();
        textPaint.setAntiAlias(true);
        textPaint.setStyle(Paint.Style.STROKE);
        textPaint.setColor(Color.parseColor("#ECFAF2"));
        textPaint.setTextAlign(Paint.Align.CENTER);
        textPaint.setTextSize(50);
        textPaint.setTypeface(Typeface.DEFAULT_BOLD);
        bgPaint = new Paint();
        bgPaint.setAntiAlias(true);
        bgPaint.setStyle(Paint.Style.FILL);
        bgPaint.setColor(Color.parseColor("#B7B7B7"));

    }
在init(Context context)里面我们初始化画笔,Paint即画笔,在绘图过程中起到了极其重要的作用,画笔主要保存了颜色,样式等绘制信息,指定了如何绘制文本和图形,画笔对象有很多设置方法,大体上可以分为两类,一类与图形绘制相关,一类与文本绘制相关,在这里呢我只说一下我们这次用到的方法,其余的方法会另开文章来说明。
| 方法 | 简介 |
|---|---|
| setAntiAlias(boolean) | 开启抗锯齿(不开启的话会显得不平滑) |
| setStyle(Paint.Style.STROKE) | 设置画笔的样式,为FILL,FILL_OR_STROKE,或STROKE |
| setColor(Color) | 设置画笔颜色 |
| setTextAlign(Paint.Align.CENTER) | 是实现水平居中 |
| setTextSize(int size) | 设置文字大小 |
| setTypeface | 设置字体,DEFAULT常规字体,DEFAULT_BOLD黑体类型等 |
 private boolean isValidClick(float x, float y) {
        if (x >= 0 && x <= getWidth() && y >= 0 && y <= getHeight()) {
            return true;
        }
        return false;
    }

    public boolean onInterceptTouchEvent(MotionEvent event) {
        switch (event.getAction()) {
            case MotionEvent.ACTION_DOWN:
            case MotionEvent.ACTION_UP:
                return true;
        }
        return false;
    }

    public boolean onTouchEvent(MotionEvent event) {
        switch (event.getAction()) {
            case MotionEvent.ACTION_DOWN:
                if (!isValidClick(event.getX(), event.getY())) {
                    return false;
                }
                return true;
            case MotionEvent.ACTION_UP:
                if (!isValidClick(event.getX(), event.getY())) {
                    return false;
                }
                centerX = event.getX();
                centerY = event.getY();

                isfollow = !isfollow;
                timerHandler.sendEmptyMessageDelayed(time, time);

                return true;
        }
        return false;
    }
下面我们要确定圆心,也就是从哪里开始画圆,圆心是我们用手点击的位置不固定,所以我们要重写onInterceptTouchEvent和onTouchEvent来获取点击的位置,我们还要考虑点击的位置是否是有效的,isValidClick就是用来判断是否有效,思路是在控件的宽高之内,之外我们就算无效点击。如果是有效事件,那我们就把触摸的位置记录下来,然后改变我们的状态,接下来呢就是发送Handler,在Handler里面我们重绘按钮,并每次都递增圆的半径。
| 方法 | 简介 |
|---|---|
| onTouchEvent | 触发触摸事件 |
| onInterceptTouchEvent | 触发拦截触摸事件 |
@Override
    protected void onDraw(Canvas canvas) {
        super.onDraw(canvas);
        height = getMeasuredHeight();
        width = getMeasuredWidth();
        Paint.FontMetrics fontMetrics = textPaint.getFontMetrics();
        //计算文字高度
        float fontHeight = fontMetrics.bottom - fontMetrics.top;
        //计算文字baseline
        float textBaseY = height - (height - fontHeight) / 2 - fontMetrics.bottom;
        canvas.drawColor(isfollow == true ? Color.parseColor("#00CE7E") : Color.parseColor("#B7B7B7"));
        bgPaint.setColor(isfollow == true ? Color.parseColor("#B7B7B7") : Color.parseColor("#00CE7E"));
        canvas.drawCircle(centerX, centerY, radius, bgPaint);
        canvas.drawText(isfollow == true ? "取消啊" : "关注", width / 2, textBaseY, textPaint);
    }
先要说下onDraw方法,View中最主要的三个方法是OnMeasure()测量大小,onDraw()画,onLayout()排放位置。像TextView和Button都是在onDraw里面绘制的。在最初我们就初始化了一个画笔,那么画笔有了接一下我们还缺什么?对,就是画布,Canvas也就是我们的画布,同Paint这里我只说一下我们用到的方法,其他方法我会在以后的文章中详细介绍。
| 方法 | 简介 |
|---|---|
| drawColor(Color) | 给画布画上颜色,也可以理解为带颜色的画布 |
| drawCircle(x,y,radius,paint) | 画圆,参数依次为:x轴y轴(圆心),半径和画笔 |
| drawText(String, x, y, paint)) | 画文字,参数依次为:要画的文字,显示位置的xy坐标和画笔 |
 Handler timerHandler = new Handler() {
        @Override
        public void handleMessage(Message msg) {
            super.handleMessage(msg);
            radius += 10;
            if (radius <= width * 2) {
                timerHandler.sendEmptyMessageDelayed(time, time);
                invalidate();
            } else {
                radius = -1;
            }
        }
    };
最后呢就是我们的Hanlder,它的主要作用就是去发消息更新我们的view,从而实现波纹效果(也可以使用自定义动画去实现),在这里我们判断半径是否大于我们View的2倍宽度,如果大于就停止重绘,否则半径每次+10并重绘,在这里呢说一下invalidate()方法,调用invalidate方法就会让我们的View重绘,也就是每调一次都会走onDraw,要注意的是invalidate只能在UI线程中调用,如果想在非UI线程中冲回View需要调用postInvalidate()方法。
